Fig. 1 – Non-Production and Production TrueNAS VMs
Virtual machines (VMs) provide opportunities to easily stand up instances of TrueNAS for a number of different purposes. End-users might use these to evaluate the functionality of TrueNAS in their environment, check out the differences between CORE and SCALE, or walk through the process of upgrading a legacy FreeNAS system to a recent release of TrueNAS. Developers at iXsystems make extensive use of virtualization when troubleshooting, documenting, and building new versions of TrueNAS; and yes – some TrueNAS users even deploy a fully-virtualized TrueNAS solution for their production environments.
Of course, TrueNAS SCALE also includes its own KVM hypervisor and can run its own VMs; however, that’s not the subject of this particular blog.
Before we continue, let’s open with a little disclaimer banner:
Warning
If the best practices and recommendations for running TrueNAS as a virtual machine are followed, a TrueNAS VM can be a safe and reliable way to store data. Failure to adhere to these same recommendations can result in permanent corruption and/or loss of your data without warning, even if the system appears initially functional. Please read through them all carefully!
Apologies for the Scary Red Text, but this needed to be made abundantly clear. Let’s get started!
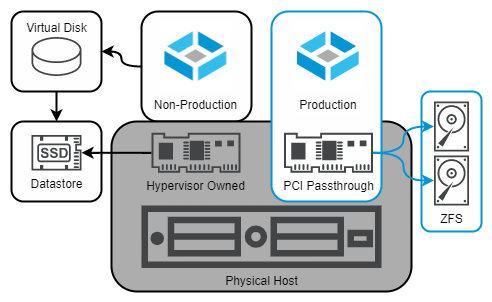
1. Consider Your Use Case
While “test-drive” and “development” use cases can play a little bit more fast and loose with the recommendations for virtual hardware, a production use-case is where certain caveats and precautions need to be taken into account.
Testing, Exploring, or Development (“Non-Production Use”)
If you’re looking to gain familiarity with the TrueNAS UI, do some development work on the TrueNAS code, perform a dry-run of upgrading between versions, or set up any other situation where data that you care about isn’t at stake, you can likely go ahead with very few guardrails on your virtualization solution. Use your hypervisor of choice to create a VM with at least 8GB of RAM, two or more vCPUs, a 16GB install disk, and data disks of whatever size are appropriate for your testing (see later in the document for some important notes if using multiple virtual disks!) – mount a TrueNAS ISO of your choice, and enjoy.
This process can be completed in less than five minutes – or if you’d prefer, you can download and deploy a pre-built TrueNAS SCALE VM image in Open Virtualization Format.
Storing Important Data (“Production Use”)
As soon as you’re storing data that you care about keeping safe, or readily available, then you should consider your TrueNAS use as a “production environment”. – this includes if it’s at home protecting your personal photos, or in an office safeguarding important documents.
For TrueNAS and OpenZFS to offer absolute protection for your data, they should have direct access to a storage controller and the drives attached. Without direct access, there is a possibility of the hypervisor interfering with settings, reordering or reconfiguring drives, and introducing avenues for data corruption. Virtual data disks are not as reliable, and are particularly prone to operator mistakes such as accidental deletion or inadvertent use of hypervisor-based snapshot technology.
The key piece of the puzzle is a technology broadly referred to as PCI passthrough – this might be given a different name such as “VMDirectPath I/O” “Discrete Device Assignment” by the vendor, but the core functionality must remain the same – the virtual machine must be able to address the PCI hardware device directly, without going through an abstraction layer.
When creating a TrueNAS VM for production use, the storage controller must be assigned to the VM via PCI passthrough. This will prevent the hypervisor from claiming the controller with its driver, and allow TrueNAS to use its own.
Most desktop virtualization applications (eg: Oracle Virtualbox, VMware Workstation) do not support PCI passthrough. Instructions for enabling PCI passthrough on various bare-metal hypervisors are listed below.
- VMware ESXi: https://kb.vmware.com/s/article/1010789
- KVM: https://www.linux-kvm.org/page/How_to_assign_devices_with_VT-d_in_KVM
- Xen: https://wiki.xenproject.org/wiki/Xen_PCI_Passthrough
- Hyper-V: https://learn.microsoft.com/en-us/windows-server/virtualization/hyper-v/plan/plan-for-deploying-devices-using-discrete-device-assignment
When using PCI passthrough, TrueNAS will treat the storage controller just like it’s been installed on physical hardware. This direct access to the PCI device does prevent several advanced features of virtualization from functioning, including (but not limited to) the following:
- Hot adding and removing of virtual devices
- Suspend and resume of the VM
- “Record and replay” functionality
- Fault tolerance and high availability, including “live migration” features
- VM snapshots (note – ZFS snapshots inside of TrueNAS do work)
In order to use PCI passthrough, you need to have an additional storage controller that is not being used by your hypervisor to boot or run other data. It is suggested to use a host bus adapter (HBA) supported by TrueNAS, such as an LSI/Broadcom/Avago controller from the SAS2308 or newer chipset family.
While the older SAS2008 chipset was historically recommended, recent updates to both the VMware ESXi vmkernel and the FreeBSD 13.x kernel have exposed edge-cases that may cause system instability and failure of the VM to properly claim the PCI device at boot time. TrueNAS SCALE may be less picky.
2. Choose Your Hypervisor Platform
The iXsystems development team runs TrueNAS as a VM on a daily basis. Our virtualization platform of choice remains VMware, and it’s the platform in which the TrueNAS developers have the most experience. Both TrueNAS CORE and SCALE include the VMware Guest tools as well, in order to respond gracefully to shutdown requests from the host OS, as well as pass some information back to the hypervisor. If deploying TrueNAS for a “non-production” use case, the desktop VMware Workstation application can be used – but for a “production” VM, the requirement for PCI passthrough means the standalone ESXi hypervisor should be used instead.
Our second choice for a virtualization platform is KVM (Kernel-based Virtual Machine) – which is also the hypervisor layer implemented into TrueNAS SCALE, Red Hat Enterprise Virtualization, and Proxmox VE. While TrueNAS has no built-in guest tools installed for this hypervisor, you can still have a solid virtualization experience regardless.
Other hypervisors such as FreeBSD’s bhyve, Citrix’s Xen, and Microsoft’s Hyper-V may also work, but the development team does not test with or use them on a daily basis.
Regardless of the hypervisor solution you choose, ensure that you follow the vendor’s guidance regarding hardware selection and configuration. Running the hypervisor on a physical hardware solution that is supported by the vendor’s Hardware Compatibility List or similar reference document is strongly encouraged, especially if running a “Production” TrueNAS VM is desired.
3. Virtualizing ZFS
The ZFS file system used by TrueNAS combines the roles of RAID controller, volume manager, and file system all into a single software component. ZFS expects direct access to your disks in order to work properly, in order to issue direct SCSI or SATA commands and receive an expected and predictable response. The closer you can get TrueNAS to your storage hardware, the happier it is, and the better it can do its job of keeping your data safe.
Hypervisor-backed virtual disks or hardware RAID controllers provide a “translation layer” to the disks, and therefore should be avoided for the data disks. TrueNAS boot devices are an exception, and can be stored on a hypervisor virtual disk safely – but it is suggested to create two identical volumes and use the TrueNAS installer to mirror these within the guest OS as well. Ensure that the underlying physical storage backing these hypervisor virtual disks is sufficiently redundant as well.
4. Configuring your Virtual Hardware
For a non-production TrueNAS VM, the minimum hardware requirements for TrueNAS will suffice, but when assigning resources to a production instance, some suggestions apply.
4.1 Select the proper Guest OS in the hypervisor
The virtual hardware presented to a VM is often dependent on the “Guest OS” selected. If possible, choose the matching OS based on the TrueNAS version:
TrueNAS CORE: FreeBSD 13.x (64-bit)
TrueNAS SCALE: Debian Linux 11 “Bullseye” (64-bit)
Do not select a “Linux” guest OS for TrueNAS CORE and do not select a “Windows” guest OS for either CORE or SCALE. “Other OS” can be selected for CORE if FreeBSD is not present, and “Other Linux” can be selected for SCALE.
TrueNAS contains the VMware Tools add-on, with support for the vmxnet3 drivers. These are suggested over the emulated E1000 Intel card.
4.2 Don’t over-assign CPU cores
For a light I/O workload, start with 2 vCPUs and provide CPU reservations or “guaranteed execution time” if you expect periods of high overall host usage in order to prevent your TrueNAS VM from becoming CPU-starved. If you expect to use iSCSI, have heavy random I/O workloads, or run compression stronger than the default LZ4 algorithm, assign 4 vCPUs. Monitor the statistics provided by your hypervisor for signs of virtual CPU exhaustion (add more cores) and co-scheduling stalls (remove CPU cores) and adjust gradually.
4.3 Assign sufficient RAM
The TrueNAS recommendations regarding sufficient RAM still apply to a VM. As a hypervisor host often contains a large amount of physical RAM, consider assigning a minimum of 16GB to the TrueNAS VM, with more added if you plan to deploy Apps or use a performance-intensive workload. Guest memory should be reserved and locked, preventing it from being shared or swapped at the hypervisor level – this is often a requirement for PCI passthrough enablement.
4.4 Enable unique ID for Virtual Disks
If deploying for non-production with multiple virtual disks, or production with virtual boot devices, TrueNAS may raise an alert that the serial numbers of the disk are not unique, often because they are missing. While an override exists in the UI to permit the use of non-unique S/N’s in a pool, this may result in unexpected behavior when attempting to import pools. It’s better to correct this at the VM level if possible. With VMware ESXi, you can set the advanced VM option disk.EnableUUID=true as described in the following knowledge base article:
https://kb.vmware.com/s/article/52815
Other hypervisors such as Xen, KVM, and Hyper-V may have different capabilities and methods of setting the serial number of virtual disks.
4.5 Avoid nested virtualization
TrueNAS SCALE and CORE both offer the ability to run VMs of their own, using the KVM or bhyve hypervisor respectively. While this functionality may work with TrueNAS itself as a VM, it can be challenging to enable, support, and troubleshoot – and is outside the scope of this guide.
Using TrueNAS SCALE with Apps or containers is expected to work on a TrueNAS VM for both testing and production cases.
4.6 In a multi-socket system, be mindful of NUMA limitations
Multi-socket systems arrange CPU sockets, memory slots, and PCIe lanes into groups known as Non-Uniform Memory Access (NUMA) nodes – communication within a node is significantly faster than communication between nodes. The benefits of spanning multiple NUMA nodes are often limited by this link.
Take the example of a system with 2x 8-core CPUs and 128GB of RAM, divided into two nodes of 8 cores + 64GB each. Assigning more than 8 cores or 64GB of RAM will cause the VM to span NUMA nodes, causing unpredictable performance if a thread is scheduled to run on a remote core or accesses a remotely-stored part of the RAM.
For similar reasons, configure your hypervisor to “pin” the VM to the NUMA node where the HBA is connected. Remote access across the node interlink for all HBA traffic can cause significant impact across the system, as periods of high I/O such as ZFS scrubs can cause congestion. Consult your vendor’s maintenance or service guide for an illustrated block diagram or PCIe slot-to-socket mapping table to identify the correct NUMA node.
Summary
If using a TrueNAS VM for “Production Data” – data that you want to keep safe and/or guarantee availability of – the only recommended approach is PCI passthrough of a TrueNAS-supported HBA. Various alternative configurations for RAID controllers (with or without “HBA Mode” or “JBOD-Like” behavior), paravirtualized disks, and local drive mapping have been proposed and often tested by community members, but the only configuration that has proven consistently reliable over the years has been full PCI passthrough.
For non-production use, research and development, or experimentation, use your hypervisor of choice, follow the simple guidance around the guest OS, and enjoy!
Feel welcome to join the TrueNAS Community Forums and share your feedback with running TrueNAS, both the technical process of running it as a virtual instance, as well as your overall impressions of the software. As an open source product, iXsystems believes in working with the community to help make TrueNAS the best it can be.