
Author: Jason Rose
ZFS RAID is not like traditional RAID. Its on-disk structure is far more sophisticated than that of a legacy RAID implementation and includes a wide array of data protection features. Because its on-disk structure is more robust, predicting how much usable capacity you’ll get from a set of hard disks with a given vdev (short for virtual device) layout is more complex. There are layers of data protection overhead that need to be understood and accounted for to get an accurate estimate. I’ve found that the best way to wrap one’s head around ZFS allocation overhead is to step through an example.
Let’s start by picking a less-than-ideal RAIDZ vdev layout so we can see the impact of all the various forms of ZFS overhead. Once we understand RAIDZ, understanding mirrored and striped vdevs will be simple. We’ll use 14 x 18TB drives in two 7-wide RAIDZ2 (7wZ2) vdevs. It will generally be easier for us to work in bytes so we don’t have to worry about conversion between TB and TiB.
Starting with the capacity of the individual drives, we’ll subtract the size of the swap partition. The swap partition acts as an extension of the system’s physical memory pool. If a running process needs more memory than is currently available, the system can unload some of its in-memory data onto the swap space. By default, TrueNAS creates a 2GiB swap partition on every disk in the data pool. Other products that use ZFS may create a larger or smaller swap partition, or it might not create one at all.
18 * 1000^4 – 2 * 1024^3 = 17997852516352 bytes
Next, we want to account for reserved sectors at the start of the disk. The layout and size of these reserved sectors will depend on your operating system and partition scheme, but we’ll use FreeBSD and GPT for this example because that is what TrueNAS CORE and Enterprise use. We can check sector alignment by running gpart list on one of the disks in the pool:
root@truenas[~]# gpart list da1
Geom name: da1
modified: false
state: OK
fwheads: 255
fwsectors: 63
last: 35156249959
first: 40
entries: 128
scheme: GPT
Providers:
-
-
Name: da1p1
-
Mediasize: 2147483648 (2.0G)
Sectorsize: 512
Stripesize: 0
Stripeoffset: 65536
Mode: r0w0e0
efimedia: HD(1,GPT,b1c0188e-b098-11ec-89c7-0800275344ce,0x80,0x400000)
rawuuid: b1c0188e-b098-11ec-89c7-0800275344ce
rawtype: 516e7cb5-6ecf-11d6-8ff8-00022d09712b
label: (null)
length: 2147483648
offset: 65536
type: freebsd-swap
index: 1
end: 4194431
start: 128
-
-
Name: da1p2
-
Mediasize: 17997852430336 (16T)
Sectorsize: 512
Stripesize: 0
Stripeoffset: 2147549184
Mode: r1w1e2
efimedia: HD(2,GPT,b215c5ef-b098-11ec-89c7-0800275344ce,0x400080,0x82f39cce8)
rawuuid: b215c5ef-b098-11ec-89c7-0800275344ce
rawtype: 516e7cba-6ecf-11d6-8ff8-00022d09712b
label: (null)
length: 17997852430336
offset: 2147549184
type: freebsd-zfs
index: 2
end: 35156249959
start: 4194432
Consumers:
-
-
Name: da1
-
Mediasize: 18000000000000 (16T)
Sectorsize: 512
Mode: r1w1e3
First, note that the sector size used on this drive is 512 bytes. The first logical block on this disk is actually sector 40; that means 40 * 512 = 20480 bytes are subtracted.
The 1. Name: da1p1 section describes the swap partition on this drive. We can see it is 2GiB in size (as expected) and it starts at logical block address 128 (i.e., an offset of 512 * 128 = 65536 bytes). If we subtract this space from the expected partition size calculated above, we see it lines up with the actual on-disk partition size:
17997852516352 – 20480 – 65536 = 17997852430336 bytes
Before ZFS does anything with this partition, it rounds its size down to align with a 256KiB block. This rounded-down size is referred to as the osize or physical volume size of the disk in the ZFS code.
floor(17997852430336 / (256 * 1024)) * 256 * 1024 = 17997852311552 bytes
Inside the physical ZFS volume, we need to account for the special labels added to each disk. ZFS creates 4 copies of a 256KiB vdev label on each disk (2 at the start of the ZFS partition and 2 at the end) plus a 3.5MiB embedded boot loader region. Details on the function of the vdev labels can be found here and details on how the labels are sized and arranged can be found here and in the sections just below this (lines 541 and 548). We subtract this 4.5MiB (4 * 256KiB + 3.5MiB) of space from the ZFS partition to get its “usable” size:
17997852311552 – 4 * 262144 – 3670016 = 17997847592960 bytes
Next, we need to calculate the allocation size or “asize” of the whole vdev. We simply multiply the usable ZFS partition size by the vdev width here. We’re not accounting for parity space just yet:
17997847592960 * 7 = 125984933150720 bytes
That’s about 114.58 TiB. ZFS takes this chunk of storage represented by the allocation size and breaks it into smaller, uniformly-sized buckets called “metaslabs”. ZFS creates these metaslabs because they’re much more manageable than the full vdev size when tracking used and available space via spacemaps. The size of the metaslabs are primarily controlled by the metaslab shift or ms_shift variable with the target size being 2^ms_shift bytes. You can read more about metaslab sizing here.
ZFS sets ms_shift so that the quantity of metaslabs is under 200. ms_shift starts at 29 and grows as high as 34. Once ms_shift is 34, it doesn’t grow any larger but instead the metaslab count grows beyond 200. With an ms_shift value of 34, ZFS will create as many 16GiB metaslabs as it can fit in the vdev allocation size. 2^17 or 131,072 is the cap on the metaslab count (or ms_count); after that cap is hit, ZFS allows metaslabs to grow larger than 16GiB. This cap won’t be hit until your vdev allocation size is at least 2^17 * 16 GiB = 2 PiB. Again, that’s the size of an individual vdev, not the whole pool; you aren’t going to run into this unless you put more than 125 18TB disks in a single Z2 vdev.
On the other hand, the “cutoff” for going from ms_shift = 34 down to ms_shift = 33 is really pretty small, 1,600GiB or 1.5625TiB. In other words, unless your vdevs are smaller than 1.5625TiB, your pool’s ms_shift value will be 34. For our example, asize is well over 1.5625TiB so we have ms_shift = 34.
Once we have the value of ms_shift we can easily calculate the metaslab size by doing 2^ms_shift.
2 ^ 34 = 17179869184 bytes
With ms_shift = 34, the metaslab size will be 16GiB. We can note that if ms_shift was 33, the metaslab size would be 8GiB; the metaslab size gets cut in half each time ms_shift decreases by 1. We now need to figure out how many full 16GiB metaslabs will fit in each vdev, so we calculate asize / metaslab_size and round down using the floor() function (the 16GiB metaslab size is represented in bytes below):
floor(125984933150720 / 17179869184) = 7333
This gives us 7,333 metaslabs per vdevs. We can check our progress so far on an actual ZFS system by using the zdb command provided by ZFS. We can check vdev size and the metaslab shift value by running zdb -C $pool_name and we can check metaslab count by running zdb -m $pool_name. Note on TrueNAS, you’ll need to add the -U /data/zfs/zpool.cache option (i.e., zdb -U /data/zfs/zpool.cache -C $pool_name and zdb -U /data/zfs/zpool.cache -m $pool_name).
root@truenas[~]# zdb -U /data/zfs/zpool.cache -C tank
MOS Configuration:
version: 5000
name: 'tank'
state: 0
txg: 11
pool_guid: 7584042259335681111
errata: 0
hostid: 3601001416
hostname: ''
com.delphix:has_per_vdev_zaps
vdev_children: 2
vdev_tree:
type: 'root'
id: 0
guid: 7584042259335681111
create_txg: 4
children[0]:
type: 'raidz'
id: 0
guid: 2993118147866813004
nparity: 2
metaslab_array: 268
metaslab_shift: 34
ashift: 12
asize: 125984933150720
is_log: 0
create_txg: 4
com.delphix:vdev_zap_top: 129
children[0]:
type: 'disk'
... (output truncated) ...
root@truenas[~]# zdb -U /data/zfs/zpool.cache -m tank
Metaslabs:
vdev 0 ms_unflushed_phys object 270
metaslabs 7333 offset spacemap free
--------------- ------------------- --------------- ------------
metaslab 0 offset 0 spacemap 274 free 16.0G
space map object 274:
smp_length = 0x18
smp_alloc = 0x12000
Flush data:
unflushed txg=5
metaslab 1 offset 400000000 spacemap 273 free 16.0G
space map object 273:
smp_length = 0x18
smp_alloc = 0x21000
Flush data:
unflushed txg=6
... (output truncated) ...
ZFS reserves one metaslab per “normal class” vdev (meaning not from cache vdevs, etc) for an “embedded SLOG”, but this is not factored into capacity calculations. More info on that here.
To calculate useful space in our vdev, we multiply the metaslab size by the metaslab count. This means that space within the ZFS partition but not covered by one of the metaslabs isn’t useful to us and is effectively lost. In theory, by using a smaller ms_shift value, we could recover a bit of this space, but we would end up using a lot more system memory so it’s not really worth it. With 7,333 metaslabs at 16GiB per metaslab, we have:
17179869184 * 7333 = 125979980726272 bytes
That’s about 114.58 TiB of useful space per vdev. If we multiply that by the quantity of vdevs, we get the ZFS pool size:
125979980726272 * 2 = 251959961452544 bytes
We can confirm this by running zpool list:
root@truenas[~]# zpool list -p -o name,size,alloc,free tank
NAME SIZE ALLOC FREE
tank 251959961452544 1437696 251959960014848
The -p flag shows exact (parsable) byte values and the -o flag determines what properties will be displayed (without the flag, it outputs a bunch of stuff that’s not relevant for this and the table text wraps and becomes almost unreadable).
Note that the zpool SIZE value matches what we calculated above. We’re going to set this number aside for now and calculate RAIDZ parity and padding. Before we proceed, it will be helpful to review a few ZFS basics including ashift, minimum block size, how partial-stripe writes work, and the ZFS recordsize value.
Hard disks and SSDs divide their space into tiny logical storage buckets called “sectors”. A sector is usually 4KiB but could be 512 bytes on older hard drives or 8KiB on some SSDs. A sector represents the smallest read or write a disk can do in a single operation. ZFS tracks disks’ sector size as the ashift where 2^ashift = sector size (so ashift = 9 for 512 byte sectors, 12 for 4KiB sectors, 13 for 8KiB sectors).
In RAIDZ, the smallest useful write we can make is p+1 sectors wide where p is the parity level (1 for RAIDZ1, 2 for Z2, 3 for Z3). This gives us a single sector of user data and the required number of parity sectors to protect that user data. With this in mind, ZFS allocates space on RAIDZ vdevs in even multiples of this p+1 value to maximize capacity and prevent unusable-small gaps on the disk. For example, imagine we made a 5-sector write to a RAIDZ2 vdev (3 user data sectors and 2 parity sectors). We later delete that data and are left with a 5-sector gap on the disk. We now make a 3-sector write to the Z2 vdev, it lands in that 5-sector gap and we have a 2-sector gap that we can’t do anything with. That space can’t be recovered without totally rewriting every other sector on the disk after it.
To avoid this, ZFS will pad out all writes to RAIDZ vdevs so they’re an even multiple of this p+1 value. By “pad out” we mean it just logically includes these extra few sectors in the block to be written but doesn’t actually write anything to them. The ZFS source code refers to them as “skip” sectors.
Unlike traditional RAID5 and RAID6 implementations, ZFS supports partial-stripe writes. This has a number of important advantages but also presents some implications for space calculation that we’ll need to consider. Supporting partial stripe writes means that in our 7wZ2 vdev example, we can support a write of 12 total sectors even though 12 is not an even multiple of our stripe width (7). 12 is evenly divisible by p+1 (which is 3 in this case because we’re using RAIDZ2), so we don’t even need any padding. We would have a single full stripe of 7 sectors (2 parity sectors plus 5 data sectors) followed by a partial stripe with 2 parity sectors and 3 data sectors. This will be important because even though we can support partial stripe writes, every stripe (including those partial stripes) need a full set of p parity sectors.
The last ZFS concept we need to understand here is the recordsize value. The ZFS recordsize value is used to determine the largest block of data ZFS can write out. It can be set per-dataset and can be any even power of 2 from 512 bytes up to 1MiB. The default recordsize value is 128KiB. For capacity estimation purposes, ZFS always assumes a 128KiB record. It’s important to note that this recordsize value only considers user data, not parity or padding. It’s also worth mentioning that block sizes in ZFS will vary based on how much data needs to be written out and the recordsize value enforces the upper limit of that block size, but again, ZFS assumes all 128KiB records for space calculation purposes, so we will use that value going forward.
You can read more about ZFS’ handling of partial stripe writes and block padding in this article by Matt Ahrens.
Getting back to our capacity example, we have the minimum sector count already calculated above at p+1 = 3. Next, we need to figure out how many sectors will get filled up by a recordsize write (128KiB here).
128 * 1024 / 4096 = 32 sectors
Our stripe width is 7 disks, so we can figure out how many stripes this 128KiB write will take. Remember, we need 2 parity sectors per stripe, so we divide the 32 sectors by 5 because that’s the number of data sectors per stripe:
32 / (7-2) = 6.4 stripes
We can visualize how this might look on the disks (P represents a parity sectors, D represents a data sectors):
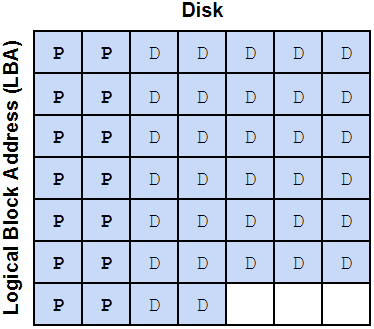
As mentioned above, that partial 0.4 stripe also gets 2 parity sectors, so we have 7 stripes of parity data at 2 parity sectors per stripe, or 14 total parity sectors. We now have 32 data sectors, 14 parity sectors, adding those, we get 46 total sectors for this data block. 46 is not an even multiple of our minimum sector count (3), so we need to add 2 padding sectors. This brings our total sector count to 48: 32 data sectors, 14 parity sectors, and 2 padding sectors.
With the padding sectors included, this is what the full 128KiB block might look like on disk. I’ve drawn two blocks so you can see how alignment of the second block gets shifted a bit to accommodate the partial stripe we’ve written. The X’s represent the padding sectors.
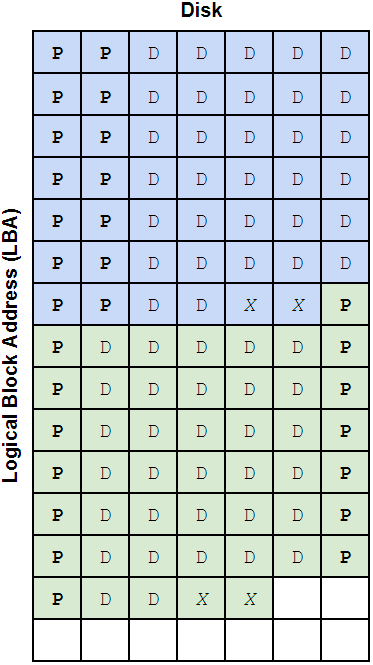
This probably looks strange because we have one parity sector at the start of the second block just hanging out by itself. Even though it’s not on the same exact row as the data it’s protecting, it’s still providing that protection. ZFS knows where that parity data is written so it doesn’t really matter what LBA it gets written to, as long as it’s on the correct disk.
We can calculate a data storage efficiency ratio by dividing our 32 data sectors by the 48 total sectors it takes to store them on disk with this particular vdev layout.
32 / 48 = 0.66667
ZFS uses something similar to this ratio when allocating space but in order to simplify calculations and avoid multiplication overflows and other weird stuff it tracks this ratio as a fraction of 512. In other words, to more accurately represent how ZFS “sees” the on-disk space, we need to convert the 32/48 fraction to the nearest fraction of 512. We’ll need to round down to get a whole number in the numerator (the top part of the fraction). To do this, we calculate:
floor(0.66667 * 512) / 512 = 0.666015625 = 341/512
This 341/512 fraction is called the vdev_deflate_ratio and it’s what we’ll multiply the pool size calculated above by in order to get usable space per vdev after parity and padding. You can read a bit more on the vdev_deflat_ratio here.
251959961452544 * 0.666015625 = 167809271201792 bytes
The last thing we need to account for is SPA slop space. ZFS reserves the last little bit of pool capacity “to ensure the pool doesn’t run completely out of space due to unaccounted changes (e.g. to the MOS)”. Normally this is 1/32 of the usable pool capacity with a minimum value of 128MiB. OpenZFS 2.0.7 also introduced a maximum limit to slop space of 128GiB (this is good; slop space used to be HUGE on large pools). You can read about SPA slop space reservation here.
For our example pool, slop space would be…
167809271201792 * 1/32 = 5244039725056 bytes
That’s 4.77 TiB reserved for SPA slop and an incredible investment in data protection and durability. If we’re running OpenZFS 2.0.7 or later, we’ll use 128 GiB instead:
167809271201792 - 128 * 1024^3 = 167671832248320 bytes
= 156156.5625 GiB
= 152.4966 TiB
And there we have it! This is the total usable capacity of a pool of 14x 18TB disks configured in 2x 7wZ2. We can confirm the calculations using zfs list:
root@truenas[~]# zfs list -p tank
NAME USED AVAIL REFER MOUNTPOINT
tank 1080288 167671831168032 196416 /mnt/tank
As with the zpool list command, the -p flag shows exact byte values.
167671831168032 + 1080288 = 167671832248320 bytes
= 156156.5625 GiB
= 152.4966 TiB
By adding the USED and AVAIL values, we can confirm that our calculation is accurate.
Mirrored vdevs work in a similar way but the vdev asize is just a single drive’s capacity (minus zfs labels and whatnot) and then the vdev_deflate_ratio is just 512/512 or 1.0. We skip all the parity and padding sector stuff but we do still need to account for metaslab allocation and SPA slop space.
This example used VirtualBox with virtual 18TB disks that hold exactly 18,000,000,000,000 bytes. Real disks won’t have such an exact physical capacity; the 8TB disks in my TrueNAS system hold 8,001,563,222,016 bytes. If you run through these calculations on a real system with physical disks, I recommend checking the exact disk and partition capacity using gpart or something similar.
It’s worth noting that none of these calculations factor in any data compression. The effect of compression on storage capacity is almost impossible to predict without running your data through the compression algorithm you intend to use. At iX, we typically see between 1.2:1 and 1.6:1 reduction assuming the data is compressible in the first place.
We’re also ignoring the effect that variable block sizes will have on functional pool capacity. We used a 128 KiB block because that’s the ZFS default and what it uses for available capacity calculations, but (as discussed above) ZFS may use a different block size for different data. A different block size will change the ratio of data sectors to parity+padding sectors so overall storage efficiency might change. The calculator above includes the ability to set a recordsize value and calculate capacity based on a pool full of blocks that size. You can experiment with different recordsize values to see its effects on efficiency. Changing a dataset’s recordsize value will have effects on performance as well, so read up on it before tinkering. You can find a good high-level discussion of recordsize tuning here, a more detailed technical discussion here, and a great generalized workload tuning guide here on the OpenZFS docs page.