Plugins are a technology for easily and securely deploying 3rd party applications directly on FreeNAS and TrueNAS storage systems. Users can use the web interface to deploy, start, stop, and update applications, along with configuration tasks such as assigning storage to them. Plugins are popular for content, security, development, collaboration, and backup applications for home and business use. FreeNAS and TrueNAS both support Plugins, with TrueNAS adding High Availability (HA) for business use.
Jails are the basis of Plugins. Jails are FreeBSD’s container technology and are highly efficient in their use of resources, are secure, and provide flexible network infrastructure to applications. iocage is the FreeBSD Jail container management framework in FreeNAS.

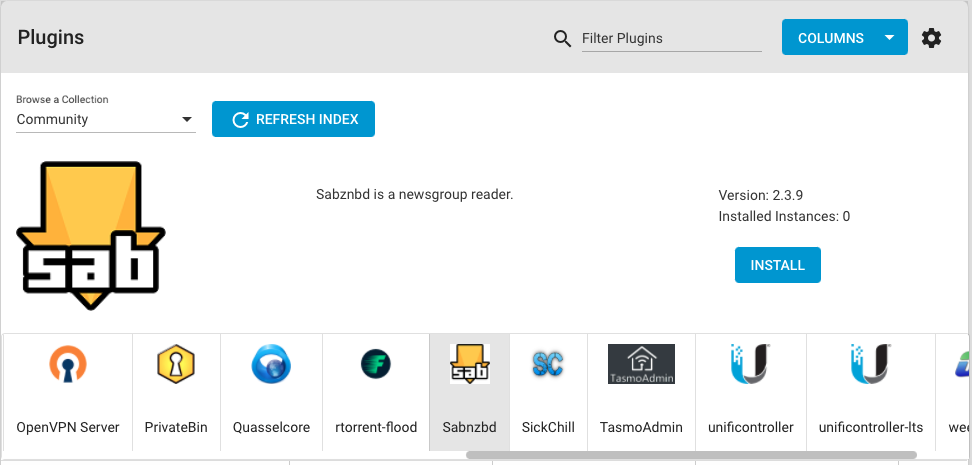
This tutorial will walk through the creation of a SABnzbd newsreader Plugin using iocage based on the
news/sabnzbdplus port to help users get involved in FreeNAS development and leverage FreeNAS as an application platform.Each of the most popular FreeNAS Plugins such as Plex Media Server, NextCloud, and SyncThing begin as FreeBSD ports:
multimedia/plexmediaserver/, deskutils/nextcloudclient/, and net/syncthing/ respectively. These can each be installed on a FreeBSD system with the pkg package manager, i.e. pkg install plexmediaserver and configured manually. A Plugin adds metadata that provides an installation source, reasonable defaults, and user interface elements such as an icon. The metadata components for the sabnzbd Plugin are:
README.md: A popular convention for a file in markdown format for describing the projectsabnzbd.json: The JSON “Artifact” file containing various Plugin properties including an inventory of all other metadata components which may be in the same or a remote repooverlay: An optional directory containing the files to be copied into the Jailui.json: A file containing the Plugin management interface URL and port numbersettings.json: An optional JSON file that contains variables used during Plugin startup and for its configurationsabnzbd.png: A .png image such assabnzbd.pngthat will appear in the FreeNAS Plugins Indexpost_install.sh: A shell script ran after jail creation to perform necessary configuration steps. It runs only once.
Requirements
FreeNAS provides everything necessary for Plugin development but a FreeBSD system is also a good choice. The requirements are:
- A FreeNAS or FreeBSD system running iocage
- An internet connection and at least 1GB of available disk space
- A publically-accessible Git repo, self-hosted or on a service like GitHub, Gitia or GitLab, or you can run GitLab as a Plugin itself
- A text editor such as
vi,ee, ornano, all of which are available in FreeNAS - Basic knowledge of FreeBSD and shell scripting
Creating Each Component
Note that // and # comments are not supported in JSON. Copy any examples from the Git repo in “raw” mode.
The Artifact file sabnzbd.json
{
  "name": "sabnzbd",		//The name of the Plugin and resulting Jail
  "plugin_schema": "2",		//The Plugin schema version
  "release": "11.3-RELEASE",	//FreeBSD version (not significantly newer than host)
  "artifact": "https://github.com/ConorBeh/iocage-plugin-sabnzbd.git",
				//The Git repo containing the Plugin
  "properties": {		//Jail properties that can be overridden by the user
    "nat": 1,
    "nat_forwards": "tcp(8080:8080)"
  },
  "pkgs": [			//FreeBSD packages to be installed, one per line
    "sabnzbdplus",
  ],
  "packagesite": "http://pkg.FreeBSD.org/FreeBSD:11:amd64/latest",
				//The package site, latest, quarterly, or self-hosted
  "fingerprints": {
    "iocage-plugins": [
      {
        "function": "sha256",
        "fingerprint": "b0170035af3acc5f3f3ae1859dc717101b4e6c1d0a794ad554928ca0cbb2f438"
      }				//The checksum of the FreeBSD port
    ]
  },
  "revision": "0"		//Internal version number
}
The artifact file properties
These are commonly-used properties specified in the artifact file. Any supported iocage property can be specified.
nat: Enables Network Address Translation to utilize the host’s IP address
nat_forwards: Required when NAT is enabled. Syntax:
< protocol >(< jailport >:< hostport >)
dhcp: Enables DHCP on the jail to allow it to automatically obtain an IP address
allow_tun: Allows the creation of a tun network device inside the jail, required for VPN connections
allow_raw_sockets: Allows the jail to create raw sockets
The artifact repository options
The official FreeBSD repository provides “latest” and “quarterly” branches. The “latest” branch contains binary packages that are updated immediately, while the “quarterly” branch binaries are only updated every quarter, and are the default of FreeBSD releases. The fingerprint remains the same for all official FreeBSD repositories. If custom port build options are required, the preferred solution is to set up a custom Poudriere build server.
The overlay Directory
The “overlay” is a directory of files that are copied into the jail after creation and before the execution of post_install.sh. The layout of these files should follow the same paths as they should have in the root filesystem of the jail. For example, a file placed in /overlay/usr/local/www/lighttpd/ inside the Git repo will be placed in /usr/local/www/lighttpd/ in the jail. This is very useful for providing pre-made configuration files, additional scripts, or even binaries that may not be available in the pkg repository.
The ui.json file
A small JSON file containing the address of the WebUI and port. Use the variable %%IP%% to automatically display the correct IP address. Make sure to include any extra components in the URL following the domain name or IP address, for example “/admin” or “/web/index”.
The settings.json file
A JSON file that is used when working with generated or user-specified data such as passwords or database names. These variables can be used in the post_install.sh. In addition to these variables the servicerestart command must also be set. This is the command that is run when a setting is changed or the jail is restarted, such as restarting a web server.
The sabnzbd.png Icon file
A link to a .png file that will be displayed in the FreeNAS Plugins Index. The image requires a transparent background and should be 128 pixel by 128 pixel square in size to produce quality results when automatically resized.
The post_install.sh script
A POSIX shell script that leverages all the other files to automate installation of the Plugin. In simple Plugins, it may only contain a few lines enabling and starting a few services. It is important to note that iocage executes the file all at once, not line by line, and to give the file execute permissions before uploading it to the Git repository.
To enable execute permissions on a FreeNAS or FreeBSD system run:
chmod +x post_install.sh
Common post-installation steps include:
- Setting file and directory permissions
- Moving, copying, and editing configuration files
- Generating random passwords
- Adding a user and/or group
- Creating a database
The /root/PLUGIN_INFO file
A text file that stores easily accessible information which can be recalled again from the web interface by clicking the “Post Install Notes” button. Information can be entered into this file via echo “relevant information” >> /root/PLUGIN_INFO in post_install.sh.
Git Repo Initialization
Create and initialize a Git repository and Readme for the Plugin with a name following the format as “iocage-plugin-<plugin name>“. The name iocage-plugin-sabnzbd and GitHub through the web are used in this example.
Once initialized, clone the project at the command line:
mkdir Plugins && cd Plugins

git clone "https://github.com/ConorBeh/iocage-plugin-sabnzbd.git"

cd iocage-plugin-sabnzbd
Create a new artifact file or use a template, containing the Git URL of the project. The NextCloud and Asigra Plugins offer a good example of more complex syntax.
Create and populate an overlay directory as appropriate.
mkdir overlay
<add files as necessary>
Create the post_install.sh shell script with a text editor:
#!/bin/sh
# Enable and start the service which will generate the config file
sysrc sabnzbd_enable="YES"
service sabnzbd start
# Sleep is needed to ensure that the service starts in time for the next command
sleep 5
# Edit config to allow outside access
sed -i '' 's/127.0.0.1/0.0.0.0/g' /usr/local/sabnzbd/sabnzbd.ini
# Restart the service for config change to take
service sabnzbd restart
Save any Plugin info such as options, credentials, or other information to /root/PLUGIN_INFO inside the jail.
Make the post_install.sh script executable. These permissions will be preserved in the Git repository.
chmod +x post_install.sh
Create a settings.json file if needed. This example does not require one. Consider enabling JSON syntax highlighting and checking in the text editor to continuously validate it.
Create a ui.json file
{
"adminportal": "http://%%IP%%"
}
Append any additional URL components or ports after the %%IP%% such as:
{
"adminportal": "http://%%IP%%:32400/web"
}
Upload the Files to the Git Repo
The following commands will authenticate with GitHub:
git config user.name <GitHub user name>
git config user.email <GitHub email address>
git config user.password <GitHub password>
Commit the changes to the repository:
git add .
git commit -m "descriptive message"
git push origin master
Test the Plugin via the CLI
Change to the Plugins parent directory with:
cd ..
Run the following commands to fetch and install the Plugin:
iocage fetch -P iocage-plugin-sabnzbd/iocage-plugin-sabnzbd.json
Test the Plugin via Web Interface
Edit the INDEX file located at: /mnt<pool name>/iocage/.plugins/github_com_ix-plugin-hub_iocage-plugin-index_git/INDEX
Add a new section alphabetically containing the following:
"sabnzbd": { 			//The name of the plugin
"MANIFEST": "sabnzbd.json", 	//The plugin artifact file
"name": "Sabnzbd",		//The name of the plugin in the web UI
"icon": "https://icons.freenas.org/community-icons/sabnzbd.png",
				//The direct link to the icon image
"description": "Sabnzbd is a newsgroup reader.",
//A one-sentence description for the web UI
"official": false,		//Leave this false
"primary_pkg": "sabnzbd"	//The primary package to be installed,
					//version will be displayed in the web UI
},
Place your Plugin artifact JSON file in the following directory:
/mnt/iocage/.plugins/github_com_ix-plugin-hub_iocage-plugin-index_git/INDEX
Open the FreeNAS web interface and click Plugins, then select the Community option under the drop down. Click the Refresh button, then select the newly created Plugin from the list and install it.
Adding the Plugin to the Community Repository
The Community Plugin repository resides on GitHub. To submit a Plugin to the Community repository, first fork the GitHub repository. Modify the forked version of the repository by adding the artifact file for the new Plugin, modifying the INDEX file, and adding a Plugin icon if needed. When everything is satisfactory, submit a Pull Request to the original repository. Include a short description of the content and why it should be included. Be prepared to make modifications or improvements. If the Pull Request is approved the Plugin will appear in the Community repository in FreeNAS.
Resolving Common Issues
The Plugin may not work on the first try. Some common issues you may encounter are:
- No internet connectivity in the jail. The jail likely had problems getting a DHCP lease or a NAT option was specified incorrectly.
- Permission is denied on “
post_install.sh“. Ensure the proper permissions were set by running “chmod +x post_install.sh” before committing the file to the Git repo
Plugin Maintenance
When future modifications to the Plugin arise such as when the upstream port is updated, the Community repository will need to be cloned, modified, and a pull request issued. Follow the commands in “Adding the Plugin to the Community Repository” above to accomplish this. This will update the JSON artifact file present in the Community repository. For updates to post_install.sh, settings.json, or ui.json, the Plugin’s repository itself must be updated. To do this, clone the repository again and make any modifications. When finished, commit those changes following the commands in “Upload the files to the Git Repo” above.
While most community plugins are best suited to live inside the community repo, there may be some that should be considered by iX to become officially supported. If you believe a plugin should be considered, please let us know by opening a ticket in our bug-tracker, with details about the plugin and why it would be a good candidate for official inclusion.
Visit the General Plugin Discussion in the FreeNAS Forums for more information and welcome to the world of FreeNAS Plugins Development!