My New All NVMe Virtualized TrueNAS Server - Story and a Guide

joeschmuck

Old Man
Moderator
Joined
May 28, 2011
Messages
10,995
PART 1:

WHY A ESXi SERVER?

I have a personal preference for virtualization and it started a long time ago while using VMWare Workstation, it was easy to operate on my Windoze computer and I'm accustom to it. While this thread is mainly how to select the right components and put together a server, it is also about requirements and teaching component selection. You can use this to build a pure TrueNAS server or a Type 1 Hypervisor like I am doing. I will not be going into much detail about the virtual environment. the big thing to know about the virtual environment for this thread is to learn what components you can pass through ESXi to your TrueNAS VM. This is actually a critical part. Everything I selected was chosen with that in mind.

REQUIREMENTS and COMPONENT LISTING

This has been a project I've been wanting to do for several years and due to some recent very good sale prices, the fact that my hard drives were double the warranty life, and I rarely spend money on myself, I was able to justify the cost.

The highlights are:
Cost: $2389.57 USD, includes tax and shipping charges.
Total Storage: RAIDZ1 = 10.1TB, RAIDZ2 = 6.67TB (values are approximate and read the story below and there are still decisions for me to make).
Power Consumption Idle: ~41 Watt at the electrical outlet (half of my spinning disk server)
Silent Operation (unless you have dog ears)


Full Parts List:
AsRock Rack B650D4U Micro-ATX Motherboard - $299 USD
Two Kingston 32GB ECC Registered DDR5 4800 Model KSM48E40BD8KM-32HM - 114.99 USD each ($229.98)
AMD Ryzen 5 7600X 6-Core 4.7 GHz CPU - $249USD
Cooler Master Hyper 212 Spectrum V3 CPU Air Cooler - $29.99 USD
Prolimatech PRO-PK3-1.5G Nano Aluminum High-Grade Thermal Compound - $7.99 USD
Six 4TB NVMe Drives (Nextorage Japan Internal SSD 4TB for PS5 with Heatsink, PCIe Gen 4.0) - $199 USD each ($1199.94)
Quad M.2 NVMe to PCIe Adapter (Newegg Item 9SIARE9JVF1975) - $35.90 USD
Corsair RM750e Fully Modular Low-Noise ATX Power Supply - $99.99 USD
ASUS AP201 Type-C Airflow-focused Micro-ATX, Mini-ITX Computer Case - $79.97 USD

Does this make sense financially to do over replacing my old spinners with new spinners? Nope. The money I spent would take over 10 years to recoup in power savings alone, assuming power costs remain the same. We know that will not happen but they will not double. My four hard drives were on the edge of end of life and the price I paid for the spinners was about the same cost of my first set of hard drives about 10 years ago. I rationalized that the NVMe drives would theoretically last 10 years at a minimum. I also wanted a more efficient CPU and faster as well, even though I did not need a faster CPU. Want overrides Need today, but this is rare for me.

I will go into my parts selection and rationale behind each selection. My hope is that this thread will help others do the legwork to select components for themselves. There is always some risk, and if you are unwilling to take the risk, then you should not build your own system.

First of all, it took months for me to decide what my system requirements were and I used a spreadsheet to document it all, which included potential hardware choices and NAS capacities and RAIDZ1 or RAIDZ2, even Mirrors with all the capacity calculations. @Arwen had a thread about looking for a low power, 20 PCIe lane (min) system a little while back which re-sparked my interest in a new system. I am very thankful for that thread as it made me ultimately purchase the system I now have.

STORAGE CAPACITY:
This first thing I feel everyone should do is know what capacity they need. You will have seen me post something like these words "Choose the capacity you desire and need for 3 to 5 years (whatever the warranty period is) and then double that capacity because anyone fairly new to a NAS will store a lot more than they expect to, so spend the money up front, and hard drives typically last 5 years or longer these days, but that doesn't mean they won't fail right after the warranty period or even before." Since I've been running a NAS for quite a long time I already know my requirements which are ~6TB minimum. Now this is the storage capacity I need form my NAS. I'm also virtualizing using ESXi (free as always) so I need a boot drive and enough space for my datastore. As of this writing I have a 4TB NVMe as my boot drive and datastore1. This is a lot of space. But I also have a second 4TB NVMe as datastore2. LOTS of VM space, and currently way more than I need.

I have six 4TB NVMe drives, four specifically for the TrueNAS VM, and two for ESXi use. I am contemplating on reallocating the 4TB NVMe for datastore2 as part of TrueNAS storage (five 4TB NVMe drives). What I'm saying it my final configuration is not decided, but it will be by the end of December. I could end up with a RAIDZ1 with ~14TB of storage if I wanted to. But I'm not really fond of RAIDZ1, I like RAIDZ2. Something I need to consider as I'm not using spinning rust anymore.

Your storage is the one main consumable item you have. It will wear out over time. You MUST realize this and keep it in mind. Every other part short of a fan should last you the length of 10+ years, typically well over 10 years however technology will advance and in 15 years you may want to replace your power hungry NAS with a newer version. My NAS consumes 41 Watts at idle right now running ESXi. In 10 years the hardware might be sipping 5 watts of power for an equivalent functional setup.

From this point forward, always buy quality parts. If you buy cheap, your system may be unstable or fail sooner. Also know that infant mortality is real, even if you buy top of the line hardware, a certain percentage will fail early. That is life.

RAM CAPACITY and TYPE:
The second thing a person should decide is how much RAM is required. For TrueNAS only I require 16GB but others may require more if they are using quite a few addon applications or in an office environment. For home use, 16GB has never failed me. But again, I'm using ESXi so I want 64GB ECC RAM and would like to have the option to double if I wanted to, even though I doubt I will. Now I know what I need, 64GB ECC RAM. That was the easiest decision I had to make as it required little research. Speaking of research, the RAM you select must be matched for your motherboard. I'll get into that more when we discuss the motherboard.

CPU SELECTION:
For this task the PCIe lanes became a significant topic in the parts selection. I needed a CPU that could provide me at a minimum of 20 PCIe lanes (more is better), support ECC RAM, faster than my previous CPU, and was cost effective. For my selection the brand initially was a factor but ultimately was not. The AMD Ryzen 5 7600X 6 core 4.7GHz (5.3GHz boost) 105W Desktop Processor met my requirements. This CPU supports 28 PCIe lanes, 24 which are usable, 128GB ECC RAM (DDR5), Built in Graphics (nothing fancy and really not needed for this server but nice to have if later I wanted it). I honestly would have preferred an Intel CPU (personal preference) however I've owned a few AMD CPUs and was never disappointed, I've owned Cyrix CPUs as well and it was a was another competitor against Intel. Back to the story... The only downside to the AMD CPU is being able to "prove" that ECC is really working. This is as I understand it, a function of the CPU, RAM, and the Motherboard electronics, where with Intel, it's just the CPU and RAM. So this is a very minor risk to me and I have "faith" that the ECC is working correctly.

MOTHERBOARD:
The motherboard is a critical part, research it as well. Thanks to @Arwen I was made to think about several factors, the most significant was PCIe lanes. This is how the data is transferred to/from your CPU to devices in the motherboard and on the PCIe card slots. Just because a motherboard has two x16 slots does not mean there is 32 PCIe lanes in operation. That is an example and you MUST download the User Guide and read it very carefully. Most of the time the answer is in the basic design/interface layout diagram, not in the text of the document. If you cannot clearly identify these very important features, do more investigating until you can identify them, or maybe the motherboard you are looking at isn't the one you need. Or you roll the dice and take a chance. My requirements for the motherboard is: One x16 slot which could be bifurcated to x4x4x4x4 for use with a NVMe PCIe adapter, One true x4 PCIe slot, and any extra slots would be nice to have. ECC RAM support for at least 64GB ECC RAM, 128GB would be nice, IPMI, 1Gbit NIC, iTX or uATX, USB 2.0 and 3.1/3.2 connectivity, and the ability to reuse my DDR4 ECC RAM form my current server. The ASRock Rack B650D4U was the one I selected. This took me over 2 weeks to research, and it was a few hours a day. Because I was using ESXi, I also examined the diagrams to see what controllers I could possibly pass though to a VM. This ASRock motherboard hit everyone of my minimum requirements except the DDR4 ECC RAM requirement. Looks like DDR5 is the current RAM choice so I had to purchase new RAM. No money saved here.

Motherboard misses (my mistake for not looking for these): An internal USB 3.2 (USB C) motherboard cable connector, Built in Sound (most servers do not seem to have a built in sound card. Those were my misses for this motherboard. They are not critical however I wish I had them. I may add a USB C adapter to support my Case front panel USB C port.
 
Last edited:

joeschmuck

Old Man
Moderator
Joined
May 28, 2011
Messages
10,995
PART 2

REQUIREMENTS and COMPONENT LISTING (continued)

CPU COOLER:
The CPU needs to be cooled and you have a choice of air cooled (heatsink and fan) or a fancy water cooled system. Unless you are purchasing a high wattage CPU and plan to run it at full speed, keep it simple. I selected a Heatsink and Fan combo that I had experience with that company in the past and I liked them. I would have preferred a stock cooler however this CPU stock cooler reviews were that it was noisy. So I purchased the Cooler Master 212. This is actually too fancy of a fan for me because it comes with programmable color LEDs. If the data cable is not connected then it cycles through the rainbow of colors which annoys me a little, but this server will be out of sight so no real issues. The heatsink does keep the CPU cool. This cooler has a lot of mount adapters for probably every CPU socket type out there. It was very easy to install.

Cooler misses: Minor but the colored LEDs.

THERMAL COMPOUND:
Every heatsink requires heatsink compound to allow good flow of heat from the CPU to the heatsink. The better the compound, the more heat is transferred. I did my research on thermal compounds and there are a lot out there but do not be fooled by the promotional data. Look at several independent research articles. There are two basic types of this stuff, Non-Conductive and Conductive. Non-Conductive means it is not electrically conductive and this type of product tend to not transfer as much heat and the Conductive product. Non-Conductive is typically a paste, Conductive is typically a liquid. Non-Conductive is not terribly expensive while Conductive can be extremely expensive.

The first issue to consider is: Non-Conductive or Conductive. yes, conductive is better, however it is a thin liquid and if you put too much on and it fall into the CPU socket, motherboard as all, then it will short out the electronics. VERY BAD! If you are a perfectionist and know you can put on just the right amount of liquid, then use Conductive, however if you are like most of us and would rather not risk everything then use Non-Conductive. I did my research as I said and I chose a very good compound and it's safe. I highly recommend it. I'm sure there are better and definitely worse product out there, but my results are very good. Do not take my word for it, do your own research and see what you come up with. I use to love Artic Silver 5 but I'm in favor of this newer stuff.

How to use: After you install the CPU, test fit the heatsink, make sure it can be installed without issue. Do not go crazy tightening the hardware, you do need to take it right back off. Now take the heatsink back off and peal off any protective covering (very important). Use an alcohol wipe of some sort to clean the top of the CPU and the bottom of the heatsink. Don't go crazy, you are looking to clean off your finger oil, that is about all that should be on it, unless you spilled some Coke on it while installing it and eating a slice of pizza.

You have heard to apply a pea sized amount of thermal compound to the heatsink. So what is a peas sized amount? Have you ever seen a green pea, like you eat? It's about a 3/16" to 1/4" diameter ball, or a small pea size. The 1.5 gram tube will easily give you three tries and I'm going to have you waste one if you are unsure about this. Place the pea size amount of compound right in the center of the CPU. Next gently place the CPU straight down on top of the CPU. Next slowly engage the mounting screws, start with 1 full turn on on corner, go to the diagonal corner and tighten 1 turn, then due it to the last two screws. Work your way diagonally witht he screws one turn at a time. Eventually you will snug them down. The thermal compound should be spread properly.

Why not spread the compound across the CPU first? Air pockets! No matter how careful you are, air pockets where no thermal compound it located created hot spots on the CPU but more importantly, less heat get transferred to the heatsink. I didn't believe this myself so I tested it, I was wrong, the pea size works much better. If you desire, you can back off the heatsink screws the same way to put them on and carefully remove the heatsink, then inspect the compound and how well it did or didn't spread out. Maybe you need more or less. Clean it all up before putting on more thermal compound. Okay enough about thermal compounds.

POWER SUPPLY:
I chose a Corsair RM750e modular power supply. I am 100% certain this is overkill however the sale price was right and the reviews I read (from many sources) were very positive about this line of power supply products. It's modular so I only required three power cables (ATX Power, two 8-pin CPU power). Makes for a really clean cable routing job.

Power supply misses: This thing is heavy. For my next project I may purchase a 400 Watt or so (need to actually figure out the proper size) and swap it out with the RM750e. It feel like the case still have 6 HDDs weighing it down.

The CASE:
This was one of the most difficult things for me to narrow down. Normally I buy high quality cases and reuse them. Until recently, my main home computer was in a computer case I purchased over 20 years ago and have had so many different setups, replaced the guts often but the case and power supply remained. I located one I wanted to try, the ASUS AP201. This is a nice clean looking case. It is tooless and all the side, front, and top panels easily pop off in your hand. The power supply is located in a very odd location but it did not bother me. I did ensure that the power supply was oriented to ensure air was being pulled from the front of the case (fan against the front of the case). I like the very clean looks of this case. This case has a nice lit power button, two USB 3.1 Type A connectors and a USB 3.2 Type C connector. It also has a microphone and headphone jack which are useless to this project. the USB-C connector has a strange cable that would plug into a special header, but my mistake that the motherboard does not have that header present. I will look for an adapter. I am thinking about making a high speed drive transfer connection.

Misses: Miss #1 - The top of the case pops right off so if you try to life the case by the top, it's going to pop off and you get to watch the case plummet to the ground. Thankfully mine only dropped less than one inch and on carpet. I will figure a way to install some black screws to ensure it cannot pop off again. Miss #2 - The vent holes are nice however ensuring the airflow is directional to flow across the components that need it are a hit and miss. This need to be carefully planned for any case, this is no exception. Thankfully I do seem to have proper airflow but I need to do more testing. Miss #3 - Fan case holes are terrible. When you mount a fan to the top, bottom, rear or front (if you can fine the room), the case holes block a little less than 50% of the fan surface area. This means that the fan spins quite fast because there is no air really flowing across the blades and the flow is jus plain crap. I was going to mount a fan in the bottom of the case (in a defined fan location) to blow air onto the four NVMe modules but the air was going nowhere so I removed the fan. So far I don't need it, yet. If I do need it, I will modify the case and cut the area blocking the fan blades, then install a wire grill (probably back to match the case). I make this modification to practically every case that I have ever owned. Punched metal just does not let enough air through. If you were to make this case modification, empty the case, no electronics at all. Take your time and run through what you are wanting to do before the first cut. Clean up the edges as they are sharp and every piece of lint will find a way to hold on for life. If I make this modification, I will post a few photos.

QUAD M.2 NVMe to PCIe ADAPTER:
So this is the only bad part of my entire build and it sucks. I will have photos to hopefully show what is going on.
The adapter I purchased is a common card, you see it produced by many companies, or maybe rebranded a lot. The issue is a combination of the Card and the NVMe Heatsinks. When you mount a normal NVMe to the card, all looks good. Everything fits nicely. But if you try to mount a NVMe that has is own Heatsink, the very thin piece of metal on the underside of the NVMe module now becomes too thick to mount on the Qual card. It looks like the M.2 connector is going to pop off the card. Now install all four and the entire card now has a bow in it and the NVMe drives are under a lot of physical stress. Thankfully the NVMe mounting screws are quite long so I'm taking a risk right now and I only tightened the screws down a few turns until I felt there was enough tension to hold the screw from turning and the NVMe drive from moving. The Quad card still has a little bow but not nearly as much.

Misses: My advice, buy an adapter which comes with it's own heatsink. So my card is like almost every other out there and it has four mounting holes for a heatsink that covers all four NVMe drives. I plan to be looking into purchasing one and then I will need to remove the heatsinks from the four NVMe drives on the card.
 
Last edited:

joeschmuck

Old Man
Moderator
Joined
May 28, 2011
Messages
10,995
PART 3
OPERATION AND PHOTOS

First of all, I am very pleased with the project overall. I have a few issues but all are minor to me. I have room for improvement but these pitfalls could be avoided by anyone using my story and reading the 'misses'.

The computer has a nice digital POST readout on the motherboard to assist in troubleshooting, should you need to.

When I powered the computer on I identified the BMC and BIOS versions, they were a little old so I updated both immediately. This was an easy process. I next did a little burn-in testing and the Memtest86+ just ran through the tests so fast. Blazing fast. I ran that for 1 day, followed up later by a few more days. I have not ran a CPU stress test, the booting of the test is kicking my but. I'm too use to a Native BIOS, not UEFI. So I still need to do that. Maybe tomorrow I will do that, it must be done.

The computer boots up fairly fast, maybe 30 seconds to start booting ESXi 8 and 30 seconds later ESXi is all up and running and TrueNAS CORE is all booted up as well. Crazy fast because of the NVMe interface. And I'm not overclocking anything and I will not. I don't need to for my needs and I'd rather reduce my energy consumption.

Speaking of energy consumption, I have not tweaked anything, everything is at the default settings, so I will play with the settings probably over the Christmas holiday period.

It's quiet. Of course I'm old and my wife says I can't hear when she's talking to me, but it's really selective hearing, Hee Hee.

I dedicate 16GB RAM to TrueNAS as I said in the first posting. This leaves 44GB free for Ubuntu, Debian, Windoze, TrueNAS SCALE, a lot of things actually. And I do not typically run many VMs at a time, TrueNAS always, the others as I need them. And I can add another 64GB RAM if I need it. Maybe next year it will be cheaper :wink:

CONCLUSION:
I love this project. I felt a little guilty spending that kind of money but I give my daughter that much to help her out every few months. I can't wait for her to find a better paying job. When running SCALE, it will place the NVMe drives into the lowest power state it can depending on the needs, but do not expect to see any huge power savings. It just isn't there, it burst my bubble as well. I was hoping for a cool 20 Watt system at idle, but 41 Watts is pretty close. Also the NVMe drives all pass through ESXi with ease, they are their own controllers! Would I recommend thsi project? Hell yes! Read the "misses" and you will have a step up form what I experienced.

And now the PHOTOs (sorry there are not more or even really good photos but if you have a request, the server is easily accessible right now)

20231120_161825.jpg

The only power cables are on the right side, all three of them!


20231120_141715.jpg

Just installed the MB into the case. I still haven't removed the old heatsink mounts. I should have done that first but not a big deal. The top NVMe drive is the boot drive, the bottom is datastore2, but might become TrueNAS's fifth RAIDZ drive. I think 4TB is enough for all my ESXi VM's, but decision not made yet.


20231120_142044.jpg
20231120_141851.jpg

I used the top four connectors only. The left two are for the ATX 3.0 power connector, the right two are for the two CPU power connectors. this leaves me a lot of expandability should I need to add other drives, I'm thinking SATA SSD and even a graphics card if really needed, but not for mu use case.


20231120_161720.jpg
20231120_173625.jpg

Look at the pretty heatsink that comes preinstalled on the NVMe. It's actually very nice. It is fairly easy to remove HOWEVER, the drive is tight, you must spread the bottom bracket carefully apart as to not damage the electronics.


20231120_173843.jpg

While it's difficult to see in this photo, the NVMe drive is not sitting flush and the PCIe adapter is bowed due to the stress of the heatsink, but I really blame the M.2 connector for being too close to the circuit board, it could be 1mm taller like the motherboard M.2 connectors.


20231120_173905.jpg
20231120_173921.jpg

You can see the four heatsink mounting holes that many adapter cards come with. Buy one that comes with it if you can.


20231204_180615.jpg

41 Watts Idle


20231204_180547.jpg

Sorry, need to turn your head sideways.


20231208_184604.jpg

The power supply is mounted here in the front. The fan is facing the front to pull cool air in.


20231208_184619.jpg

Pretty Colors !!!
 
Last edited:

Davvo

MVP
Joined
Jul 12, 2022
Messages
3,222
You finally did it! Congrats!
We will await the inevitable performance boasting tests!

As a side note, did you consider a thermal pad for the CPU?
 
Last edited:

joeschmuck

Old Man
Moderator
Joined
May 28, 2011
Messages
10,995
As a side note, did you consider a thermal pad for the CPU?
I did not. Maybe I should have. Out of curiosity did you have a recommendation?

You finally did it! Congrats!
We will await the inevitable performance boasting tests!
Thanks and I will get some benchmark testing done. Any specific benchmark you would like to see? There are a few. I plan to test VM to VM (TrueNAS being one of them of course), but NIC transfers are limited by the 1Gbit connection so no need to test that aspect. If I upgraded to a 10Gbit network, NOPE! I spent enough already and I might as well just shoot for 100Gbit, right. Rewiring the house is out of the question :wink:, maybe. Just not this year. But in reality, 1Gbit is fast enough for my needs. So it takes 15 minutes to backup my Windoze machine, nothing wrong with that. I recall a day when backups were on cassette tape or reel to reel 9 track tape.

For me the big thing right now is deciding the final pool layout. Do I use 4 or 5 NVMe drives? Heck, I could use all 6 and add a 4TB SSD boot drive. And I'm seriously contemplating cutting a hole in the new case. I already have the black wire grills and some black plastic grommet edging in my Amazon saved list. If you do a job, do it right. It will look like it was designed that way.


ADDITIONAL THOUGHTS: When you build a computer or are removing or adding parts, there is a good engineering practice we call "Touch a Nut". Keep your mind out of the gutter. This simply means that before you pick up a circuit card or electronic part, touch the metal case first to remove any static electricity potential. It doesn't take much to destroy electronics these days. If you feel the need, a ground strap may be used, one that has a wrist band if you like. Where I work we use Leg Stats and must have a resistance value below 500K Ohms (I'm normally at 200K-250K) from the bottom of your left shoe up your left leg, through your body, down to your right leg to the bottom of your right shoe. This mitigates a spark from igniting solid propellant from your finger tips.
 
Last edited:

joeschmuck

Old Man
Moderator
Joined
May 28, 2011
Messages
10,995
BENCHMARK TESTING (solnet-arry-test v3)

My NVMe pool is a simple four drive RAIDZ1 setup. I'm not certain what my final layout will be as I'm still playing around with the new toy.

Here are the results of this test. I've never run this script before so I'm not sure what to make of the results.

Code:
sol.net disk array test v3

This is a nondestructive (read-only) full disk test designed to help
diagnose performance irregularities and to assist with disk burn-in

1) Use all disks (from camcontrol)
2) Use selected disks (from camcontrol|grep)
3) Specify disks
4) Show camcontrol list

Option: 3

Enter disk devices separated by spaces (e.g. da1 da2): nvd0 nvd1 nvd2 nvd3

Selected disks: nvd0 nvd1 nvd2 nvd3
Is this correct? (y/N): y

You can select one-pass for the traditional once-thru mode, or
burn-in mode to keep looping forever.

One-pass or Burn-in mode? (o/B): o
Performing initial serial array read (baseline speeds)
Sat Dec  9 17:06:42 EST 2023
Sat Dec  9 17:15:43 EST 2023
Completed: initial serial array read (baseline speeds)

This test checks to see how fast one device at a time is.  If all
your disks are the same type and attached in the same manner. they
should be of similar speeds.  Each individual disk will now be
compared to the average speed.  Results that are unusually slow or
unusually fast may be tagged as such.  It is up to you to decide if
there is something wrong.

Array's average speed is 4923.75 MB/sec per disk

Disk    Disk Size  MB/sec %ofAvg
------- ---------- ------ ------
nvd0     3815447MB   4869     99
nvd1     3815447MB   5071    103
nvd2     3815447MB   4778     97
nvd3     3815447MB   4977    101

This next test attempts to read all devices in parallel.  This is
primarily a stress test of your disk controller, but may also find
limits in your PCIe bus, SAS expander topology, etc.  Ideally, if
all of your disks are of the same type and connected the same way,
then all of your disks should be able to read their contents in
about the same amount of time.  Results that are unusually slow or
unusually fast may be tagged as such.  It is up to you to decide if
there is something wrong.

Performing initial parallel array read
Sat Dec  9 17:15:43 EST 2023
The disk nvd0 appears to be 3815447 MB.
Disk is reading at about 5065 MB/sec
This suggests that this pass may take around 13 minutes

                   Serial Parall % of
Disk    Disk Size  MB/sec MB/sec Serial
------- ---------- ------ ------ ------
nvd0     3815447MB   4869   6001    123 ++FAST++
nvd1     3815447MB   5071   6003    118 ++FAST++
nvd2     3815447MB   4778   6008    126 ++FAST++
nvd3     3815447MB   4977   6024    121 ++FAST++

Awaiting completion: initial parallel array read
Sat Dec  9 17:26:38 EST 2023
Completed: initial parallel array read

Disk's average time is 654 seconds per disk

Disk    Bytes Transferred Seconds %ofAvg
------- ----------------- ------- ------
nvd0        4000787030016     655    100
nvd1        4000787030016     655    100
nvd2        4000787030016     651    100
nvd3        4000787030016     654    100

This next test attempts to read all devices while forcing seeks.
This is primarily a stress test of your hard disks.  It does thhis
by running several simultaneous dd sessions on each disk.

Performing initial parallel seek-stress array read
Sat Dec  9 17:26:38 EST 2023
The disk nvd0 appears to be 3815447 MB.
Disk is reading at about 7006 MB/sec
This suggests that this pass may take around 9 minutes

                   Serial Parall % of
Disk    Disk Size  MB/sec MB/sec Serial
------- ---------- ------ ------ ------
nvd0     3815447MB   4869   7006    144
nvd1     3815447MB   5071   7006    138
nvd2     3815447MB   4778   7006    147
nvd3     3815447MB   4977   7004    141

Awaiting completion: initial parallel seek-stress array read
Sat Dec  9 18:22:11 EST 2023
Completed: initial parallel seek-stress array read

Disk's average time is 1682 seconds per disk

Disk    Bytes Transferred Seconds %ofAvg
------- ----------------- ------- ------
nvd0        4000787030016    2067    123 --SLOW--
nvd1        4000787030016    1788    106
nvd2        4000787030016    1576     94
nvd3        4000787030016    1297     77 ++FAST++
root@truenas:/mnt/farm/scripts #


While this test was running I also ran Multi-Report once a minute so I could collect temperature data.
A) My normal NVMe temperature is 27C.
B) While running the test nvd0 reached a temperature of 68C (154.4F), that is hot. BTW, 89C is the Critical Temperature Limit for these drives.
C) It took 5 minutes to cool down to 47C and then another 10 minutes to reach 30C. There is no airflow over the NVMe drives and this was intentional as I wanted to know how well the large heatsinks alone would work. I can't imagine how hot it would have been without the heatsinks.
D) This means I will be adding a temporary fan and rerunning the test. If it's nice, I will order the parts I need to cut a hole into the case and install the fan properly. I will take before, during, and after photos for anyone who wants to know how it's done.
E) I also want to include drive da0 which is a virtual boot drive from ESXi to see how it performs.

BENCHMARK TESTING (solnet-arry-test v3) with da0 and cooling fan.

I included the VM boot drive da0 (virtualized disk) and I also added a 120mm fan below the NVMe modules and it's probably pushing half the airflow it could be once I modify the case.

First of all the temperatures now started at 25C and the highest value was 42C during the test, quite a huge difference from 68C. This means I will be posting photos on how I modify this case. I have already ordered the black fan grill, should be here 15 December.

Now for the solnet-array-test v3 results the second time around. This time the results for da0 have really confused me. Maybe this script cannot properly test a virtual drive?

Code:
root@truenas:/mnt/farm/scripts # ./solnet-array-test-v3.sh
sol.net disk array test v3

This is a nondestructive (read-only) full disk test designed to help
diagnose performance irregularities and to assist with disk burn-in

1) Use all disks (from camcontrol)
2) Use selected disks (from camcontrol|grep)
3) Specify disks
4) Show camcontrol list

Option: 3

Enter disk devices separated by spaces (e.g. da1 da2): nvd0 nvd1 nvd2 nvd3 da0

Selected disks: nvd0 nvd1 nvd2 nvd3 da0
<VMware Virtual disk 2.0>          at scbus32 target 0 lun 0 (pass1,da0)
Is this correct? (y/N): y

You can select one-pass for the traditional once-thru mode, or
burn-in mode to keep looping forever.

One-pass or Burn-in mode? (o/B): o
Performing initial serial array read (baseline speeds)
Sat Dec  9 20:15:16 EST 2023
Sat Dec  9 20:26:31 EST 2023
Completed: initial serial array read (baseline speeds)

This test checks to see how fast one device at a time is.  If all
your disks are the same type and attached in the same manner. they
should be of similar speeds.  Each individual disk will now be
compared to the average speed.  Results that are unusually slow or
unusually fast may be tagged as such.  It is up to you to decide if
there is something wrong.

Array's average speed is 4853.75 MB/sec per disk

Disk    Disk Size  MB/sec %ofAvg
------- ---------- ------ ------
nvd0     3815447MB   4631     95
nvd1     3815447MB   4804     99
nvd2     3815447MB   4952    102
nvd3     3815447MB   5028    104
da0        16384MB      0      0 --SLOW--

This next test attempts to read all devices in parallel.  This is
primarily a stress test of your disk controller, but may also find
limits in your PCIe bus, SAS expander topology, etc.  Ideally, if
all of your disks are of the same type and connected the same way,
then all of your disks should be able to read their contents in
about the same amount of time.  Results that are unusually slow or
unusually fast may be tagged as such.  It is up to you to decide if
there is something wrong.

Performing initial parallel array read
Sat Dec  9 20:26:31 EST 2023
The disk nvd0 appears to be 3815447 MB.
Disk is reading at about 5232 MB/sec
This suggests that this pass may take around 12 minutes

                   Serial Parall % of
Disk    Disk Size  MB/sec MB/sec Serial
------- ---------- ------ ------ ------
nvd0     3815447MB   4631   5651    122 ++FAST++
nvd1     3815447MB   4804   6236    130 ++FAST++
nvd2     3815447MB   4952   6228    126 ++FAST++
nvd3     3815447MB   5028   6239    124 ++FAST++
da0        16384MB      0      0      0 --SLOW--

Awaiting completion: initial parallel array read
Sat Dec  9 20:37:59 EST 2023
Completed: initial parallel array read

Disk's average time is 520 seconds per disk

Disk    Bytes Transferred Seconds %ofAvg
------- ----------------- ------- ------
nvd0        4000787030016     688    132 --SLOW--
nvd1        4000787030016     640    123 --SLOW--
nvd2        4000787030016     636    122 --SLOW--
nvd3        4000787030016     633    122 --SLOW--
da0           17179869184       5      1 ++FAST++

This next test attempts to read all devices while forcing seeks.
This is primarily a stress test of your hard disks.  It does thhis
by running several simultaneous dd sessions on each disk.

Performing initial parallel seek-stress array read
Sat Dec  9 20:37:59 EST 2023
The disk nvd0 appears to be 3815447 MB.
Disk is reading at about 7005 MB/sec
This suggests that this pass may take around 9 minutes

                   Serial Parall % of
Disk    Disk Size  MB/sec MB/sec Serial
------- ---------- ------ ------ ------
nvd0     3815447MB   4631   7006    151
nvd1     3815447MB   4804   7003    146
nvd2     3815447MB   4952   7006    141
nvd3     3815447MB   5028   7004    139
da0        16384MB      0      0      0

Awaiting completion: initial parallel seek-stress array read
Sat Dec  9 21:33:28 EST 2023
Completed: initial parallel seek-stress array read

Disk's average time is 1190 seconds per disk

Disk    Bytes Transferred Seconds %ofAvg
------- ----------------- ------- ------
nvd0        4000787030016    1829    154 --SLOW--
nvd1        4000787030016    1576    132 --SLOW--
nvd2        4000787030016    1370    115 --SLOW--
nvd3        4000787030016    1168     98
da0           17179869184       6      1 ++FAST++
root@truenas:/mnt/farm/scripts #


EDIT: TrueNAS said my NVMe high temp was 54C. I'm inclined to believe what SMART reports in my script of 68C but maybe TrueNAS knows something I don't. My script checked temps every 1 minute.
 
Last edited:

joeschmuck

Old Man
Moderator
Joined
May 28, 2011
Messages
10,995
PART 4: CASE MODIFICATION for FAN

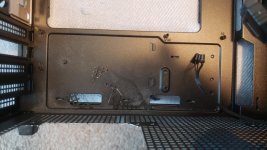
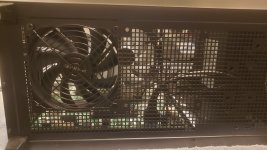
Previously I mentioned that while performing the solnet-array-test, my NVMe drives got rather hot. The solution was easy, add another fan to blow a little air across the NVMe heatsinks. The dilemma was that the case blocks probably 40% of the airflow to the fan. Case modifications are extremely easy, see my process.

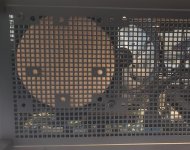
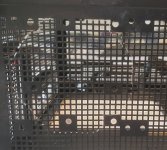
1) The Problem: Too much blocked airflow.

In the photo below I have the fan installed and a circle depicting the material I want to remove. Well how did I come up with that?
Problem1.jpg

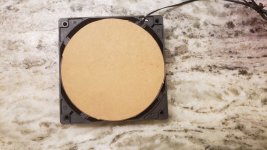
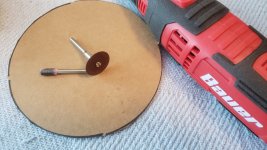
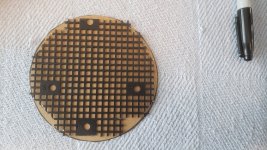
2) Using the wire grill, trace out the circle on a piece of light card stock. I used a cereal box.
Problem2.jpg
Problem3.jpg

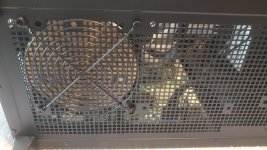
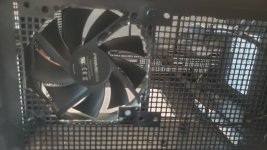
3) Now mount the fan and use the cutout to easily visualize what must be removed. I also installed the wire grill. It is always smart to measure twice and cut once.
Problem4.jpg

4) Now that I can see what must be removed, is this what I really want to do? In my case, yes it is. So I now use a marker and trace my wire grill so I can see what I need to cut. It was difficult to see as I only had a black marker.

5) At this point I'm ready to cut, well almost. I left the electronics in the case because when test fitting, you really want everything there. So now I remove the NVMe add-on card and the motherboard. The only thing I left was the power supply due to it's location. In a "typical" case, I'd have removed the power supply as well.
Problem6.jpg

6) Next I took my cutting wheel and made a mark at every location I wanted to cut so I could yet again, visually see if I wanted to do this. At this point if I changed my mind, a black sharpie would cover the marks and no one would be the wiser.
Problem5.jpg

7) Here are my tools, a rotary tool, a small cutting wheel, and a grinding stone to burnish the metal so we cannot easily cut our fingers.
Problem7.jpg

8) Using great care, and some eye protection, cut out the hole. Take your time, being fast is not the goal, being accurate is.
Here is the first section removed.
Problem8.jpg
It is not a great looking circle. To be honest, this was the most difficult hole I had to cut. Most cases are not these large grids and strange mounting pads for several variations of fans. So slow is good.
Problem9.jpg
That is a nasty looking hole, right. But we are not done.

9) Mark the remaining areas of metal to remove. Take your time. Remove and reinstall the fan as often as it takes to get something that looks good. When this part is done, take the other stone and deburr the hole to remove the sharp edges. Carefully feel it with your fingers, try not cutting yourself. If it has an edge or lip, remove it.

10) When you are done you will have this mess of ground metal bits and the grinding wheel. The metal bits are not good.
Problem10.jpg
Take your case somewhere that you can blow out the crap. Do a very good job, wipe it down.

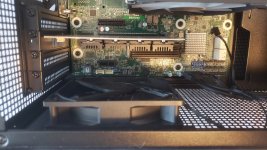
11) Next I reinstalled my motherboard, the fan and grill, and then the add-on NVMe card.
Problem11.jpg
Problem12.jpg
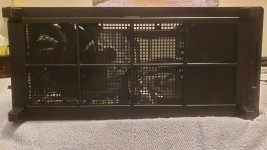
And the bottom filter screen fits nicely as well. To be honest, I forgot to check that fitment with the wire grill attached. I got lucky here. If I had an issue, I would have figured a solution.

While this specific case modification is far from looking factory, you can make them look surprisingly like it was made that way at the factory. Originally I was planning to buy some plastic gromet edging but I thought I'd try this first. I left enough material so I could make this look much better by a little more cutting and adding the edging (make it a square opening, not my ideal look). Yea, I'm a bit embarrassed how bad it looks.

12) In my situation I removed my RAM during the removal of the motherboard. I am currently running MemTest86+ to ensure I did not induce an error. After a few days I will be content that all is working properly.

13) The very last thing to do is slow the fan speed down for my situation, remember that I only need a little airflow across my NVMe modules. My motherboard will control the fan speed if it were a 4 pin fan, but nope, I have a 3 pin fan. So I need to dig into my spares to locate a 4 pin fan, then I can change my fan speed from 1500 RPM down to 700-900 RPM. The other way to go is to run the 12VDC fan from 7VDC. That is another topic.

I hope this helps some people.

EDIT: I found a 4 pin 120mm fan just laying around. I wish the two new BeQuiet case fans were 4 pin but they were not. So now the fan is running at 800 RPM.
 
Last edited:

joeschmuck

Old Man
Moderator
Joined
May 28, 2011
Messages
10,995
An update: About 2 weeks ago I installed a fifth 4TB NVMe drive into the pool, so now I have a proper RAIDZ2 setup. I still have concerns about data recovery should the computer break. I would need a computer with enough PCIe lanes of a nice card that does all the bifurcation itself. One that holds eight M.2 NVMe cards would be a nice thing to have, then I can up the entire pool on one card. Eh, that is something way down the road I hope.
 
Top