
- Joined
- Feb 6, 2014
- Messages
- 5,112
This post will help TrueNAS users enable the built-in service for iX-Storj.
If you’re interested in learning more about the Storj network for Globally Distributed Storage, check out our resources at https://www.truenas.com/ix-storj/ - and read the latest article on the TrueNAS blog https://www.truenas.com/blog/easy-and-affordable-cloud-storage-with-the-ix-storj-starter-package/ to find out how you can enter for a chance to win some fantastic prizes, including a Mini R loaded with 72TB of storage.
Registration
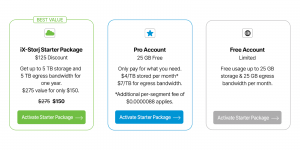
To get started, simply navigate to the registration portal at https://ix.storj.io/. Ensure that you use this URL to sign up, in order to receive the exclusive iX-Storj Starter Pack pricing as an option. You can also find this link in the TrueNAS UI when adding cloud credentials. You’ll be directed to the Storj registration portal for your nearest region, and asked to enter your name, email address, and a password. After verifying your email address, you’ll be prompted to select from one of three accounts. You can start with a 30-day trial account of 25 GB, and at any time, upgrade to the iX-Storj Starter Package or a Pro account.

Once you’ve selected a plan, you’ll be prompted to get started with either the web browser or the Uplink CLI. We’ll get started by choosing the web browser option on the left. Next, it’s time to set up your encryption passphrase. For our example, we’ll let Storj generate a new, 12-word passphrase, but if desired, you can supply your own.

Important Note on Encryption
Note that Storj doesn’t know or store your passphrase. Make sure you save this passphrase and keep it in a safe place, as if it’s lost, neither iX nor Storj can retrieve any data encrypted with it. You can reveal the passphrase, copy it to your clipboard, or download it as a plain text file, but make sure it is recorded before continuing to the next step.
Creating your First Data Bucket
Once you’ve completed the encryption setup, you’ll be brought to the Storj dashboard. Scroll to the bottom of the page, and we’ll create our first “bucket” to store your data with the “New Bucket” button. Give your new bucket a name, using lowercase characters only, and click “Create Bucket” to be brought to the Storj web interface for this bucket. While you could upload your files manually from this browser, TrueNAS has a built-in method to replicate an entire dataset or folder directly to Storj.
Setting up S3 Credentials
For our next step, we’ll set up Storj S3 credentials that our TrueNAS system can use.
Enabling Storj Functionality
Once you’ve saved these credentials, it’s time to enable the built-in Storj functionality within TrueNAS. Log into your TrueNAS system, and navigate to the Credentials and Backup Credentials menu, and choose to Add a new set of Cloud Credentials. Ensure that the provider is selected as Storj iX, and then enter the Access Key ID and Secret Access Key that you downloaded beforehand. Click the Verify Credential button and ensure that the credentials are reported as valid before clicking the Save button.
Create a Cloud Sync Task
In your TrueNAS system, select the Data Protection menu, and then choose Add beside Cloud Sync Tasks. Give your upload task a name, and then select your Storj credentials from the drop-down menu. Since this job will be uploading data to Storj, set the direction of traffic to a Push and check that the transfer mode is COPY. Expand the directory tree, and select a directory or directories to copy from. Note that if you select multiple folders, they all must be at the same “level” or have the same parent directory.
On the Remote side, select the bucket you created in the Storj dashboard, and optionally select the folder inside the Storj bucket to use for the synchronization job.

At the lower part of the job configuration, you can also configure additional encryption options. Storj includes AES256 encryption for your data to ensure its safety in the distributed network, but you can add an extra layer by encrypting the data before it even reaches the Storj network. Ensure that if you do choose this option that you record both your encryption password and encryption salt value separately, and keep them in a secure location. Similar to encrypting a dataset in TrueNAS, losing your encryption keys means losing the data!
Additional Settings for Transfers
The number of transfers can be fine-tuned depending on the amount of network bandwidth available for the Storj job, the size of individual files, and the memory on your TrueNAS system. If you’re backing up a large number of small files, you may benefit from increasing the number of simultaneous transfers, but there’s no single solution to optimize all scenarios. Adjusting this value slowly while monitoring bandwidth usage and memory will help to find an optimal number. A bandwidth limit can also be set for situations where Internet connectivity is limited. Once you’ve made any adjustments to the transfer number or bandwidth limit, click the Save button.
Running the Sync Task
Back on the Cloud Sync Tasks dashboard in TrueNAS, select the Dry Run button beside your new job. This will test accessing the Storj bucket and simulate transferring a file, but not actually send any data. Click Continue and confirm that the job state changes to Success. To synchronize your data, click the Run Now button, and confirm the request with Continue.
You can now switch back to the Storj dashboard, open the Bucket listing on the left, and navigate to the data bucket that TrueNAS is syncing with, and see all of your files as they’re uploaded to and distributed around the Storj network.
If you’re interested in learning more about the Storj network for Globally Distributed Storage, check out our resources at https://www.truenas.com/ix-storj/ - and read the latest article on the TrueNAS blog https://www.truenas.com/blog/easy-and-affordable-cloud-storage-with-the-ix-storj-starter-package/ to find out how you can enter for a chance to win some fantastic prizes, including a Mini R loaded with 72TB of storage.
Registration
To get started, simply navigate to the registration portal at https://ix.storj.io/. Ensure that you use this URL to sign up, in order to receive the exclusive iX-Storj Starter Pack pricing as an option. You can also find this link in the TrueNAS UI when adding cloud credentials. You’ll be directed to the Storj registration portal for your nearest region, and asked to enter your name, email address, and a password. After verifying your email address, you’ll be prompted to select from one of three accounts. You can start with a 30-day trial account of 25 GB, and at any time, upgrade to the iX-Storj Starter Package or a Pro account.
Once you’ve selected a plan, you’ll be prompted to get started with either the web browser or the Uplink CLI. We’ll get started by choosing the web browser option on the left. Next, it’s time to set up your encryption passphrase. For our example, we’ll let Storj generate a new, 12-word passphrase, but if desired, you can supply your own.
Important Note on Encryption
Note that Storj doesn’t know or store your passphrase. Make sure you save this passphrase and keep it in a safe place, as if it’s lost, neither iX nor Storj can retrieve any data encrypted with it. You can reveal the passphrase, copy it to your clipboard, or download it as a plain text file, but make sure it is recorded before continuing to the next step.
Creating your First Data Bucket
Once you’ve completed the encryption setup, you’ll be brought to the Storj dashboard. Scroll to the bottom of the page, and we’ll create our first “bucket” to store your data with the “New Bucket” button. Give your new bucket a name, using lowercase characters only, and click “Create Bucket” to be brought to the Storj web interface for this bucket. While you could upload your files manually from this browser, TrueNAS has a built-in method to replicate an entire dataset or folder directly to Storj.
Setting up S3 Credentials
For our next step, we’ll set up Storj S3 credentials that our TrueNAS system can use.
- Choose Access on the Storj dashboard, and then Create S3 Credentials.
- Set up a name for these credentials to identify it within your Storj dashboard.
- You’ll be prompted to accept the use of server-side encryption, which can be used in addition to TrueNAS encryption applied before uploading.
- This S3 user can also be limited to specific permissions, or specific storage buckets within your Storj account.
- In our example, we’ll allow all permissions, but only for the one data bucket that we created earlier.
- Storj will even let you specify an expiration date for these permissions, if you want to limit the time period to allow synchronization.
- Proceed to the next step, where you’ll be given the option to set up a separate encryption passphrase.
- If desired, the S3 credentials can encrypt data with a separate encryption passphrase, in order to separate the TrueNAS synchronized data from other data in the same bucket, but this will also prevent these S3 credentials from accessing data encrypted by a different phrase.
- For our configuration, we’ll leave the current passphrase in place, as we don’t need to separate out our data to this level.
- On the last screen, you’ll be asked to confirm the name, permissions, buckets, and end date of the new credentials.
- Make sure you’ve granted the right access before clicking Confirm.
- Once the credentials have been created, you’ll be prompted to download, copy, or reveal them, similar to the main encryption passphrase earlier in the setup.
- Just like the encryption passphrase, Storj doesn’t store or have the ability to recover these keys, so record them in a safe place before continuing!
Enabling Storj Functionality
Once you’ve saved these credentials, it’s time to enable the built-in Storj functionality within TrueNAS. Log into your TrueNAS system, and navigate to the Credentials and Backup Credentials menu, and choose to Add a new set of Cloud Credentials. Ensure that the provider is selected as Storj iX, and then enter the Access Key ID and Secret Access Key that you downloaded beforehand. Click the Verify Credential button and ensure that the credentials are reported as valid before clicking the Save button.
Create a Cloud Sync Task
In your TrueNAS system, select the Data Protection menu, and then choose Add beside Cloud Sync Tasks. Give your upload task a name, and then select your Storj credentials from the drop-down menu. Since this job will be uploading data to Storj, set the direction of traffic to a Push and check that the transfer mode is COPY. Expand the directory tree, and select a directory or directories to copy from. Note that if you select multiple folders, they all must be at the same “level” or have the same parent directory.
On the Remote side, select the bucket you created in the Storj dashboard, and optionally select the folder inside the Storj bucket to use for the synchronization job.
At the lower part of the job configuration, you can also configure additional encryption options. Storj includes AES256 encryption for your data to ensure its safety in the distributed network, but you can add an extra layer by encrypting the data before it even reaches the Storj network. Ensure that if you do choose this option that you record both your encryption password and encryption salt value separately, and keep them in a secure location. Similar to encrypting a dataset in TrueNAS, losing your encryption keys means losing the data!
Additional Settings for Transfers
The number of transfers can be fine-tuned depending on the amount of network bandwidth available for the Storj job, the size of individual files, and the memory on your TrueNAS system. If you’re backing up a large number of small files, you may benefit from increasing the number of simultaneous transfers, but there’s no single solution to optimize all scenarios. Adjusting this value slowly while monitoring bandwidth usage and memory will help to find an optimal number. A bandwidth limit can also be set for situations where Internet connectivity is limited. Once you’ve made any adjustments to the transfer number or bandwidth limit, click the Save button.
Running the Sync Task
Back on the Cloud Sync Tasks dashboard in TrueNAS, select the Dry Run button beside your new job. This will test accessing the Storj bucket and simulate transferring a file, but not actually send any data. Click Continue and confirm that the job state changes to Success. To synchronize your data, click the Run Now button, and confirm the request with Continue.
You can now switch back to the Storj dashboard, open the Bucket listing on the left, and navigate to the data bucket that TrueNAS is syncing with, and see all of your files as they’re uploaded to and distributed around the Storj network.
Attachments
Last edited: