My Dream System (I think)

Status
Not open for further replies.

Dice

Wizard
Joined
Dec 11, 2015
Messages
1,410
I've very recently taken interest in exploring this route. Ie, 'newbielischous ESXi /w FreeNAS'.

The background story is as follows, which takes its point of departure upon completing my FreeNAS box and being super happy about it.
My plan for the next project was to build a stand alone pfsense dedicated box. Researched only the hardware requirements and went out and bought equipment. But when researching pfsense and firewalls I ran into the rather religious discussion regarding virtualization of firewalls. Then I discovered discussions on different hypervisors and found free packages of ESXi.. Then.... I realized I'd better virtualize my windows utility serverbox.. on the same piece of hardware. At this point I used the 'regret of purchase window to upgrade ram to 16gb...

Yet, I've been a good newbie at the forum compeltely being indoctrinated that freenas shouldn't be virtualized (at least not for me as noob).

Now I'm in the middle of a mental struggle of wondering if I just wasted a 'cycle of drive upgrades worth of cash' on tmy pfsense/esxi box.. to ...do something my freenasbox is way better suited for. Arggh!

I will follow your track on testing on a this newly bought machine before going 'b*lls deep' on one ESXi host for all purposes... Hopefully something good comes out of this testing.

Looking forward to updates on your whereabouts.

Cheers /
 
Last edited:

Dice

Wizard
Joined
Dec 11, 2015
Messages
1,410
797286b0dfa271e179da4dbf4f33d0bd.jpg
 

joeschmuck

Old Man
Moderator
Joined
May 28, 2011
Messages
10,996
Crap, I need to do a write up don't I.

Well I can tell you that my experience has been very good but I'm also patient and try to plan out what I'm doing. The only thing that was a pain was using the new CPU and Motherboard but once ESXi 6.0U1b came out, all was feeling much better. This is the price you pay for cutting edge adoption of hardware, again, I knew there was a risk but I took it and so far it's paying off.

So, I will sit down and come up with some write up on what the heck I did, how things worked out, problems I had and what I had to do to overcome them.

But I will say that is you are not diciplined enough to just leave the server alone (meaning don't reboot it frequently and just screw around with it) then it could work just fine for someone. Also when you do mess with it, place it into Maintenance Mode so the VMs don't start up accidentally. So give me a few days, I already have something started but I'm just trying to put a lot of detail into it so it takes me a while.
 

Dice

Wizard
Joined
Dec 11, 2015
Messages
1,410
So give me a few days, I already have something started but I'm just trying to put a lot of detail into it so it takes me a while.
I' recon there are a lot of useful links in this thread, and the jgreco 'caution' threads, along with some links provided by @ALFA that a 'write-up' is of course highly appreciated. Yet the 'few inital pointers in what direction to look' are available which is super neat :))
Hope you don't mind bombing further questions in this thread?
 

joeschmuck

Old Man
Moderator
Joined
May 28, 2011
Messages
10,996
Okay, I'm going to do a bad job of this but I do want to get some of this information out for those who want to use ESXi but I can't state this enough, These forums do not support ESXi use, meaning if you have a complaint about how it works, you will not get any sympathy. I may create a thread specifically pulling all this data together but someone else can do that as well if they want.

So, the first thing to know is backup your data if you are moving a previously existing pool into an ESXi environment. Be smart and methodical about what you are doing. Read everything before moving forward, and take your time.

First you need to have proper hardware, if you don't then you could be looking for trouble. Look at my ESXi System setup for my specific hardware choices and I'm not promoting that this is the preferred system configuration, it's just what I have. Keep in mind that with my specific motherboard I was unable to use the onboard SATA ports in pass-thru for ESXi which is why my configuration ended up the way it is and my boot device ended up on the motherboard SATA ports (not what I desired but what I ended up with).

Software desired:
MemTest86 (free)
The Ultimate Boot CD (contains MemTest86 and CPU Stress Tests)

Software required:
ESXi 6.0 Hypervisor (current iso)
ESXi 6.0 Hypervisor Update (if newer than the iso)
vSphere 6 Client
FreeNAS (whatever version you desire)

There are a few things to do once you have proper hardware:
1) Run MemTest86 (free version) for an extended period of time (72 hours at least).
2) Run a CPU stress test (any one will do) for at least 2 hours. Others will say you can run them longer however you can damage a CPU from excessive thermal stress and I feel 2 hours should throw an error if one is coming.

Setup your motherboard IP addresses to static values:
1) Enter the BIOS settings and set your IPMI to a static address and your LAN1 port to a static IP address. For this thread I will use IPMI set to 192.168.1.40 and LAN1 to 192.168.1.41.
2) Also in the BIOS set the Boot for Legacy.

Connect ONLY your boot hard drive to the motherboard SATA connectors. I used a 256GB SSD because it was available.

Install ESXi. I used the following link for most of my instructions. Do not use the VMXNET3 driver or worry about MTU 9000 settings, it will only set you behind if you're not willing to troubleshoot a lot.

https://b3n.org/freenas-9-3-on-vmware-esxi-6-0-guide/

So now you should have ESXi installed and possibly FreeNAS installed, it depends on how far you went with the tutorial using the link above. Things which will make it custom to your system is the pass-thru ports like the SATA ports for your FreeNAS hard drives for the pool(s). If you are also going to run Sophos or other software which will have direct control (pass-thru) of devices, ensure all the hardware is installed ahead of time.

WARNING: If you move or add on cards to the motherboard after you have setup ESXi pass-thru ports, you may and likely will change the addressing of those cards for ESXi and your system will fail to work. I found this out the hard way but since I was taking my time building my system and methodically testing it, it was obvious and I decided on my final layout rather quickly.

So with respect to the FreeNAS VM, I dedicated 16GB RAM, 2 CPU cores, and 10GB of boot drive space to my FreeNAS VM and all works very well. I used 10GB for the boot drive because I wanted to allocate more than enough space because that is the way that I am.

Automatic Shutdown isn't updated in the linked guide above to support USB connected devices so I'll provide the instructions here that worked fine for me. If you find something dosn't work, I would appreciate the feedback and if you figured out a better way, post it for all to see. This is a cut and paste from a Word document I started a few months ago:

--------------------------------------------------------------
How to setup ESXi, FreeNAS, and an APC UPS (USB Connection) to Control Shutdown

First of all, I cannot take any real credit except for basically combining a few sources and making things actually just work properly, and lastly, making the instructions easy to follow. Original Source: http://rene.margar.fr/2012/05/client-nut-pour-esxi-5-0/

So the purpose of this guide is to provide step by step instructions on how to implement proper power shutdowns of your ESXi VM Machines and we are using FreeNAS 9.3x to host the APC UPS.

When reading this document, if something is in parenthesis, it is because there could be a space in the text or just to clearly identify what needs to be entered. Do not enter the parentheses unless specifically directed.

Before we start you need to have the following installed:
1) ESXi 5.x or greater (tested on 6.0U1b)
2) FreeNAS 9.3x running
3) Any other VMs, at least one more to prove to yourself it works properly

Software you will need:
1) NutClient-ESXi500-1.3.0.tar.gz (http://rene.margar.fr/downloads/NutClient-ESXi500-1.3.0.tar.gz)

FreeNAS Configuration:

1) If FreeNAS is running, stop the machine.
2) Edit the profile to add a USB Controller and click Ok.
3) Edit the profile to add a USB Device and select the APC UPS, then click Ok.
4) Start FreeNAS.
5) Configure your UPS as follows:
a. UPS Mode: “Master”
b. Identifier: “ups”
c. Driver: (select the driver for your UPS)
d. Port: (select the correct port identified during bootup)
e. Auxiliary Parameters: “override.battery.charge.low = 20”

NOTE: In the above setting I am changing the default low threshold from 10% to 20% so that my system has lots of time to shutdown. You may want to set the value for 50 if you have a small UPS or a lot of VMs to shutdown. This is something that you need to test yourself, no one can tell you for certain what value you should set.

f. Shutdown mode: “UPS reaches low battery”
g. Monitor User: “upsmon”
h. Monitor Password: “upspassword”
i. Remote Monitor: checked
j. Send Email Status Updates: checked
k. To email: (enter your email address)
l. Power Off UPS: unchecked
m. Click OK
n. Turn ON the UPS Service
o. Open the Shell (left side of the screen)
p. Type “upsc ups” and you should get a long status response meaning your UPS is communicating properly. If you type “upsc ups | grep battery.charge.low” it should just output the level you entered in the step above (5e), if it doesn’t, stop and figure out why it’s not working.
q. Type “exit” to close the shell

6) Shutdown FreeNAS

ESXi NUT Installation & Configuration:

1) Enable SSH for ESXi and open an SSH connection (log on as root)
2) Copy the NutClient-ESXi500-1.3.0.tar.gz file to the /tmp directory
a. NOTE: I uploaded to the datastore and then moved it to the /tmp directory, but I don’t see why you couldn’t run this from the datastore itself either.
3) Type “cd /tmp”
4) Type “tar –xzf NutClient-ESXi500-1.3.0.tar.gz”
5) Type “sh upsmon-install.sh”
6) You should see the following results:

Installation Result

Message: Operation finished successfully.
Reboot Required: false
VIBs Installed: Margar_bootbank_upsmon_2.7.2-1.3.0vmw.500
VIBs Removed:
VIBs Skipped:

7) Type “exit” to close the SSH connection
8) Reboot the ESXi server
9) Once the ESXi server is back online under the Configuration Tab, in the Software box, select Advanced Settings
10) On left side scroll down to UserVars and select it
11) On the right side scroll down to the following values and enter as specified:
a. UserVars.NutFinalDelay = “0”
b. UserVars.NutMailTo = (enter your email address)
c. UserVars.NutPassword = “upspassword”
d. UserVars.NutSendMail = “1”
e. UserVars.NutUpsName = “ups@192.168.1.51” (enter the IP address of your FreeNAS)
f. UserVars.NutUser = “upsmon”
g. Click OK
12) Once again open an SSH connection and log in as root
13) Type “upsc ups@192.168.1.51” (what was set is step 11e) and the UPS status should be displayed.

So this takes care of the UPS properly communicating with both FreeNAS and the ESXi system.
---------------------------------------------------------


ESXi Automated Shutdown Setup:

Now we will configure both automatic startup and shutdown of the VMs.
1) In vSphere Client open the Configuration tab for the ESXi server, under Software click on Virtual Machine Startup/Shutdown.
2) Now you can move your VMs around and establish the settings. I would set the delays for 120 seconds and check mark the "Allow virtual machines to start and stop automatically with the system".
 

Dice

Wizard
Joined
Dec 11, 2015
Messages
1,410
thnx @joeschmuck, this provided indeed additional value.
I'll add a couple urls that are not specific to FreeNAS but has helped me a lot the last days in 'getting this hypervisor train' running.

Here are some links to understand the virtual networking aspects. They are using pfSense, but probably valid for the 'viewers' of this thread.
https://snowulf.com/2015/08/31/tutorial-using-vmware-esxi-and-pfsense-as-a-network-firewallrouter/
Walkthrough youtube-expert:
https://www.youtube.com/watch?v=61tVFaVcoqk
An official url to provide further views on what lays ahead in terms of settings:
https://doc.pfsense.org/index.php/PfSense_2_on_VMware_ESXi_5

Edit: ran into this pdf that has some good pointers/reads when interested in ESXi hardware and considerations. I recon this is a useful primer to gather in this thread too.
https://www.vmware.com/files/pdf/techpaper/VMware-PerfBest-Practices-vSphere6-0.pdf

Cheers / Dice
 
Last edited:

joeschmuck

Old Man
Moderator
Joined
May 28, 2011
Messages
10,996
Here is some more information as to how to update ESXi for us folks who like it all free. vCenter is a paid product so we are forced to use other means to update ESXi. I have set this information up in a reoccurring monthly calendar reminder so I don't have to look for the instructions each time I want to do the update. Yes, I'm lazy.


Check VMWare for ESXi patches.

https://my.vmware.com/web/vmware/login

1. Go to the “More Available Free Trials” section and select View All.
2. Roll down to the bottom of the page and select vSphere Hypervisor (64 bit).
3. You should see your license and then the binaries. Open the binaries and check to see if they are newer, then download.
4. Do a Google search for the new version, for example “vmware esxi 6.0U2” and see if you need to apply the update. I would not apply an update if it didn't affect me.


How to install the patch. The link is where I got the steps.

https://kb.vmware.com/selfservice/m...nguage=en_US&cmd=displayKC&externalId=2008939

NOTE: To upload the zip file to the directory, and well to create the "patch" directory use vShpere as follows:
1) Open vSphere and click on the Summary tab.
2) Under Resources right-click one of your datastores and click Browse Datastore, a windows will pop open.
3) Create a new folder called "patch" and then double-click to enter it.
4) On the top of the window are icons to Upload to datastore and download to datastore, select Upload to datastore and pick the zip file for the ESXi upgrade.
5) Once all done, just close the windows.
6) To delete the file for cleanup, well you should now know how to get to the datastore area to delete the file at the end of this procedure.


Instructions:

1) Place ESXi into Maintenance Mode
2) Download patch and place zip file into datastore/patch
3) SSH into 192.168.1.41 and log in as root
4) Install the patch with this command: esxcli software vib update -d "/vmfs/volumes/datastore_HDD/patch/PatchName.zip"
5) Verify the patch was installed: esxcli software vib list
6) Reboot the system: reboot
7) Remove ESXi from Maintenance Mode
8) Cleanup by removing the zip file from "patch" directory
 

Dice

Wizard
Joined
Dec 11, 2015
Messages
1,410
@joeschmuck have you tried benchmarking performance of file transfers between your freenas VM/shares and ...something else? (ideally windows/CIFS)?
I realize that my own 'biggest selling point' to go all in on the virtualizing route including freenas, (managed to get win7&pfsense up neatly on my testbench) - has to do with the transferspeeds between VM's.
Any input? (anyone welcome to chime in ofc).

Cheers /
 
Last edited:

Spearfoot

He of the long foot
Moderator
Joined
May 13, 2015
Messages
2,478
@joeschmuck have you tried benchmarking performance of file transfers between your freenas VM/shares and ...something else? (ideally windows/CIFS)?
I realize that my own 'biggest selling point' to go all in on the virtualizing route including freenas, (managed to get win7&pfsense up neatly on my testbench) - has to do with the transferspeeds between VM's.
Any input? (anyone welcome to chime in ofc).

Cheers / Dice
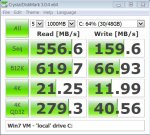
I've been running FreeNAS 9.x on ESXi 6 for nearly a year now. I set my systems up very much the same way as @joeschmuck, using Ben Bryan's instructions as linked above. I found NFS more reliable than iSCSI as a datastore and that's what I use for my ESXi VM datastore. I also configured a storage network on a VMware virtual switch separate from the wired LAN, as Ben describes.

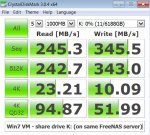
Overall, it delivers transfer speeds comparable to a system running on the bare metal, i.e., it will saturate a gigabit LAN. Virtual machines homed on the same server as FreeNAS get much better transfer rates attaching to shares.

Here's a CrystalDiskMark screenshot from a Win7 VM, run against its local drive C:
win7-vm-local-drive-c.jpg

The same Win 7 VM, run against a share on the same FreeNAS server:
win7-vm-share-drive-k-same-server.jpg

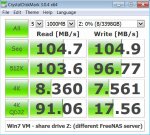
And lastly, the same Win7 VM, run against a share on a different virtualized FreeNAS server:
win7-vm-share-drive-z-different-server.jpg

The latter is typical of the transfer rates I get when attaching to either of my virtualized FreeNAS servers from my workstation PC and other systems on the LAN.
 

joeschmuck

Old Man
Moderator
Joined
May 28, 2011
Messages
10,996
@Dice I have not done any benchmarks but I do know that my throughput is slightly slower than when I'm on a pure metal machine but I'm certain that is because I have not tuned the system at all. My typical CIFS throughput from my main computer to the FreeNAS VM is running in the 80MB/sec. I will eventually start to tweak my system to give it better performance but when I say I'm taking my time with my system, I was very serious. I can say I believe my system to be 100% stable right now. I have not rebooted ESXi in over a month and have been running FreeNAS, Ubuntu, and a single Windows 7 VM, along with other VMs I've been playing around with and we are rock solid. I may start tweaking ESXi to make FreeNAS better but I need to sit down and see what modifications would be best to do first and document what I do so if something goes wrong, I can back track and hopefully figure out what I did wrong.

As for transfer speeds between ESXi VMs on the same hardware, if using the VMXNET3 driver then you could achieve extremely high throughputs, but you must use that VMXNET3 driver, the E1000 drive is just slow (but it's a good starting point). I will eventually get to using that driver but first I need to get by backup NAS back online and backup all my data again (only changes since last month so not too much data).

So I guess I will get started on some benchmarks since I need to have a starting point. I like to use a few benchmark tests, one is the IBM NAS tool (can't recall the name off the top of my head) and a few other simple but common tests. If you have a specific benchmark which I can run in Windows, I'll give it a go.
 

joeschmuck

Old Man
Moderator
Joined
May 28, 2011
Messages
10,996
I did some quick testing and changes but I have yet to achieve the throughput I desire. I believe I will need to move a single SATA cable across my two controllers to balance out the throughput better and see if that makes a difference. I just upgraded to FreeNAS 9.10 so i could use the VMXNET3 driver and it with an MTU of 9000 I did squeeze slightly more out of it. Here is my throughput and of course it's for CIFS. If I figure out how to get more out of my system, I'll post it. Also I will drop my MTU value back to 1500 just because the added throughput was so minor.

After 9000 mtu.JPG
 

Dice

Wizard
Joined
Dec 11, 2015
Messages
1,410
Very nice, thank you both.
I've done some 15 benchmarks in various situations corresponding to my typical use. I've not yet put FreeNAS on the same host, which not yet makes numbers comparable to yours. Trying to make sense of the results now.
At first glance, the E1000 driver is absolutely junk on win7. The VMXNET3 driver is outperforming the E1000 by miles when working with large files.

Cheers /
 
Last edited:

jgreco

Resident Grinch
Joined
May 29, 2011
Messages
18,680
Yeah, there are cases where the E1000 will actually outperform VMXNET3 (and by a good bit). The big thing is that people see the "1000" in "E1000" and think it means the adapter is limited to 1Gbps. It isn't. Just as with the VMXNET3 stuff, it talks to the vSwitch as fast as it can. I suspect it really boils down to whether or not VMware has spent time optimizing the VMXNET3 driver for a given platform. In *theory* VMXNET3 should be faster. In practice it can be a real piece of ****, especially if you inadvertently do something like an upgrade where suddenly you need a new version of the driver. The E1000 is likely to just keep plugging right along.
 

joeschmuck

Old Man
Moderator
Joined
May 28, 2011
Messages
10,996
Here is another benchmark snapshot, it's a bit better and I can explain why... The previous testing was done via RDP so there was some additional network traffic slowing down the testing. Also, I will retain using the VMXNET3 driver for a while to see how stable things are. If it keeps working then I'll keep it but at least I can roll back to the E1000 adapter if needed. Now I need to go clean up a mess. I boiled some hotdogs and left one in the pot, with the heat still on. Man it stinks in the kitchen and that pot looks like I burned some cheese in it.

After 9000 mtu.JPG


EDIT: I moved my SATA cables around to spread the bandwidth evenly, I was correct thinking that it wouldn't make any difference. The cards I purchased are pretty fast. So my slowness comes from just ESXi and maybe there is some tweaking I can do. On a bare metal machine I should be able to come close to saturation so I need to learn a little more about ESXi. But first, I have to take apart a laptop and replace the CPU fan. It's a complete gut job too, this is going to be a mess. Hope I don't have any extra screws left over when I'm done.
 
Last edited:

Dice

Wizard
Joined
Dec 11, 2015
Messages
1,410
I boiled some hotdogs and left one in the pot, with the heat still on. Man it stinks in the kitchen and that pot looks like I burned some cheese in it.
>.<
 

joeschmuck

Old Man
Moderator
Joined
May 28, 2011
Messages
10,996
Fixed my dad's laptop, had the take the entire laptop apart to replace the CPU fan and it wasn't too bad, 2 hours to do the work. Now I'm thinking about installing a SSD for him just to speed up his tired laptop. Of course a clean Windoze installation would also be helpful but I'm not sure I want to put that much work into it.

About my file transfer speeds, with everyone off the internet and slowing down my LAN, I was transferring large files (a few mp4 movies about 1.4GB in size) at 95 to 107 MB/sec from my main computer to the FreeNAS and then transferring from the FreeNAS server to my main computer a different mp4 movie file (6GB in size) was averaging 108MB/sec. These are values reported by Windows which are not highly accurate but still a decent representation.
 

Spearfoot

He of the long foot
Moderator
Joined
May 13, 2015
Messages
2,478
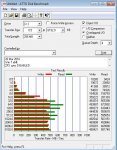
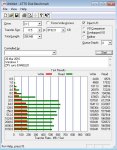
@joeschmuck, do you have a ZIL device? I installed one (an Intel S3700) last month. Before that I ran my NFS datastore with synchronous writes disabled. (I know, I know... you're not supposed to do that. But it wasn't my 'production' server and I like living on the edge!). Here is a Win7 VM ATTO benchmark run w/ sync disabled:
IntelSSD-ZIL-sync-disabled.jpg

And the same test with sync enabled:
IntelSSD-ZIL-sync-enabled.jpg

You can easily see the write performance hit with sync enabled, though, to be honest, I don't really perceive the difference in day-to-day use. It's still pretty fast...
 

Ericloewe

Server Wrangler
Moderator
Joined
Feb 15, 2014
Messages
20,194
Now I'm thinking about installing a SSD for him just to speed up his tired laptop. Of course a clean Windoze installation would also be helpful but I'm not sure I want to put that much work into it.
Oh, I remember when I did that on my Sony laptop.

"Here's this awesomesauce brand new 128GB Samsung 830... Damn, I can't easily fit my desktop's system partition on 128GB. I guess I'll try it on the laptop..."
"Holy crap, I'm never buying a laptop without an SSD ever again!"
 

joeschmuck

Old Man
Moderator
Joined
May 28, 2011
Messages
10,996
"Holy crap, I'm never buying a laptop without an SSD ever again!"
Actually I price compare because often it's cheaper to install the SSD yourself, but I agree with you, SSD is the only way to go for a laptop.
 
Status
Not open for further replies.
Top