
salsacalientemuy
Dabbler
- Joined
- Jul 10, 2018
- Messages
- 25
This is an updated version of this guide for 11.1-U5
In the previous guide there ended up being a lot of questions about permissions, so I'll include creating the dataset and share from the beginning in this guide.
In order to use these plugins properly, you will need to have a usenet provider account, and indexers.
DISCLAIMER: This guide follows the steps for permissions as recommended by FreeNAS in this video. However I have had multiple issues with permissions in windows. Sometimes it will work as expected, and then other times I cannot connect no matter what credentials I am using. After doing research, it seems that many users are having issues with SMB permissions after the 11.3 update. Right now I currently recommend either allowing guest access, or adding the same username and password that you use in windows to provide passthrough authentication. If you are able to find a solution that fixes this issue feel free to post a reply.


Now your new windows share is mapped as a drive, and you should be able to access it.
Now that we have our media share setup, we are going to create a new group and user that our plugins are going to use.


Next we will go ahead and create the jails for each of our plugins. Navigate to Jails > Add and then it will bring a wizard. On the first step select the default jail type, and then the release that corresponds with your version of freenas.


This completes what we need to configure from the CLI for sonarr, and now we will move on to radarr.
This completes what we need to configure from the CLI for radarr, and now we will move on to sabnzbd.

This completes what we need to configure from the CLI for sabnzbd, and now we will move on to transmission.

Now we are done configuring the plugins in the CLI and we can move onto configuring them from the web GUI. Save changes by typing ctrl+shift+x. Confirm with Y then enter.
the plugins can be found by typing in the jail ip address with the appropriate port ex: 192.168.1.56:8080
The default ports for the plugins are as follows
Sabnzbd: 8080
Sonarr: 8989
Radarr: 7878
Transmission: 9091
First we will begin by configuring sabnzbd.
in the setup wizard it will prompt you to enter your usenet server information. If this is not done here, it can be done under config>servers. (be sure to test the connection also)
Next under config>folders set the following.
Note: I do not personally use transmission to work with sonarr and radarr. As such I have not tested how the post processing and renaming is handled.
The only setting that needs to be set in transmission is to set the download path. Do this by navigating to edit preferences and then setting the path we created earlier /mnt/testmedia/downloads/transmission.
Now that transmission is setup, we can move on to sonarr, and radarr.
Note: Sonarr and Radarr are essentially the same, so I will only demonstrate how to setup Sonarr and these steps can be repeated for Radarr.
Note: With these steps select the test connection button each time you add an api to ensure that everything is working properly.
Under settings>indexers this is where you will want to add the indexers that you are subscribed to as mentioned in the beginning of the guide. It is recommended that you have 2 or 3 in the event that one crashes your service won't be interrupted.
Next under settings>download client this is where we will add sabnzbd and transmission.
Select add>sabnzbd
Repeat for radarr.
That's it, apart from some fine tuning according to your preferences, everything should be up and running.
I hope that this guide was helpful, and that you get good use out of it. I am planning on making a video to go along with it, and I will post that as soon as it's available.
I'm also happy to receive feedback on how this guide can be improved, or on any mistakes that you may have noticed.
In the previous guide there ended up being a lot of questions about permissions, so I'll include creating the dataset and share from the beginning in this guide.
In order to use these plugins properly, you will need to have a usenet provider account, and indexers.
DISCLAIMER: This guide follows the steps for permissions as recommended by FreeNAS in this video. However I have had multiple issues with permissions in windows. Sometimes it will work as expected, and then other times I cannot connect no matter what credentials I am using. After doing research, it seems that many users are having issues with SMB permissions after the 11.3 update. Right now I currently recommend either allowing guest access, or adding the same username and password that you use in windows to provide passthrough authentication. If you are able to find a solution that fixes this issue feel free to post a reply.
- First we will create a dataset for our media by navigating to storage > pools > Add Dataset
- Name the dataset and since we are using windows in this guide, set the share type to SMB. Leave all other options as default.
- Next we will add a windows share by navigating to Sharing > Windows Shares (SMB) > ADD
- Select the path of the dataset that we created, and leave the other options as default.
- Next we want to create the login credentials that we want will be using in windows and add that to the dataset. I prefer to create a group named users and add all new user accounts to that group just to keep things clean.
- Choose whatever group number you would like and name it.
- Next navigate to Accounts > Users > Add.
- Enter the name of the user, then the username that you would like to use in windows, and your password. Uncheck the new primary group box, and select users as the primary group. Leave all other options as default and click save.
- Next we need to add that user to the dataset by navigating to Storage > Pools > Edit ACL.
- Here we will select ADD ACL ITEM, and then a new entry will appear at the bottom. Now we want to add the user we just created by selecting Who = User, and User = computerlogin. Leave all other options as default.
- Next navigate to the share by opening windows explorer and entering "\\ipaddress" in the address bar.
- Right click the share we configured earlier and select map network drive. Select connect using different credentials.
- Here you will select More choices > Use a different account. Then you will enter the username and password that we created earlier in freenas.
Now your new windows share is mapped as a drive, and you should be able to access it.
Now that we have our media share setup, we are going to create a new group and user that our plugins are going to use.
- Go to Accounts > Groups > Add and take note of the group ID and name. In this case we will do 900 and testnewmedia.
- Next we will make a user to match the group by navigating to Accounts > Users > Add. We need to make sure the username and ID matches the group name and ID. The password can be set to anything you like. Ensure that you do not have the New Primary Group box checked. All other options can be left as default.
- Next we need to add this user to our media share. Navigate to Storage > Pools > Edit ACL. You will select Add ACL Item and then choose user and testnewmedia. Leave the other options for this entry as default. Make sure you select Apply permissions recursively if you have any existing items in the share.
Next we will go ahead and create the jails for each of our plugins. Navigate to Jails > Add and then it will bring a wizard. On the first step select the default jail type, and then the release that corresponds with your version of freenas.
- On the second step we need to select the proper network configuration. Select the VNET Option, and then on IPv4 Interface select vnet0. Enter an IPv4 Address to create an address that is not already in use on your network. Under IPv4 select the Netmask the corresponds with your network (usually 24). Under IPv4 Default Router enter the IP address of your router. Leave all other options as default. Repeat this for each plugin that you want to install.
- Once this is complete you should have 4 jails in the down state.
- Before starting them, I recommend going to edit each jail and enabling the Auto-start option. This will ensure that your plugins start automatically in the event of a reboot.
- Next we need to add our media share to give the jail access. Select the dropdown for the jail and select mount points. Once here select Actions > Add and then select the path for the share we created. Your destination should be /mnt/testmedia. Leave Read-Only unchecked. Repeat this for each jail we created.
- Once you have the mount point added it should look like this.
- Now that the jails are all configured, we can turn them all on by selecting the check box for each one and selecting the start button.
- Now we will need to work through the command line to install the plugin and configure it. This can be done through putty, or you can simply access it directly by going to the jail dropdown and selecting shell. I will be using putty in this guide.
- Once you have logged into freenas, you can elevate your user to root priveleges by typing Code:
sudo su -
- Once you are in the root of FreeNAS you can type to see all of the jail information.Code:
iocage list
- To access the jail type .Code:
iocage console testsonarr
- Now that we are in the jail we are going to create our directories by running the following commands.
Code:
cd /mnt/testmedia
mkdir downloads
cd downloads
mkdir sabnzbd transmission
cd sabnzbd
mkdir complete incomplete
cd complete
mkdir movies tvshows
cd\
- Next we need to make sure the package system is up to date by running the following commands.
Code:
pkg update
pkg upgrade
- Next we are going to install the plugin and a text editor by running the following commands.
Code:
pkg install nano
pkg install sonarr
- Next we need to enable the plugin to run when the jail starts up, and start the service manually for the first time with these command.
Code:
sysrc sonarr_enable=YES
service sonarr start
- Now we will create the user that we added to the media share within the jail and give the plugin this user with these commands.
Code:
pw useradd -n testnewmedia -u 900 -d /nonexistent -s /usr/sbin/nologin

service sonarr onestop
chown -R testnewmedia:testnewmedia /usr/local/sonarr
sysrc 'sonarr_user=testnewmedia'
chown -R testnewmedia:testnewmedia /usr/local/share/sonarr
service sonarr start
This completes what we need to configure from the CLI for sonarr, and now we will move on to radarr.
- Once we are in the CLI for the radarr jail, we will continue by updating the package system with the following commands.
Code:
pkg update
pkg upgrade
- Next we will install the text editor and radarr with the following commands.
Code:
pkg install nano
pkg install radarr
- Next we need to enable the plugin to run when the jail starts up, and start the service manually for the first time with these commands.
Code:
sysrc radarr_enable=YES
service radarr start
- Next we need to create the new user and give the plugin that user with these commands.
Code:
pw useradd -n testnewmedia -u 900 -d /nonexistent -s /usr/sbin/nologin

service radarr onestop
chown -R testnewmedia:testnewmedia /usr/local/radarr
sysrc 'radarr_user=testnewmedia'
chown -R testnewmedia:testnewmedia /usr/local/share/radarr
service radarr start
This completes what we need to configure from the CLI for radarr, and now we will move on to sabnzbd.
- Once we are in the CLI for the sabnzbd jail, we will continute by updating the package system with the following commands.
Code:
pkg update
pkg upgrade
- Next we will install the text editor and sabnzbd with the following commands.
Code:
pkg install nano
pkg install sabnzbdplus
- Next we need to enable the plugin to run when the jail starts up, and start the service manually for the first time with these commands.
Code:
sysrc sabnzbd_enable=YES
service sabnzbd start
- Next we need to create the new user and give the plugin that user with these commands.
Code:
pw useradd -n testnewmedia -u 900 -d /nonexistent -s /usr/sbin/nologin

service sabnzbd onestop
chown -R testnewmedia:testnewmedia /usr/local/sabnzbd
sysrc 'sabnzbd_user=testnewmedia'
chown -R testnewmedia:testnewmedia /usr/local/share/sabnzbdplus
chown -R testnewmedia:testnewmedia /var/run/sabnzbd
service sabnzbd start
- Now we need to change the following line of code in the sabnzbd config by running the following command.
Code:
nano /usr/local/sabnzbd/sabnzbd.ini
- Change the host line to host = 0.0.0.0 This will enable you to access sabnzbd on your jail ip address. Save changes by typing ctrl+shift+x. Confirm with Y then enter.
- Next start and stop sabnzbd with the following commands.
Code:
service sabnzbd onestop
service sabnzbd start
This completes what we need to configure from the CLI for sabnzbd, and now we will move on to transmission.
- Once we are in the CLI for the transmission jail, we will continue by updating the package system with the following commands.
Code:
pkg update
pkg upgrade
- Next we will install the text editor and transmission with the following commands.
Code:
pkg install nano
pkg install transmission
- Next we need to enable the plugin to run when the jail starts up, and start the service manually for the first time with these commands.
Code:
sysrc transmission_enable=YES
service transmission start
- Next we need to create the new user and give the plugin that user with these commands.
Code:
pw useradd -n testnewmedia -u 900 -d /nonexistent -s /usr/sbin/nologin

service transmission onestop
chown -R testnewmedia:testnewmedia /usr/local/etc/transmission
sysrc 'transmission_user=testnewmedia'
chown -R testnewmedia:testnewmedia /usr/local/share/transmission
service transmission start
- Now we need to stop the transmission service and change the following line of code in the sabnzbd config by running the following command.
Code:
service transmission onestop
nano /usr/local/etc/transmission/home/settings.json
- Change the "'rpc-whitelist-enabled': true" line to false.
- Next start transmission with the following commands.
Code:
service transmission start
Now we are done configuring the plugins in the CLI and we can move onto configuring them from the web GUI. Save changes by typing ctrl+shift+x. Confirm with Y then enter.
the plugins can be found by typing in the jail ip address with the appropriate port ex: 192.168.1.56:8080
The default ports for the plugins are as follows
Sabnzbd: 8080
Sonarr: 8989
Radarr: 7878
Transmission: 9091
First we will begin by configuring sabnzbd.
in the setup wizard it will prompt you to enter your usenet server information. If this is not done here, it can be done under config>servers. (be sure to test the connection also)
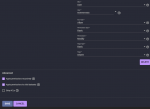
Next under config>folders set the following.
- Temporary Download Folder = /mnt/media/downloads/sabnzbd/incomplete
- Completed Download Folder = /mnt/media/downloads/sabnzbd/complete
- Category = tv , Folder/Path = tv
- Category = movies , Folder/Path = movies
- Abort jobs that cannot be completed = [√]
- Action when encrypted RAR is downloaded = Abort
- Extra PAR2 Parameters = -t+
Note: I do not personally use transmission to work with sonarr and radarr. As such I have not tested how the post processing and renaming is handled.
The only setting that needs to be set in transmission is to set the download path. Do this by navigating to edit preferences and then setting the path we created earlier /mnt/testmedia/downloads/transmission.
Now that transmission is setup, we can move on to sonarr, and radarr.
Note: Sonarr and Radarr are essentially the same, so I will only demonstrate how to setup Sonarr and these steps can be repeated for Radarr.
Note: With these steps select the test connection button each time you add an api to ensure that everything is working properly.
Under settings>indexers this is where you will want to add the indexers that you are subscribed to as mentioned in the beginning of the guide. It is recommended that you have 2 or 3 in the event that one crashes your service won't be interrupted.
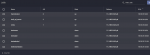
Next under settings>download client this is where we will add sabnzbd and transmission.
Select add>sabnzbd
- name = sabnzbd
- host = IP address of sabnzbd
- api key = (found in sabnzbd config>general)
- name = transmission
- host = IP address of transmission
Repeat for radarr.
That's it, apart from some fine tuning according to your preferences, everything should be up and running.
I hope that this guide was helpful, and that you get good use out of it. I am planning on making a video to go along with it, and I will post that as soon as it's available.
I'm also happy to receive feedback on how this guide can be improved, or on any mistakes that you may have noticed.
Attachments
Last edited: