HOWTO: setup a pair of larger SSDs for boot pool and data

Patrick M. Hausen

Hall of Famer
Joined
Nov 25, 2013
Messages
7,776
How do I get space out of freebsd-zfs and into the free space so I can create the additional partition for my jails/plugins?
You can't. It is not possible to shrink the partitions. You need to install to a USB drive of the desired size (e.g. 16 or 32 GB), then manually mirror the smaller partition to your two SSDs. Which is precisely the point of my instructions above.
 

ato

Dabbler
Joined
Aug 2, 2012
Messages
10
Disconnect one drive from the mirror, partition it as you want and prepare for UEFI boot,
copy boot-pool to it, boot from it, and as a last step prepare an 'old' drive to be mirror: copy partition table and efi partition from 'new',
and finally attach 'old' as a 'new' mirror.
 

Patrick M. Hausen

Hall of Famer
Joined
Nov 25, 2013
Messages
7,776
copy boot-pool to it, boot from it,
How do you copy the pool to a smaller partition? Seriously if you have a solution for that step, my entire "dance" with the thumb drive becomes obsolete ...
 

ato

Dabbler
Joined
Aug 2, 2012
Messages
10
Of course I assume that his boot-pool real data is small how it is usually (eg. <2G in my case) so zfs export + import
 

Patrick M. Hausen

Hall of Famer
Joined
Nov 25, 2013
Messages
7,776
You mean zfs send | zfs receive? zpool export; zpool import does not copy anything. But in that case you need to create a new pool under a new name as the target for zfs receive. And you cannot rename it to "boot-pool" later, because you already have one "boot-pool" mounted. And you cannot export that one because you are running the system from it. So you cannot rename it to e.g. "old-boot-pool", either.

What you suggest can be done if you boot a stock FreeBSD from CD/DVD/USB and use the live system to manipulate the pools but I don't see a way to do it from an installed and running TrueNAS. That's why I devised the procedure with an intermediate USB drive.
 

mattyv316

Dabbler
Joined
Sep 13, 2021
Messages
27
Thank you guys for the quick replies. I originally had my install on USB, inserted 2 new SSDs and tried the steps in the first thread, but zpool and gpart would not even see the 2 SSDs for me to do any copying to. That's why I tried to just start with a mirrored SSD install and adjust the partitions.
I am not sure why the SSDs wouldn't show in command line tools, but did in the UI.
Yesterday, I re-tried the steps in the original post (but changed to UEFI. I was using a BIOS install prior). Not sure if changing to UEFI was the difference, or that the first time I tried, the SSDs were never formatted, but I was able to get it to work. The only issue I have now, is that the SMART service will not start. It fails every time I try to start it.
I will need to get back to this over the next couple days, but I think I am going to try starting over from the new install on USB and see how that goes.
 

Patrick M. Hausen

Hall of Famer
Joined
Nov 25, 2013
Messages
7,776
Probably SMART simply does not work with your SSDs attached to that RAID controller. I would agree that for a boot device the common advice to avoid these RAID controllers at all costs can be ignored. You even have a mirrored pair - so all's well.

Just go to Storage --> Disks and disable SMART for these two drives and the service will probably start. So you get the SMART monitoring for your data drives which is much more important.
 

ato

Dabbler
Joined
Aug 2, 2012
Messages
10
You mean zfs send | zfs receive? zpool export; zpool import does not copy anything. But in that case you need to create a new pool under a new name as the target for zfs receive. And you cannot rename it to "boot-pool" later, because you already have one "boot-pool" mounted. And you cannot export that one because you are running the system from it. So you cannot rename it to e.g. "old-boot-pool", either.

What you suggest can be done if you boot a stock FreeBSD from CD/DVD/USB and use the live system to manipulate the pools but I don't see a way to do it from an installed and running TrueNAS. That's why I devised the procedure with an intermediate USB drive.
Yes it is possible to create second boot-pool on disk using another name for in-core pool using -t option. I just checked it and it works.
This problem is also solved (in another way) in FreeNAS installer in "upgrade" mode - please take a look at /etc/install.sh on FreeNAS install iso
Matty - if you really want do it please study install.sh - functions: install_loader, create_partitions and partition_disks. They are quite readable.
I just extracted it for you: https://ftp2.zet.pw.edu.pl/pub/BSD/TrueNAS/zetis/bin/install.sh
 

Patrick M. Hausen

Hall of Famer
Joined
Nov 25, 2013
Messages
7,776
Yes it is possible to create second boot-pool on disk using another name for in-core pool using -t option.
TIL - thanks.
 

mattyv316

Dabbler
Joined
Sep 13, 2021
Messages
27
I finally have it running.
Patrick, you were correct about SMART not liking the SSD on the embedded controller. It actually didn't like any of the drives on that controller. Drives 0 and 1 were the SSD boot mirror, but it also did not like the (6) 4TB WD Red SATA drives in the other 6 bays. As soon as I connected my NetApp DS4246 via LSI SAS9207-8e, all 24 drives had SMART enabled and the service started no problem.
ato, thank you for taking the time. I have downloaded the extracted install.sh and will look at it. I probably won't do a re-install, but I am interested to look deeper into your suggestion.
Thanks again to both of you
 

karolyi

Cadet
Joined
Oct 24, 2021
Messages
2
Thought I'd add my 2 cents. I'm new to TrueNAS, still figuring out my ways with it, but I'm not new to FreeBSD, I have FreeBSD servers since 15+ years.

The way I installed TrueNAS on my SSD on a 50GB boot partition is the following. This applies for EFI booting, your data on the SSD drive will be lost if you don't back it up beforehand.

- Boot up the USB installer and install the system as if it were installed normally on the entire SSD.
- After the installation, don't reboot, go to shell.
- zfs snapshot and zfs send the boot-pool snapshot to somewhere it will be kept, recursively (zfs send -vR)
- zpool export boot-pool
- gpart delete the partition of the boot-pool (I even deleted the suggested 16GB swap as I recreated it with 4GB)
- gpart add swap, gpart add the boot pool partition as 50G (in my case, gpart add -t freebsd-zfs -s 50G ada0)
- gpart add another partition as the partition for the data/iocage jails
- zpool create -F boot-pool, from the created partition (ada0p3 in my case)
- zfs recv the snapshot from the place you exported it, back to the freshly created boot-pool
- zpool set rootfs=boot-pool/ROOT/default boot-pool <- this way zfs will know where to continue loading after loading the EFI boot
- zpool create ssd-storage with the partition remaining on the SSD (ada0p4 in my case)
- reboot, go to the UI, get a rootshell
- zpool export ssd-storage
- import the storage from the UI

The trick here is, I only deleted the partitions necessary, and kept the EFI partition with its data. After recreating the proper partitions, I copied (received) the boot-pool back to the previously made smaller partition so the system could boot. All I missed was the fact that the pool has to be imported from the UI afterwards.

Voila!
 

Scampicfx

Contributor
Joined
Jul 4, 2016
Messages
125
@Patrick M. Hausen Thanks for this guide.
Anyway, I have difficulties.

My boot-pool consists of one m.2 disk (nvd0) and for redundancy purpose, I would like to create a mirror out of it and attach two more SSDs to it (ada0 and ada1).

zpool status boot-pool
Code:
  pool: boot-pool
 state: ONLINE
  scan: scrub repaired 0B in 00:00:03 with 0 errors on Tue Oct 26 03:45:03 2021
config:

        NAME        STATE     READ WRITE CKSUM
        boot-pool   ONLINE       0     0     0
          nvd0p2    ONLINE       0     0     0


Now, I would like to add ada0 and ada1 to this boot-pool.

gpart show nvd0
Code:
=>       40  488397088  nvd0  GPT  (233G)
         40     532480     1  efi  (260M)
     532520   33554432     3  freebsd-swap  (16G)
   34086952  454295552     2  freebsd-zfs  (217G)
  488382504      14624        - free -  (7.1M)


gpart show ada0
Code:
gpart: No such geom: ada0.


gpart show ada1
Code:
gpart: No such geom: ada1.


What I did so far:

gpart backup nvd0 | gpart restore -F ada0
gpart show ada0

Code:
=>       40  500118112  ada0  GPT  (238G) [CORRUPT]
         40     532480     1  efi  (260M)
     532520   33554432     3  freebsd-swap  (16G)
   34086952  454295552     2  freebsd-zfs  (217G)
  488382504   11735648        - free -  (5.6G)


zpool attach boot-pool nvd0p2 ada0p2
dd if=/dev/nvd0p1 of=/dev/ada0p1

Code:
532480+0 records in
532480+0 records out
272629760 bytes transferred in 29.901127 secs (9117709 bytes/sec)


The boot pool thereafter was looking like this:
Code:
  pool: boot-pool
 state: ONLINE
  scan: resilvered 2.43G in 00:00:06 with 0 errors on Sat Oct 30 13:38:52 2021
config:

        NAME        STATE     READ WRITE CKSUM
        boot-pool   ONLINE       0     0     0
          mirror-0  ONLINE       0     0     0
            nvd0p2  ONLINE       0     0     0
            ada0p2  ONLINE       0     0     0


however, as you can see, gpart show ada0 shows [CORRUPT] after ada0 GPT (238G)


That's the point I became scared and therefore detached ada0 again from boot-pool and reverted to original configuration. What did I do wrong?
 

Patrick M. Hausen

Hall of Famer
Joined
Nov 25, 2013
Messages
7,776
No idea. Try gpart recover ada0 and post the results.
 

acdoussan

Cadet
Joined
Nov 6, 2021
Messages
2
Not sure if anyone has thought about this or tried it yet, but think I just found a WAY easier way to do this. If you are installing fresh from start, or do not care about your existing install, you can run the installer and install to your SSD AND the flash drive at the same time, just select them all on the installer. This will create the partitions with the flash drive size on the SSDs, but leave the extra space open. Once the install is finished, reboot, unplug the flash drive and remove it from the pool.

Code:
zpool offline boot-pool <flash drive>
zpool detach boot-pool <flash drive>


Attached are a couple of screenshots to show how this looked once it was done.
 

Attachments

  • d9cc6bb4452c9a8efde61f1a2e58ba9b.png
    d9cc6bb4452c9a8efde61f1a2e58ba9b.png
    9.5 KB · Views: 371
  • 9031cf4b9d4c1c46aedfc81add53f49c.png
    9031cf4b9d4c1c46aedfc81add53f49c.png
    24.2 KB · Views: 497

acdoussan

Cadet
Joined
Nov 6, 2021
Messages
2
Not sure if anyone has thought about this or tried it yet, but think I just found a WAY easier way to do this. If you are installing fresh from start, or do not care about your existing install, you can run the installer and install to your SSD AND the flash drive at the same time, just select them all on the installer. This will create the partitions with the flash drive size on the SSDs, but leave the extra space open. Once the install is finished, reboot, unplug the flash drive and remove it from the pool.

Code:
zpool offline boot-pool <flash drive>
zpool detach boot-pool <flash drive>


Attached are a couple of screenshots to show how this looked once it was done.
Also, I was also having the same issue as others where I was getting the "can only attach to mirrors and top-level disks" error message, due to mismatched block sizes. Installing in this manner allowed me to get around that without manually setting block sizes and having the warning message when running "zpool status boot-pool"
 

Alex_c2616

Cadet
Joined
Dec 17, 2021
Messages
1
This is pure gold, thank you so much for this complete, yet clear and short tutorial!
Many of us definetly been wanting this. Can't believe it's not a baked in feature yet!

Once again, thank you very much Sir!
 

kknas

Cadet
Joined
Feb 12, 2015
Messages
8
Not sure if anyone has thought about this or tried it yet, but think I just found a WAY easier way to do this. If you are installing fresh from start, or do not care about your existing install, you can run the installer and install to your SSD AND the flash drive at the same time, just select them all on the installer. This will create the partitions with the flash drive size on the SSDs, but leave the extra space open. Once the install is finished, reboot, unplug the flash drive and remove it from the pool.

Code:
zpool offline boot-pool <flash drive>
zpool detach boot-pool <flash drive>


Attached are a couple of screenshots to show how this looked once it was done.
Thank you, @acdoussan. I could reproduce your approach by installing on both a 64 GB USB stick and a larger M.2 SATA SSD that now hosts my jails in addition to the boot pool. Also thanks to @Patrick M. Hausen for the original how-to.
 

ZFS-2012

Cadet
Joined
Dec 31, 2021
Messages
3
Great thread!

Just wanted to chime in and confirm the slight mod on this approach works well.

I wanted to boot with dual NVMe drives, two SAMSUNG 980 M.2 2280 250GB. Have been doing some eval of TrueNAS 12, and was at a point to wipe and start over (again). So I did the following:

- Temporarily attached a 16 GB USB thumb drive
- Fresh install, and selected 3 drives for boot-pool: The 16 GB USB plus the two NVMe drives
- This created a 3-way mirror, but partition was limited to size of 16 GB USB drive
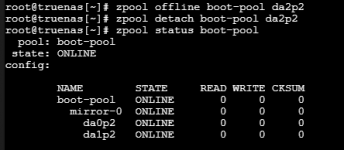
- After installed removed USB drive from pool

End up with proper UEFI boot, already built out mirror on NVMe for boot-pool.

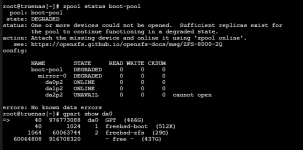
Was now fighting with TrueNAS to setup dual 16 GB swap, one on each. Prior to then creating ZFS mirror vdev on remaining NVMe free space. But having issues because of course TrueNAS always wants to do it's own thing, and admitely I haven't yet figured enough of the "middle-ware" to successfully tame it. I did find this thread on scheduling a post init script to do swapon stuff:


If I recall, when I did install direct to dual mirrored NVMe, it automagically created swap and a 16 GB GELI device? Not sure if anyone has advice on how to recreate that after doing this workaround for boot-pool and usable zpool on dual NVMe / SSD. In such a way that it plays well with TrueNAS base config files, and is persistent between reboots, with out janky work arounds. Might be handy to have in the thread.

Given how much fighting it takes to get more advanced setup out of TrueNAS, not sure I will continue down this path. Only feedback I can give to any devs reading posts: More flexibility would be nice. Seems a large number of users would be more than capable of properly using advanced installs. Options for shared partitioning on boot devices. Ability to better control swap partitions. I see a lot of comments, threads such as this one, on how to hack your way around not only built-in, but practically forced limitations. Food for thought.
 

raidflex

Guru
Joined
Mar 14, 2012
Messages
531
Not sure if anyone has thought about this or tried it yet, but think I just found a WAY easier way to do this. If you are installing fresh from start, or do not care about your existing install, you can run the installer and install to your SSD AND the flash drive at the same time, just select them all on the installer. This will create the partitions with the flash drive size on the SSDs, but leave the extra space open. Once the install is finished, reboot, unplug the flash drive and remove it from the pool.

Code:
zpool offline boot-pool <flash drive>
zpool detach boot-pool <flash drive>


Attached are a couple of screenshots to show how this looked once it was done.

I just wanted to confirm will this process work installing to 2 SSDs + USB? Meaning I can choose 2 SSDs and the USB and then detach the USB, to leave the two SSD's in a mirror with the smaller boot partition.
 
Top