
Glorious1
Guru
- Joined
- Nov 23, 2014
- Messages
- 1,211
After I set up FreeNAS and got comfortable with it, I began to explore accessing it remotely over the internet. Not being a computer professional, I was surprised to find out how often people were sniffing around trying to get in. If you want to see for yourself, just give yourself a super-secure password and forward port 22 on your router to the server, and keep an eye on /var/log/auth.log. You’ll get lots of visitors, and if you don’t shut down that port pretty soon, eventually the contents of your server will probably be in strangers’ hands and you’ll be mining bitcoins for someone and acting as a proxy server for child pornography or something. And of course a visit from @RussianMafia is a distinct possibility  HTTP access is less secure, and even HTTPS access relies entirely on your password, which can eventually be cracked if someone is determined.
For common mortals, the best approach is to put all remote access to your server over SSH with public key authentication. This gives you encrypted communication AND a secure authentication scheme. This means a private key on your client computer must correspond to a public key on the FreeNAS server. The keys are not even sent between the machines. The client provides a single-use, randomized derivation that proves it has the private key, but which can’t lead to the key by an inverse operation, except with the public key. It’s all very cool and mysterious. The private key is (at least should be) encrypted with a passphrase. If your client computer is stolen or hacked, thieves will have to crack the passphrase, hopefully giving you time to remove the public key from the server.
These instructions are from the point of view of a Mac or other unix-like client computer. Windows operations should be readily translatable. It is recommended that you do not attempt this until your FreeNAS setup is otherwise fully configured and working well, and you are familiar with managing it and can comfortably use SSH over the local network.
Setting Up Keys
A key pair is normally generated on the client computer. First see if there is a ~/.ssh folder on your client. Some implementations of ssh-keygen (such as Mac OS X) will create the folder for you while generating the keys. If unsure, make one with “mkdir -m 700 ~/.ssh”. Generate the keys with ssh-keygen. This will generate an RSA key pair by default (although some have reported they only had success after specifying the type with
Now copy the public key into the file ~/.ssh/authorized_keys on the server:
SSH Settings
In the FreeNAS WebGUI, go to Services > SSH > Settings.

Now you can SSH into the server locally with “ssh <you>@<IPaddress>:<port number>” (If you haven't changed the SSH port on FreeNAS, leave out the colon and port number; it will default to 22). You will be prompted for the passphrase to unlock your private key. Depending on your system, the key will subsequently be provided by ssh-agent without entering the passphrase until you log out of the client.
Dynamic DNS
To SSH remotely over the internet, you need either a permanent IP address or a domain name that is updated to point to the IP address when it changes. The latter requires a dynamic domain name service. A good free one is DuckDNS (duckdns.org). First, use one of the sign-in options such as Google. In the domain line enter your preferred subdomain name. If it is available, that’s it; you will see a token (long sequence of random characters). Copy it.
Then you need to tell FreeNAS how to update the dynamic DNS server at DuckDNS. FreeNAS has a Dynamic DNS service that can take care of this if your service is listed (DuckDNS isn’t), but doing it yourself is easy. As outlined nicely by RoboKaren:

And that's it. You may want to run:
/usr/local/bin/curl https://www.duckdns.org/update/<subdomain>/<token>
from your user account first to make sure that the command actually works. If it does, it should return “OK”. If there is some sort of a problem, it'll return “KO”.
Port Forwarding
Now you need to forward the SSH port from your router to the server. Find instructions for your router. As an example, for a Motorola SurfBoard SBG6580, go to Advanced > Forwarding, click “Create IPv4”, and enter as in the left figure (using something different for the external port, and your server’s local IP). In this modem, you can forward the external port number to a different-numbered local port. The second figure shows settings for a Zyxel C3000Z (accessed via Advanced Setup > Security: Port Forwarding). In that modem, local and external ports must be the same (as the port set above in FreeNAS SSH settings).


If you choose to use the same port number externally and locally, you will need to put that port number in the FreeNAS GUI in the SSH Settings. Then, accessing your server via SSH remotely would be “ssh -p 52739 <you>@<subdomain>.duckdns.org”.
SSH Tunneling – web access
It seems you can tunnel just about anything through SSH, though I haven’t tried sending a pizza through yet. I haven’t figured out a single SSH command that will set up tunneling for everything, so I’ve divided it into two parts. The following services can be accessed remotely by tunneling web access through SSH
First open the SSH tunnel: ssh -D 15443 -p 52739 <subdomain>.duckdns.org
“-D 15443” specifies an arbitrary, high-numbered local port that listens for any local traffic. “-p 52739” specifies where that traffic will be forwarded: the external port on your server’s router that you have set to forward to the designated SSH port on your FreeNAS box.
IF NOT, AND YOU ONLY HAVE PUTTY:
A lot of people are having trouble setting up the equivalent command in Putty. I won't go through the whole Putty setup (you have to point it to your key file), but here are the two key screens to get the same effect as the ssh command above:


The first time, Firefox must be configured:

When you’re finished accessing your server, change Firefox’s proxy settings back to System. It will remember the manual proxy settings, so next time all you have to do is switch it back to the manual settings.
While operating through the tunnel, Firefox will behave as if you are on the local network with the server. So you can access the WebGUI, IPMI, WebDAV, and jails with the exact same URLs as you would on the local network. You can even control your router remotely the same way. For example, on my system the following URLs are used:
WebGUI https://192.168.0.2
IPMI https://192.168.0.3
Transmission http://192.168.0.4:9091/transmission/web
WebDAV https://192.168.0.2:51415/<share_name>
Although you can set up most of those services in FreeNAS as HTTPS, as I have, it probably isn’t necessary because it’s all going through an encrypted channel anyway.
Secure FTP (SSH File Transfer Protocol)
If you want to use an FTP client and access your files that way, you can set up an SFTP connection in one step. WinSCP, Cyberduck, and other programs can do the public key authentication and set up the SSH tunnel themselves. However you must be sure to choose the proper options. In Cyberduck for example, you must make sure you choose the connection type SFTP (SSH File Transfer Protocol). You should also choose “Use Public Key Authentication” in the connection dialog and enter the location for your private key, although Cyberduck is smart enough to use public key authentication if necessary, as it should be, and to get the private key from ssh-agent, if available.
To enable SFTP for various users that allows access specific to each user, generate a new key pair for each user and put the public key in the user’s ~/.ssh/authorized_keys file on the server. Each user should then have access corresponding to their established permissions.
Regular File Browsing and Manipulation
But who needs SFTP when you can connect to your shares on the server as if they were local volumes? This works with AFP and I’m sure it can be done with CIFS/SMB as well. To set up the tunnel:
This connects to your account on your server through your router’s external SSH port 52739. Any local traffic sent to port 15548 will be sent through the tunnel and then, in the server, will be sent to the AFP port 548. The “sleep 120” ensures that the tunnel will be automatically closed if at least 2 minutes have elapsed since it was opened and it is not in use (meaning server volumes are not mounted).
Now in the Finder choose Go > Connect to Server, and enter “afp://localhost:15548", simply saying to open an AFP connection to port 15548 on your local computer. Tell it to remember the URL for future use.
I know: it’s so nice to browse and edit your FreeNAS files over the internet this way, you feel a little uneasy, like there must be something wrong with it. Just enjoy!
Aliases
To make it easier to open SSH connections, you can set up aliases in your shell profile. For example, the command “sss” opens a straight-up SSH session, “ssw” opens a tunnel for web access, and “ssa” opens a tunnel for AFP (or CIFS, if you adjust the port numbers) access:
Troubleshooting
SSH is somewhat picky about permissions when it comes to key authentication, surely for good reason. If you have trouble, check these things.
HTTP access is less secure, and even HTTPS access relies entirely on your password, which can eventually be cracked if someone is determined.For common mortals, the best approach is to put all remote access to your server over SSH with public key authentication. This gives you encrypted communication AND a secure authentication scheme. This means a private key on your client computer must correspond to a public key on the FreeNAS server. The keys are not even sent between the machines. The client provides a single-use, randomized derivation that proves it has the private key, but which can’t lead to the key by an inverse operation, except with the public key. It’s all very cool and mysterious. The private key is (at least should be) encrypted with a passphrase. If your client computer is stolen or hacked, thieves will have to crack the passphrase, hopefully giving you time to remove the public key from the server.
These instructions are from the point of view of a Mac or other unix-like client computer. Windows operations should be readily translatable. It is recommended that you do not attempt this until your FreeNAS setup is otherwise fully configured and working well, and you are familiar with managing it and can comfortably use SSH over the local network.
Setting Up Keys
A key pair is normally generated on the client computer. First see if there is a ~/.ssh folder on your client. Some implementations of ssh-keygen (such as Mac OS X) will create the folder for you while generating the keys. If unsure, make one with “mkdir -m 700 ~/.ssh”. Generate the keys with ssh-keygen. This will generate an RSA key pair by default (although some have reported they only had success after specifying the type with
ssh-keygen -t rsa; guess it can't hurt). Press Enter to accept the default location and filename (~/.ssh/id_rsa). Then you will be prompted to create a passphrase for unlocking the private key. The corresponding public key will be stored in the same place and same name with “.pub” appended. Here's what the key generation looks like:Code:
tmpuser$ ssh-keygen
Generating public/private rsa key pair.
Enter file in which to save the key (/Users/tmpuser/.ssh/id_rsa):
Created directory '/Users/tmpuser/.ssh'.
Enter passphrase (empty for no passphrase):
Enter same passphrase again:
Your identification has been saved in /Users/tmpuser/.ssh/id_rsa.
Your public key has been saved in /Users/tmpuser/.ssh/id_rsa.pub.
The key fingerprint is:
f5:81:22:91:20:c2:af:2d:b7:47:16:a9:14:37:6a:2b tmpuser@Jims-MacBookPro.local
The key's randomart image is:
+--[ RSA 2048]----+
|o . ....         |
| o o o..   .     |
|  . + + . o .    |
|   = o . o . .   |
|  = o . S   .    |
| E = o           |
|  + +            |
|   . .           |
|    .            |
+-----------------+
tmpuser$
Now copy the public key into the file ~/.ssh/authorized_keys on the server:
- Easiest is to:
- Open id_rsa.pub on the client computer, and copy the ENTIRE contents of the file.
- In the FreeNAS WebGUI, open 'Account > Users', and double-click on your username (the one you will SSH with) to open the dialog.
- Then paste the text into the field 'SSH Public Key' and save; OR
- You can just copy over id_rsa.pub and rename it authorized_keys; OR
- If the file already exists and has a key in it, just make a new line and paste the contents there.
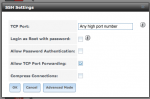
SSH Settings
In the FreeNAS WebGUI, go to Services > SSH > Settings.
- Set the FreeNAS SSH port. If you use an outward-facing port number that is arbitrary and high (1024–65535), you will log few to no break-in attempts, but it is questionable whether it actually adds security. The “key” thing is that you are using key authentication and an encrypted channel rather than plain-text communication and/or a password that can be picked up en route or cracked. In some modems, you can forward the high port number to port 22, and that's fine; in others the outward and inner port numbers have to be the same.
- Make sure “Login as Root with password” is unchecked. You can still log in via SSH as root (if you add the public key to /root/.ssh/authorized_keys), but it is generally not necessary as you can sudo or su from your user.
- Also uncheck “Allow Password Authentication”. Now only public key authentication can be used to log in.
- Check "Allow TCP Port Forwarding". This is apparently necessary for tunneling (below).
- You may need to stop and start the SSH service for settings to take effect.
Now you can SSH into the server locally with “ssh <you>@<IPaddress>:<port number>” (If you haven't changed the SSH port on FreeNAS, leave out the colon and port number; it will default to 22). You will be prompted for the passphrase to unlock your private key. Depending on your system, the key will subsequently be provided by ssh-agent without entering the passphrase until you log out of the client.
Dynamic DNS
To SSH remotely over the internet, you need either a permanent IP address or a domain name that is updated to point to the IP address when it changes. The latter requires a dynamic domain name service. A good free one is DuckDNS (duckdns.org). First, use one of the sign-in options such as Google. In the domain line enter your preferred subdomain name. If it is available, that’s it; you will see a token (long sequence of random characters). Copy it.
Then you need to tell FreeNAS how to update the dynamic DNS server at DuckDNS. FreeNAS has a Dynamic DNS service that can take care of this if your service is listed (DuckDNS isn’t), but doing it yourself is easy. As outlined nicely by RoboKaren:
- Login to your Freenas server GUI
- Go to Task > Cron Jobs > Add Cron Job
- Set up the new cron job:
- Set it to run as 'nobody'
- You can have it at 1 minute past the hour, every 12 hours (or less), every day of the week.
- The command to run is:
/usr/local/bin/curl https://www.duckdns.org/update/<subdomain>/<token>
where <subdomain> is your subdomain in subdomain.duckdns.org
and <token> is the long sequence of random characters from DuckDNS. - Note, if you set this up before and then it broke, you must now specify their domain as www.duckdns.org, not duckdns.org.
And that's it. You may want to run:
/usr/local/bin/curl https://www.duckdns.org/update/<subdomain>/<token>
from your user account first to make sure that the command actually works. If it does, it should return “OK”. If there is some sort of a problem, it'll return “KO”.
Port Forwarding
Now you need to forward the SSH port from your router to the server. Find instructions for your router. As an example, for a Motorola SurfBoard SBG6580, go to Advanced > Forwarding, click “Create IPv4”, and enter as in the left figure (using something different for the external port, and your server’s local IP). In this modem, you can forward the external port number to a different-numbered local port. The second figure shows settings for a Zyxel C3000Z (accessed via Advanced Setup > Security: Port Forwarding). In that modem, local and external ports must be the same (as the port set above in FreeNAS SSH settings).
If you choose to use the same port number externally and locally, you will need to put that port number in the FreeNAS GUI in the SSH Settings. Then, accessing your server via SSH remotely would be “ssh -p 52739 <you>@<subdomain>.duckdns.org”.
SSH Tunneling – web access
It seems you can tunnel just about anything through SSH, though I haven’t tried sending a pizza through yet. I haven’t figured out a single SSH command that will set up tunneling for everything, so I’ve divided it into two parts. The following services can be accessed remotely by tunneling web access through SSH
- WebGUI
- IPMI
- Transmission web interface
- WebDAV
First open the SSH tunnel: ssh -D 15443 -p 52739 <subdomain>.duckdns.org
“-D 15443” specifies an arbitrary, high-numbered local port that listens for any local traffic. “-p 52739” specifies where that traffic will be forwarded: the external port on your server’s router that you have set to forward to the designated SSH port on your FreeNAS box.
IF NOT, AND YOU ONLY HAVE PUTTY:
A lot of people are having trouble setting up the equivalent command in Putty. I won't go through the whole Putty setup (you have to point it to your key file), but here are the two key screens to get the same effect as the ssh command above:
The first time, Firefox must be configured:
- Go to Preferences (or Options) > Advanced > Network > Settings
- Check “Manual proxy configuration (or settings)”
- For “SOCKS Host” enter “localhost” and port “15443”
- Hit OK
When you’re finished accessing your server, change Firefox’s proxy settings back to System. It will remember the manual proxy settings, so next time all you have to do is switch it back to the manual settings.
While operating through the tunnel, Firefox will behave as if you are on the local network with the server. So you can access the WebGUI, IPMI, WebDAV, and jails with the exact same URLs as you would on the local network. You can even control your router remotely the same way. For example, on my system the following URLs are used:
WebGUI https://192.168.0.2
IPMI https://192.168.0.3
Transmission http://192.168.0.4:9091/transmission/web
WebDAV https://192.168.0.2:51415/<share_name>
Although you can set up most of those services in FreeNAS as HTTPS, as I have, it probably isn’t necessary because it’s all going through an encrypted channel anyway.
Secure FTP (SSH File Transfer Protocol)
If you want to use an FTP client and access your files that way, you can set up an SFTP connection in one step. WinSCP, Cyberduck, and other programs can do the public key authentication and set up the SSH tunnel themselves. However you must be sure to choose the proper options. In Cyberduck for example, you must make sure you choose the connection type SFTP (SSH File Transfer Protocol). You should also choose “Use Public Key Authentication” in the connection dialog and enter the location for your private key, although Cyberduck is smart enough to use public key authentication if necessary, as it should be, and to get the private key from ssh-agent, if available.
To enable SFTP for various users that allows access specific to each user, generate a new key pair for each user and put the public key in the user’s ~/.ssh/authorized_keys file on the server. Each user should then have access corresponding to their established permissions.
Regular File Browsing and Manipulation
But who needs SFTP when you can connect to your shares on the server as if they were local volumes? This works with AFP and I’m sure it can be done with CIFS/SMB as well. To set up the tunnel:
Code:
ssh -L 15548:localhost:548 -p 52739 <you>@<subdomain>.duckdns.org sleep 120
This connects to your account on your server through your router’s external SSH port 52739. Any local traffic sent to port 15548 will be sent through the tunnel and then, in the server, will be sent to the AFP port 548. The “sleep 120” ensures that the tunnel will be automatically closed if at least 2 minutes have elapsed since it was opened and it is not in use (meaning server volumes are not mounted).
Now in the Finder choose Go > Connect to Server, and enter “afp://localhost:15548", simply saying to open an AFP connection to port 15548 on your local computer. Tell it to remember the URL for future use.
I know: it’s so nice to browse and edit your FreeNAS files over the internet this way, you feel a little uneasy, like there must be something wrong with it. Just enjoy!
Aliases
To make it easier to open SSH connections, you can set up aliases in your shell profile. For example, the command “sss” opens a straight-up SSH session, “ssw” opens a tunnel for web access, and “ssa” opens a tunnel for AFP (or CIFS, if you adjust the port numbers) access:
Code:
alias sss='ssh -p 52739 <you>@<subdomain>.duckdns.org'
alias ssw='ssh -D 15443 -p 52739 <subdomain>.duckdns.org'
alias ssa='ssh -L 15548:localhost:548 -p 52739 <you>@<subdomain>.duckdns.org sleep 120'
Troubleshooting
SSH is somewhat picky about permissions when it comes to key authentication, surely for good reason. If you have trouble, check these things.
- At least on the server, the user's home directory should not have write permission for group or other.
- On both server and client, the .ssh directory and files in it must be owned by the user
- On both server and client, the .ssh directory should have permissions 700
- The authorized_keys file should have permissions 644
- The private key (id_rsa) should have permissions 600
Attachments
Last edited: