
dasti
Explorer
- Joined
- Jun 11, 2014
- Messages
- 71
16/5/2016 - tested on freenas 9.10 with deluge 3.12
Deluge is a lightweight torrent client based on libtorrent
Why do I like in Deluge ?
step 0 - preparation
your FreeNAS box must have a fully working internet connection
you must prepare the ip address you'll allocate to the jail we're going to create together
you must be able to access your freenas box through SSH
you have a dataset named "torrentsdatas" (if not, there's an explanation later in this guide)
your pool is named "mypool"
the jail and the user name are both "deluge"
step 1 - create a jail
create a jail in freenas web interface
name it "deluge"
you can choose to configure the ip address manually or let it be assigned by your dhcp server, it's up to you, but ultimatly you'll need the ip or the hostname to connect to deluge
step 2 - create a deluge user in the freenas web interface
Go in account / users and add a new user
username : deluge
comment : deluge bit torrent client
homedirectory : /nonexistant
disable login password : checked
Keep the user ID in mind, we will need this later

step 3 - connect to your freenas box in ssh
from linux
- open a shell and type
from windows
- download and install your favorite ssh client software (example superputty)
- use your client to connect to your FreeNAS box
step 4 - enter your jail
(so you'll be able to enter commands directly from inside the jail)
check how many jails you have and note the number ( jail Id = JID) or the name of your deluge jail (that should be "deluge" anyway)
you'll get a list of the jail looking like this
now that you confirmed that your jail name is "deluge", you can enter the jail with a command of this format -> jexec [JailName] tcsh
now the prompt should look like something like this -> root@deluge:/ #
step 5 - download the portstree structure
not necessary anymore step 6 - correct the "lib torrent rasterbar problem"
step 6 - create the deluge user in the jail
make sure to replace [ID] with the user ID you noted previously
step 7 - create a directory to store the deluge's config files
step 8 - install deluge
When you'll be prompted, make sure that GTK2 option is NOT installed, for the other compilations options, I just leave everything by default
not necessary anymore step 10 - replace the port's startup scripts with the ones from deluge website
exit with [crtl + X] and answer yes to save the file
save the existing startup script for the deluge daemon
create a new file
paste the content of this quote
exit with [crtl + X] and answer yes to save the file
give execute rights to the created files
step 9 - make sure that the deluge daemon will start automatically at startup
you can edit the /etc/rc.conf file with ee or just use these commands :
there are more parameters that can be
step 10 - start/stop the deluge daemon to create the configuration file
step 11 - control deluge
I'll describe 3 ways of doing it
- with the WEB user interface only
- with the GTK user interface only
- with both user interfaces
On windows
- deluged.exe is the daemon taking care of your torrents
- deluge.exe is the gtkUI
In freenas
- deluged is the daemon
- delugew or (deluge_web) is the daemon for the webUI
If you use the webUI only
- you'll need the delugew daemon to be launched to do that
- you can start/stop the deluged daemon from it, In that case you will be able to see the daemon running via ps -aux
If you use the GTK interface only
- you'll need the deluged daemon to be launched
- you can launch the webUI from it, in that case you won't be able to see the delugew daemon in the process list via ps -aux
It's a good practice to separate your data from the application. The jail has already it's dataset and we'll use another for the data and mount it into the jail
Make sure that you have a dataset ready for those data, if not go in Freenas webUI in storage / volumes / mypool / create dataset and create it ! Check the official documentation for more detailled informations.
To mount your data's dataset in the jail use Freenas'webUI, go in Jails / Deluge / storage / Add storage and input the correct source and destinations directories. Check the official documentation for more detailed informations
step 13 - configure deluge to store the data in that dataset
Open deluge interface, go in preferences / downloads / folders and configure the download path in the jail -> /mnt/torrentsdatas
some defaults values for deluge
default admin password : deluge
default port for web user interface : 8112
default port for gtk user interface : 56846
configuration fle is /home/deluge/.config/deluge/core.conf
authentification file is /home/deluge/.config/deluge/core.conf
sources and credits
the documentations and tutorials that made this one possible :
https://dysphunkional.wordpress.com/freebsd/jails/deluge/
http://dev.deluge-torrent.org/wiki/Installing/FreeBSD
http://dev.deluge-torrent.org/wiki/UserGuide/ThinClient
http://dev.deluge-torrent.org/wiki/UserGuide/Service/FreeBSD
http://dev.deluge-torrent.org/wiki/Faq
Thanks to jrg on #freenas for his help to find my way in this "perl problem".
Thanks to deleted on #deluge for his help to understand the remote connections
Deluge is a lightweight torrent client based on libtorrent
Why do I like in Deluge ?
- it has an easy approach : in a graphical environment it can act in "classic" mode (like utorrent), it can also act in "daemon" mode, perfect for a headless server !
- the connection manager allow you to connect on several daemons
- It has gtk+, web and console user interfaces
- It has a nice collection of plugins here
- The official features' list is here
- Here's a bittorent clients comparison is here
- Create a jail and prepare all the details so deluge can be installed smoothly
- Install deluge in that jail
- Connect to deluge (various ways to do that)
- finally some extra configuration
step 0 - preparation
your FreeNAS box must have a fully working internet connection
you must prepare the ip address you'll allocate to the jail we're going to create together
you must be able to access your freenas box through SSH
you have a dataset named "torrentsdatas" (if not, there's an explanation later in this guide)
your pool is named "mypool"
the jail and the user name are both "deluge"
step 1 - create a jail
create a jail in freenas web interface
name it "deluge"
you can choose to configure the ip address manually or let it be assigned by your dhcp server, it's up to you, but ultimatly you'll need the ip or the hostname to connect to deluge
step 2 - create a deluge user in the freenas web interface
Go in account / users and add a new user
username : deluge
comment : deluge bit torrent client
homedirectory : /nonexistant
disable login password : checked
step 3 - connect to your freenas box in ssh
from linux
- open a shell and type
Code:
ssh [YourUserName]@[IpAddressOfYourFreenasBox]
from windows
- download and install your favorite ssh client software (example superputty)
- use your client to connect to your FreeNAS box
step 4 - enter your jail
(so you'll be able to enter commands directly from inside the jail)
check how many jails you have and note the number ( jail Id = JID) or the name of your deluge jail (that should be "deluge" anyway)
Code:
jls
you'll get a list of the jail looking like this
[root@freenas] ~# jls
JID IP Address Hostname Path
1 192.168.1.10 poney /mnt/mypool/jails/poney
2 192.168.1.11 deluge /mnt/mypool/jails/deluge
JID IP Address Hostname Path
1 192.168.1.10 poney /mnt/mypool/jails/poney
2 192.168.1.11 deluge /mnt/mypool/jails/deluge
now that you confirmed that your jail name is "deluge", you can enter the jail with a command of this format -> jexec [JailName] tcsh
Code:
jexec deluge tcsh
now the prompt should look like something like this -> root@deluge:/ #
step 5 - download the portstree structure
Code:
portsnap fetch extract
If you try to install deluge directly, you'll get this error message at the end of the installation. It's seems that there's something wrong with libtorrent rasterbar.
===> py27-libtorrent-rasterbar-0.16.19_1 depends on shared library: libtorrent-rasterbar.so - not found
===> Verifying for libtorrent-rasterbar.so in /usr/ports/net-p2p/libtorrent-rasterbar
===> Building for libtorrent-rasterbar-0.16.19_1
Making all in include/libtorrent
Making all in src
CXX escape_string.lo
CXX file_storage.lo
CXX gzip.lo
CXX http_connection.lo
CXX http_parser.lo
escape_string.cpp:546:19: error: no matching function for call to 'libiconv'
size_t retval = iconv(h, TORRENT_ICONV_ARG &in, &insize,
^~~~~
/usr/local/include/iconv.h:81:15: note: expanded from macro 'iconv'
#define iconv libiconv
^~~~~~~~
/usr/local/include/iconv.h:83:15: note: candidate function not viable: no known conversion from 'char **' to 'const char **' for 2nd
argument
extern size_t iconv (iconv_t cd, const char* * inbuf, size_t *inbytesleft, char* * outbuf, size_t *outbytesleft);
^
/usr/local/include/iconv.h:81:15: note: expanded from macro 'iconv'
#define iconv libiconv
^
1 error generated.
*** [escape_string.lo] Error code 1
1 error
*** [all-recursive] Error code 1
1 error
===> Compilation failed unexpectedly.
let's make a copy of the problematic file, and edit it
and replace this line
with this line
===> Verifying for libtorrent-rasterbar.so in /usr/ports/net-p2p/libtorrent-rasterbar
===> Building for libtorrent-rasterbar-0.16.19_1
Making all in include/libtorrent
Making all in src
CXX escape_string.lo
CXX file_storage.lo
CXX gzip.lo
CXX http_connection.lo
CXX http_parser.lo
escape_string.cpp:546:19: error: no matching function for call to 'libiconv'
size_t retval = iconv(h, TORRENT_ICONV_ARG &in, &insize,
^~~~~
/usr/local/include/iconv.h:81:15: note: expanded from macro 'iconv'
#define iconv libiconv
^~~~~~~~
/usr/local/include/iconv.h:83:15: note: candidate function not viable: no known conversion from 'char **' to 'const char **' for 2nd
argument
extern size_t iconv (iconv_t cd, const char* * inbuf, size_t *inbytesleft, char* * outbuf, size_t *outbytesleft);
^
/usr/local/include/iconv.h:81:15: note: expanded from macro 'iconv'
#define iconv libiconv
^
1 error generated.
*** [escape_string.lo] Error code 1
1 error
*** [all-recursive] Error code 1
1 error
===> Compilation failed unexpectedly.
let's make a copy of the problematic file, and edit it
Code:
cd /usr/ports/net-p2p/libtorrent-rasterbar/work/libtorrent-rasterbar-1.0.4/include/libtorrent
cp config.hpp config.hpp.original
ee config.hpp
and replace this line
Code:
#define TORRENT_ICONV_ARG (char**)
with this line
Code:
#define TORRENT_ICONV_ARG (const char**)
step 6 - create the deluge user in the jail
make sure to replace [ID] with the user ID you noted previously
Code:
pw useradd -n deluge -u [ID] -c "Deluge BitTorrent Client" -s /sbin/nologin -w no
step 7 - create a directory to store the deluge's config files
Code:
mkdir -p /home/deluge/.config/deluge
chown -R deluge:deluge /home/deluge/
step 8 - install deluge
When you'll be prompted, make sure that GTK2 option is NOT installed, for the other compilations options, I just leave everything by default
Code:
cd /usr/ports/net-p2p/deluge && make WITHOUT_X11=yes install clean
In the next steps I'll propose 3 ways of controlling deluge, and to do I need the startup script for deluged and delugew to be separated from each other. The script from Dysphunkional start everything in one script, it works great.The ones from the port also have this behavior but I still don't understand why. So my solution is to use the scripts from the deluge website. (with just a correction at the interpreter line)
save the existing startup script for the deluge webUI daemon
create a new file
paste the content of this quote into the file
save the existing startup script for the deluge webUI daemon
Code:
cd /usr/local/etc/rc.d
mv deluge_web deluge_web.original
create a new file
Code:
ee delugew
paste the content of this quote into the file
#!/bin/sh
#
# deluge-web RCng startup script
# created by: R.S.A. aka .faust
# mail: rsa dot aka dot f at gmail dot com
#
# PROVIDE: delugew
# REQUIRE: NETWORKING SERVERS DAEMON ldconfig resolv
# BEFORE: LOGIN
# KEYWORD: shutdown
# Add the following line to /etc/rc.conf.local or /etc/rc.conf to enable deluge-web at startup
# delugew_enable="YES"
#
# cfg_dir (str): Specify the full path to directory with deluge-web config files
# log (str): Specify the full path to the LOG file
# pidfile (str): Specify the full path to the PID file
# delugew_user (str): Set to user running deluge-web
#
# Warning! Rights to folders and files must be "rwx" for the user under which deluge-web is run
. /etc/rc.subr
name="delugew"
rcvar=`set_rcvar`
load_rc_config $name
delugew_enable=${delugew_enable:=NO}
cfg_dir="/home/deluge/.config/deluge/"
log="${cfg_dir}${name}.log"
pidfile="${cfg_dir}${name}.pid"
delugew_user="deluge"
required_dirs=${cfg_dir}
command_interpreter="/usr/local/bin/python2.7"
command="/usr/local/bin/deluge-web"
start_cmd="${name}_start"
start_postcmd="${name}_poststart"
delugew_start()
{
if [ ! -f "${pidfile}" ]; then
su -m ${delugew_user} -c "/usr/local/bin/deluge-web -f -c ${cfg_dir} -l ${log}"
echo "Starting ${name}."
else
GETPROCESSPID=`/bin/ps -auxw | /usr/bin/awk '/deluge-web/ && !/awk/ && !/sh/ {print $2}'`
PIDFROMFILE=`cat ${pidfile}`
if [ "$GETPROCESSPID" = "$PIDFROMFILE" ]; then
echo "${name} already running with PID: ${PIDFROMFILE} ?"
echo "Remove ${pidfile} manually if needed."
else
rm -f ${pidfile}
su -m ${delugew_user} -c "/usr/local/bin/deluge-web -f -c ${cfg_dir} -l ${log}"
echo "Starting ${name}."
fi
fi
}
delugew_poststart()
{
echo `/bin/ps -auxw | /usr/bin/awk '/deluge-web/ && !/awk/ {print $2}'` > $pidfile
}
run_rc_command "$1"
exit with [crtl + X] and answer yes to save the file
save the existing startup script for the deluge daemon
Code:
cd /usr/local/etc/rc.d
mv deluged deluged.original
create a new file
Code:
ee deluged
paste the content of this quote
#!/bin/sh
#
# deluged RCng startup script
# created by: R.S.A. aka .faust
# mail: rsa dot aka dot f at gmail dot com
#
# PROVIDE: deluged
# REQUIRE: NETWORKING SERVERS DAEMON ldconfig resolv
# BEFORE: LOGIN
# KEYWORD: shutdown
# Add the following line to /etc/rc.conf.local or /etc/rc.conf to enable deluged at startup
# deluged_enable="YES"
#
# cfg_dir (str): Specify the full path to directory with deluged config files
# log (str): Specify the full path to the LOG file
# loglevel (str): Set loglevel (Available: none, info, warning, error, critical, debug)
# pidfile (str): Specify the full path to the PID file
# deluged_user (str): Set to user running deluged
#
# Warning! Rights to folders and files must be "rwx" for the user under which deluged is run
. /etc/rc.subr
name="deluged"
rcvar=`set_rcvar`
load_rc_config $name
deluged_enable=${deluged_enable:=NO}
cfg_dir="/home/deluge/.config/deluge/"
log="${cfg_dir}${name}.log"
loglevel="error"
pidfile="${cfg_dir}${name}.pid"
deluged_user="deluge"
required_dirs=${cfg_dir}
command_interpreter="/usr/local/bin/python2.7"
command="/usr/local/bin/${name}"
start_cmd="${name}_start"
deluged_start()
{
if [ ! -f "${pidfile}" ]; then
su -m ${deluged_user} -c "/usr/local/bin/${name} -c ${cfg_dir} -L ${loglevel} -l ${log} -P ${pidfile}"
echo "Starting ${name}."
else
GETPROCESSPID=`/bin/ps -auxw | /usr/bin/awk '/deluged/ && !/awk/ && !/sh/ {print $2}'`
PIDFROMFILE=`cat ${pidfile}`
if [ "$GETPROCESSPID" = "$PIDFROMFILE" ]; then
echo "${name} already running with PID: ${PIDFROMFILE} ?"
echo "Remove ${pidfile} manually if needed."
else
rm -f ${pidfile}
su -m ${deluged_user} -c "/usr/local/bin/${name} -c ${cfg_dir} -l ${log} -P ${pidfile}"
echo "Starting ${name}."
fi
fi
}
run_rc_command "$1"
exit with [crtl + X] and answer yes to save the file
give execute rights to the created files
Code:
chmod +x delugew
chmod +x deluged
step 9 - make sure that the deluge daemon will start automatically at startup
you can edit the /etc/rc.conf file with ee or just use these commands :
Code:
echo 'deluged_enable="YES"' >> /etc/rc.conf
echo 'deluged_user="deluge"' >> /etc/rc.conf
there are more parameters that can be
step 10 - start/stop the deluge daemon to create the configuration file
Code:
service deluged start
service deluged stop
step 11 - control deluge
I'll describe 3 ways of doing it
- with the WEB user interface only
- with the GTK user interface only
- with both user interfaces
On windows
- deluged.exe is the daemon taking care of your torrents
- deluge.exe is the gtkUI
In freenas
- deluged is the daemon
- delugew or (deluge_web) is the daemon for the webUI
If you use the webUI only
- you'll need the delugew daemon to be launched to do that
- you can start/stop the deluged daemon from it, In that case you will be able to see the daemon running via ps -aux
If you use the GTK interface only
- you'll need the deluged daemon to be launched
- you can launch the webUI from it, in that case you won't be able to see the delugew daemon in the process list via ps -aux
choice 11.1 - with the web user interface only
11.1.1 - make sure that the deluge web daemon will start automatically at boot
11.1.2 - start the web user interface
11.1.3 - connect to the web interface
from your favorite web browser using this url format -> http://[IpAddressOfTheJail]:8112
you should get a prompt from the connection manager, select the running daemon and connect to it


11.2.1 - create a gtk user
as described in this link, deluge support multi users authentication and rights management. To create an administrator, use this command and replace [username] and [password] with yours...(keep track of those)
11.2.2 - enable gtk remote connections
stop deluged daemon if it's running
this will allow remote connection from an external gtk user interface : edit the core configuration file
Replace
this line
with this line
start deluged daemon
It's also possible to to that step with another method, using the deluge console mode
11.2.3 - install deluge on your computer
You can do that on pcbsd, linux, macOS, windows, the official documentation is pretty good
11.2.4 - activate the daemon mode
go in edit / preferences / interface and desactivate the classic mode

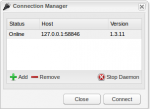
11.2.5 - connect the connection manager to your jail's deluge daemon
deluge will restart and on the next start you'll be prompted with the connection manager. In the list, your local daemon will appear as 127.0.0.1:58846 don't bother with it

click on "add"
a new line will appear in the connection manager and the daemon should be running, just click on it
choice 11.3 - use web and gtk user interface
Just run all command from choice 13.1 and 13.2
step 12 - create a dataset and mount it into the jail11.1.1 - make sure that the deluge web daemon will start automatically at boot
Code:
echo 'deluge-web_enable="YES"' >> /etc/rc.conf
11.1.2 - start the web user interface
Code:
service deluge-web start
11.1.3 - connect to the web interface
from your favorite web browser using this url format -> http://[IpAddressOfTheJail]:8112
you should get a prompt from the connection manager, select the running daemon and connect to it
you will have a second prompt for the password, enter "deluge" as the default password
at your first login you'll get a 3rd prompt to change the default password,you can also consider activating SSL and use your key and certificates
choice 11.2 - use only gtk user interface11.2.1 - create a gtk user
as described in this link, deluge support multi users authentication and rights management. To create an administrator, use this command and replace [username] and [password] with yours...(keep track of those)
Code:
echo "[username]:[password]:10" >> ~/.config/deluge/auth
11.2.2 - enable gtk remote connections
stop deluged daemon if it's running
Code:
service deluged stop
this will allow remote connection from an external gtk user interface : edit the core configuration file
Code:
ee /home/deluge/.config/deluge/core.conf
Replace
this line
Code:
"allow_remote": false,
with this line
Code:
"allow_remote": true,
{
"file": 1,
"format": 1
}{
"info_sent": 0.0,
"lsd": true,
"max_download_speed": -1.0,
"send_info": false,
"natpmp": true,
"move_completed_path": "/root",
"peer_tos": "0x00",
"enc_in_policy": 1,
"queue_new_to_top": false,
"ignore_limits_on_local_network": true,
"rate_limit_ip_overhead": true,
"daemon_port": 58846,
"torrentfiles_location": "/root",
"max_active_limit": 8,
"geoip_db_location": "/usr/local/share/GeoIP/GeoIP.dat",
"upnp": true,
"utpex": true,
"max_active_downloading": 3,
"max_active_seeding": 5,
"allow_remote": true,
"outgoing_ports": [
0,
0
],
"enabled_plugins": [],
"max_half_open_connections": 50,
"download_location": "/root",
"compact_allocation": false,
"max_upload_speed": -1.0,
"plugins_location": "/home/deluge/.config/deluge/plugins",
"max_connections_global": 200,
"enc_prefer_rc4": true,
"cache_expiry": 60,
"dht": true,
"stop_seed_at_ratio": false,
"stop_seed_ratio": 2.0,
"max_download_speed_per_torrent": -1,
"prioritize_first_last_pieces": false,
"max_upload_speed_per_torrent": -1,
"auto_managed": true,
"enc_level": 2,
"copy_torrent_file": false,
"max_connections_per_second": 20,
"listen_ports": [
6881,
6891
],
"max_connections_per_torrent": -1,
"del_copy_torrent_file": false,
"move_completed": false,
"autoadd_enable": false,
"proxies": {
"peer": {
"username": "",
"password": "",
"hostname": "",
"type": 0,
"port": 8080
},
"web_seed": {
"username": "",
"password": "",
"hostname": "",
"type": 0,
"port": 8080
},
"tracker": {
"username": "",
"password": "",
"hostname": "",
"type": 0,
"port": 8080
},
"dht": {
"username": "",
"password": "",
"hostname": "",
"type": 0,
"port": 8080
}
},
"dont_count_slow_torrents": false,
"add_paused": false,
"random_outgoing_ports": true,
"max_upload_slots_per_torrent": -1,
"new_release_check": false,
"enc_out_policy": 1,
"seed_time_ratio_limit": 7.0,
"remove_seed_at_ratio": false,
"autoadd_location": "/root",
"max_upload_slots_global": 4,
"seed_time_limit": 180,
"cache_size": 512,
"share_ratio_limit": 2.0,
"random_port": true,
"listen_interface": ""
}
start deluged daemon
Code:
service deluged start
It's also possible to to that step with another method, using the deluge console mode
11.2.3 - install deluge on your computer
You can do that on pcbsd, linux, macOS, windows, the official documentation is pretty good
11.2.4 - activate the daemon mode
go in edit / preferences / interface and desactivate the classic mode
11.2.5 - connect the connection manager to your jail's deluge daemon
deluge will restart and on the next start you'll be prompted with the connection manager. In the list, your local daemon will appear as 127.0.0.1:58846 don't bother with it
click on "add"
hostname : ip address of the jail
username : gtk user name you just created
password : gtk user password
username : gtk user name you just created
password : gtk user password
choice 11.3 - use web and gtk user interface
Just run all command from choice 13.1 and 13.2
It's a good practice to separate your data from the application. The jail has already it's dataset and we'll use another for the data and mount it into the jail
Make sure that you have a dataset ready for those data, if not go in Freenas webUI in storage / volumes / mypool / create dataset and create it ! Check the official documentation for more detailled informations.
To mount your data's dataset in the jail use Freenas'webUI, go in Jails / Deluge / storage / Add storage and input the correct source and destinations directories. Check the official documentation for more detailed informations
here's the format (assuming that you'll place all in the /mnt directory)
source : /mnt/[YourPoolNameHere]/[YourData'sDatasetNameHere]
destination : /mnt/[YourPoolNameHere]/jails/[JailNameHere]/mnt/[YourData'sDatasetNameHere]
create directory is : checked
mounted is : checked
here's the example in our case
source : /mnt/mypool/torrentsdata
destination : /mnt/mypool/jails/deluge/mnt/torrentsdatas
create directory is : checked
mounted is : checked
step 13 - configure deluge to store the data in that dataset
Open deluge interface, go in preferences / downloads / folders and configure the download path in the jail -> /mnt/torrentsdatas
some defaults values for deluge
default admin password : deluge
default port for web user interface : 8112
default port for gtk user interface : 56846
configuration fle is /home/deluge/.config/deluge/core.conf
authentification file is /home/deluge/.config/deluge/core.conf
sources and credits
the documentations and tutorials that made this one possible :
https://dysphunkional.wordpress.com/freebsd/jails/deluge/
http://dev.deluge-torrent.org/wiki/Installing/FreeBSD
http://dev.deluge-torrent.org/wiki/UserGuide/ThinClient
http://dev.deluge-torrent.org/wiki/UserGuide/Service/FreeBSD
http://dev.deluge-torrent.org/wiki/Faq
Thanks to jrg on #freenas for his help to find my way in this "perl problem".
Thanks to deleted on #deluge for his help to understand the remote connections
Attachments
Last edited: