Found a fix after way too many hours of digging around online, and much frustration. You're using the local Truenas certs in your example, so that'll never work.
What is typically required is to enter CA (from the VPN provider or your local VPN server) that signed the client cert (again from the VPN provider or your local VPN server) that is going to be trusted by your VPN provider (or local VPN server.) Both of these need to be installed ahead of configuring either the client/server section. With OpenVPN Cloud for example, the easiest way is to download a config from their portal, take the certs from their config, and import. There are a few examples of how to do this around the web so I won't belabor the point too much.
On to the actual bug: Keep me honest here, but the subjectkeyidentifier should be checked on the CA, and doesn't apply to client certificates. It shouldn't need to be checked on the client certs. So after trying too many other things than I'm happy to admit, I figured I'd check how to disable the check on the client cert, and that's what ended up working for me.
Disclaimer: This is my best effort to provide the best solution I can come up with. I've done my best to do things properly in order to help folks out with the issue. I am not responsible for any breakage or reduction in functionality you may experience while implementing this fix. As always, if you aren't comfortable or sure in what you're doing, do not proceed blindly or without backups and a rollback plan.
"
Code:
#sudo in order to have permission to edit the file. you'll be prompted for password#
sudo -s
#copy the vpn.py file to root in order to have a backup#
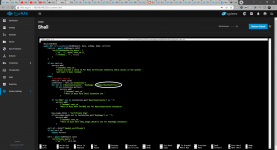
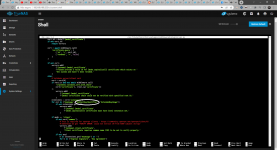
cp /usr/lib/python3/dist-packages/middlewared/plugins/vpn.py /vpn_backup.py
#edit the vpn.py file. look for the second instance of 'subjectkeyidentifier' and remove it#
#be careful to remove the surrounding quotes and comma so the remaining list makes sense#
nano vpn.py
#restart the web interface in order to re-load the resulting vpn.py file#
systemctl restart middlewared
/usr/lib/python3/dist-packages/middlewared/plugins/vpn.py"
Once the web interface comes back up, you should find that you can submit the client config and start the service.