
Steve_93
Dabbler
- Joined
- Sep 15, 2015
- Messages
- 10
Hey guys!;)
I posted a few weeks ago (HERE) and asked for your help with my build.
Now i am back to show you the results, thanks again for the help :)
The components:
CPU: Intel E3-1231v3
Mainboard: Supermicro X10SL7-F
RAM: 2x8GB Crucial CT102472BD160B
PSU: SeaSonic G-550
Case: Fractal R5
HDD: 3x6TB WD red
The build:
I really wanted to do a timelapse build video for you guys.
I setup a nice workspace, started the camera and went for it.
You guess it, camera cuts out at 20 minutes, jep and I found out at the end of the build :(
Because i used the camera for filming i was not able to make photos during the build either.
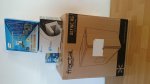
But I got a few before the build and afterwards :)
All parts except the HDD´s arrived.
The HDD´s took 7 more days to arrive

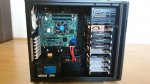
I started building and everything went very smooth.
The PSU cabel was a little bit to short to wire it behind the motherboard.
Normal mainboards have the PSU connectors on the right not the top I guess.
In the end I somehow managed to get the PSU cabel behind the motherboard, but it was a really tight fit.

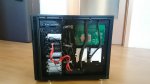
The Fractal case is very nice, routing the cables was very easy and it was a joy.
This was my first "premium" case and i was really blown away, never going with a cheap case ever again.

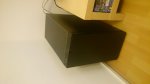
The server now sits right beside my TV-table.
Cablemanagement will be fixed today

Setting up FreeNAS:
I was really scared with setting up FreeNAS.
About 2 months I read post, articles and so on about FreeNAS.
It was very common to read "lol i am not dealing with it going back to xyz OS".
But i told myself i can do it ;)
So the day came and the build was finished (without HDD´s as mentioned earlier).
At first there was the problem with the image of FreeNAS being no longer available, just the ISO.
This was a rather quick fix and i was ready to install FreeNAS on a USB drive.
The next part, and this one is funny, i was not able to select the USB drive were i wanted to install FreeNAS. It literally took me 45minutes to figure out that i needed to press the space key to select the drive.:D Stupid me:D
In the end it took me 1 1/2 hours to get FreeNAS running, without my little mistake it would have been much quicker.:)
I had to wait 7 days for the harddrives to arrive. That part sucked to most.
I used the time to flash the LSI onboard controller with P20 IT, which was to my surprise very easy:)
Yesterday was the day, the harddrives arrived
3x6TB WD red for raid z1.
I am on a budget and the array will be destroyed and rebuild with 6x6TB WD red raid z2 around chistmas. :)
Setting up the array and the dataset´s was very easy.
I thought this would be the complicated part.
Setting up Plex was also easy.
But i am a little bit lost with the permission system and share system.
I know how to create a share and give certain users permission to the shares.
But i have no idea how i am going to give users permissions for some shares.
Like User1 having access to share 1,2,3; User2 having access to share 1,2 and User3 having access to share 2,3.
But i did not have much time setting up everything so i might me able to get it working when i come home from work:)
I also dont understand why i should not make 1 windows and 1 mac share for the same dataset.
I read this is not recommended, but i want access to one dataset with two different operation systems.
Also changing a windows dataset to unix, almost doubles the read/write speed.
I read something about how windows/samba only has on thread and unix is multithreaded.
But again i did not have that much time to play around or read tutorials :)
Power consumption:
When i planed my build i could not find alot of information for power consumption.
This was an issue as power consumption was a hugh factor for me.
A found a few numbers here and there but i was not sure what to expect.
Anyway here are my numbers.
Idle without drives: 35watts
Idle with 3 drives spinning: 50watts
Writing files to the 3 drive array: 65-80watts (depending on files/clients)
Running plex: 70-130watts (depending on files/clients/transcode format)
Conclusion:
Building my own NAS and setting up FreeNAS was easy
I was suprised how well everything went and i am glad i used FreeNAS instead of Xpenology.
Although the Xpenology UI is a little bit better to play around and looks more fancy, the functions on FreeNAS are alot better. I dont want to call the UI on FreeNAS bad, it is very good to be honest, compared to Xpenology i might just call it more mature.:)
I hoped you guys liked the build and didnt mind my bad english
A BIG thanks again for everybody who helped me.;)
EDIT1: Added power consumption
I posted a few weeks ago (HERE) and asked for your help with my build.
Now i am back to show you the results, thanks again for the help :)
The components:
CPU: Intel E3-1231v3
Mainboard: Supermicro X10SL7-F
RAM: 2x8GB Crucial CT102472BD160B
PSU: SeaSonic G-550
Case: Fractal R5
HDD: 3x6TB WD red
The build:
I really wanted to do a timelapse build video for you guys.
I setup a nice workspace, started the camera and went for it.
You guess it, camera cuts out at 20 minutes, jep and I found out at the end of the build :(
Because i used the camera for filming i was not able to make photos during the build either.
But I got a few before the build and afterwards :)
All parts except the HDD´s arrived.
The HDD´s took 7 more days to arrive
I started building and everything went very smooth.
The PSU cabel was a little bit to short to wire it behind the motherboard.
Normal mainboards have the PSU connectors on the right not the top I guess.
In the end I somehow managed to get the PSU cabel behind the motherboard, but it was a really tight fit.
The Fractal case is very nice, routing the cables was very easy and it was a joy.
This was my first "premium" case and i was really blown away, never going with a cheap case ever again.
The server now sits right beside my TV-table.
Cablemanagement will be fixed today
Setting up FreeNAS:
I was really scared with setting up FreeNAS.
About 2 months I read post, articles and so on about FreeNAS.
It was very common to read "lol i am not dealing with it going back to xyz OS".
But i told myself i can do it ;)
So the day came and the build was finished (without HDD´s as mentioned earlier).
At first there was the problem with the image of FreeNAS being no longer available, just the ISO.
This was a rather quick fix and i was ready to install FreeNAS on a USB drive.
The next part, and this one is funny, i was not able to select the USB drive were i wanted to install FreeNAS. It literally took me 45minutes to figure out that i needed to press the space key to select the drive.:D Stupid me:D
In the end it took me 1 1/2 hours to get FreeNAS running, without my little mistake it would have been much quicker.:)
I had to wait 7 days for the harddrives to arrive. That part sucked to most.
I used the time to flash the LSI onboard controller with P20 IT, which was to my surprise very easy:)
Yesterday was the day, the harddrives arrived
3x6TB WD red for raid z1.
I am on a budget and the array will be destroyed and rebuild with 6x6TB WD red raid z2 around chistmas. :)
Setting up the array and the dataset´s was very easy.
I thought this would be the complicated part.
Setting up Plex was also easy.
But i am a little bit lost with the permission system and share system.
I know how to create a share and give certain users permission to the shares.
But i have no idea how i am going to give users permissions for some shares.
Like User1 having access to share 1,2,3; User2 having access to share 1,2 and User3 having access to share 2,3.
But i did not have much time setting up everything so i might me able to get it working when i come home from work:)
I also dont understand why i should not make 1 windows and 1 mac share for the same dataset.
I read this is not recommended, but i want access to one dataset with two different operation systems.
Also changing a windows dataset to unix, almost doubles the read/write speed.
I read something about how windows/samba only has on thread and unix is multithreaded.
But again i did not have that much time to play around or read tutorials :)
Power consumption:
When i planed my build i could not find alot of information for power consumption.
This was an issue as power consumption was a hugh factor for me.
A found a few numbers here and there but i was not sure what to expect.
Anyway here are my numbers.
Idle without drives: 35watts
Idle with 3 drives spinning: 50watts
Writing files to the 3 drive array: 65-80watts (depending on files/clients)
Running plex: 70-130watts (depending on files/clients/transcode format)
Conclusion:
Building my own NAS and setting up FreeNAS was easy
I was suprised how well everything went and i am glad i used FreeNAS instead of Xpenology.
Although the Xpenology UI is a little bit better to play around and looks more fancy, the functions on FreeNAS are alot better. I dont want to call the UI on FreeNAS bad, it is very good to be honest, compared to Xpenology i might just call it more mature.:)
I hoped you guys liked the build and didnt mind my bad english
A BIG thanks again for everybody who helped me.;)
EDIT1: Added power consumption
Attachments
Last edited: