[How-To] Properly setup FreeNAS 9.2.1.5 to use Active Directory folder/file/user permissions

Status
Not open for further replies.

mauirixxx

Explorer
Joined
Oct 2, 2013
Messages
60
UPDATE 2017-04-17
Instead of modifying the below posts to reflect the changes to the FreeNAS side of things with the introduction of Corral, I've decided to just link to my wiki I used originally to first create the posts blow. You can find the wiki HERE and again linked below (the link below takes you directly to my FreeNAS 10 page).

If it's at all possible for an admin to insert a post right after the Active Directory Prep post, then I'll gladly copy & paste my work back over to here.

Aloha, mauirixxx

UPDATE 2016-02-01
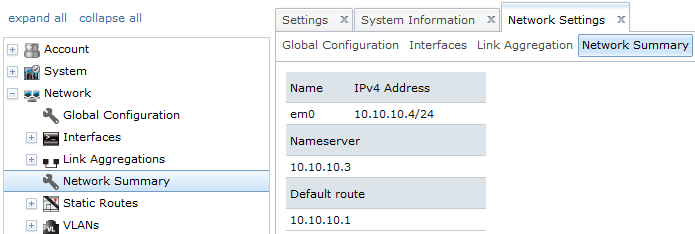
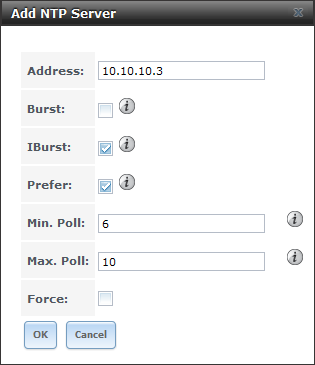
This post was written with FreeNAS 9.2.1.5 in mind, before the Active Directory interface changes in FreeNAS 9.3. However, setting up the Windows side of things have not changed. You still need your time to be good, you still need a solid A.D. DNS setup, and a user dedicated to joining your FreeNAS server to the domain is still highly suggested.

I have taken to writing up a walkthrough on my personal wiki dedicated to setting up FreeNAS as an Active Directory member, which you can view the FreeNAS 9.3 specific stuff HERE. Once that writeup is complete, I'll update this thread with current (9.3.x at least) information.

About
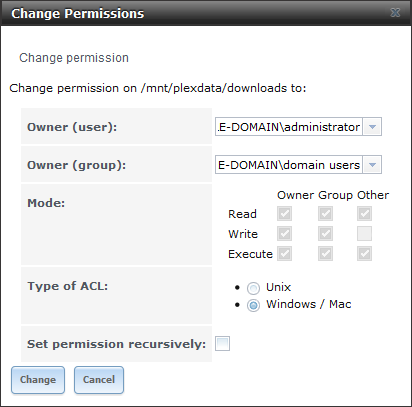
This post is a collaboration between bigphil and myself of the FreeNAS forum pooling our knowledge together of making FreeNAS work with the various flavors of Active Directory in our respective work & home environments, in order to use Windows based permissions on files hosted on the FreeNAS server.

Tested
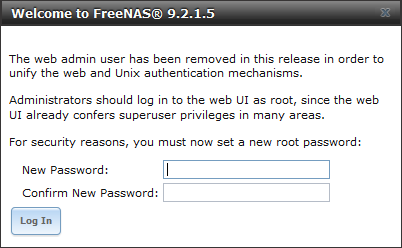
This how-to has been tested with the following software releases, with this how-to being written using Windows Server 2008 & FreeNAS 9.2.1.5:
  • FreeNAS v9.1.1-RELEASE-x64 (a752d35)
  • FreeNAS v9.2.1.4.1-RELEASE-x64 (fec915c)
  • FreeNAS v9.2.1.5-RELEASE-x64 (80c1d35)
  • FreeNAS-Corral-10.0.3 (4845fa74c)
  • Microsoft Windows Server 2008
  • Microsoft Windows Server 2008 R2
  • Microsoft Windows Server 2012 R2
Assumptions
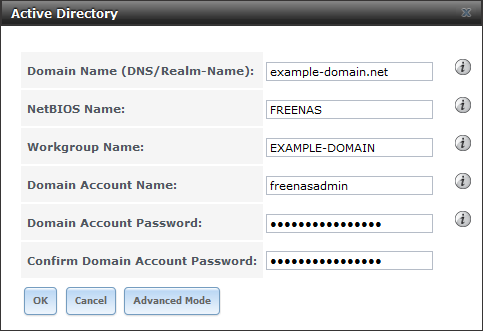
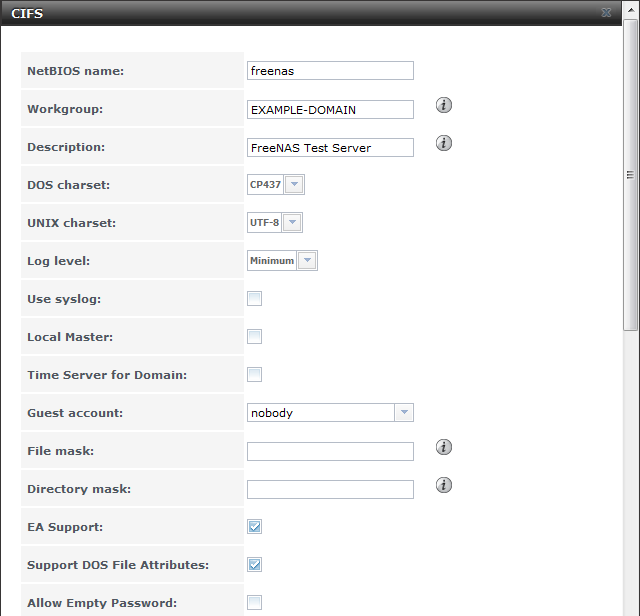
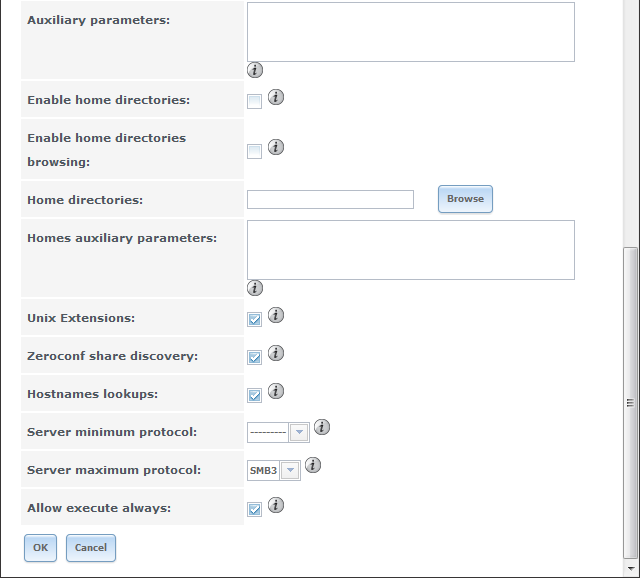
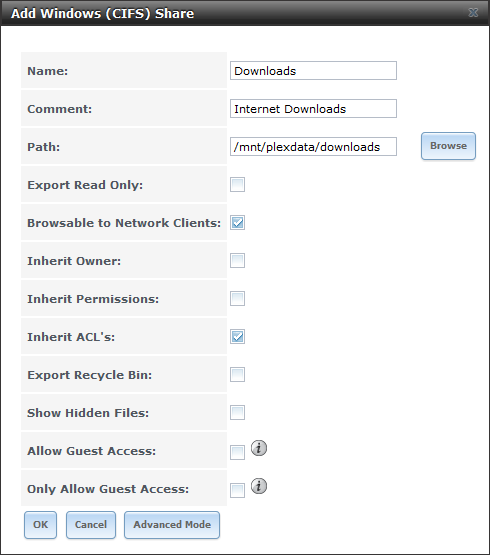
  • Active Directory support (installation, configuration) is beyond the scope of this document, because ...
  • This how-to assumes you already have a working Active Directory installation.
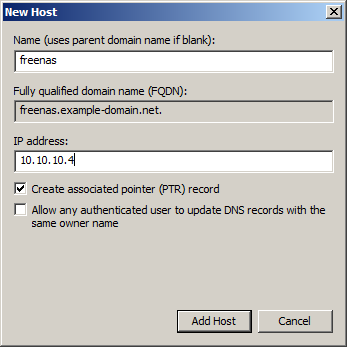
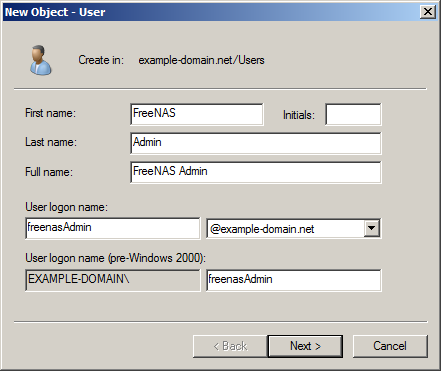
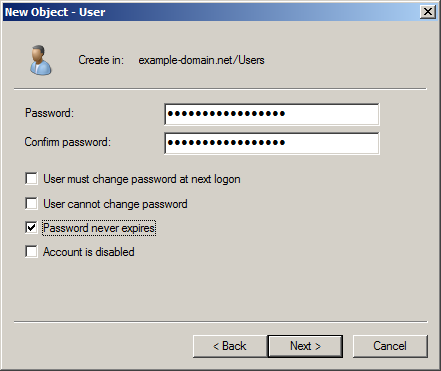
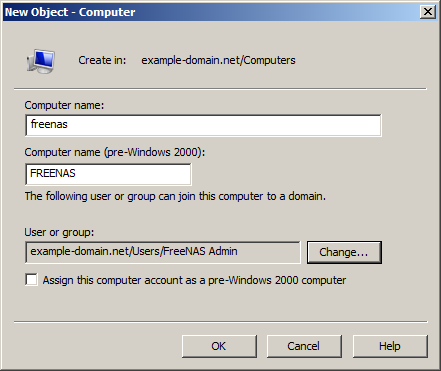
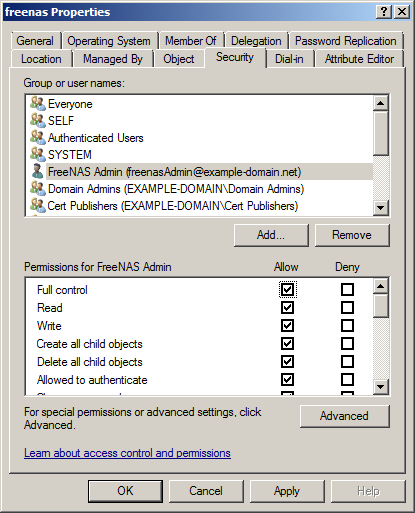
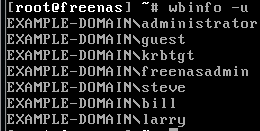
  • We assume you have the required access to create user and computer objects in Active Directory, as well as access to create the necessary records required in DNS.
  • We assume you are using a fresh install of FreeNAS.
  • We assume you have a current backup of your Active Directory setup.
  • We are not responsible for YOU breaking YOUR Active Directory (not that you will, but "stuff" happens).
The next 4 posts will detail the required steps for prepping Active Directory, then configuring FreeNAS to work with Active Directory, using the "Computer Management" MMC snap-in to configure permissions on the FreeNAS CIFS share, and current bug(s) with (their) solution(s).
 
Last edited:

mauirixxx

Explorer
Joined
Oct 2, 2013
Messages
60
Active Directory Prep

Before we start
  • We used a virtualized setup in order to create this walkthrough, using generic domain & computer names where possible.
  • We used the private IP address range of 10.10.10.x - obviously you'll want to replace our internal IP addresses with your own
    • We used a single Active Directory domain controller, to keep things simple. We then configured the following network settings, which is reflected throughout this document:
      • Gateway: 10.10.10.1
      • DNS: 10.10.10.3
      • NTP: 10.10.10.3
      • DC (Domain Controller): 10.10.10.3
      • FreeNAS: 10.10.10.4
DNS Prep
  • Create a DNS "A" record
    DNS_A_record.png
Adding a FreeNAS user
  • Create a FreeNAS user specifically for joining the FreeNAS server to the domain, named freenasAdmin
    User_freenasAdmin_creation.png
  • Create a non-expiring password for user freenasAdmin
    User_freenasAdmin_password.png
Pre-creating FreeNAS computer object in AD
  • Create a computer account in preparation for joining the FreeNAS server to the domain. The name should match the "A" record you created earlier.
    • Before clicking OK to finalize the computer account creation, click "Change" and assign the previously created user "freenasAdmin" the ability to join the server to the domain
      • NOTE: Normal users in Active Directory CAN join computers to a domain, but there's a predefined limit of to how many times (it's 10) this can happen - this may not apply to Server 2008 and above, needs verification
        Computer_freenas_account_creation.png
  • Afterwards, right click on the "freenas" computer object, and select Properties, then click on the Security tab, and give the freenasAdmin user "Full Control" and click OK.
    • NOTE: If you don't see the security tab, you need to switch your view to "Advanced Features" - you can see where HERE.
      Computer_freenas_give_user_freenasAdmin_full_control.png
  • Verify the accuracy of your server's clock - since every computer joined in the domain will be using the DC as a time server as well, it needs to be accurate.
NTP server prep
  • From a CMD prompt, type w32tm /query /configuration - if NtpServer shows time.windows.com- you should really think about changing it.
    • To change the time server to both use a more accurate clock, and redundant clocks, type the following:
      • w32tm /config /syncfromflags:manual /manualpeerlist:"0.us.pool.ntp.org,0x1 1.us.pool.ntp.org,0x1 2.us.pool.ntp.org,0x1" /update /reliable:yes
      • If you got any result other then "The command completed successfully", verify your command line. View an example successful result HERE.
      • Restart the Windows time service by issuing the following command net stop w32time && net start w32time. View an example successful restart HERE.
FreeNAS setup
If everything went ok, move on to the next post
 

mauirixxx

Explorer
Joined
Oct 2, 2013
Messages
60
Getting started with FreeNAS

Initial connection
  • When FreeNAS 9.2.1.5 is first installed, the network adapter is set to DHCP - we will change this a few steps down. We will be configuring FreeNAS purely from the webUI, so make a note of the IP on the FreeNAS server console:
    FreeNAS_DHCP_on_first_boot.png
  • Use your favorite web browser to connect to that address - the first visit to the FreeNAS webUI will prompt you for a password, for the default user root
    FreeNAS_first_visit_password_prompt.png
Configuring networking
  • Click on Network -> Global Configuration
    • Hostname: freenas (this needs to match the DNS "A" record & computer account name you created during the Active Directory prep)
    • Domain: example-domain.net
    • IPv4 Default Gateway: 10.10.10.1
    • Nameserver 1: 10.10.10.3
    • Click "Save"
      FreeNAS_network_settings_-_global_configuration.png
  • Click on Network -> Interfaces -> Add Interface
    • NIC: select the NIC being used by FreeNAS (single NIC systems only have 1 item in the dropdown list)
    • Interface Name: em0 (We named it the same as what FreeNAS names it, for consistency - you can name it whatever you like)
    • DHCP: unchecked
    • IPv4 Address: 10.10.10.4 (this needs to match the DNS "A" record you created during the Active Directory prep)
    • IPv4 Netmask: /24
    • Click "Save"
      • The new IP address takes effect immediately - repoint your browser to the new address to continue
        FreeNAS_network_settings_-_add_interface.png
  • Click on Network -> Network Summary to verify previous settings
    FreeNAS_network_settings_-_network_summary.png
Configuring Time Server
  • Click on System -> NTP Servers -> View NTP Servers
    • Remove all 3 default NTP servers
    • Click Add NTP Server
      • Address: 10.10.10.3
      • Prefer: checked (only if you have other time servers configured)
      • Leave everything else at its default setting
        Add_NTP_server.png
  • Now that the time server is set, you need to set your time zone
  • Click on Settings -> General
    • Timezone: (obviously select YOUR time zone)
    • Directory Service: Active Directory (since we plan on using Active Directory)
    • Click "Save"
      System_Settings_Timezone.png
Creating a Storage Pool
  • Your storage pool has to be created before you configure FreeNAS to use Active Directory, however that is beyond the scope of this how-to.
  • The FreeNAS wiki is an excellent resource on creating your storage pool.
  • We also suggest giving cyberjocks excellent PowerPointpresentation explaining what VDev zpool, ZIL and L2ARC is.
    • After your pool is created, we suggest creating a dataset specifically for CIFS sharing.
    • Again, the official FreeNAS wikiis a good source of info on how to do this
      • When creating the dataset, you have to take into consideration how this particular dataset will be used.
      • In this how-to, we are assuming the storage will be used to store already compressed files, and the following screenshot reflects that.
        • Dataset Name: downloads
        • Compression level: Off (everything's already compressed already)
        • Share type: Windows
        • Enable atime: Off (unless your backup solution scans this share, then turn it on)
        • ZFS Deduplication: Off
          Create_a_dataset_for_CIFS_sharing.png
Setting up Active Directory & CIFS
  • Click on Services -> Directory Services -> Active Directory
    • Domain name: example-domain.net
    • NetBIOS Name: FREENAS
    • Workgroup Name: EXAMPLE-DOMAIN
    • Domain Account Name: freenasadmin
    • Domain Account Password: StrongPassword1234
    • Confirm Domain Account Password: StrongPassword1234
      FreeNAS_Active_Directory_settings.png
  • Click on Services -> CIFS
    • NetBIOS name: freenas
    • Workgroup: EXAMPLE-DOMAIN
    • Description: (optional to fill in)
    • DOS charset: CP437
    • UNIX charset: UTF-8
    • Log Level: Minimum
    • Use syslog: unchecked
    • Local Master: unchecked
    • Time Server for Domain: unchecked
    • Guest Account: nobody
    • File Mask: (leave this field blank)
    • Directory Mask: (leave this field blank)
    • EA Support: checked
    • Support DOS File Attributes: checked
    • Allow Empty Password: unchecked
    • Auxiliary Parameters: (leave this field blank)
    • Enable home directories: unchecked
    • Enable home directories browsing: unchecked
    • Home directories: (leave this field blank)
    • Homes auxiliary parameters: (leave this field blank)
    • Unix Extensions: checked
    • Zeroconf share discovery: checked
    • Hostnames lookups: checked
    • Server minimum protocol: ---------
    • Server maximum Protocol: SMB3
    • Allow execute always: checked
    • Click "OK"
      CIFS_Settings_top.png
      CIFS_Settings_bottom.png
  • Click Services -> Control Services
    • Turn on Directory Services
      • This will also automatically turn on the CIFS services. Turning on Directory Services can take up to a minute to start, be patient.
Creating your share using Windows permissions
  • Click on Sharing -> Windows (CIFS) Shares -> Add Windows (CIFS) Share
    • Name: Downloads (this is the name you'll see when you connect via Windows Explorer)
    • Comment: (optional)
    • Path: (browse to the path of the dataset created previously)
    • Leave everything else at its default setting
    • Click "OK"
      Add_Windows_share.png
Dataset File/Folder Permissions
  • Now we need to change the default owner & group on the dataset created
  • Click on Storage -> Volumes
    • Expand your volumes until you find the dataset created for file sharing
    • Click Change Permissions
      • Owner (user): EXAMPLE-DOMAIN\administrator
      • Owner (group): EXAMPLE-DOMAIN\domain users
      • Mode: (unchangeable)
      • Type of ACL: Windows / Mac
      • Set permission recursively: unchecked (unless you have files owned by a FreeNAS user stored in this dataset already)
      • Click "Change"
        Dataset_for_CIFS_change_permission.png
Verification
  • From a Windows client, open Windows Explorer, and type in '''\\freenas''' - if everything is set properly, you should see the CIFS share you created earlier.
    Windows_Explorer_-_freenas_share_Downloads.png
  • Enter into the shared directory, and as a simple test - create a folder. If you're allowed, then it worked!
    Windows_Explorer_-_freenas_share_test.png
  • If you go into the FreeNAS shell, you can further verify permissions are using Active Directory style permissions
    FreeNAS_with_Active_Directory_permissions.png
On to managing folder/user permissions!
 

mauirixxx

Explorer
Joined
Oct 2, 2013
Messages
60
About
If you're an "I.T. Pro" you can probably disregard this section, as you should already know how to manager folder/file permissions on a file share. Also, if you don't care that the default permission is that EVERYONE can read/write/modify data on the share, skip this part.

Computer Management
  • On your Windows server, click Start -> Administrative Tools -> Computer Management
    • On the left tree menu, right click on Computer Management (local) and select Connect to another computer ...
      Windows_Computer_Management_-_change_server.png
    • Click the '''Another computer:''' radio button, and type in '''freenas''' (or whatever you named your FreeNAS server)
      Windows_Computer_Management_-_changed_server_name.png
    • Click "OK" - if there's no errors, you should now see '''Computer Management (FREENAS)''', like so:
      Windows_Computer_Management_-_changed_to_FreeNAS.png
    • Now, click '''System tools ''' -> '''Shared Folders''' -> '''Shares''' and select your CIFS share you created previously
      Windows_Computer_Management_-_FreeNAS_share_management.png
    • Right click on your share and select '''Properties'''
      • Click on the '''Share Permissions''' tab, and add/remove/modify your permissions as needed.

    The next post lists any known bugs and their fixes (if a fix is also known), as they pertain to Active Directory & CIFS.
 

mauirixxx

Explorer
Joined
Oct 2, 2013
Messages
60
Known bugs & issues

9.2.1.5
  • Bug #4878
    • Issue: CIFS is started, and can't be turned off, and Directory Services can't be turned on (usually occurs after a reboot).
    • Solution: Patch to fix issue is provided in the bug report. After patch is applied, turn off the CIFS service, then turn on Directory Services (which will automatically turn on the CIFS service).
 

TheSmoker

Patron
Joined
Sep 19, 2012
Messages
225
Nice write up! Congrats!

Tell me one more thing. If you enable Unix extensions in Directory Service service it will work? If yes, how have you fixed the error message nss_ldap cannot find directory server?

Thanks in advance!
 

mauirixxx

Explorer
Joined
Oct 2, 2013
Messages
60
Nice write up! Congrats!

thanks :D

Tell me one more thing. If you enable Unix extensions in Directory Service service it will work? If yes, how have you fixed the error message nss_ldap cannot find directory server?

I never enabled the Unix extension in the Directory Service. I was looking at the how-to from a viewpoint of having a Windows based network (clients & servers) and integrating FreeNAS into that mix. I would assume most shops with *nix clients would just setup NFS and be done with it. I have everything running in a VM, so I'll fire it up later and enable the Unix extensions and see what breaks ;)

EDIT: Haven't enabled the Unix extensions yet in the Directory Services, though I took a really quick peek at the tool tip - if I'm not mistaken, that option should only be enabled if you installed the "Windows Services for Unix" in Windows Server, which I have too little experience with to speak with any authority.
 

TheSmoker

Patron
Joined
Sep 19, 2012
Messages
225
I understand your viewpoint.

One more thing: after you add a user to AD, after how much time that user will be available/visible in FreeNAS? If is not, how you fix it, besides a service restart?
 

mauirixxx

Explorer
Joined
Oct 2, 2013
Messages
60
Not sure - however, I just tested it because now I want to know.

On my FreeNAS 9.2.2 alpha VM, doing a wbinfo -u shows the following users:
Wbinfo_-u.png


However on my Windows 7 test VM, I can already access the file share and create a test folder:
Example-domain-rick.png


I'm guessing because I set the share/folder group owner to EXAMPLE-DOMAIN\Users and the "Everyone" group by default allows everyone access my "Rick" account was able to access and create a folder on the share.

However, test user Bill can still deny Rick access to a folder Bill created:
Rick-denied-access-to-bill.png


So the next time Rick logs in to the FreeNAS share, he won't even know Bill has a test folder there!
Bills-folder-hidden-from-rick.png


But when Steve logs in, he'll create his folder and even see Bills folder, even though Rick can't.
Steve-sees-all.png


The point of all of this is: even though the user doesn't show up in "wbinfo -u" - permissions still work as intended. Also, 30 minutes later, FreeNAS still hasn't updated it's local info, so I guess it's going to require a service restart if you plan on setting a volume owner to a new AD user specifically.
 

TheSmoker

Patron
Joined
Sep 19, 2012
Messages
225
Thank for the update.
Unforunately if you really want to mix things up, you will have to restart the service so it will refresh the data. I have some thoughts about some work arounds. I will post them as soon as I validate them.
 

mauirixxx

Explorer
Joined
Oct 2, 2013
Messages
60
Thank for the update.

My pleasure :)

Unforunately if you really want to mix things up, you will have to restart the service so it will refresh the date.

You lost me here? Refresh the date? Or was this supposed to be "data" ?

I have some thoughts about some work arounds. I will post them as soon as I validate them.

I'm all ears! Once you validate them, I'll do the same on my end, and add it in to the post. Thanks!
 

Serverbaboon

Dabbler
Joined
Aug 12, 2013
Messages
45
Good writeup.

You can force a refresh of by using the rebuild LDAP/ad button at the bottom of the Advanced tab in Settings on your Freenas box.

If your Free as box is acting as a DC the it should update as part of the AD rep period, historically This used to be a max of 36 mins (mcse question) but this would be a large number of servers across multiple sites.
 

mauirixxx

Explorer
Joined
Oct 2, 2013
Messages
60
Good writeup.

Thanks :D

You can force a refresh of by using the rebuild LDAP/ad button at the bottom of the Advanced tab in Settings on your Freenas box.

See, I did that, and failed to document it (hell I forgot I did that roughly a nanosecond after doing a wbinfo -u and not seeing the new user in the list), since it didn't provide immediate results at the time.
 

Markus23

Cadet
Joined
May 7, 2014
Messages
1
Hi there,

Just followed your how-to and managed to get my freenas test-system into our samba4 AD :)
Users and groups are there and even when trying "wbinfo -u" , "wbinfo -g" and "getent passwd" , "getent group" via ssh on the freenas box , all sems good.

Strangely if a create a new global group with some users in the AD , this group won't show up on freenas , to be precise the group shows up in the gui and can be choosen for access rights,
but if I check via ssh/console and wbinfo or getent , the group is missing ?!
Tried everything from deactivating/activating DirectoryServices , Rebuild AD Cache , etc. the group won't show up in console and is only an empty shell when used in freeNAS Gui.

Any hints on that ? how to get the AD User/Group updated in FreeNAS ?


Regards,

Markus


Update:

Just waited around 2 hours and now the newly created group is available both in GUI and Console AND is working for access rights.
Is there a way to speed up the winbind updating ? Rebuild AD/Cache hasn't worked !
 

TheSmoker

Patron
Joined
Sep 19, 2012
Messages
225
You can use the following commands:
Code:
/usr/local/www/freenasUI/tools/cachetool.py expire
/usr/local/www/freenasUI/tools/cachetool.py fill

And you can double check they are loaded correctly with:
Code:
/usr/local/www/freenasUI/tools/cachetool.py keys

Optionally, if you are in a hurry, you can add those commands in cron jobs though web GUI.

Maybe one of the devs can jump right in and tell us what are the events that triggers an AD user/group refresh for the FN GUI. Or if it's a scheduled job how often that job/expiration/refresh time is being set up.
 

Chuwaca

Cadet
Joined
May 25, 2014
Messages
1
Hi,

I have done everything step by step, but still cannoct connect with Windows 2008 R2 active directory users...

[root@freenas] ~# wbinfo -t
could not obtain winbind interface details: WBC_ERR_WINBIND_NOT_AVAILABLE
could not obtain winbind domain name!
checking the trust secret for domain (null) via RPC calls failed
failed to call wbcCheckTrustCredentials: WBC_ERR_WINBIND_NOT_AVAILABLE
Could not check secret
[root@freenas] ~# wbinfo -u
Error looking up domain users
 

ndboost

Explorer
Joined
Mar 17, 2013
Messages
78
I followed this guide, I'm on 9.2.1.6-beta and stuffs acting funky..

wbinfo -u/g/t all shows the right info and works properly. yet getent passwd and group doesn't show the ad users/groups. I don't see any errors at all, and i can't see users or groups in the permissions of shares. Im not sure whats up.
 

NetworkCo

Cadet
Joined
Mar 3, 2014
Messages
8
I have been trying to get connected to my AD for a while now with 9.1.x or 9.2.x . From day one, the version 9 releases seemed to worked no problem. Same occurs for the current stable 9.2.1.5 and 9.2.1.6 RC .

Then after a few hours or weeks even, if I restart FreeNAS it never connects to the AD again. I've had this problem with a 2008 R2 DC as well as the new 2012 R2 AD. Far as I can tell everything is good, time good, DNS, permissions etc...

In order to get it to work, I have to start fresh with a new USB install, auto-import my volume, set up FreeNAS accordingly it will connect and work.... Till I restart of course.

Now, the interesting thing is, if I shutdown, plug in my 8.3 release on the identical hardware it reconnects to the AD and works flawlessly time and time again.


Something is a miss and I just can't point my finger at it yet.
 

robles

Explorer
Joined
Jul 29, 2014
Messages
89
Superb tutorial! Using 9.2.1.6 and everything works perfectly, even after reboots.

@Markus23: Updates are generally directed by the LDAP controller, not the clients (although it could be FreeNAS, I'm not that experienced in this platform). If you didn't specify a kerberos server in your configuration, try going to Services > Directory Services > Advanced Settings and type your domain controller, kerberos server and kerberos password server.

Using this how-to configuration, changes on the W2K8 R2 server reflect immediately in the FreeNAS server.
 
Status
Not open for further replies.
Top