So if everything is ok with your system and network this single command is as good as the plugin. For everything to go as smoothly as possible here you should have a
user and group created on the truenas host named plex with the UID
972 with the GID
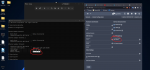
972 do the group first (important), and when you create the user select the group plex as the primary group, feel free to join him to any other auxillary groups you might have created along with your other users. And make sure this user/group has full access to the media by adjusting your permissions in GUI>Storage>Pools>TANK>DATASET>...>Edit Permissions. This step could also be unneeded if you have done this already previously.
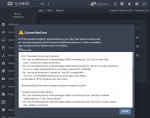
Take care to remove the -plexpass and _plexpass if you arent a subscriber, as well as any IP tweaks you need to do. Also ensure the path to your media is correct i.e. "/mnt/ZFS/media in the last line. Open a shell from the GUI>Shell and paste the following Shift+Insert (do your edits in notepad).
echo '{"pkgs":["multimedia/plexmediaserver-plexpass","ca_root_nss"]}' > /tmp/pkgs.json && iocage create -r 12.2-RELEASE -p /tmp/pkgs.json -n plex ip4_addr="vnet0|192.168.50.222/24" defaultrouter=192.168.50.1 vnet=on boot=on allow_raw_sockets=1 host_hostname="PLEX" && iocage exec plex sysrc plexmediaserver_plexpass_enable=YES && iocage exec plex service plexmediaserver_plexpass start && iocage stop plex && iocage fstab -a plex "/mnt/ZFS/media /media nullfs rw 0 0" && iocage start plex
I tested this single command does everything thats needed for you to be able to access PLEX at
http://192.168.50.222:32400/web/
If you took care to make sure the user plex with UID 972 can access the media at the TrueNAS level all will be good when you add your media from /media for scanning.