CPU cooling challenge on Supermicro X9SCM-F mobo with Xeon E31220 @ 3.10Ghz and stock passive heatsink with heatsink bracket underneath

mbrakes

Dabbler
Joined
Jul 16, 2020
Messages
18
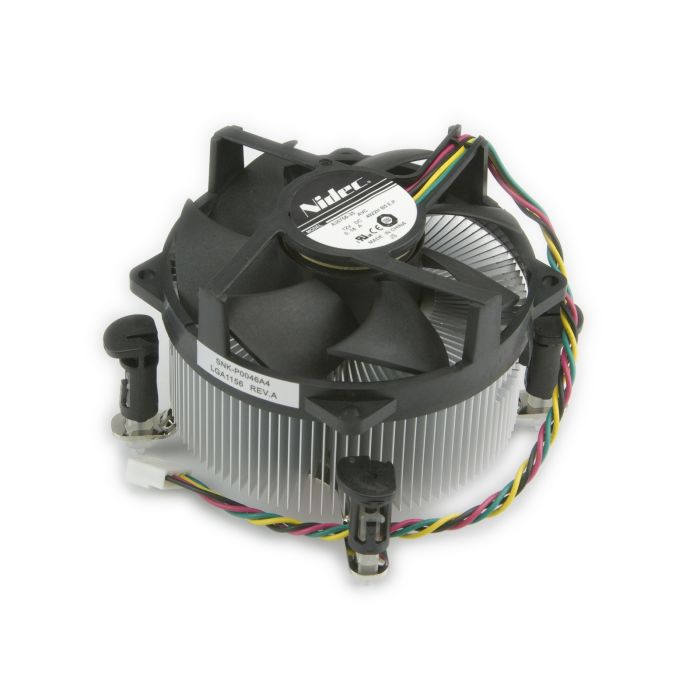
I have this combo of mobo and CPU, and when I planned my build, I was expecting to reuse an active cooling unit I had leftover from an old LGA 1151 PC build, as my research suggested that the installation holes for the LGA 1151 used in the previous build and the LGA 1155 socket used by the X9SCM-F should be the same.

But when I received this mobo, it turned out it had been fitted with what looks like the passive heatsink pictured on page 2-5 in the mobo manual, pictured below, which includes a bracket underneath the mobo which interferes with the installation pins of the LGA 1151 active cooling unit I had. I could not figure out how to remove it, as removal seemed to require force which I'm not inclined to subject the board to:
Image.png

My makeshift solution was to just strap a 80mm Arctic F8 silent 1200rpm fan I had lying about on to the passive heatsink using zip ties, to force air onto the heatsink. Sizewize, this 80mm fan is a near perfect fit onto the passive heatsink. I haven't had time to look into fan control, so I believe this fan is just running at max rpm all the time.

After finishing the build and doing some testing, it seems like the CPU is hovering around 37-45 degrees celsius under moderate load, and peaking at around 50 degrees occasionally. From my understanding, this is slightly higher than what is desirable. When peaking, I'm occasionally seing yellow and red warning signs for the CPU in the TrueNAS dashboard adjacent to the "highest usage" metric, similar to what is described here. So my question is:

Is this something I should worry about?

And if not negligible - does anyone have any good suggestion on how to improve the situation?

I found this thread which suggests that no other heatsinks exists for this mobo except the stock one, and that the passive heatsink can't be removed, which leaves me with various "creative" solutions. Would another 80mm fan with a higher rpm be my best bet? And if so, can anyone recommend a faster fan that is still somewhat silent, affordable and easy to get hold of?

Advance thanks! :smile:
 

jgreco

Resident Grinch
Joined
May 29, 2011
Messages
18,680
I could not figure out how to remove it, as removal seemed to require force which I'm not inclined to subject the board to:

Careful application of a solvent to soften the adhesive, followed by some warming with a heat gun, will loosen it to the point of easier pry-ability. Sticking some long M3 screws in, turning it upside-down, and gently rocking circularly over all the screws to apply pressure on individual corners to slowly loosen it will carry the day. Failure to be cautious and careful can cause permanent damage.

Technical grade isopropyl alcohol (99%+ isopropanol) often works on these. If it is the typical foamy/rubbery-taped type of adhesive, it will tend to suck up a bunch of the alcohol. This is *good*. In the shop, we keep a dropper bottle filled with iso and this makes it super-easy and safe to run a bead of iso around the edge of an object like this. If you end up with one of the more rubbery-taped backings, it isn't going to penetrate as well as the foamy stuff.

You do not want to apply massive amounts of heat with the heat gun. More like hairdryer level heat. You could even use a hairdryer. You are just trying to soften things up, not melt the solder. Heat will tend to evaporate the iso as well.

More aggressive solvents such as acetone ("nail polish remover") or 3M 8984, are not recommended because they quickly transform from loosening the PCB to eating through coatings, often in mere seconds. Not recommended in this case.

From my understanding, this is slightly higher than what is desirable.

Yeah. Airflow across a 1U heatsink is supposed to be *across* it at a fairly high volume, with an air shroud. A cheap PC/gamer grade fan is noncompetitive with what the heatsink is designed for environmentally.

I personally think you're going about this wrong, and should leave the base alone. Most of the "replacement" options here are going to be plastic-y things with asinine pushpin spreader clips to go into the mainboard holes. These can break. The metal backer will NEVER fail. You may be better off just finding some M3 screws and doing a little bit of modification to your cooler to adapt it.
 

mbrakes

Dabbler
Joined
Jul 16, 2020
Messages
18
Thanks a lot @jgreco!

You may be better off just finding some M3 screws and doing a little bit of modification to your cooler to adapt it.

Yes, I think I will leave the base alone, as you suggest.

But, if you please don't mind me asking, as I'm a complete noob and need spoonfeeding - what do you suggest in terms of "modification to the cooler" - please...? :smile:
 

jgreco

Resident Grinch
Joined
May 29, 2011
Messages
18,680
don't mind me asking, as I'm a complete noob

Really only a complete noob would think I mind questions being asked. I'm on the far side of a professional lifetime doing this stuff, and it's fun stuff, and I've probably got a few hundred or maybe even a thousand messages to my name... ;-)

"modification to the cooler"

So, it's hard to say. I don't happen to recall the exact details of that particular heatsink bracket, and I gave away the last few 1U servers with those boards a year or two ago.

These things typically worked one of several ways.

In one, the "pins" of the bracket end up roughly flush with the top of the PCB, and the heatsink screws are spring-loaded with significant travel ability, which lent themselves to a rookie mistake of not evenly tightening them. You have to first go around and tighten them "finger" tight (i.e. just lightly), then tighten them "hand" tight in a double diagonal ("X") pattern, and then finally crank down all the way, again in an X pattern. Failure to do this would result in uneven mounting and bad cooling.

In another, the "pins" of the bracket extend upwards beyond the PCB by some amount (several millimeters min.), but still use spring-loaded screws with some good amount of travel.

A "better" variation on that was where the pins came up to a carefully measured amount (essentially the height of the socket+CPU) and used spring-loaded screws with minimal travel just to keep pressure on the CPU tight. This was highly effective at preventing amateurs from the dangerously uneven mounting scenario.

Now, a typical low end cooler will have some "push-pin" style attachment, where there is a pin with three or four little "hooks" arranged in a circle, and a central pin, that when depressed, will force the hooks outward to catch on the bottom of the mainboard. If you have one of these, you can remove the pin, use a flush cutter or Dremel to remove the hooks, and use some M3 screws and washers to jerry-rig an attachment -- but only if the backing bracket is reasonably flush with the mainboard. Such coolers are like the Supermicro SNK-P0046A4

snk-p0046a4_1_2.jpg


However, in general, it is probably better for you to look at a fan designed for bracket mounting. I suspect that the matching cooler for your application is SNK-P0051AP4

snk-p0051ap4_1_1.jpg


but actually verifying this involves a bunch of screwing around, reading manuals, etc., and the minefield here is stuff like narrow ILM and parts clearance on the mainboard. Supermicro's heatsink guide doesn't really always give you the help you'd like, but it's a good resource.

If you can verify that the bracket on the board is 0028L, that same bracket comes with the cooler above, which is used in some of the old Supermicro workstations and 4U's. This is not a guarantee of compatibility, but it is a strong hint at potential compatibility.

I found this thread which suggests that no other heatsinks exists for this mobo except the stock one,

I find the level of ignorance on some of the other hardware forums hard to tolerate. I would also rub glass shards in my eyes than watch Linus Tech Tips. Supermicro has many failings, but lack of options is not likely to be a credible one. I have actually spent a lot of time over the years doing things with Supermicro gear that was never intended; refurbishing UIO into WIO servers, building WIO servers with parts combinations "not blessed" by SM, or my favorite, making low power hyperconverged servers out of X10SDV-7TP4F, a RAID controller, and a 24-bay 2.5" 2U chassis. If anything, the problem is that there are too many choices, and you can get screwed if you don't do your homework.

My gut instinct here is that you can find both Supermicro and non-Supermicro fixes to your cooling problem, capable of using the installed plate. Lots of 1151/1155 coolers are backer-based, and the main issue would be variability in the specific height of the posts and the screw size.

Please excuse some rambling. I'm sorta just waking up this morning. Hopefully you find the useful tidbits you need to make a good path forward within.
 

mbrakes

Dabbler
Joined
Jul 16, 2020
Messages
18
Thanks a lot @jgreco, very much appreciated, and no need to apologize for rambling, it's just spice, and I pick up stuff from your ramblings too, loads of useful info here! :smile:

The SNK-P0051AP4 would probably be my safest bet, as you suggest. I can't confirm 100% until actually mounting one, but by the looks of it, the screw arrangement on that cooler looks like it is made to fit on the kind of bracket I have on my mobo. But the SNK-P0051AP4 seems really pricey relative to the rest of my build - at least from judging from ebay prices - and I can't find any locally. With VAT and shipping to my part of the world it is going to be really expensive. And it is loud too, it seems - "Acoustic Noise: 38.0 dB(A) at Rated Speed" according to the spec sheet - ATM I'm not able to hide my NAS in a closet, so I'm aiming at a quiet build, if possible.

After some more digging around, I found this thread, which lists BKT-0028L back plate compatible CPU coolers.

So I assume the coolers on this list with a "YES" in the "LGA115X backplate" field should fit.

I found a dirt cheap Cooler Master Hyper H411R Black locally which I will try first, using your M3 screw method, if that doesnt work out, then I'm back to the drawing board and the list above, I guess.

What should be my aim temperature-wise for the CPU BTW? At what temperature level am I allowed to settle and pat myself on the back? :smile:
 

jgreco

Resident Grinch
Joined
May 29, 2011
Messages
18,680
What should be my aim temperature-wise for the CPU BTW?

Below 50'C under moderate load is lovely if you can manage it, but you likely won't. Below 65' is completely reasonable. Above 75' is too warm, and going much more than that can cause damage if the CPU doesn't self-throttle. Different people may have different opinions.

CPU's are not as sensitive to temperature as other components, especially PSU's and HDD's. However, the CPU temp is often a proxy for those.
 

mbrakes

Dabbler
Joined
Jul 16, 2020
Messages
18
Top