So you've had a disk fail, or you know it's about to fail, and you need to replace it. And for whatever reason, the manual's instructions weren't clear enough. So, step by step, here's how to do it.
Note: The illustrations below describe the simple case of replacing a disk in a two-disk mirror. However, they'll work in any pool with sufficient redundancy or parity. This can be a mirror (of any width) or RAIDZn. There's absolutely no difference in the procedure.
DO NOT USE THE VOLUME MANAGER
Seriously, no part of replacing a failed disk involves clicking the Volume Manager button. Don't do it.
Log in to the FreeNAS web GUI, and click on the Storage button. On the page that comes up, click on your pool. You'll notice there are two entries with your pool name; click the first one (it's highlighted in the screen shot below).

Then, below the list, you'll see three buttons. The far-right one (the one that looks like a blank sheet of notebook paper) is the volume status button--if you hold your mouse over that button for a second, you'll see a tooltip pop up saying as much. Click that button.

In this screen, you'll see that the troubled disk is already offline. If it weren't, a third button marked "Offline" would appear below the list. Click on the troubled disk, and if you see a button that says "Offline", click it.
Shut down your server, remove the failed/failing disk, and replace it with a good, burned-in, tested disk. Power up the server.
Log back into the web GUI.
DO NOT USE THE VOLUME MANAGER
Just in case you forgot, do not click on the Volume Manager button.
Click the Storage button, select your pool, and click Volume Status, just as you did above.
Click on the entry for the OFFLINE disk on the Volume Status page. Then click the Replace button at the bottom.

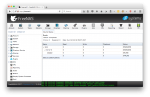
In the window that pops up, select your new, replacement disk from the Member disk drop-down, then click the Replace Disk button. In a moment, the disk will be replaced, and resilvering will begin. The page will then look like this:

You can continue to use your server while resilvering is in progress, though performance may suffer.
Note: The illustrations below describe the simple case of replacing a disk in a two-disk mirror. However, they'll work in any pool with sufficient redundancy or parity. This can be a mirror (of any width) or RAIDZn. There's absolutely no difference in the procedure.
DO NOT USE THE VOLUME MANAGER
Seriously, no part of replacing a failed disk involves clicking the Volume Manager button. Don't do it.
Log in to the FreeNAS web GUI, and click on the Storage button. On the page that comes up, click on your pool. You'll notice there are two entries with your pool name; click the first one (it's highlighted in the screen shot below).
Then, below the list, you'll see three buttons. The far-right one (the one that looks like a blank sheet of notebook paper) is the volume status button--if you hold your mouse over that button for a second, you'll see a tooltip pop up saying as much. Click that button.
In this screen, you'll see that the troubled disk is already offline. If it weren't, a third button marked "Offline" would appear below the list. Click on the troubled disk, and if you see a button that says "Offline", click it.
Shut down your server, remove the failed/failing disk, and replace it with a good, burned-in, tested disk. Power up the server.
Log back into the web GUI.
DO NOT USE THE VOLUME MANAGER
Just in case you forgot, do not click on the Volume Manager button.
Click the Storage button, select your pool, and click Volume Status, just as you did above.
Click on the entry for the OFFLINE disk on the Volume Status page. Then click the Replace button at the bottom.
In the window that pops up, select your new, replacement disk from the Member disk drop-down, then click the Replace Disk button. In a moment, the disk will be replaced, and resilvering will begin. The page will then look like this:
You can continue to use your server while resilvering is in progress, though performance may suffer.