Pheran's 32TB FreeNAS build with photos

Pheran

Patron
Joined
Jul 14, 2015
Messages
280
This is the build that resulted from the questions I posted in this thread. Thanks to all who contributed! The objective was to build a "bulletproof" FreeNAS server with 8x4TB drives that is fully compliant will all FreeNAS hardware recommendations. I'll use this thread to photoblog the resulting build. For anyone else thinking of building a FreeNAS box, I highly recommend the following resources:

FreeNAS Intro Slideshow
Hardware Recommendations Thread

Here is the parts list with the prices I paid in the US. Parts were mainly sourced from Newegg but a few things came from Amazon or Ebay.

Fractal Design Define R5 Case: $90
Fractal Design Dynamic GP-14 140mm Fan: $16
SeaSonic S12G-450 450W PSU: $64
Supermicro X10SL7-F Motherboard: $252
Intel Xeon E3-1220V3 CPU: $180
2x Crucial CT2KIT102472BD160B 16GB (2x8GB) ECC RAM: $286
2x Sandisk Ultra Fit 32GB USB Flash Drive: $23
8x HGST 4TB NAS Hard Drive: $1208

Server Total (no storage): $911
32TB Storage Drives: $1208
Total Cost: $2119

I'd like to point out that the total for the bare server is slightly less than the cost of the Synology DS1815+ I was originally thinking of getting, but is massively more powerful. Admittedly, it will consume more power than the Synology, but it will have more features and the ability to do things like Plex transcoding and Virtualbox without breaking a sweat. I think that's a better than fair tradeoff.

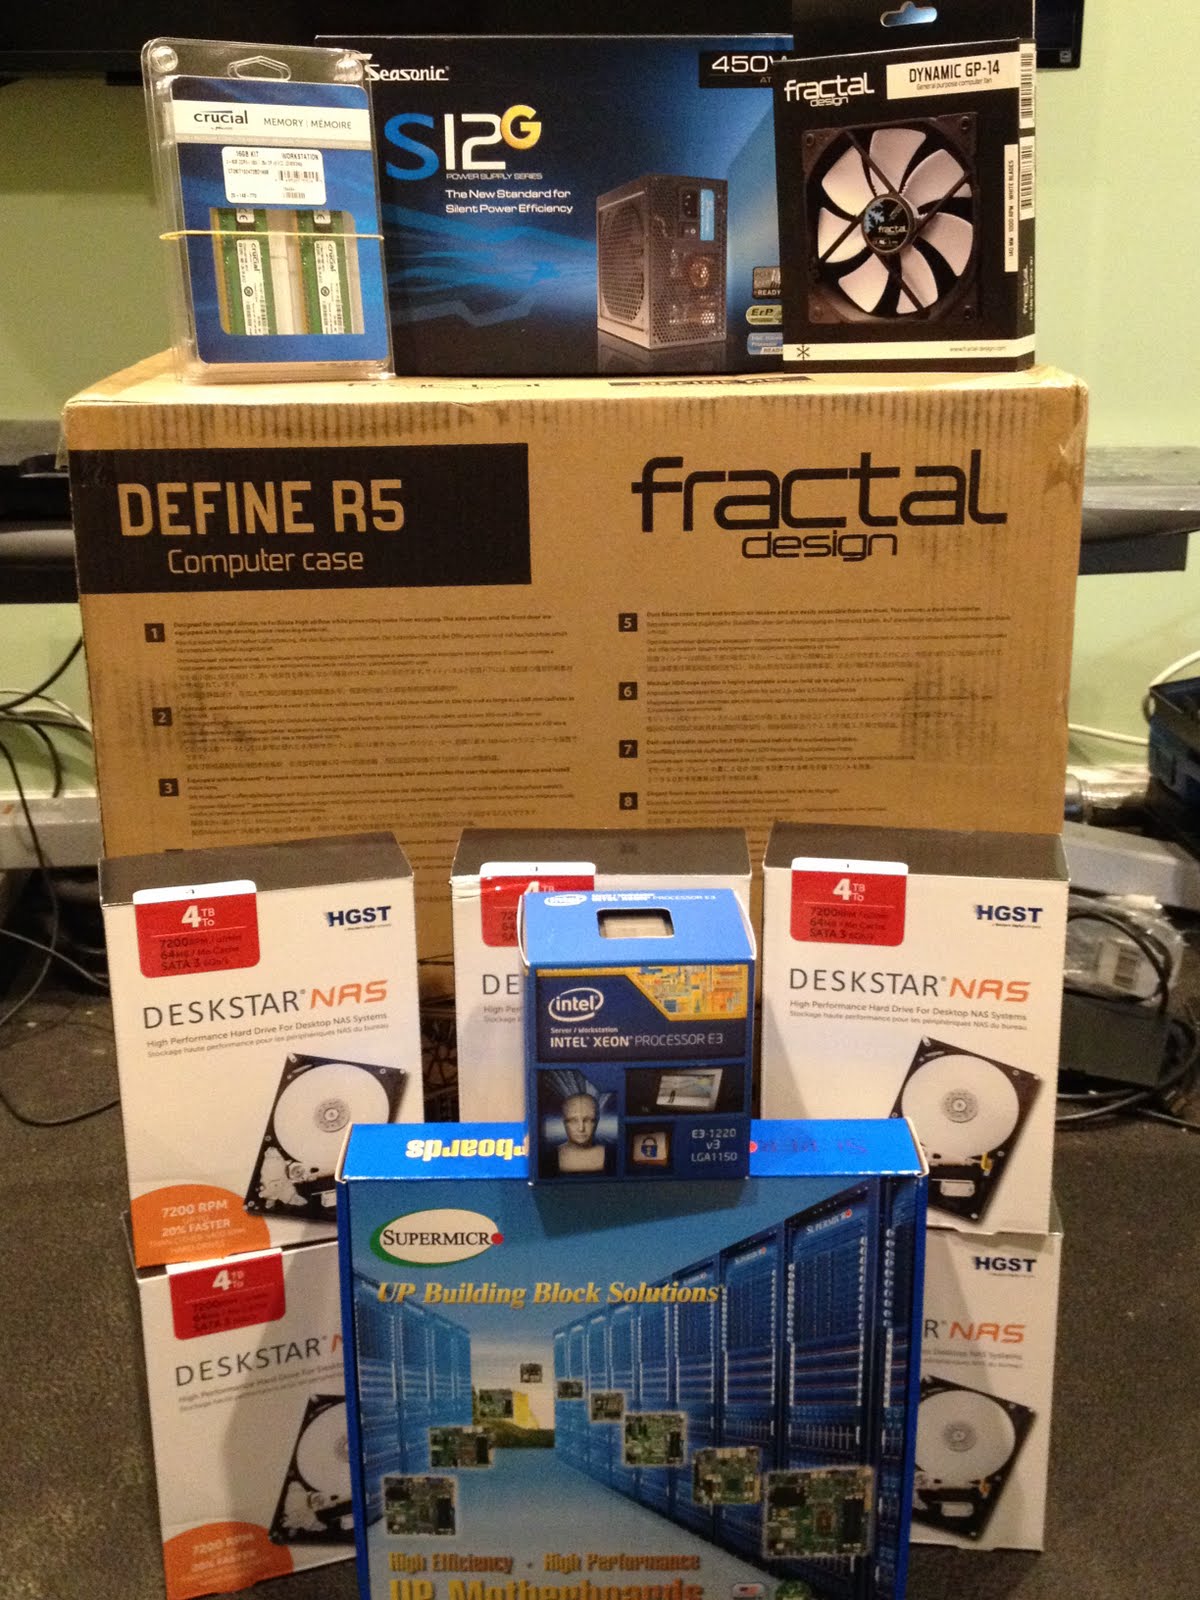
All items have arrived! In case you are wondering why there are only 6 NAS drives, I have two additional drives running in a server that will be replaced by this build. I purchased them very recently because of a drive failure in the old server, so they are exactly the same HGST model as the rest.
IMG_1409.JPG


Here's a view of the interior of the Define R5 case. This case looks fantastic and there's plenty of room inside for the build. You can see the 8 3.5" bays on the right. You could even squeeze 10 3.5" drives in here if you put adapters in the two 5.25" bays at the top, but the cooling for the last two drives might be suboptimal. There's a box of case accessories in the bottom bay that I hadn't removed yet.

IMG_1411.JPG


This isn't a hotswap case, but the drives will all be mounted in these white metal sleds, which should make taking out any drive relatively easy.

IMG_1414.JPG


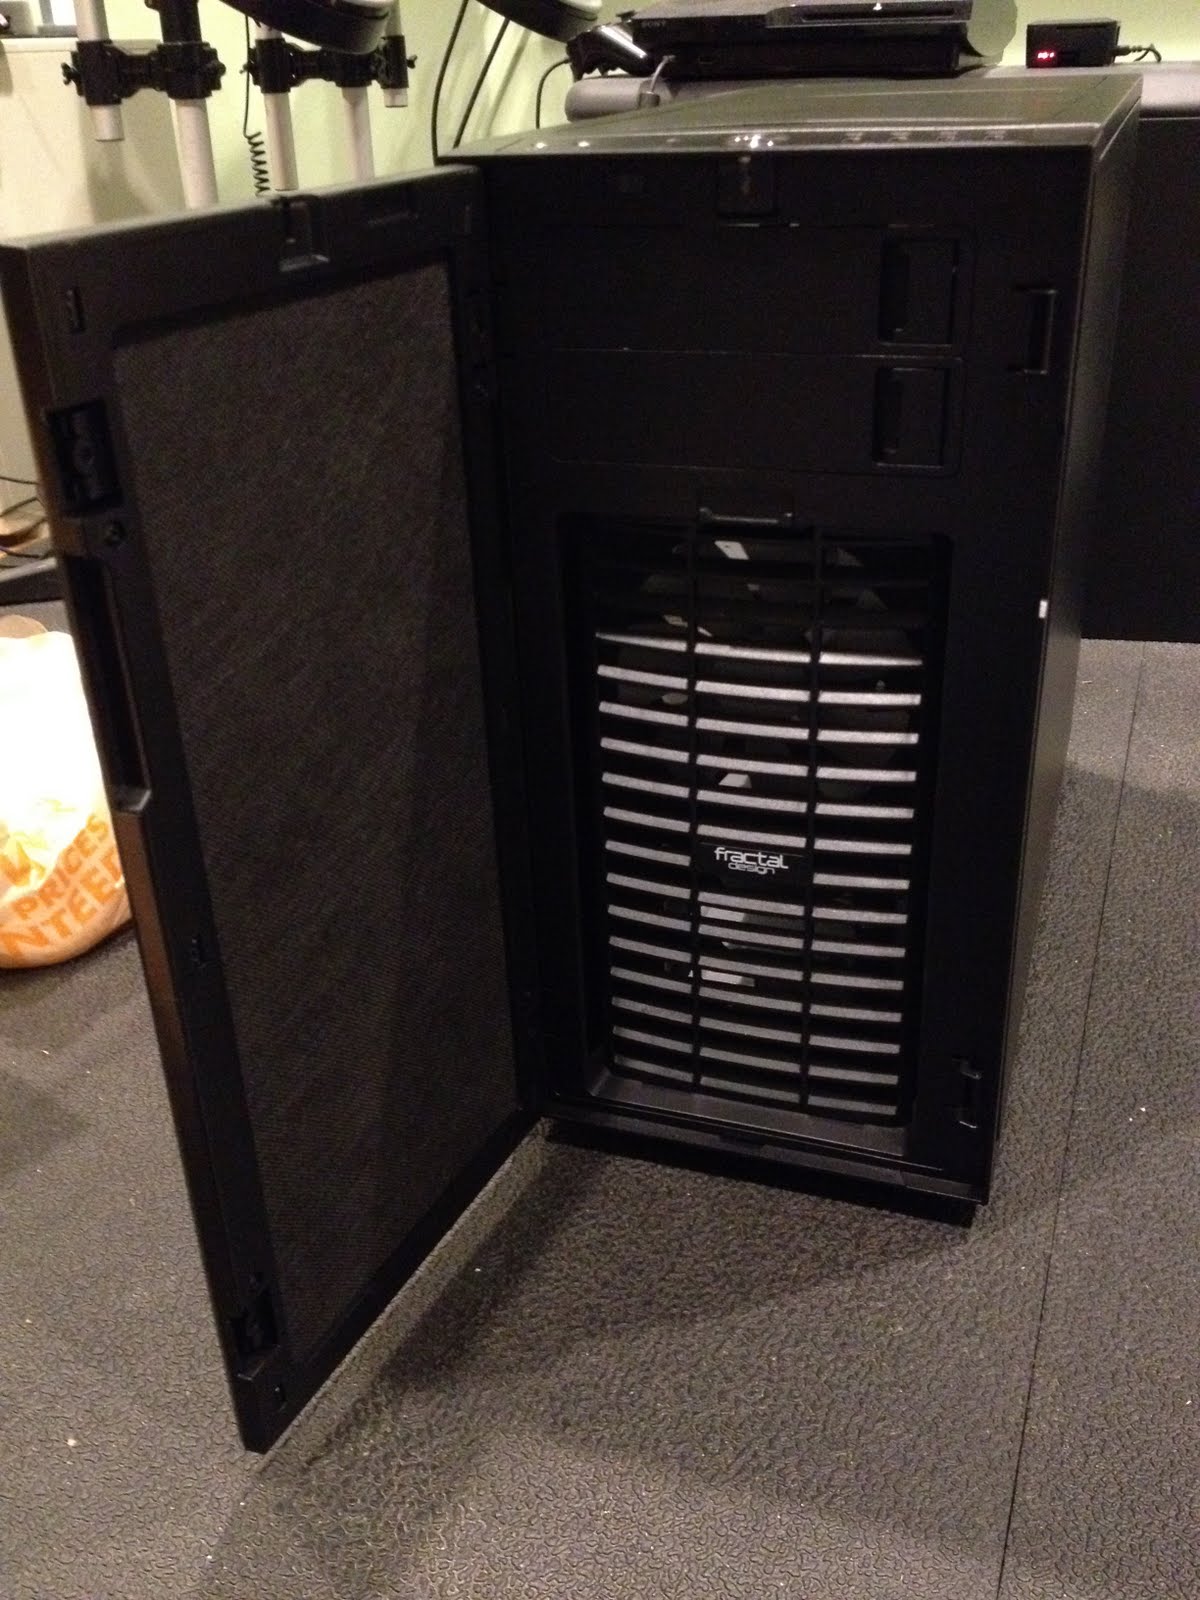
Here's the front of the case with the door open - the lower part is the front fan filter. You can see the interior of the door is padded with some sound-dampening material. Sorry some of these are a bit dark - the hazards of photographing objects that are mostly black!
IMG_1420.JPG


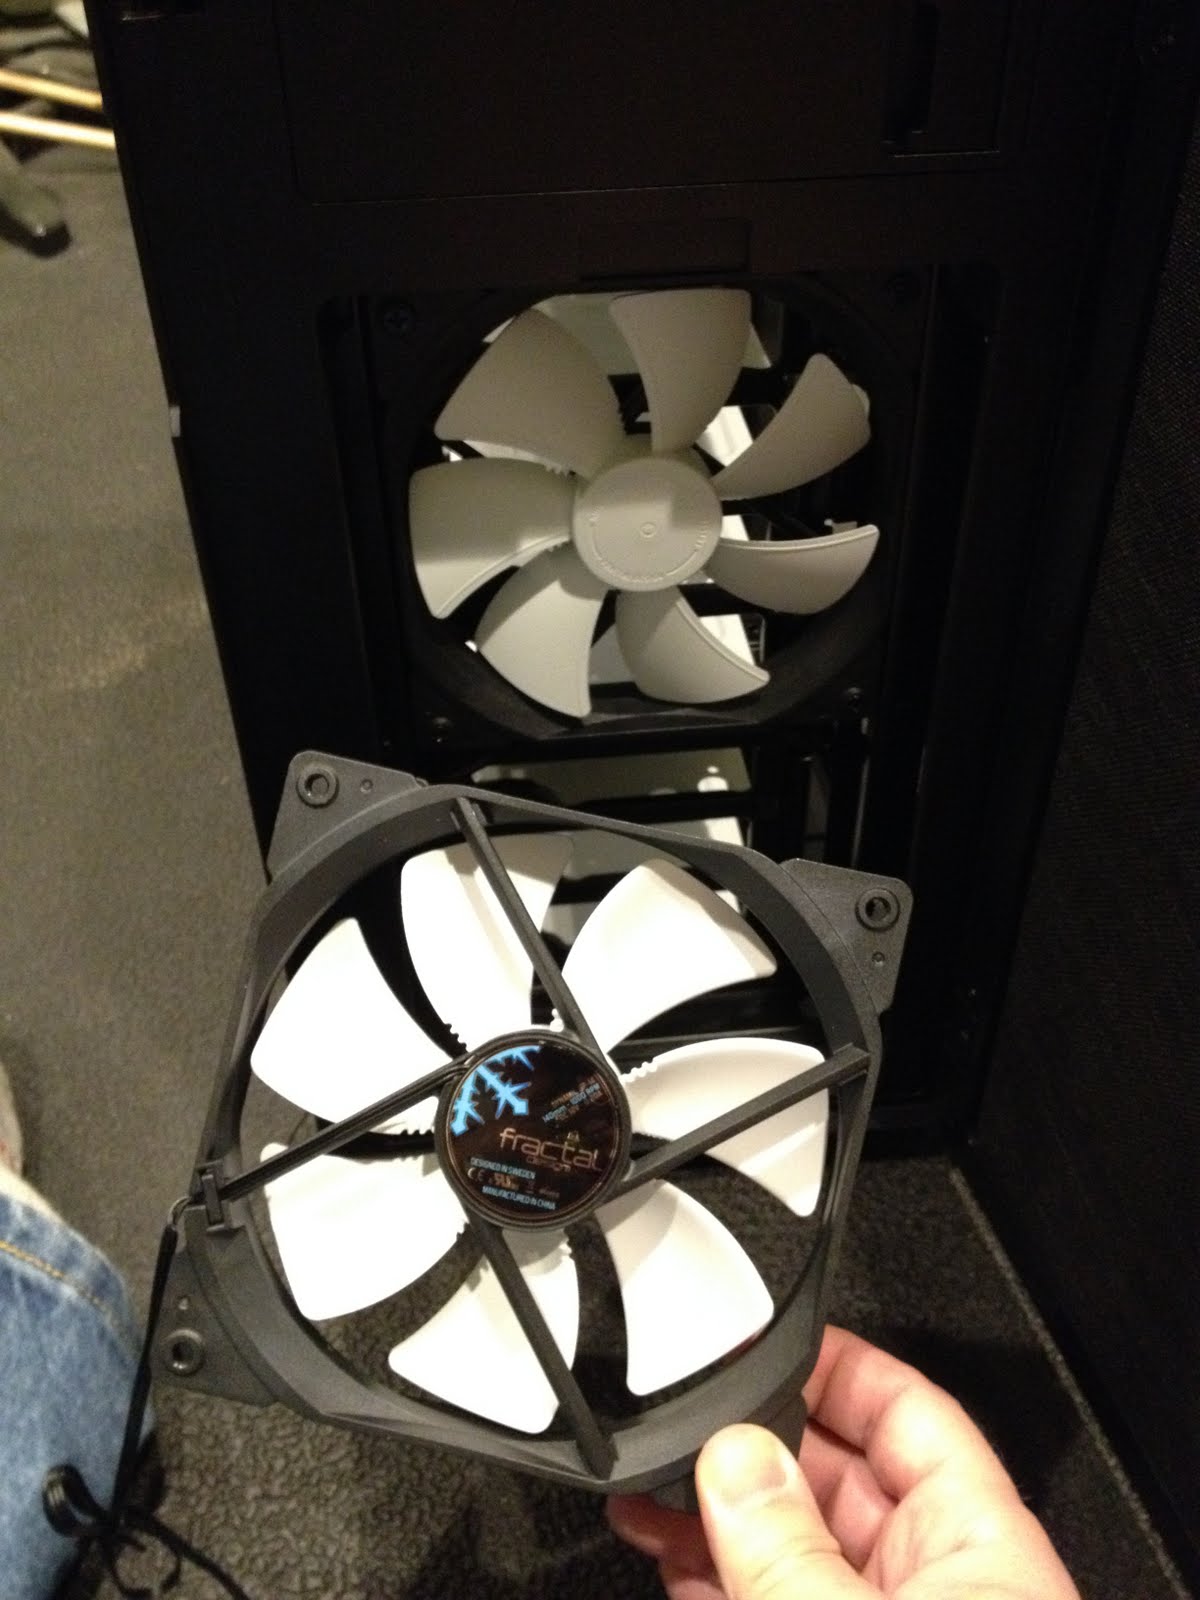
With the fan filter removed, you can see the exposed 140mm front fan that is included. The way this fan is positioned, it will basically cool the upper four 3.5" bays. This is why I'm installing a second front fan, which should ensure that the lower four drives also get airflow.
IMG_1429.JPG


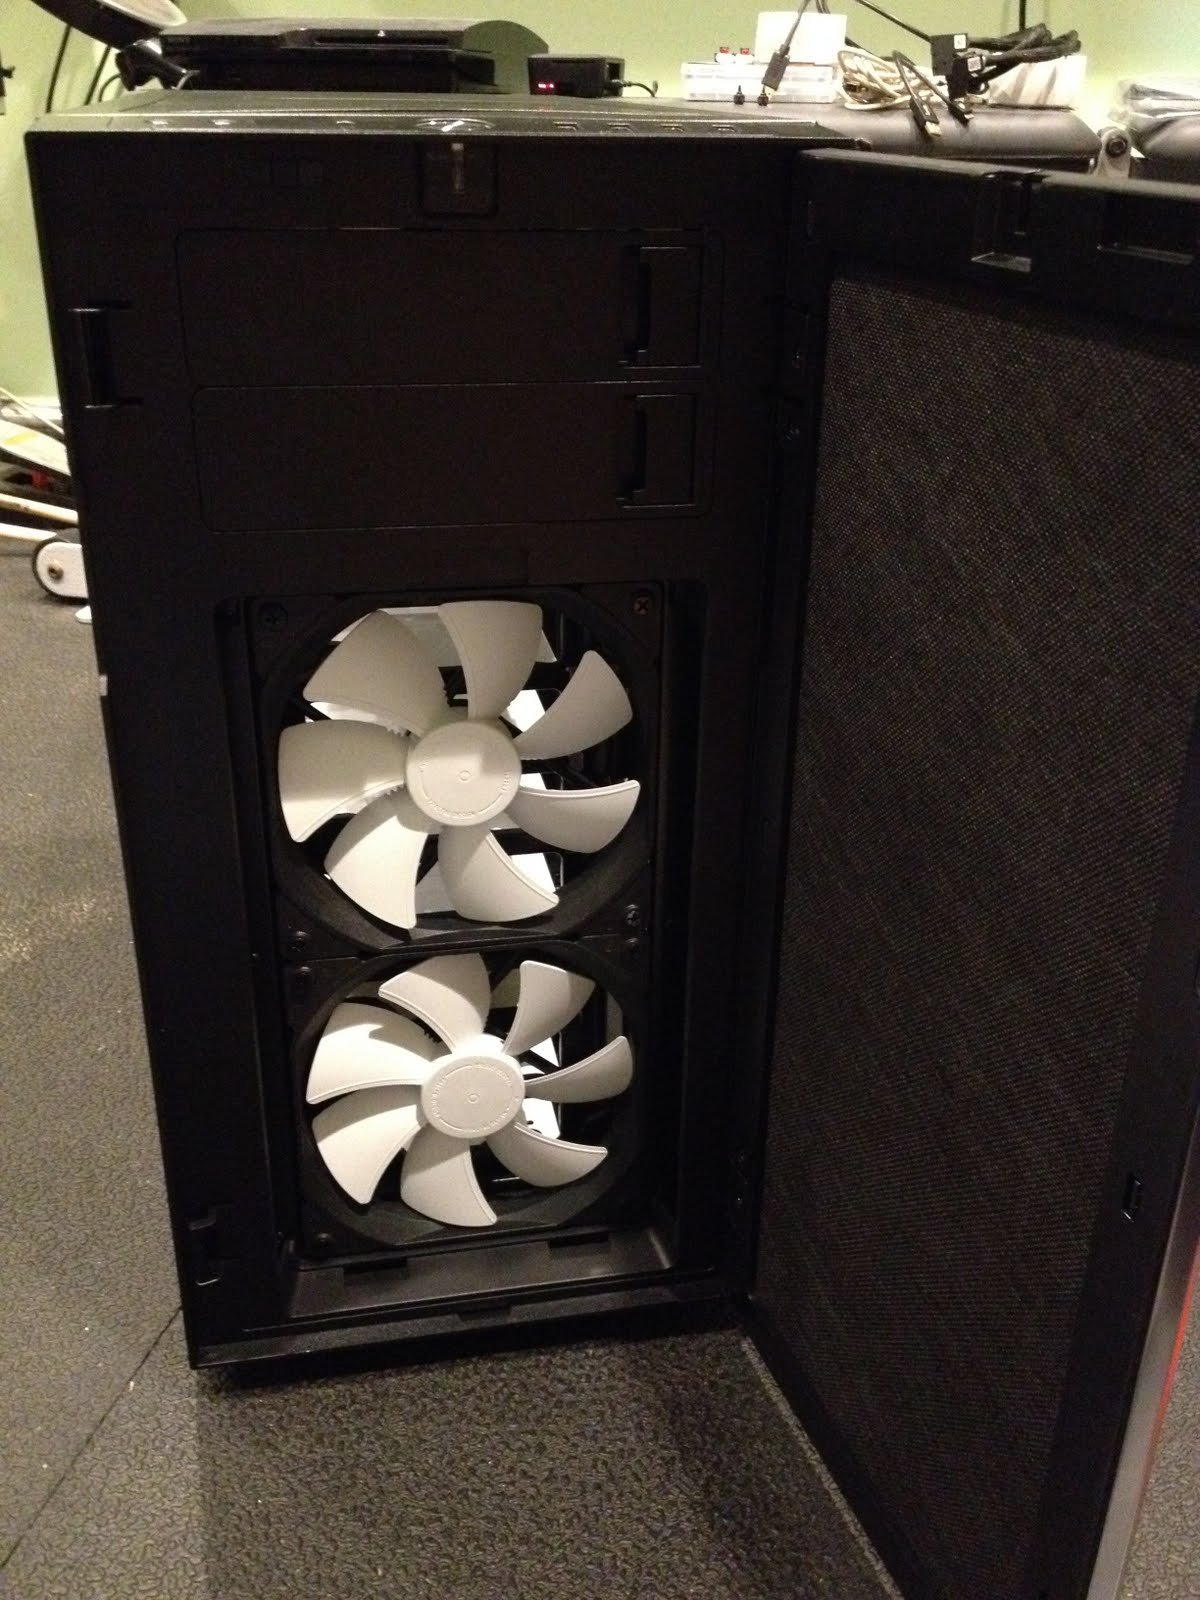
The Fractal GP-14 is the perfect match for the other fans in this case, I just have to flip it over so that it's an intake fan. The screws that come with the fan aren't useful for this mount, but thankfully the case accessory box includes 4 long screws for the additional front fan mount. It looks great, and eagle-eyed readers may notice that I flipped the front door to open on the other side - yes, you can do that.
IMG_1432.JPG


Speaking of the case accessory box, here's everything you get.

IMG_1423.JPG


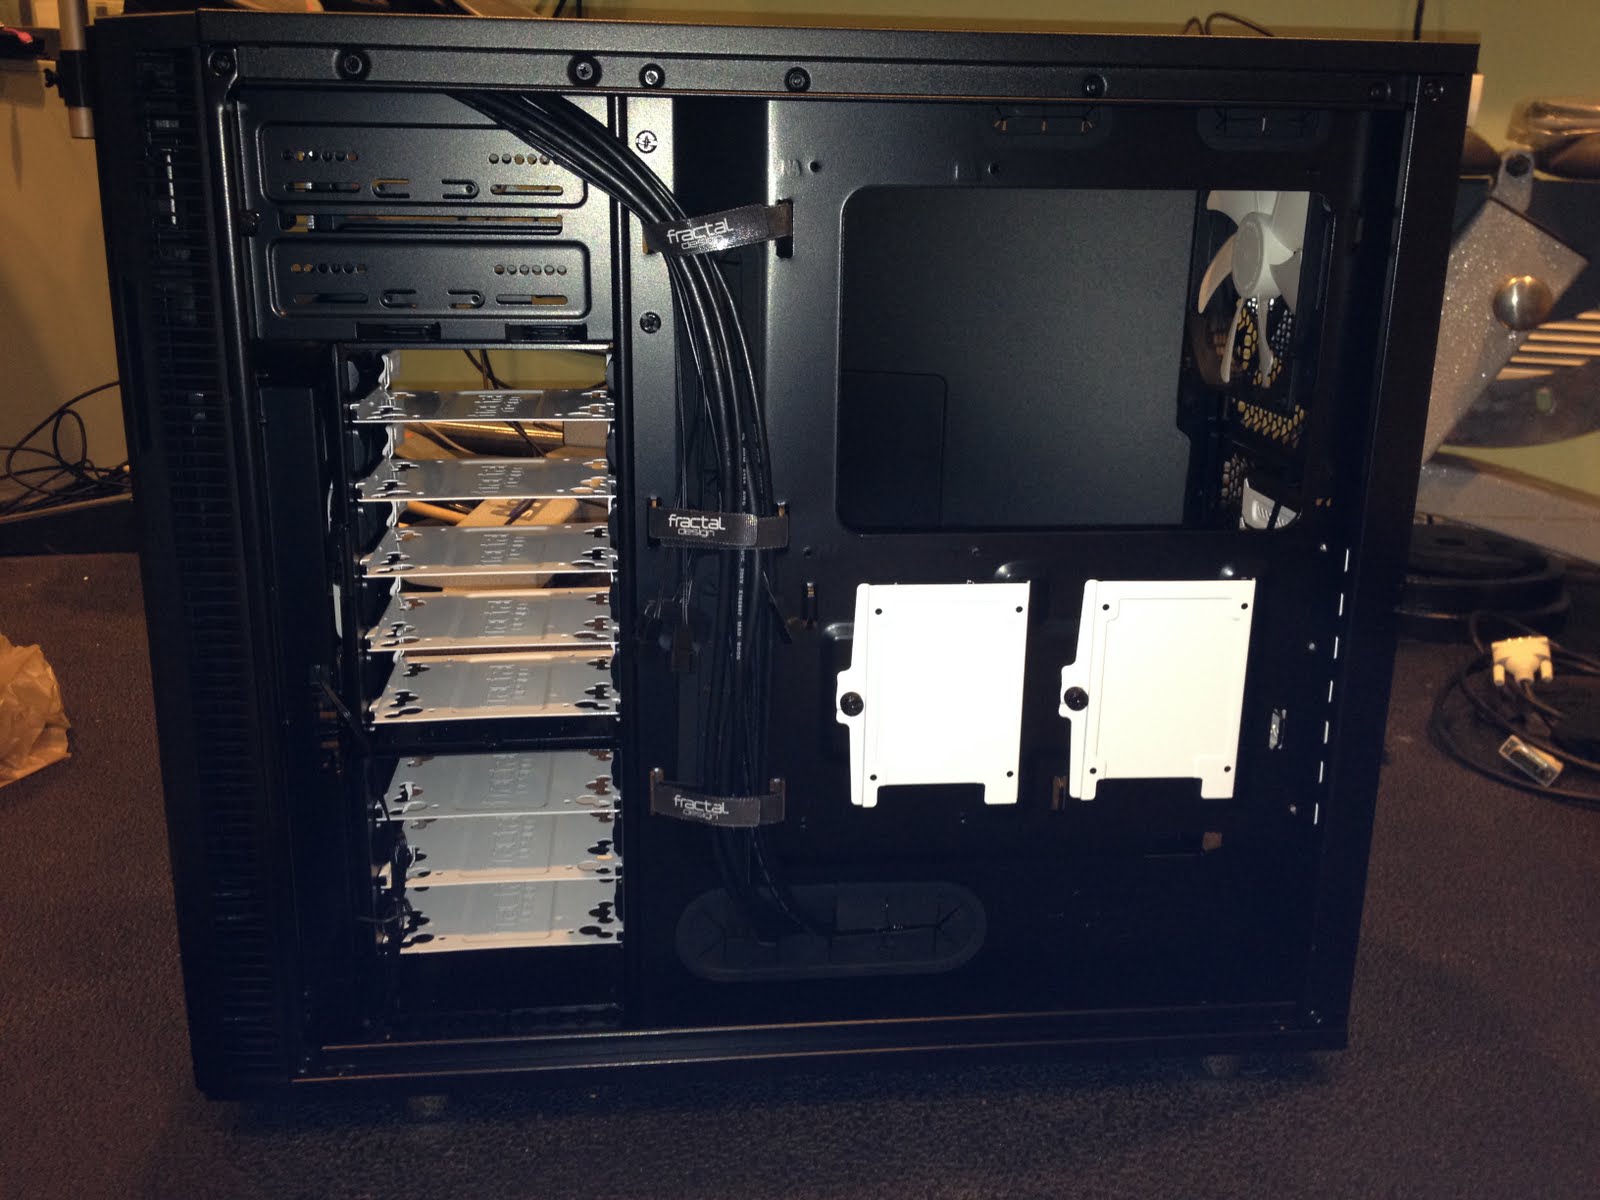
Let's take a look at the right side of the case. Here you can see the rear of the drive bays and a bunch of cable-routing features. There are rubber grommets all around the motherboard tray that allow for easy cable routing back and forth through the case. There are even some you can't see because they are underneath the front panel cables that are routed through those built-in velcro ties. The two white panels are the right are 2.5" drive mounts, so you can mount a couple of SSDs underneath the motherboard. I might use these in the future for jail or VirtualBox storage.

I did get one surprise back here - some of those cables are for the built-in fan controller in this case. It is able to control three fans and there's a switch on the front that you can set for low/medium/high fan speed. This could work out perfectly since I have three case fans, but the surprise was that the input power for the fan controller is a SATA power connector. This is mildly annoying since all eight of my SATA power connectors are already claimed by hard drives, but it's not a big deal - I can just use a molex to SATA adapter to for the fan controller.
IMG_1425.JPG


Time to mount the power supply. Here we see the bottom rear of the case. There are a couple of nice features here, one is the filtered vent on the bottom of the case for the PSU fan intake. There are also four rubber feet at the bottom that the PSU can rest on. By allowing the PSU to intake air directly from underneath the case and then exhaust it out the rear, it removes the PSU from the cooling equation for the rest of the case.

IMG_1434.JPG


Here you see the SeaSonic mounted in the case; the fit of this PSU happened to be perfect because the length of it comes right to the end of the rubber feet.

IMG_1437.JPG


Here's the Supermicro X10SL7-F motherboard. This is one of the most popular motherboards for FreeNAS because of the built-in LSI RAID controller, which can be flashed to IT (Initiator Target) firmware so that FreeNAS gets direct access to the drives instead of being exposed to a hardware RAID volume. The LSI controller supports 8 SAS/SATA drives, these are the blue connectors on the lower right of the board. The additional six SATA connectors at the bottom of the board on the right are the Intel chipset ports. The two white ports are SATA3 6 Gbps ports and the four black ports are SATA2 3 Gbps. I'll be using the 8 LSI ports for my drives.

IMG_1445.JPG


Here are two sticks of the Crucial ECC memory. The only reason I posted this photo is to highlight the Micron part number MT18KSF1G72AZ-1G6E1 on the Crucial CT2KIT102472BD160B DIMMs, which is exactly the part number that appears on the Supermicro compatibility list for this board (well, there's an extra ZE at the end on the DIMM, but I don't think that matters!).

IMG_1447.JPG


Here's the board after installing the 32GB ECC RAM and the Xeon CPU with fan. One minor annoyance on this board is that there are no fan connectors right next to the CPU, but it's a MicroATX board so it's not like anything is that far either. I plugged the CPU into FAN-A but I admit I'm unclear if you have to use a specific fan connector for the CPU. EDIT: Based on additional research, it seems preferable to use FAN-1 for the CPU, not FAN-A.

IMG_1449.JPG


Here's the motherboard mounted in the case and hooked up. The power cable routing isn't as clean as I'd like because unfortunately those cables aren't long enough to go underneath the board and come back out at the top (which the case would allow just fine). So that's a minor fault with this power supply, but not really a big deal. As of right now the server has been running Memtest86+ overnight and everything looks great so far! More to come in the next parts after I've finished qualifying the memory.

IMG_1454.JPG
 
Last edited:

Pheran

Patron
Joined
Jul 14, 2015
Messages
280
After 50+ hours of MemTest86+, the memory looks good! I also later checked the IPMI event log to make sure no ECC errors had popped up (hopefully that's where they go?).

IMG_1459.JPG


After memory testing, it was time to get the IPMI interface up and running so I could ditch the monitor and keyboard. I just plugged in the IPMI port and then used my router to figure out what address it had gotten via DHCP. After logging into the web interface I used the Configuration/Network page to change it to the IP I wanted it to permanently have. I have to say that the IPMI interface is fantastic - I've had an even better experience with it than I usually do with Dell DRACs or Cisco CIMCs. Here's a quick shot of the IPMI web interface while also running the Java console app.

ipmi1.png


With the basic hardware running, it was time to verify firmware versions. I found that the board shipped to me from Newegg with BIOS 2.2 and IPMI 1.92. The IPMI version is current but BIOS 3.0 is available. After reading this thread I decided that I had no need for BIOS 3.0, I'm sticking with 2.2 - especially since my IPMI temperature sensors are all working fine! Since that was thankfully a no-op, the next task was to deal with the LSI RAID firmware. Using the IPMI console I went into the LSI manager (hit Ctrl+C at the LSI boot screen) and found that it was running v15 IR (Integrated RAID) firmware.

lsi2308sasaddr.png


The LSI firmware upgrade procedure is slightly arcane, but basically you want to download the v16 IT (Initiator Target) firmware from Supermicro (EDIT: if you are installing FreeNAS 9.3.1 or higher, then you want the newer v20 firmware instead) then copy the contents of the UEFI directory to a USB stick (which does NOT have to be bootable, ignore the install doc on that). You'll also need the last 9 digits (ignore the colon character) of your SAS address - mine is 01C8D2800 as you can see from the screen above. Boot up the system, hit F11 to get into the boot menu and choose the UEFI shell. If you only have the USB stick connected it should end up as fs0, just change to it and then run SMC2308T.NSH.

uefishell.png


After the script does a few things it will ask you to type in the 9-digit portion of your SAS address then the flashing should complete. Afterwards I verified that I really had the v16 IT firmware and my SAS address was still the same. Success!

lsi2308itflashed.png


With all the firmware in order, I could finally install these beautiful 4TB HGST drives - these things feel solid. The Define R5 mounting trays are genius - they have little Mickey Mouse shape cutouts where you can insert a rubber washer, so that the drive is resting on a cushion of rubber. They provide special drive screws with the case that are long enough to mount the drive through the rubber.

IMG_1463.JPG


Here's a drive attached to the tray.

IMG_1469.JPG


I only have 6 drives to install right now since 2 are in the server that this will replace. Those two will be installed near the end of the process after backing everything up. The HGSTs have serial number labels on the end of the drive, so it will be easy to identify which drive is which when I need to replace one in the future. You can also see that I switched the CPU fan to FAN1.

IMG_1480.JPG


During the course of all this I remembered that I have an old 80GB Intel X25-M SSD floating around, so I decided to install it. Here's the rear of the drives and you can also see the SSD mounted. I was initially worried about whether the 2x4 SATA power cables from the PSU would be long enough or spaced appropriately, but they work perfectly with this build. I've got molex to SATA adapters on the fan controller and the SSD drive.

IMG_1477.JPG


Up to this point the server was extremely quiet, but I was expecting some noise after installing six 7200 RPM hard drives. I powered it up... nothing! I'm honestly shocked at how quiet it still is. It's a combination of the drives being fairly quiet in the first place and the excellent Define R5 case. I used the IPMI virtual media to boot the FreeNAS ISO image on the server and installed FreeNAS to the SSD. Later I'll probably install FreeNAS on the USB sticks as I originally intended and save the SSD in case I need a fast storage area for jails or VM disks. This initial install is purely for testing/burn-in. The drives are looking good in FreeNAS!

freenasdisks.png


Time for some disk testing and burn-in. I'm going to try out the script from the burn-in thread eventually, but for starters I've launched a SMART long test on all six drives. Here's what this looks like on the first drive, smartctl claims it will take about 10 hours. Thankfully you can run these all in parallel.

Code:
[root@freenas] ~# smartctl -t long /dev/da0
smartctl 6.3 2014-07-26 r3976 [FreeBSD 9.3-RELEASE-p16 amd64] (local build)
Copyright (C) 2002-14, Bruce Allen, Christian Franke, www.smartmontools.org

=== START OF OFFLINE IMMEDIATE AND SELF-TEST SECTION ===
Sending command: "Execute SMART Extended self-test routine immediately in off-line mode".
Drive command "Execute SMART Extended self-test routine immediately in off-line mode" successful.
Testing has begun.
Please wait 591 minutes for test to complete.
Test will complete after Fri Jul 31 07:16:29 2015

Use smartctl -X to abort test.


Drive temperatures are looking mostly OK but one is a tad high. I'll still be adding two more drives so I'm a bit concerned about the end result. The fan controller is already on high; I might need different fans if the temperatures become problematic.

Code:
[root@freenas ~]# for i in /dev/da*; do smartctl -a $i | grep Temp; done
194 Temperature_Celsius  0x0002  171  171  000  Old_age  Always  -  35 (Min/Max 22/36)
194 Temperature_Celsius  0x0002  162  162  000  Old_age  Always  -  37 (Min/Max 23/38)
194 Temperature_Celsius  0x0002  162  162  000  Old_age  Always  -  37 (Min/Max 22/39)
194 Temperature_Celsius  0x0002  146  146  000  Old_age  Always  -  41 (Min/Max 22/43)
194 Temperature_Celsius  0x0002  157  157  000  Old_age  Always  -  38 (Min/Max 21/40)
194 Temperature_Celsius  0x0002  187  187  000  Old_age  Always  -  32 (Min/Max 22/34)


The drives are chugging away so that's it for part 2. Part 3 should be a bit more burn-in and some FreeNAS configuration.
 
Last edited:

Pheran

Patron
Joined
Jul 14, 2015
Messages
280
After the basic SMART long test, it was time for a full badblocks hard drive burn-in. I used badblocks -ws on all 6 drives in parallel with tmux. Unfortunately I don't have any screenshots of this, but the screen was kind of a mess with the tmux session anyway. The badblocks test took about 3 days with these 4TB drives - no joke! That was followed by another SMART long test; all drives passed with flying colors. Since then they've had a few more scheduled tests; here's how da0 looks now:
Code:
SMART Self-test log structure revision number 1
Num  Test_Description    Status                  Remaining  LifeTime(hours)  LBA_of_first_error
# 1  Short offline       Completed without error       00%       469         -
# 2  Extended offline    Completed without error       00%       313         -
# 3  Extended offline    Completed without error       00%       176         -
# 4  Short offline       Completed without error       00%        62         -
# 5  Extended offline    Completed without error       00%        32         -


At this point I was pretty confident that the hardware was good so it was time to install FreeNAS for real. First I had to take a full backup of my old server (not FreeNAS), shut it down for the last time, and remove both of its 4TB drives. These were then installed into the new box - finally a complete hardware configuration!

IMG_1537.JPG


After removing an ancient, huge full-tower server case, the Define R5 assumed its rightful place next to my primary desktop that's in an Antec Solo II case. Suprisingly, the Define isn't much taller than the Solo II, which is a relatively small ATX case. It is both deeper and wider though.

IMG_1541.JPG


I wiped out the SSD I had installed the test copy of FreeNAS on with a quick "dd if=/dev/zero of=/dev/ada0" (I didn't want it causing any boot confusion in the future). Then I powered down, put both of my SanDisk USB sticks into USB 2.0 ports on the back, and mounted the FreeNAS 9.3 STABLE ISO with the IPMI interface.

freenas%252520ipmi%252520media.png


I powered up the server (again with IPMI - IPMI is awesome, USE IT!). I furiously hit F11 so I could get to the boot selection screen. You can see the ATEN Virtual CDROM, that's the FreeNAS ISO file mounted through the IPMI interface.

freenas%252520boot%252520selection.png


After going through the FreeNAS installer boot process, you reach the device selection screen. Scrolling down, we see that da8 and da9 are my SanDisk Ultra Fit USB drives. Selecting both of them will cause FreeNAS to create a mirrored boot device, which reduces the chance of losing your boot drive and FreeNAS config due to a flash drive failure.

freenas%252520device%252520selection.png


After the installation FreeNAS should boot up to its console menu on the IPMI console. Now you can configure the network interface - you may want to give FreeNAS a static IP address so it doesn't change across reboots - or if you can support DHCP reservations on your network, you could configure your DHCP server with the MAC address of the server so it always gives FreeNAS the same IP.

freenas%252520console%252520menu.png


Time for some FreeNAS config. It's critical that your FreeNAS server is able to communicate with you. What's the point of having all this awesome RAIDZ2 redundancy if a drive can fail and you don't know about it? If problems go unresolved, eventually enough drives are going to fail that you lose your data. So you'll want to configure SMTP so that the FreeNAS server can email you. I've blanked out a few sensitive bits on this screen (such as my username) but you get the idea. Comcast is my ISP but these settings will depend on what service provider you are using - consult their documentation. After doing this, go into the user list and change the email address for the root user in FreeNAS to your own email address, because FreeNAS will send important notifications to its root account. Once you've done this, make sure to use the Send Test Mail button on this screen. If you don't get an email, something is wrong!

freenas%252520email%252520settings.png


One of the basic capabilities I want is SSH access to my CLI. As great as IPMI is, using the IPMI console after the server is on the network is suboptimal because it doesn't have features like scrollback and cut & paste. Please note that I only use the CLI for diagnostic commands - the configuration of FreeNAS should be performed through the web interface. Using the Services menu, I both configure the SSH service and turn it on in Control Services. You can use SSH key authentication if you like, in fact it's more secure, but for the purposes of my home network I configure SSH to allow a root login with password authentication.

freenas%252520ssh%252520config.png


Now that SSH is working I can log into the server with PuTTY (or any SSH client) and do a quick sanity check on the configuration. Here we can see all 11 devices - 8x4TB drives (da0-da7), 2 USB flash drives (da8,da9) and 1 80GB SSD (ada0). Also, we see that the boot devices is correctly mirrored across both USB flash drives.

Code:
[root@vault] ~# camcontrol devlist
<ATA HGST HDN724040AL A5E0>        at scbus0 target 0 lun 0 (pass0,da0)
<ATA HGST HDN724040AL A5E0>        at scbus0 target 1 lun 0 (pass1,da1)
<ATA HGST HDN724040AL A5E0>        at scbus0 target 2 lun 0 (pass2,da2)
<ATA HGST HDN724040AL A5E0>        at scbus0 target 3 lun 0 (pass3,da3)
<ATA HGST HDN724040AL A5E0>        at scbus0 target 4 lun 0 (pass4,da4)
<ATA HGST HDN724040AL A5E0>        at scbus0 target 5 lun 0 (pass5,da5)
<ATA HGST HDN724040AL A5E0>        at scbus0 target 6 lun 0 (pass6,da6)
<ATA HGST HDN724040AL A5E0>        at scbus0 target 7 lun 0 (pass7,da7)
<INTEL SSDSA2M080G2GC 2CV102M3>    at scbus3 target 0 lun 0 (pass8,ada0)
<SanDisk Ultra Fit 1.00>           at scbus8 target 0 lun 0 (pass9,da8)
<SanDisk Ultra Fit 1.00>           at scbus9 target 0 lun 0 (pass10,da9)

[root@vault] ~# zpool status
  pool: freenas-boot
state: ONLINE
  scan: none requested
config:

        NAME        STATE     READ WRITE CKSUM
        freenas-boot  ONLINE       0     0     0
          mirror-0  ONLINE       0     0     0
            da8p2   ONLINE       0     0     0
            da9p2   ONLINE       0     0     0

errors: No known data errors


Of course you can also view your devices in the GUI, but it won't show the FreeNAS boot drives.

freenas%252520view%252520disks.png


Sadly I forgot to capture an image of the Volume Manager screen when I built the RAIDZ2 volume across all 8 of the 4TB drives, but I can at least reproduce the volume status screen. My main volume (zpool) is called megadata.

freenas%252520volume%252520status.png


Let's take a look at our new volume. If you're not familiar with FreeNAS, you may be confused at this point. The following screen prompts questions like "Why are there 2 different megadatas with different sizes?" and "What happened to my 32TB?" The top-level megadata here is the actual volume/zpool I created from the 8 drives. It shows the full, raw space of the volume, which would be 29 TiB I hadn't already used up a few TB before taking this screenshot. This is where we get into the terabyte (10^12 bytes) vs tebibyte (2^40 bytes) battle. Hard drive manufacturers rate their drives in terabytes (TB) because they look bigger that way, but FreeNAS (and, incidentally, Windows) reports everything in tebibytes (TiB). In tebibytes, my 4 TB NAS drives are only 3.64 TiB. So that's 8x3.64 TiB = 29.1 TiB. But wait, I haven't subtracted anything for the RAIDZ2 parity space. The second megadata here is the top-level dataset that comes with the volume, and this one only shows 18 TiB available, but there was over 20 TiB before I chewed up some space. You can Bidule0hm's excellent size and reliability calculator to figure out how much space to expect from any ZFS drive configuration.

freenas%252520volumes.png


At this point I added some users so that I could properly set the permissions on the datasets, but I haven't reproduced the user list since I'd just have to censor most of it. I'm not using any kind of directory service so I just added local user accounts for my family and made sure that the passwords are set the same as the passwords for their local accounts on our Windows PCs, that way they don't have to enter additional credentials to use a FreeNAS share.

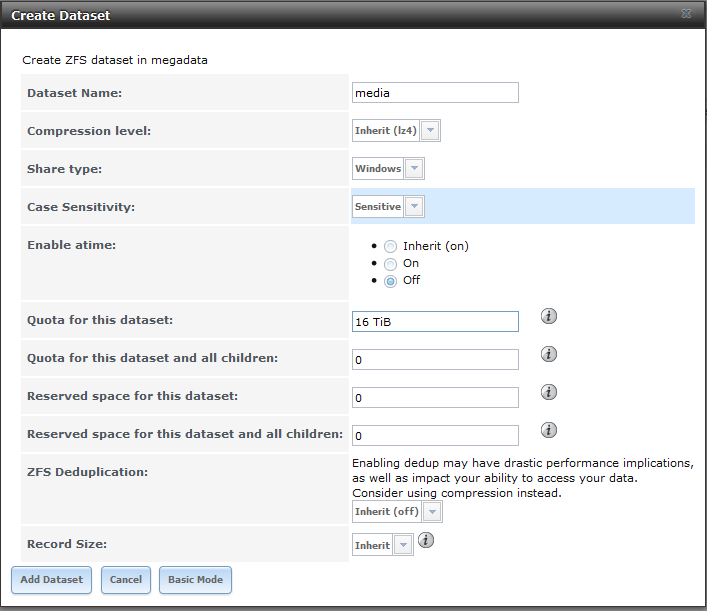
Time to build some datasets - these are the chunks of space I will actually share out via CIFS. I decided to initially create 4 datasets - backup (for storing backups from other computers), home (FreeBSD home directories within FreeNAS - many users won't need or care about this), media (the raison d'etre of this file server), and winuser (a container for Windows user home directories). Here's the creation of the media dataset; I'm not sweating the quota sizes too much right now since they are easily adjusted later. You can also see that I turned off atime updates on this dataset since it's a modest performance increase. After creating the dataset you may wish to use the Change Permissions entry underneath it to control who has access to the files.

freenas%252520create%252520dataset.png


Creating a dataset mounts the filesystem on your FreeNAS box, but doesn't actually do anything to share it on the network. I still have to configure the CIFS service to share files on my network. Make sure the CIFS settings are OK (the defaults are pretty reasonable, check what you want your server name to be) and turn on the CIFS service under Control Services.

freenas%252520cifs%252520config.png


Once CIFS is running, you actually have to create shares for your datasets. Here I show two shares, one is my media dataset for storing movies, photos, etc. The other is the winuser share, which is set as the home share. The home share automatically shares a set of Windows home directories that match up to the username of the logged in user - these should all be directories underneath the dataset, or they can even be nested datasets if you'd like to be able to set an individual quota for each user. If you create one of these shares, you'll want to go into Advanced Mode and turn off Browsable to Network Clients, otherwise the actual share name (i.e. winuser) will show up on the network in addition to the username that you are trying to share.

freenas%252520shares.png


If your shares are working at this point, you are not done yet! FreeNAS provides tools to help you avoid losing your data; USE THEM! You can schedule periodic SMART tests to check the integrity of your hard drives, as well as scrubs to verify the contents of your ZFS pool. The exact schedule of these can be shaped to your needs, but I decided to make my tests/scrubs run on Tuesday evenings at 11 PM, with the following schedule each month:

1st Tuesday - SMART Long Test
2nd Tuesday - SMART Short Test
3rd Tuesday - ZFS Scrub
4th Tuesday - SMART Short Test

This way I get 2 short tests, 1 long test, and 1 scrub each month. The configuration of these isn't as straightforward as I'd like, but here are the screenshots showing how I set these up. When setting up the SMART tests, be sure to select all of your hard drives, not just one of them. Take my scrub config with a grain of salt, because my first scrub in September did not run when it was supposed to, but a week later. I reduced the threshold days from 28 to 21 thinking that it was interfering with the schedule, so I'm hoping that the October scrub does what it's supposed to.

freenas%252520smart%252520schedule.png


freenas%252520scrub%252520schedule.png


Now that the server has been running a while, here's a quick review of my thermals. Those two drives that have hit 50+ C were the ones that came out of the old server, which unfortunately didn't have great cooling. They shouldn't see those temperatures again.
Code:
[root@vault ~]# for i in /dev/da[0-7]; do drivetemp=`smartctl -a $i | awk '$2 == "Temperature_Celsius" { print $10, $11, $12 }'`; echo $i $drivetemp; done
/dev/da0 39 (Min/Max 22/41)
/dev/da1 43 (Min/Max 23/45)
/dev/da2 38 (Min/Max 23/50)
/dev/da3 35 (Min/Max 24/51)
/dev/da4 38 (Min/Max 22/42)
/dev/da5 41 (Min/Max 22/47)
/dev/da6 38 (Min/Max 21/43)
/dev/da7 33 (Min/Max 22/36)


With this setup my FreeNAS server has been running fantastically well over the past month. Someone asked about benchmarks - there's not a whole lot I can benchmark here, for the simple reason that the gigabit connection is clearly the bottleneck for this server. It can push over 110 MB/sec onto the network without breaking a sweat, which is effectively saturating the 1 Gbps link. Unfortunately link aggregation won't help for single streams, and 10 Gbps switches and adapters are still too expensive for me, so for now that's the performance cap. On the bright side, this server will be capable of supporting a 10 Gbps link with an add-in card once the prices come down a bit more.

In the final part I hope to talk about backups, plugins and jails. Stay tuned!
 
Last edited:

Z300M

Guru
Joined
Sep 9, 2011
Messages
882
This is the build that resulted from the questions I posted in this thread. Thanks to all who contributed! The objective was to build a "bulletproof" FreeNAS server with 8x4TB drives that is fully compliant will all FreeNAS hardware recommendations. I'll use this thread to photoblog the resulting build. For anyone else thinking of building a FreeNAS box, I highly recommend the following resources:

FreeNAS Intro Slideshow
Hardware Recommendations Thread

Here is the parts list with the prices I paid in the US. Parts were mainly sourced from Newegg but a few things came from Amazon or Ebay.

Fractal Design Define R5 Case: $90
Fractal Design Dynamic GP-14 140mm Fan: $16
SeaSonic S12G-450 450W PSU: $64
Supermicro X10SL7-F Motherboard: $252
Intel Xeon E3-1220V3 CPU: $180
2x Crucial CT2KIT102472BD160B 16GB (2x8GB) ECC RAM: $286
2x Sandisk Ultra Fit 32GB USB Flash Drive: $23
8x HGST 4TB NAS Hard Drive: $1208

Server Total (no storage): $911
32TB Storage Drives: $1208
Total Cost: $2119

I'd like to point out that the total for the bare server is slightly less than the cost of the Synology DS1815+ I was originally thinking of getting, but is massively more powerful. Admittedly, it will consume more power than the Synology, but it will have more features and the ability to do things like Plex transcoding and Virtualbox without breaking a sweat. I think that's a better than fair tradeoff.

All items have arrived! In case you are wondering why there are only 6 NAS drives, I have two additional drives running in a server that will be replaced by this build. I purchased them very recently because of a drive failure in the old server, so they are exactly the same HGST model as the rest.
<pictures deleted>

Originally I had the CPU fan plugged into the FANA connector, but after much reading I came to understand that it should be plugged into FAN1.
 

Pheran

Patron
Joined
Jul 14, 2015
Messages
280
<pictures deleted>

Originally I had the CPU fan plugged into the FANA connector, but after much reading I came to understand that it should be plugged into FAN1.

Thanks for this post, after I saw this I went back and did more research and came up with pschatz's excellent post. Based on that, it does make more sense to put the CPU fan on a numbered connector since you would want it to be controlled by the CPU temperature, not the system temperature. Once I'm done memory testing I will probably move it to FAN3 which is the closest connector to the CPU socket.

EDIT: Reading farther in that thread, it may be best to use FAN1 for the CPU, but it's not entirely clear. I'll probably just use that instead to stay on the safe side.

As for the case fans, I have them all on the case fan controller. They are 3-pin anyway so the motherboard couldn't control their speed, and RPM monitoring is fairly pointless as long as the temperature is good.
 
Last edited:

HardChargin

Dabbler
Joined
Jul 19, 2015
Messages
49
Very nice build, thanks for posting. Regarding which header to plug the CPU fan into, I am struggling with the same thing (same board/basic setup but Im using a core i3). I too have seen information indicating either FAN1 or FANA (or FAN1-FAN4) being for the CPU on this motherboard. If you take what it says in the manual literally (FAN1-FAN4, FANA | System/CPU Fan Headers), then it would seem FANA is intended for the CPU, but I'm not certain it's that literal. With my CPU fan plugged into FAN1, when I first tried to run a stress test, my cpu quickly jumped up to over 80 deg C :eek: (keep an eye on your temps). The idle temps were perfect, mid/low 30s so I'm fairly confident the heat sink is mounted correctly. I am pretty sure the cpu fan rpm never fluctuated, it stayed at 1000rpm no matter what the cpu temp was while in FAN1. Right now I have the CPU fan in header FANA and for the first time the cpu fan is above 1000rpm, hovering around 1900rpm. Still working on more testing. Based on the majority of what I've read, it would seem FAN1 is the correct header for the cpu fan, and does make some sense to me as I've read its also tied to the PWM of FAN1-4. If I picture a rack mount server, with a row of fans across the case, presumably plugged into FAN1-4, a cpu with a passive cooler (no direct fan on heatsink), then when the cpu needed more cooling, it would make sense to spool up all those fans to move air across the entire motherboard/cpu.

If I make any discoveries in my testing, I will share. Good luck on your build!

*After some more playing around, reading, and shuffling fans between headers, I've drawn the conclusion that the motherboard does not regulate the fan speed in the sense that I was thinking/expecting (like a desktop MB). Using the built in Fan Modes on the motherboard I will ultimately end up changing the mode to Full Speed (keeps fans at 100% full time I think) while doing my burn in and will probably switch back to Standard, or Optimal once done. For what its worth, you mentioned all your case fans being plugged into the case fan controller, one benefit I see to having them plugged into separate headers on the motherboard, is the ability to monitor them via the motherboard utilities (helpful I'd think if one dies down the road).
 
Last edited:

HardChargin

Dabbler
Joined
Jul 19, 2015
Messages
49
One other thing I'll throw out there, I've read about, and found on my build that the LSI 2308 controller seems to run hot (haven't pinned down what "hot" is though), 140-160 deg F + at the surface of the heat sink in my case. With a fan on it, it seems to be 120-130 deg F (using a temp gun to read). You may want to make sure you have direct air flow over it.

*Update from SuperMicro regarding the LSI Controller:

"From LSI’s datasheet it says the following,

“If the junction temperature exceeds the 115 °C limit, LSI cannot guarantee the operation or reliability of the part.”."
 
Last edited:

Lox

Cadet
Joined
Feb 18, 2015
Messages
9
Very nice writeup. I've been researching a similar build for some time now, but budget & work haven't allowed me enough free time just yet. (maybe i'll hold off for the next generation at this point)

In regards to the fan header the manual is indeed abit confusing. But i read it as HardChargin mentions it, being FANA as the CPU fan header
He also makes a good point about the LSI controller, and to get some extra airflow over that heatsink.
 

katit

Contributor
Joined
Jun 16, 2015
Messages
162
I'm doing exactly same build right now. Well, almost. I'm using same MB but 4U supermicro case.

I do have LSI card in my older VM server and that LSI chip get's REALLY hot. On a card it was straight-forward solution. 40mm fan mounted over heatsink. But here heatsink is pretty small and I'm not even sure which way to go now
 

Spearfoot

He of the long foot
Moderator
Joined
May 13, 2015
Messages
2,478
I emailed tech support at Supermicro and asked them which fan header to use for the CPU on my X10SL7 motherboard - they told me to use FAN1; FANA is for add-on cards.

The LSI chip does get hot! So I installed a 30mm fan on it, as well as positioning an 80mm fan on a Zalman FB123 mounting bracket to direct airflow to it.
 

HardChargin

Dabbler
Joined
Jul 19, 2015
Messages
49
I emailed tech support at Supermicro and asked them which fan header to use for the CPU on my X10SL7 motherboard - they told me to use FAN1; FANA is for add-on cards.

The LSI chip does get hot! So I installed a 30mm fan on it, as well as positioning an 80mm fan on a Zalman FB123 mounting bracket to direct airflow to it.

Much nicer than my hack job (a 40mm fan stuck to the case using industrial strength double sided tape).
How did you install the 30mm fan?
 

Attachments

  • copy_fan.jpg
    copy_fan.jpg
    294.9 KB · Views: 1,511

katit

Contributor
Joined
Jun 16, 2015
Messages
162
I'm not Spearfoot but I assume he installed it on a screws over heatsink. Screws go into slots in heatsink itself so the fan stays on top similar to CPU fan. At least this is how I did it on my LSI card and planning to do now on this motherboard. I'm still puzzled onto WHY it's not setup from factory. And WHY there is no bigger heatsink...
 

Spearfoot

He of the long foot
Moderator
Joined
May 13, 2015
Messages
2,478
katit said:
I'm not Spearfoot but I assume he installed it on a screws over heatsink.
@katit has it right; I installed my fan by screwing it onto the LSI chip's heatsink. I run it at 7V, too, because at 12V it sounds like a swarm of angry bees.

IMAG0495.jpg
 

HardChargin

Dabbler
Joined
Jul 19, 2015
Messages
49
Thanks all. I may have to order one of those 30mm fans up. LOL, "angry bees". Agreed regarding why there isn't better cooling from the factory. I'd argue because it's designed for a rack mount server case, but SuperMicro has tower cases also as recommended cases for this mobo on their site. I will say, my temps (140-160deg F) weren't as bad as I had originally thought if 115deg C truly is the max for this chip, but my temps were also taken under no load and from the surface of the heat sink.
 

Jailer

Not strong, but bad
Joined
Sep 12, 2014
Messages
4,975
Spearfoot, what CPU cooler are you running. I'm not at all pleased with the factory heatink/fan and am looking for a good cooler to replace it with.
 

Spearfoot

He of the long foot
Moderator
Joined
May 13, 2015
Messages
2,478
jailer said:
Spearfoot, what CPU cooler are you running. I'm not at all pleased with the factory heatink/fan and am looking for a good cooler to replace it with.
@Jailer, I'm using a common, garden-variety Cooler Master Hyper 212 EVO. The system is located in my shop, so noise isn't an issue and I run all of the fans at full speed (with the exception of the 30mm LSI chip fan). The CPU temp has never broken 40C and usually hovers around 27C.
 

Z300M

Guru
Joined
Sep 9, 2011
Messages
882
Spearfoot, what CPU cooler are you running. I'm not at all pleased with the factory heatink/fan and am looking for a good cooler to replace it with.
Don't you think that Intel knows what kind of cooling its CPUs need? Mine is running at 43C with the standard cooling fan.
 

Ericloewe

Server Wrangler
Moderator
Joined
Feb 15, 2014
Messages
20,175
hopefully that's where they go?)
They do show up there.

Also, I'm glad to have company in yellow SATA cable land! Screw black and red, yellow screams "I ordered these just for the server!"
 
Top