
Intro
This is my 3rd NAS and my 2nd home-build. My first NAS was a Netgear ReadyNAS NV+, which despite being quite a basic device, served me very well and was still going strong 6 years later when I sold it.
My first home-build was hap-hazard and was mostly focused on lowest possible cost. It was based around an LGA 1150 mini-ITX Intel AIO board from ASUS (the Q87T) which for some reason at the time were retailing, boxed new, for just £30. With 4 onboard SATA3 ports, mSATA, dual LAN NIC and built-in DC-DC power conversion (so no PSU required) this was an absolute steal. I ended up buying 4 for future projects! Combined with this, I had a compatible i5 from a decommissioned desktop and 8GB SODIMM DDR3 RAM from an old laptop that I could drop straight in. This meant my total compute costs for the build were… £30!
For the chassis I ended up going for the In-Win IW-MS04-01 case, retailing at £105. This just left a low-profile CPU cooler and a few SATA cables to be procured, around another £25. So the build total cost was just £160. Not bad for a 4-bay i5 based NAS server (although if I’d had to buy all the components the real cost would have been closer to £250). I eventually ended up buying another 8GB memory to take it up to 16GB to allow for a few VMs to run (another £20).
This setup served me well, I was very pleased with the simplicity, low-power and quiet design. All power was provided from a 19V 180W laptop PSU, which plugged directly into the motherboard. The board has a male SATA power header for the drives, which was plenty capable of powering 4 NAS grade spinning drives. In terms of uptime and data integrity it was rock-solid.
It did have it’s drawbacks however. Something about the design of the Q87T meant that it didn’t fully support SATA hot-plug with FreeNAS (despite saying it was enabled in the BIOS settings). Any time a disk was hot-pulled under FreeNAS it would re-index the entire SATA bus, making it appear as if every device had just been pulled and re-inserted. All pools would subsequently detach then re-attach but in error state and would have to be manually cleared. This was annoying, but easy to work around, especially on a home system as I would just shut the unit down before doing any drive moves/adds/replacements.
However what eventually moved me to build my 3rd gen NAS was running out of disk slots. The RAID acronym ‘Redundant Array of Inexpensive Disks’ is ironic when you have to keep buying larger more expensive disks to replace perfectly good smaller ones in your limited slots!
Design Ethos
Some things were clear, I was going for 8x 3.5” bays. It would have a server grade mini-ITX motherboard and 32GB of ECC RAM, internal SSDs for boot and I would likely need a PCIE HBA to get the number of ports required. I also wanted to keep it as compact, quiet and low-power as possible, and this would influence PSU and fan choices.
Sourcing the Parts
Most of the time spent on this build was online, researching and sourcing the parts for the lowest possible cost. For a long time I had 2 possible compute builds in mind, with similar (pre-owned) costings:
Endlessly trawling eBay for specific product numbers (in this case A1SRI-2758F) eventually threw up an interesting lot from a fixed asset removal company. From the picture it was a battered old NAS case, dented, knocked around and not even assembled properly and they were asking £400 for it, however the very limited description caught my eye.

“Supermicro A1SRI-2758F Intel C2758 8 Core 32GB 8 Bay NAS Quad RJ45 IPMI 12TB LSI” was all that was on the listing, along with a note that it was ‘tested working’ (whatever that may mean). No more details at all.
Dissecting these limited characters in the title however, got me excited, it would appear this unassuming box already contained almost everything I needed:
Deal done. Then the horrible wait for it to arrive… what had I actually bought here?!
The packaging it arrived in did not inspire much confidence, it was in a cardboard bundle held together with endless wrappings of packaging tape, but under this shell the seller had as least encased it in several layers of bubble-wrap and shipping foam. Once it was freed from the packaging I removed the cover and started my inspection.
It turned out to be an appliance originally built by a company called DATTO – even containing a sticker on the interior stating it was ‘Proudly Built in the USA by Michael for Datto’. Taking stock of the components I had:
The only thing of note during the test was the LSI 9211 HBA had been left in RAID (IR) mode. Following the very comprehensive instructions I found here: https://nguvu.org/freenas/Convert-LSI-HBA-card-to-IT-mode/ this took less than 5 minutes to flash to the correct version of IT mode firmware.
So far, so lucky. However there was an issue lurking which I discovered after more in-depth reading on the A1SRI-2758F board. Being an Intel C2000 based board, the onboard SoC was affected by the so called AVR54 ‘Clock Death’ hardware bug that renders these systems unbootable sometime after 18 months, but with increasing certainty after 36 months of use. I checked the manufacture date on the board… September 2016… just over 36 months old. This means my board was likely to fail anytime soon and there is no way to predict when. Not a good start for a new NAS build!
However a glimmer of hope, allegedly Intel did secret deals with the hardware manufacturers that they would cover the costs of replacing the C2000 SoCs on these integrated boards in return for silence on the issue to the press. Intel’s press strategy worked – Googling this issue shows that apart from a few tech-press articles based on speculation back in 2017, there has never really been any negative press against Intel for this – despite this being a fundamental failure in their design and quality processes that will have impacts lasting decades as these SoCs are embedded in thousands of products like network routers, firewalls, NAS etc that will all begin to silently fail in the next few years. The flip side to this, is that the hardware manufacturers are able offer generous warranty extensions and replacement programs, presumably with Intel picking up at least some of the cost.
My board was over 3 years old, out of its original warranty and I was the second owner with no proof of purchase, so I was not holding out much hope for Supermicro to do anything for me. How wrong I was.
Just 1 hour after dropping an email to SM’s RMA department they confirmed they would offer a no-cost RMA repair on the board with a 5-10 day turnaround time. All I had to pay was the shipping, one way. If this was a retail board, they would have cross-shipped me a replacement immediately, however as this board was originally sold to an OEM customer (presumably DATTO) they said this wasn’t an option. I wasn’t too concerned about this, it would only delay my build by a couple of weeks. I have a gained a lot of respect for SuperMicro through this, their support is truly first class.
With the replacement board off being repaired, there were only a couple more ancillary components to source. For cooling two Arctic P12 silent cooling fans (£10). A second internal SSD to pair with the one that came in the case (£16) and a couple of SATA cables (~£5).
I wanted a silent PSU because I cannot stand the drone of the 40mm fans installed in 99% of 1U ATX PSU, so I purchased an FSP150-50FGBBB Silent 1U 150W PSU (£72).
150W power for an 8 Bay NAS system may seem foolishly conservative but components have got considerably more efficient in recent years. In fact, even with ‘worst case’ and ‘under load’ estimates from the manufacturers I will actually use under 97W at full load, leaving me 53W of headroom for any USB devices attached.
That was it, ready to build. Below is the full hardware list.
The Build
The first step in any build is to temporarily install all the fixed components, to check for fit and work out the cable routings and lengths. Almost immediately I could see this was going to be a challenge as a lot of wiring needed to be wedged in the very small clearance at the bottom of the motherboard bay where the ATX Power, USB3 and fan headers were all located, taking care not to push against the lower 2 RAM modules or restricting airflow to the CPU heatsink. More importantly it transpired the cables on the Flex ATX PSU were too short all round, not being able to reach the ATX header on the board or the required interfaces for SATA on the internal drives or Molex for the backplane. Not a big issue, approx. £8 of additional cable extenders/splitters needed.
The bigger issue with the PSU was that it was physically smaller in every dimension than the original case PSU. I had not realised that the 'standards' around PSU form factor for ‘1U’ devices are not really that standard at all. In order to securely attach it to the chassis required me to fashion an adapter for the backplate and a small bracket internally. I purchased some 1mm aluminium sheet from Amazon for £3.50 to make these.
The rest of the cabling was fairly simple, there being an ample amount of space under the drive bays to feed the fan cables and a large amount of free space on the top, partly as I was using a slightly smaller PSU as noted.
It also transpired the case had some interesting mounts for the 2.5” internal bays. The drives affixed to some custom metal brackets which then in turn mounted to the case. The case as I received it (from eBay) had only one bracket and the position of the case stand-offs meant there was no way of attaching a drive directly to the chassis. This meant I needed to fashion another bracket for the second drive. This was a trivial task and I was able to use the left-over aluminium from the PSU brackets.
So, onto the build. I will let the pictures do the talking from here on in.
This is my 3rd NAS and my 2nd home-build. My first NAS was a Netgear ReadyNAS NV+, which despite being quite a basic device, served me very well and was still going strong 6 years later when I sold it.
My first home-build was hap-hazard and was mostly focused on lowest possible cost. It was based around an LGA 1150 mini-ITX Intel AIO board from ASUS (the Q87T) which for some reason at the time were retailing, boxed new, for just £30. With 4 onboard SATA3 ports, mSATA, dual LAN NIC and built-in DC-DC power conversion (so no PSU required) this was an absolute steal. I ended up buying 4 for future projects! Combined with this, I had a compatible i5 from a decommissioned desktop and 8GB SODIMM DDR3 RAM from an old laptop that I could drop straight in. This meant my total compute costs for the build were… £30!
For the chassis I ended up going for the In-Win IW-MS04-01 case, retailing at £105. This just left a low-profile CPU cooler and a few SATA cables to be procured, around another £25. So the build total cost was just £160. Not bad for a 4-bay i5 based NAS server (although if I’d had to buy all the components the real cost would have been closer to £250). I eventually ended up buying another 8GB memory to take it up to 16GB to allow for a few VMs to run (another £20).
This setup served me well, I was very pleased with the simplicity, low-power and quiet design. All power was provided from a 19V 180W laptop PSU, which plugged directly into the motherboard. The board has a male SATA power header for the drives, which was plenty capable of powering 4 NAS grade spinning drives. In terms of uptime and data integrity it was rock-solid.
It did have it’s drawbacks however. Something about the design of the Q87T meant that it didn’t fully support SATA hot-plug with FreeNAS (despite saying it was enabled in the BIOS settings). Any time a disk was hot-pulled under FreeNAS it would re-index the entire SATA bus, making it appear as if every device had just been pulled and re-inserted. All pools would subsequently detach then re-attach but in error state and would have to be manually cleared. This was annoying, but easy to work around, especially on a home system as I would just shut the unit down before doing any drive moves/adds/replacements.
However what eventually moved me to build my 3rd gen NAS was running out of disk slots. The RAID acronym ‘Redundant Array of Inexpensive Disks’ is ironic when you have to keep buying larger more expensive disks to replace perfectly good smaller ones in your limited slots!
Design Ethos
Some things were clear, I was going for 8x 3.5” bays. It would have a server grade mini-ITX motherboard and 32GB of ECC RAM, internal SSDs for boot and I would likely need a PCIE HBA to get the number of ports required. I also wanted to keep it as compact, quiet and low-power as possible, and this would influence PSU and fan choices.
Sourcing the Parts
Most of the time spent on this build was online, researching and sourcing the parts for the lowest possible cost. For a long time I had 2 possible compute builds in mind, with similar (pre-owned) costings:
- Supermicro A1SRI series board with onboard processor (~£280)
- Asrock LGA2011 X99E board (~£200) with an 8 core Xeon E5-2630L (~£60)
Endlessly trawling eBay for specific product numbers (in this case A1SRI-2758F) eventually threw up an interesting lot from a fixed asset removal company. From the picture it was a battered old NAS case, dented, knocked around and not even assembled properly and they were asking £400 for it, however the very limited description caught my eye.
“Supermicro A1SRI-2758F Intel C2758 8 Core 32GB 8 Bay NAS Quad RJ45 IPMI 12TB LSI” was all that was on the listing, along with a note that it was ‘tested working’ (whatever that may mean). No more details at all.
Dissecting these limited characters in the title however, got me excited, it would appear this unassuming box already contained almost everything I needed:
- A1SRI-2758F Motherboard with Integrated Intel C2758 8 Core Processor
- 32GB - which was highly likely ECC RAM because that’s all that the A1SRI board officially supports
- 8 Bay enclosure - highly likely to include the cables/PSU
- 12TB – as a bonus it would appear there is some disk storage also installed
- LSI – probably indicating some sort of LSI HBA installed
Deal done. Then the horrible wait for it to arrive… what had I actually bought here?!
The packaging it arrived in did not inspire much confidence, it was in a cardboard bundle held together with endless wrappings of packaging tape, but under this shell the seller had as least encased it in several layers of bubble-wrap and shipping foam. Once it was freed from the packaging I removed the cover and started my inspection.
It turned out to be an appliance originally built by a company called DATTO – even containing a sticker on the interior stating it was ‘Proudly Built in the USA by Michael for Datto’. Taking stock of the components I had:
- 1x U-NAS NSC-800 8-bay chassis. Despite being a little knocked around it was a very solid and well-designed enclosure (which I decided to stick with, as you will see from the build pics below)
- 1x SuperMicro A1SRI Motherboard with integrated C2758 8-core processor
- 32GB (4x 8GB) Kingston DDR3 Unbuffered ECC SODIMMs
- LSI 9211-8i SAS HBA
- 2x MiniSAS to 4xSATA breakout cables
- 2x 6TB HGST Ultrastar 7K6 drives
- 1x 120GB Kingston SSD
- 1x 400W AsPower 1U ATX PSU
The only thing of note during the test was the LSI 9211 HBA had been left in RAID (IR) mode. Following the very comprehensive instructions I found here: https://nguvu.org/freenas/Convert-LSI-HBA-card-to-IT-mode/ this took less than 5 minutes to flash to the correct version of IT mode firmware.
So far, so lucky. However there was an issue lurking which I discovered after more in-depth reading on the A1SRI-2758F board. Being an Intel C2000 based board, the onboard SoC was affected by the so called AVR54 ‘Clock Death’ hardware bug that renders these systems unbootable sometime after 18 months, but with increasing certainty after 36 months of use. I checked the manufacture date on the board… September 2016… just over 36 months old. This means my board was likely to fail anytime soon and there is no way to predict when. Not a good start for a new NAS build!
However a glimmer of hope, allegedly Intel did secret deals with the hardware manufacturers that they would cover the costs of replacing the C2000 SoCs on these integrated boards in return for silence on the issue to the press. Intel’s press strategy worked – Googling this issue shows that apart from a few tech-press articles based on speculation back in 2017, there has never really been any negative press against Intel for this – despite this being a fundamental failure in their design and quality processes that will have impacts lasting decades as these SoCs are embedded in thousands of products like network routers, firewalls, NAS etc that will all begin to silently fail in the next few years. The flip side to this, is that the hardware manufacturers are able offer generous warranty extensions and replacement programs, presumably with Intel picking up at least some of the cost.
My board was over 3 years old, out of its original warranty and I was the second owner with no proof of purchase, so I was not holding out much hope for Supermicro to do anything for me. How wrong I was.
Just 1 hour after dropping an email to SM’s RMA department they confirmed they would offer a no-cost RMA repair on the board with a 5-10 day turnaround time. All I had to pay was the shipping, one way. If this was a retail board, they would have cross-shipped me a replacement immediately, however as this board was originally sold to an OEM customer (presumably DATTO) they said this wasn’t an option. I wasn’t too concerned about this, it would only delay my build by a couple of weeks. I have a gained a lot of respect for SuperMicro through this, their support is truly first class.
With the replacement board off being repaired, there were only a couple more ancillary components to source. For cooling two Arctic P12 silent cooling fans (£10). A second internal SSD to pair with the one that came in the case (£16) and a couple of SATA cables (~£5).
I wanted a silent PSU because I cannot stand the drone of the 40mm fans installed in 99% of 1U ATX PSU, so I purchased an FSP150-50FGBBB Silent 1U 150W PSU (£72).
150W power for an 8 Bay NAS system may seem foolishly conservative but components have got considerably more efficient in recent years. In fact, even with ‘worst case’ and ‘under load’ estimates from the manufacturers I will actually use under 97W at full load, leaving me 53W of headroom for any USB devices attached.
| Component | Qty | Full Load Power (W) | Total | Source |
| Board, CPU & RAM | 1 | 40 | 40 |
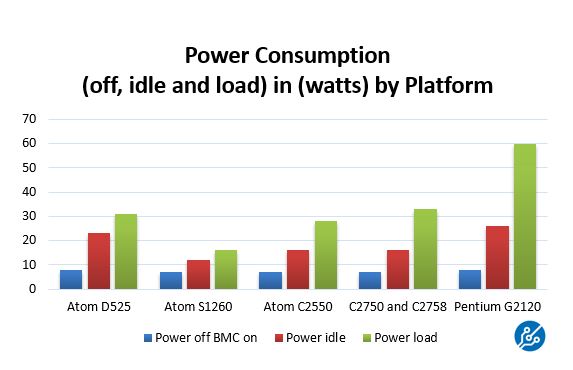
Intel Atom C2550 Power Consumption and ComparisonA look at Intel Atom C2550 power consumption and comparisons to the Atom C2750, C2758, S1260 and D525. Great overall results
 www.servethehome.com
|
| HBA | 1 | 15 | 15 |
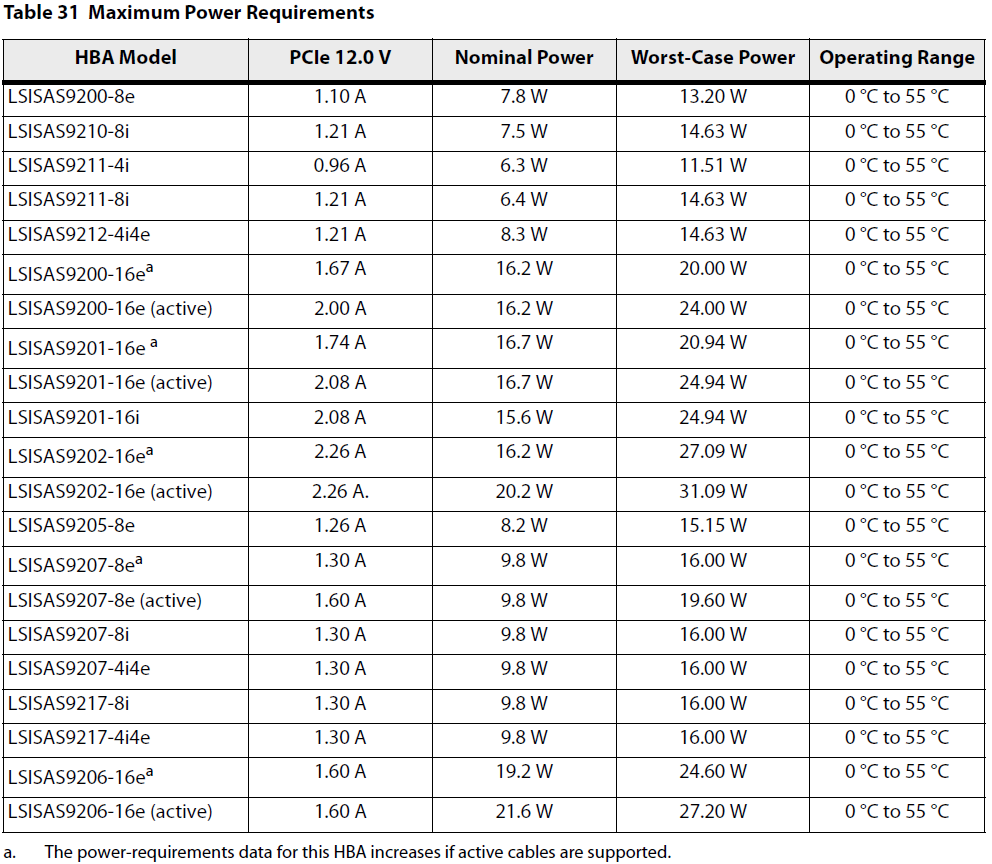
LSI Host Bus Adapter (HBA) Power Consumption Comparison - ServeTheHomeA look at the power consumption of LSI Host Bus Adapters (HBAs) and comparison of current LSI HBA models.
www.servethehome.com
|
| Fans | 2 | 1 | 2 |

P12 PWM | Pressure-optimised 120 mm PWM Case Fan | ARCTICThe P12 PWM is a pressure-optimised 120mm Case Fan. Controlled by PWM is offers a wide RPM range for effieicent and powerful cooling.
 www.arctic.ac
|
| HGST Drives | 2 | 8 | 16 | |
| WD Drives | 2 | 5 | 10 |

WD's Red 4TB hard drive reviewed - The Tech ReportPC storage has increasingly split into two categories: system and secondary. System storage houses your OS, applications, games, and all the data you need to access quickly. Secondary storage handles...
 techreport.com
|
| Seagate Drives | 2 | 5 | 10 | |
| SSDs | 4 | 1 | 4 |

Reviewing Kingston A400: SSD storage on a budget! | Digital CitizenRead our opinion about the Kingston A400 SSD in this review. We test its speed both in benchmarks and in Windows. See how fast it performs, and what it has to offer. Is it worth buying?
|
| Total | 97W | |||
| Budget | 150W | |||
| Overhead | 53W |
That was it, ready to build. Below is the full hardware list.
| Part | Description | Source | Cost |
| Chassis | U-NAS NSC-800 8-Bay 3.5” Enclosure with 2 internal 2.5” mounts. | eBay | Included in the eBay lot |
| Motherboard | SuperMicro A1SRI-2758F | eBay | Included in the eBay lot |
| CPU | Intel C2758 | eBay/Supermicro | Included in the eBay lot then replaced by SuperMicro |
| RAM | 32GB (4x8GB) Kingston KVR16LSE11 DDR3 1600 ECC SODIMM | eBay | Included in the eBay lot |
| HBA | LSI 9811-8i SAS HBA | eBay | Included in the eBay lot |
| Backplane | 2x 4 Port SAS Discreet Unknown Mfg | eBay | Included in the eBay lot |
| PSU | FSP150-50FGBBB Fanless 150W Flex ATX 1U | OverTech | £72 |
| Cables | 2 x MiniSAS to 4xSATA | eBay | Included in the eBay lot |
| StarTech 8” LSATA Cable | Amazon | £2.50 | |
| StarTech 12” LSATA Cable | Amazon | £2.50 | |
| Fans | 2x Arctic Cooling P12 Silent PWM | Amazon | £10 |
| eBay Lot | £350 | ||
| Total Server Cost | £442 | ||
| Drives | 2x 2TB WD Red | Owned | £0 |
| 2x 4TB Seagate Ironwolf | Owned | £0 | |
| 2x 6TB HGST Ultrastar 7K6 | Included in eBay Lot | £0 | |
| 2x Kingston 120GB SSD | 1 included in eBay lot, 1 from Amazon | £16 | |
| 2x Other SSD 250GB | Owned | £0 | |
| Total Drives Cost | £16 | ||
| Total for New Build | £453 | ||
The Build
The first step in any build is to temporarily install all the fixed components, to check for fit and work out the cable routings and lengths. Almost immediately I could see this was going to be a challenge as a lot of wiring needed to be wedged in the very small clearance at the bottom of the motherboard bay where the ATX Power, USB3 and fan headers were all located, taking care not to push against the lower 2 RAM modules or restricting airflow to the CPU heatsink. More importantly it transpired the cables on the Flex ATX PSU were too short all round, not being able to reach the ATX header on the board or the required interfaces for SATA on the internal drives or Molex for the backplane. Not a big issue, approx. £8 of additional cable extenders/splitters needed.
The bigger issue with the PSU was that it was physically smaller in every dimension than the original case PSU. I had not realised that the 'standards' around PSU form factor for ‘1U’ devices are not really that standard at all. In order to securely attach it to the chassis required me to fashion an adapter for the backplate and a small bracket internally. I purchased some 1mm aluminium sheet from Amazon for £3.50 to make these.
The rest of the cabling was fairly simple, there being an ample amount of space under the drive bays to feed the fan cables and a large amount of free space on the top, partly as I was using a slightly smaller PSU as noted.
It also transpired the case had some interesting mounts for the 2.5” internal bays. The drives affixed to some custom metal brackets which then in turn mounted to the case. The case as I received it (from eBay) had only one bracket and the position of the case stand-offs meant there was no way of attaching a drive directly to the chassis. This meant I needed to fashion another bracket for the second drive. This was a trivial task and I was able to use the left-over aluminium from the PSU brackets.
So, onto the build. I will let the pictures do the talking from here on in.
- The bare chassis (with backplane)
- Fans
The Arctic fans install very easily, with self-tapping screws through the back plate of the chassis. One cable tie keeps the power leads tidy.
- Backplane power connectors.
The eagle eyed amongst you will notice here we have 4 molex connectors on the backplane, into 2 Y splitters into a further single Y splitter into single molex plug on the PSU. In total all 8 bay drives from a single molex. This was due to the fact the PSU only had a single molex connector. This concerned me, but I ran the power sums again and it is OK. The drives draw a max of 40W split between the 12V and 5V rails. You can safely assume most of this is the motor and arm actuator which is on the 12V rail, so 3.5A – which in this PSU has 10A of capacity. Additionally, the smallest wire-gauge in the chain was 20AWG which can safely support 4A of current at 12V.
- Backplane SAS-SATA Breakout Connectors
Nothing special here, just a few zip-ties to keep everything neat and in place.
- Internal SSD No. 1
The first SSD mounts on the side of the case, on its special adaptor plate. SATA and power tail also attached.
- Internal SSD No. 2
This one mounts on the top of the chassis, also on its adaptor plate. The SATA cable from the first drive routes neatly under this.
- Motherboard
Apologies for the lack of detailed photos of this step, its complexity required two hands and stopped me picking up the camera! By this stage the RAM was installed, the USB3 front panel connector attached, fan power attached and the 20cm ATX power extender tail, all at the very bottom of the board. Then with a small degree of difficulty, the motherboard slides vertically into the case and is secured by the 4 mounting screws, which due to the interesting design of this case, enter from two different directions.
The case includes an insulating shield, which is required as the top metal bracket which holds the board in place is on the underside of the board with only couple of millimetres clearance.
- Motherboard Part 2
Now the internal SATA SSD cables are attached and the front panel switches/LEDs. A quick cable tie tidies up the slack cable loops of breakout cable.
Last edited: