
As of 24 June 2019 I am no longer using CrashPlan (got fed-up with their constant changing rules), and as such this resource will not be updated anymore. Jonathan.
Please Note: (22-Aug-2017) CrashPlan for Home is being discontinued, please see: https://www.crashplan.com/en-us/consumer/nextsteps/. However, this guide still works for CrashPlan for Small Business.
After reading though the forums and posting various questions I have managed to get CrashPlan installed and working on FreeNAS v11.0-U2. As there wasn’t a single resource to guide me though this, I thought I would create this [HOW TO] guide so that others could benefit.
Assumptions:
FreeNAS server name is called:
FreeNAS server IP number is:
Main data volume is called:
Step 1
Install FreeNAS! ;)
Step 2
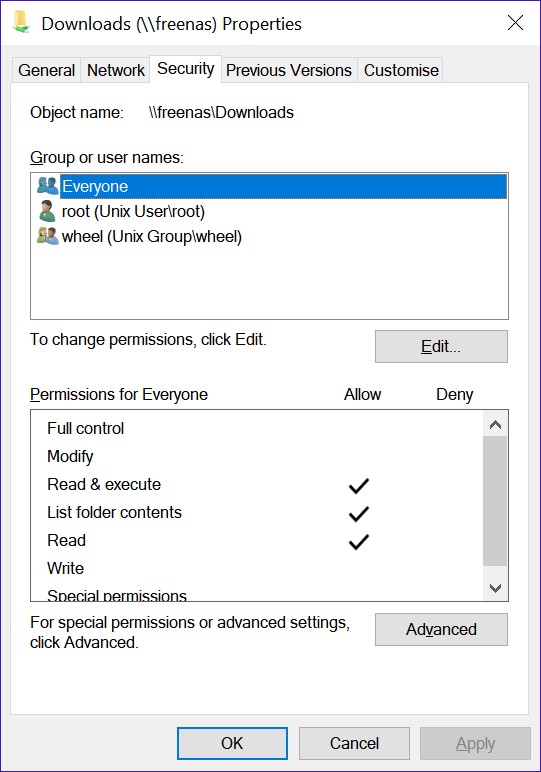
Ensure you have a dataset with a Windows share, which is accessible by Everyone (you only need “Read & Execute, List folder contents, Read” permissions). This is the default permissions FreeNAS gives a share (unless you have changed it).
You need this share to store the install .iso on, for example,
Step 3
Visit the Ubuntu website and download the .iso for the Ubuntu Desktop version you want. Place this .iso file in the above share.
Note: I use Ubuntu Desktop v16.04.2 LTS
UPDATE (29 Aug 2018): I am now using Ubuntu Desktop v14.04.5 LTS. This is because there is a bug in Bhyve (the FreeBSD virtual machine software) which stops the latest Linux Kernel (v4.15) (which UBUNTU v16 is now patched to) from booting correctly. This has been patched by FreeBSD but the patch is not schedule until FREENAS v11.2 - as per bug report #26708.
Step 4
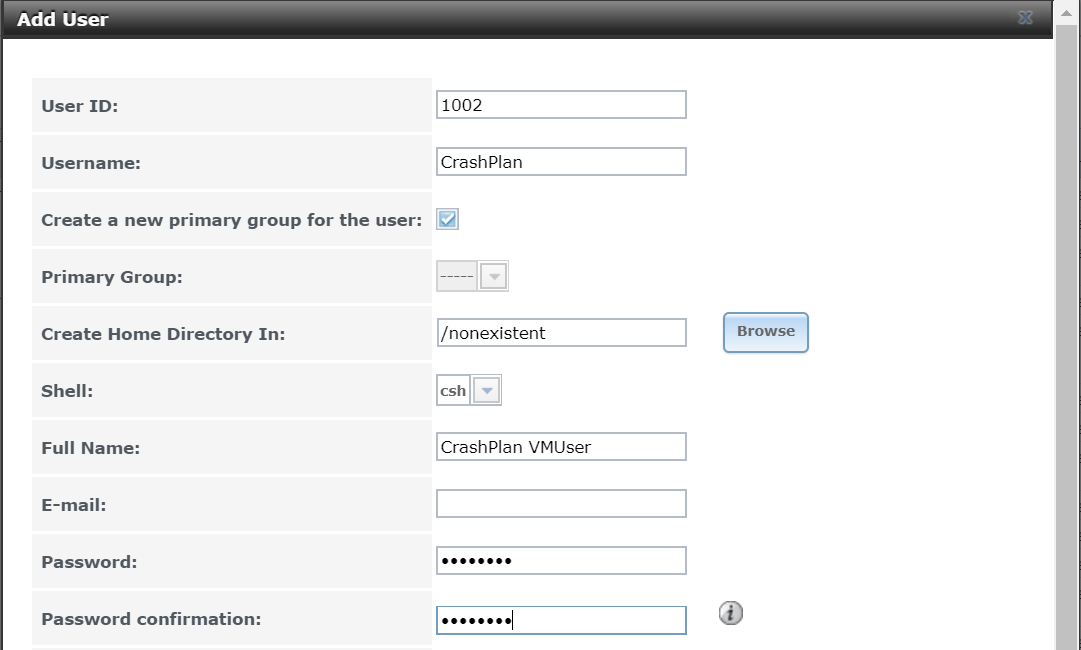
Using the FreeNAS GUI, create a new user called
Step 5
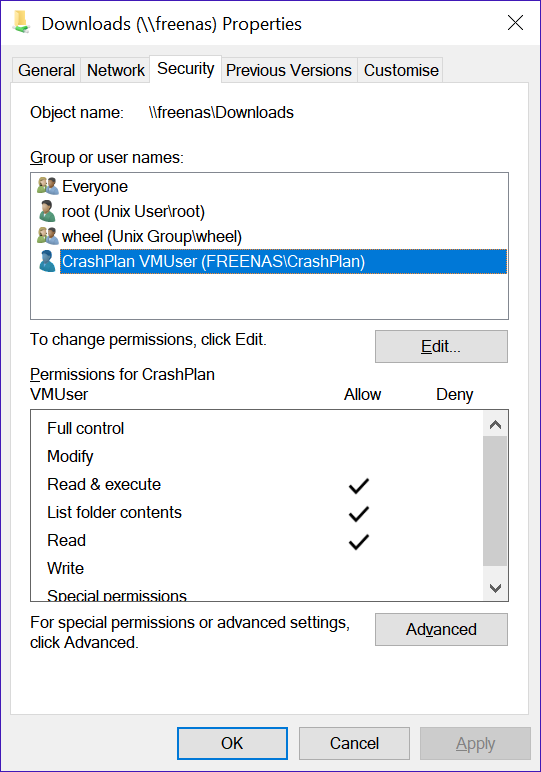
Using Windows Explorer, grant the user
Step 6
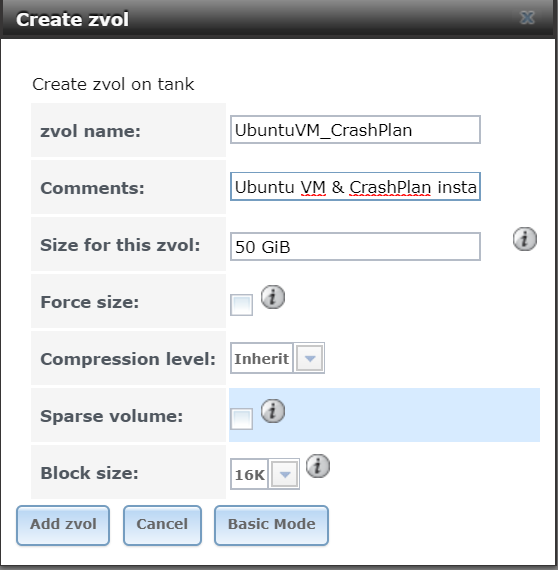
Using the FreeNAS GUI, create a new zvol. This is the “hard disk storage” for the Virtual Machine you wish to create, using the following settings:
--> zvol Name: UbuntuVM_CrashPlan
--> zvol Comments: Ubuntu VM & CrashPlan install and data
--> zvol Size for this zvol: 50 GiB
--> zvol Force size: default
--> zvol Compressiong level: Inherit
--> zvol Spare volume: default
--> zvol Block Size: default
Step 7
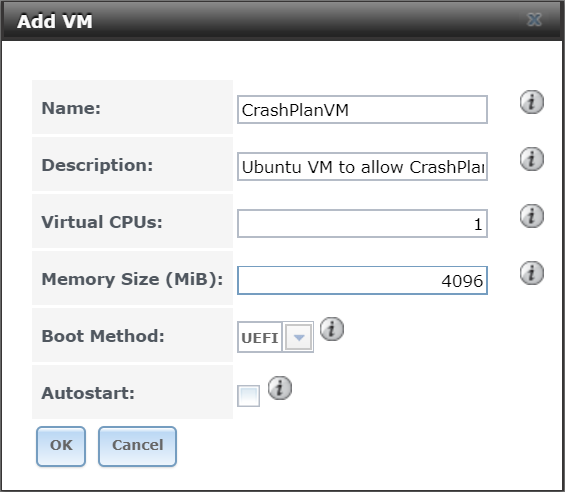
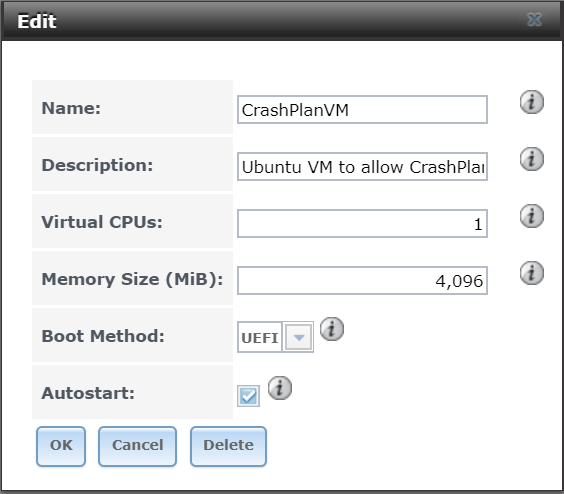
Using the FreeNAS GUI, create a new VM, using the following settings:
-->Name: CrashPlanVM
-->Description: Ubuntu VM to allow CrashPlan backup of NAS to offsite
-->Virtual CPUs: 1
-->Memory Size (MiB): 4096
-->Boot Method: UEFI
-->Autostart: (untick)
Step 8
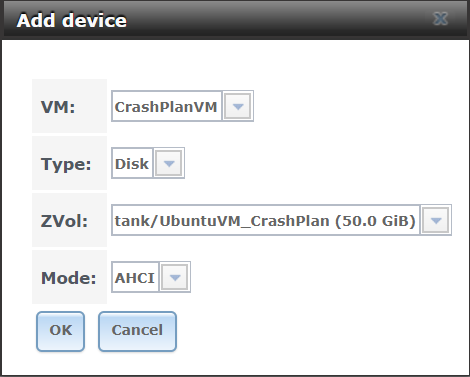
You now need to add some “devices” to the VM, the first of these is the hard-disk storage (i.e. zvol) you created in Step 6. Add a device using the following settings:
-->VM: CrashPlanVM
-->Type: Disk
-->Zvol: /mnt/tank/UbuntuVM_CrashPlan
-->Mode: AHCI
Step 9
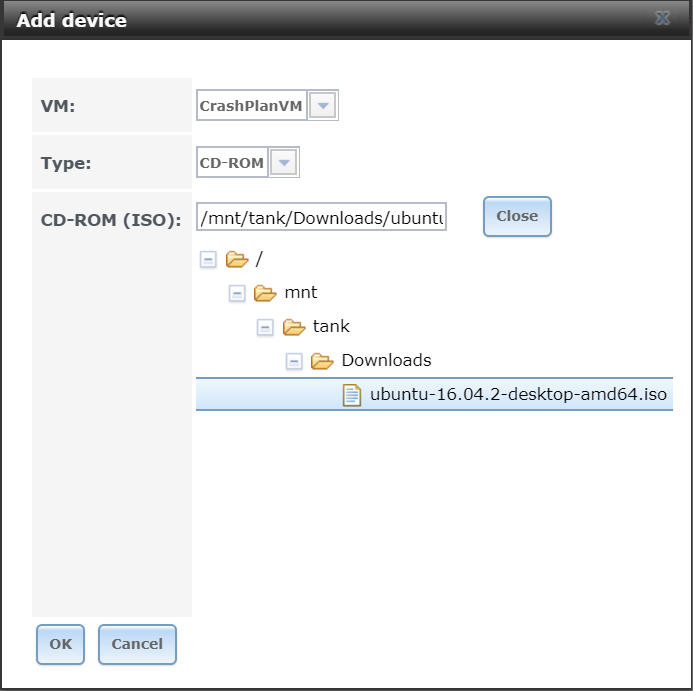
We now need to add a bootable CD-ROM to the VN, so that it can access the install .iso. Add a device using the following settings:
-->VM:CrashPlanVM
-->Type: CD-ROM
-->CD-ROM (ISO): /mnt/tank/Downloads/ubuntu-16.04.2-desktop-amd64.iso
Step 10
Ensure you have a VNC application installed, I use TightVNC.
Step 11
You now need to select and start the VM, once started you then need to connect to it via VNC. The IP number is the same as your FreeNAS server, and the port number is displayed on the VMs screen.
At the moment, the VM won’t actually start until you connect to it via VNC (we will change this setting later).
For example, if the IP address is
Step 12
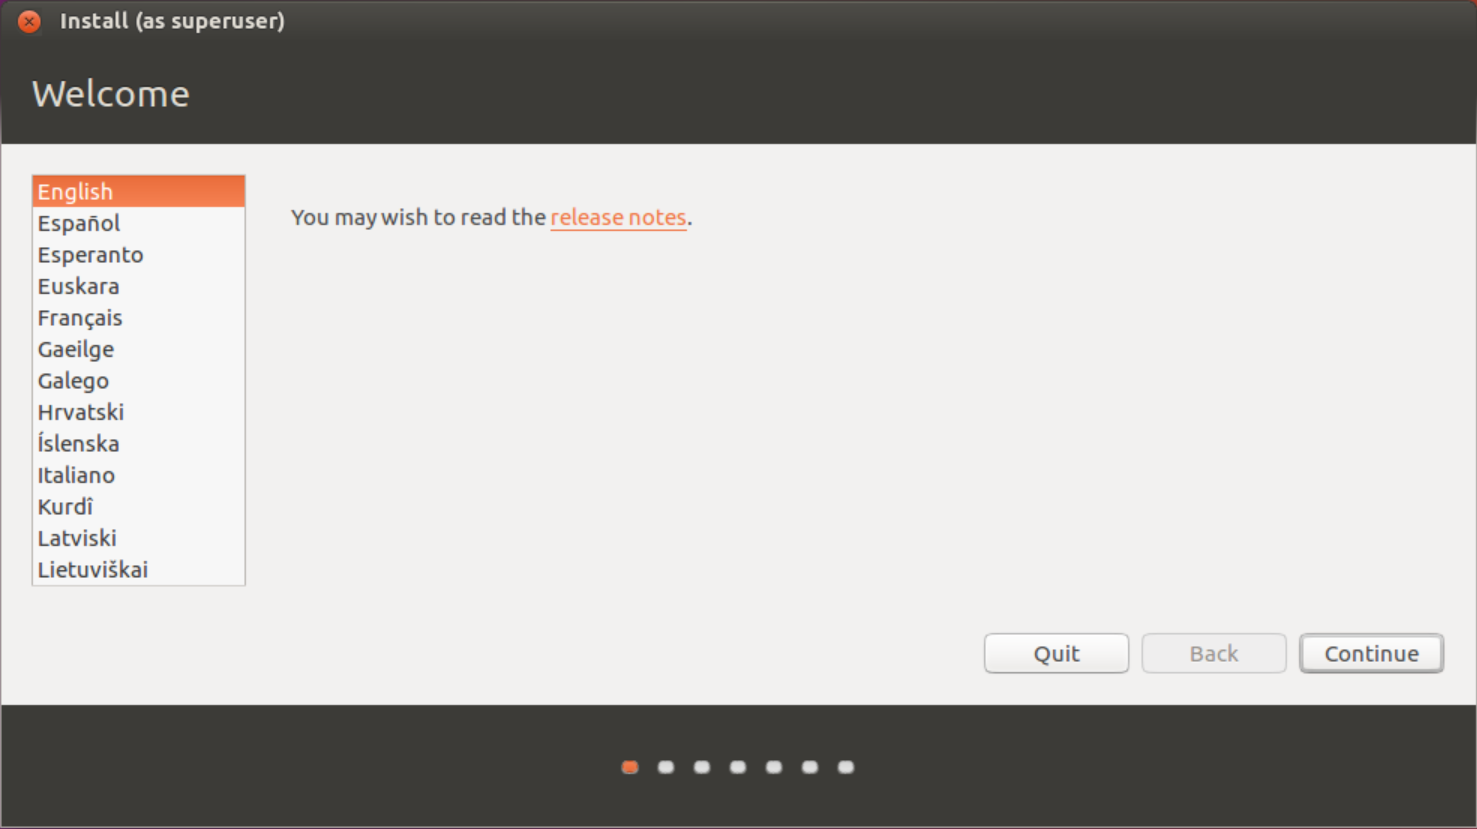
Once connected via VNC, you need to follow the install process of the Ubuntu .iso:
Select your install language, then press Continue.
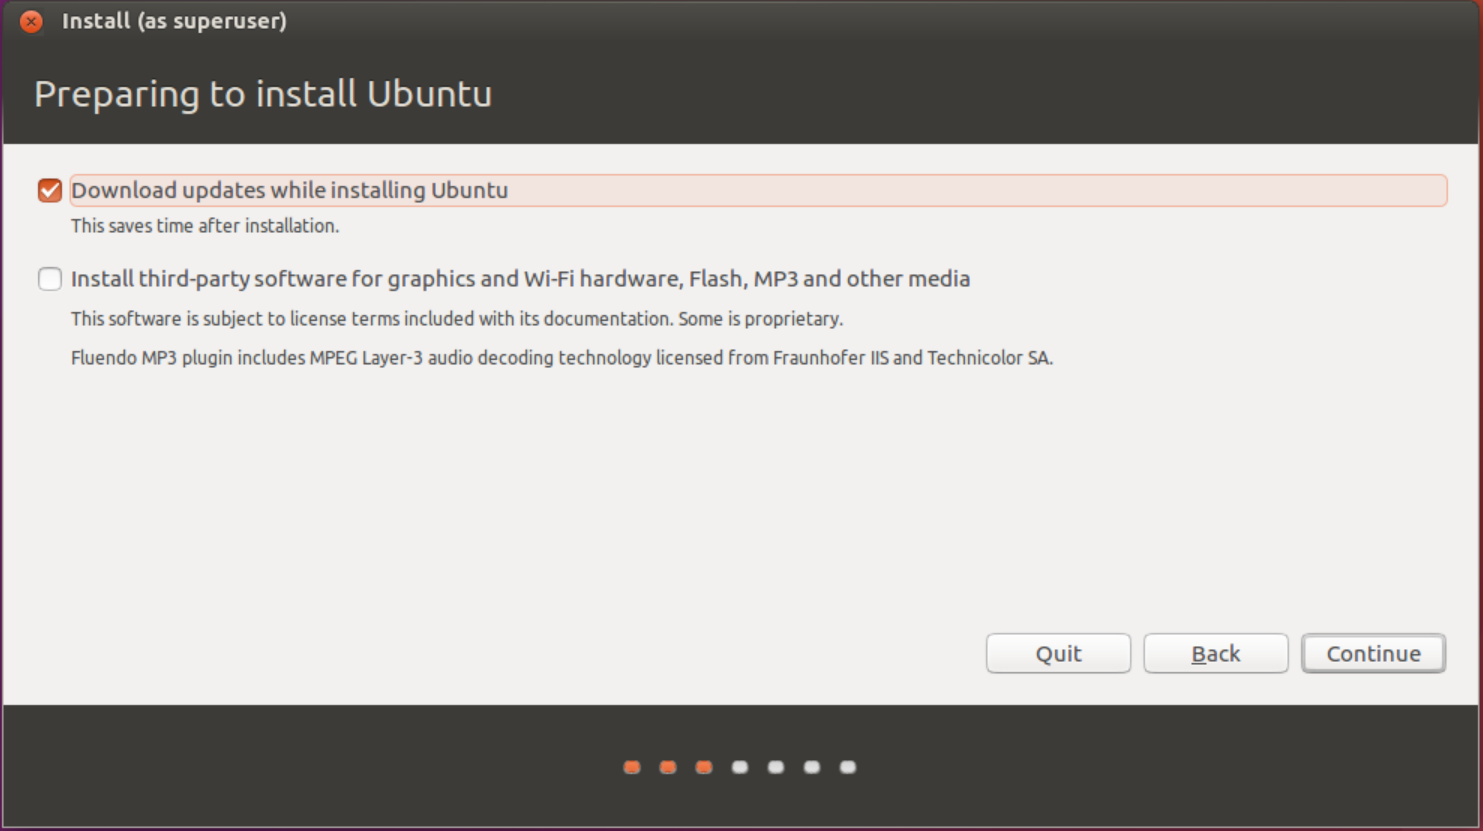
Select “Download updates while installing Ubuntu”, then press Continue.
“Erase disk and install Ubuntu” is selected by default, but you need to select “Use LVM with the new Ubuntu installation”, then press Install Now.

A pop-up will ask if you want to “Force UEFI installation?”, press Continue in UEFI mode.

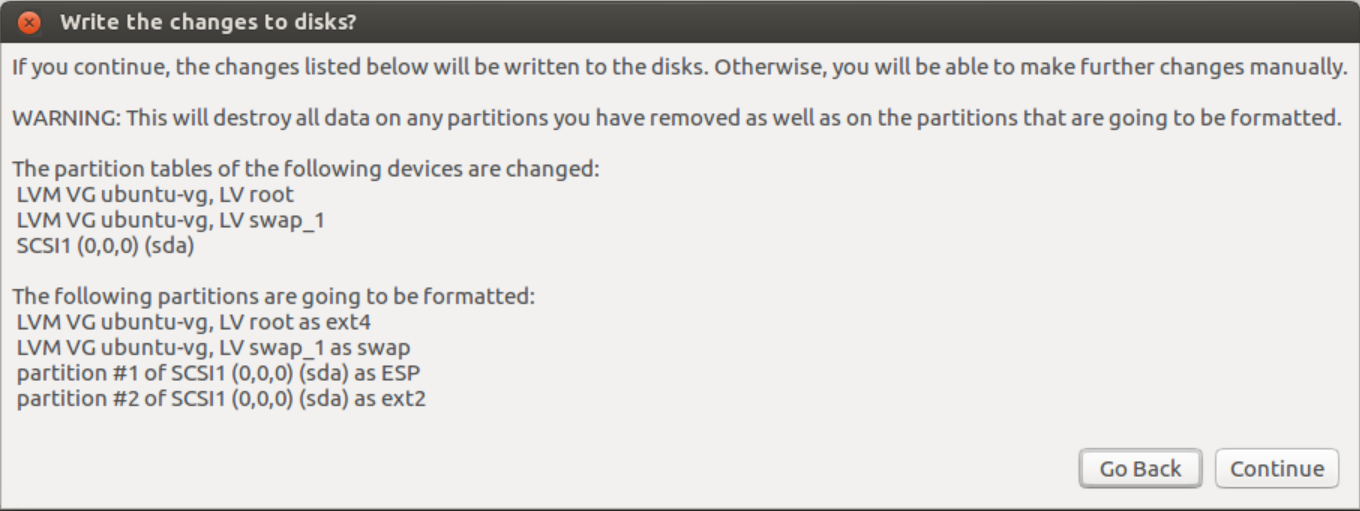
You then get another pop-up asking you to “Write the changes to disks?”, press Continue to accept.
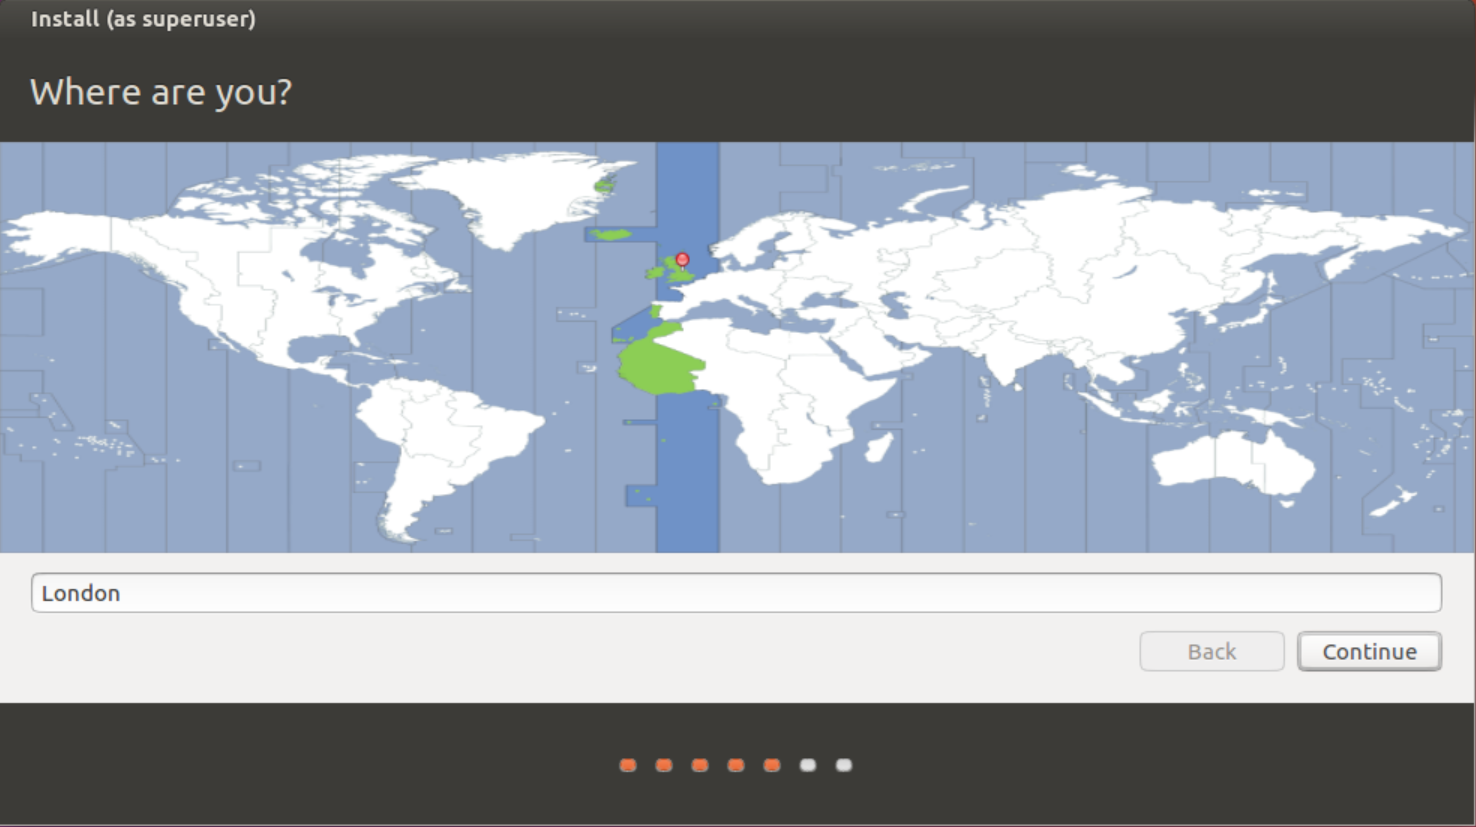
You are then asked to select your location, do this and then press Continue.
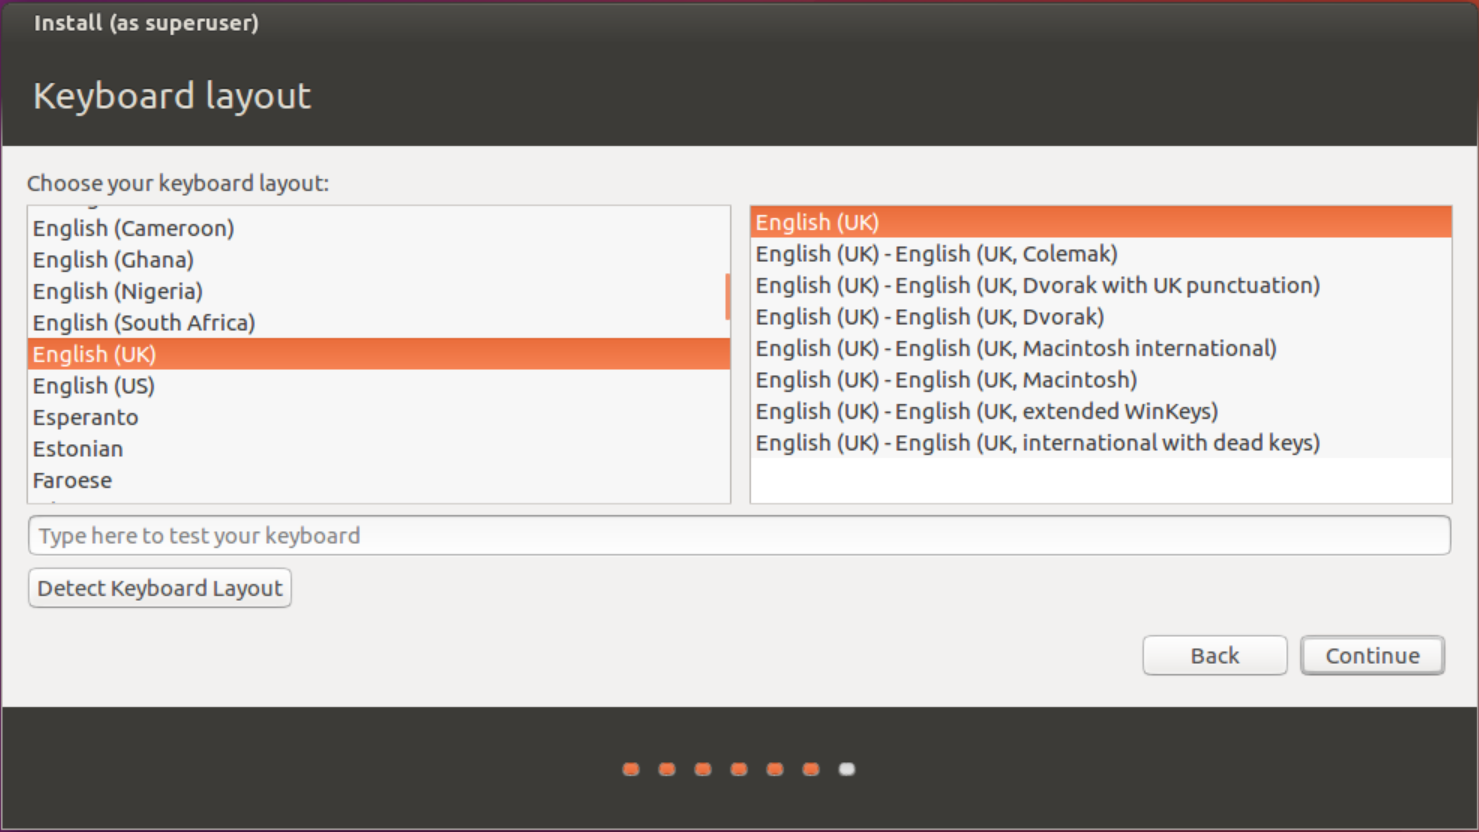
You then need to select your Keyboard layout and press Continue to accept.
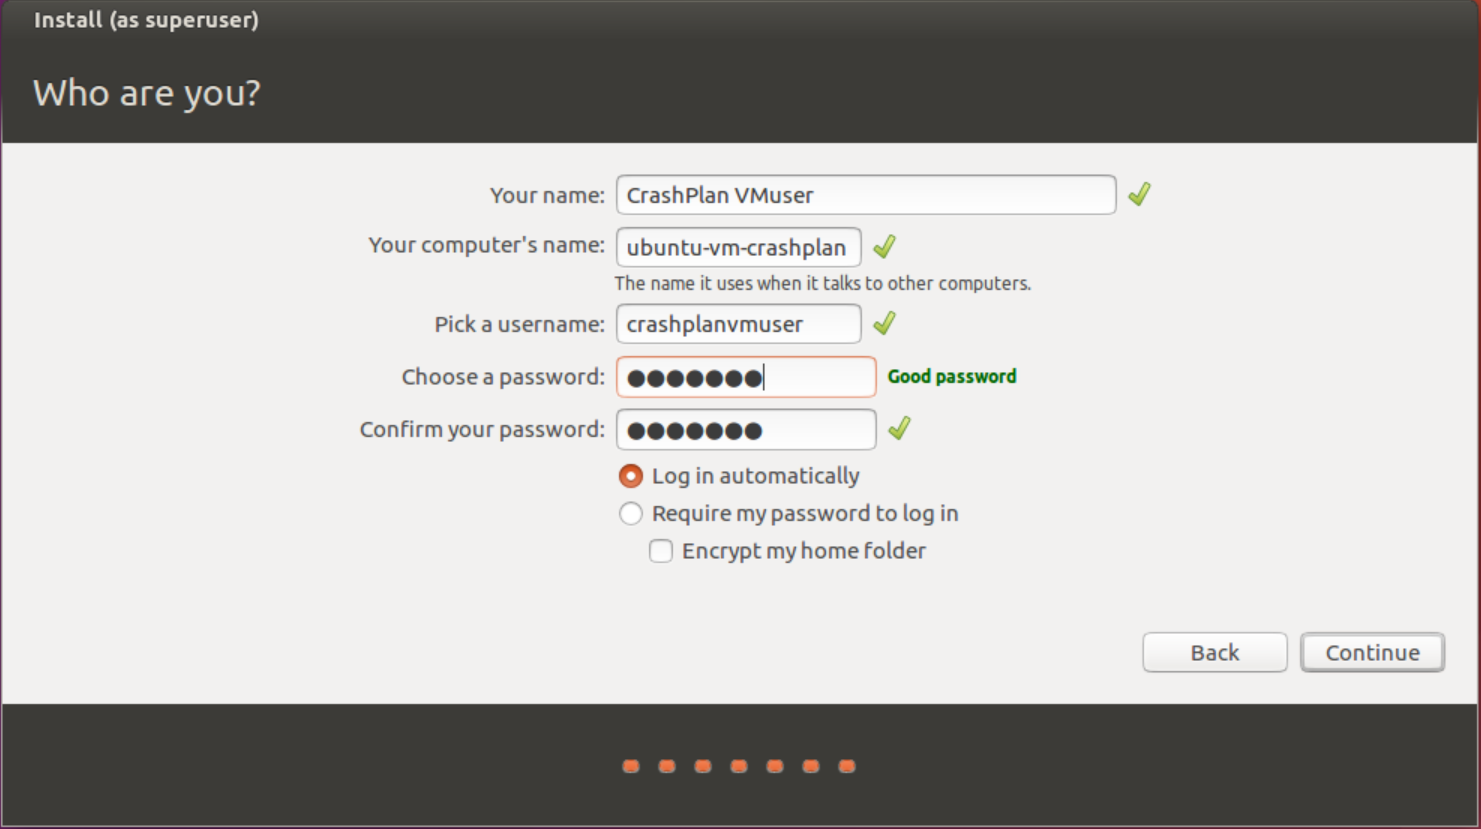
You are now asked to create a user, this user is classed as a Superuser and has the rights to use the
-->Full Name: CrashPlan VMuser
-->Your computer's name: ubuntu-vm-crashplan
-->Username: crashplanvmuser
-->Password: <password>
-->Log in automatically
You now need to wait for the install to finish, so make yourself a cup of coffee! Once the install has finished, you need to press Restart Now. However, it may not restart and you may need to press the
Step 13
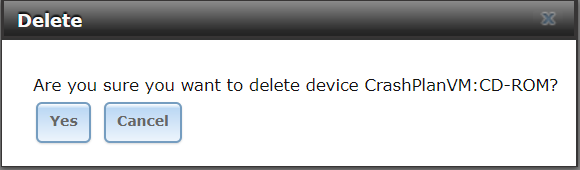
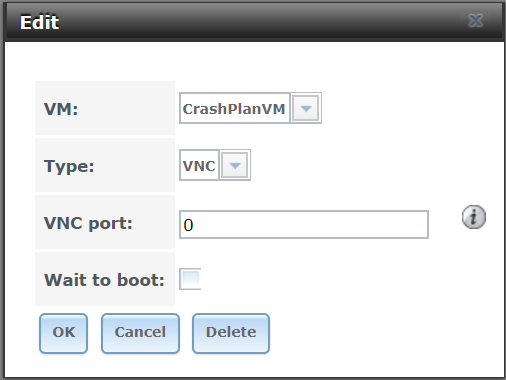
You now need to configure the VM to boot from the zvol and not from the install .iso, to do this you need to remove the CD-ROM device and also make some configuration changes as follows:
Stop the VM, and then delete CD-ROM device from the VM.
You then need to edit the VNC device and untick "Wait to boot" (this means it will now boot automatically and not wait for a VNC connection).
You then need to edit the VM and tick Autostart (this will ensure that the VM starts automatically on a FreeNAS server reboot).
Once you have made the above changes, you need to restart the VM.
Step 14
However, you may find that the VM does not boot into Ubuntu automatically, and if so, you will need the following fix:
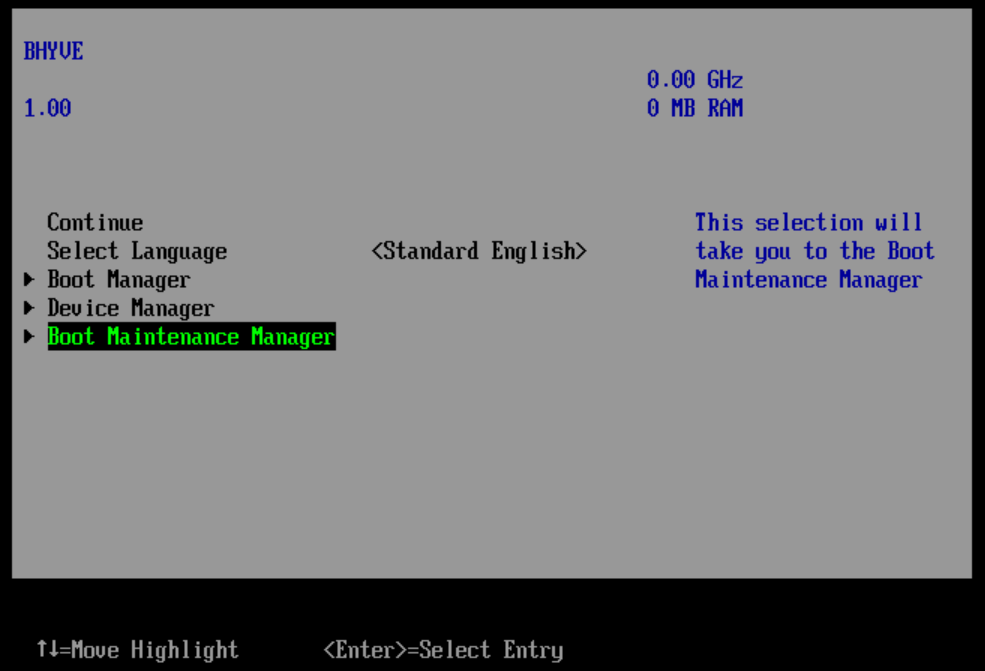
If you see the UEFI Interactive Shell, then you need to type exit at the prompt.

You now need to select the Boot Maintenance Manager.
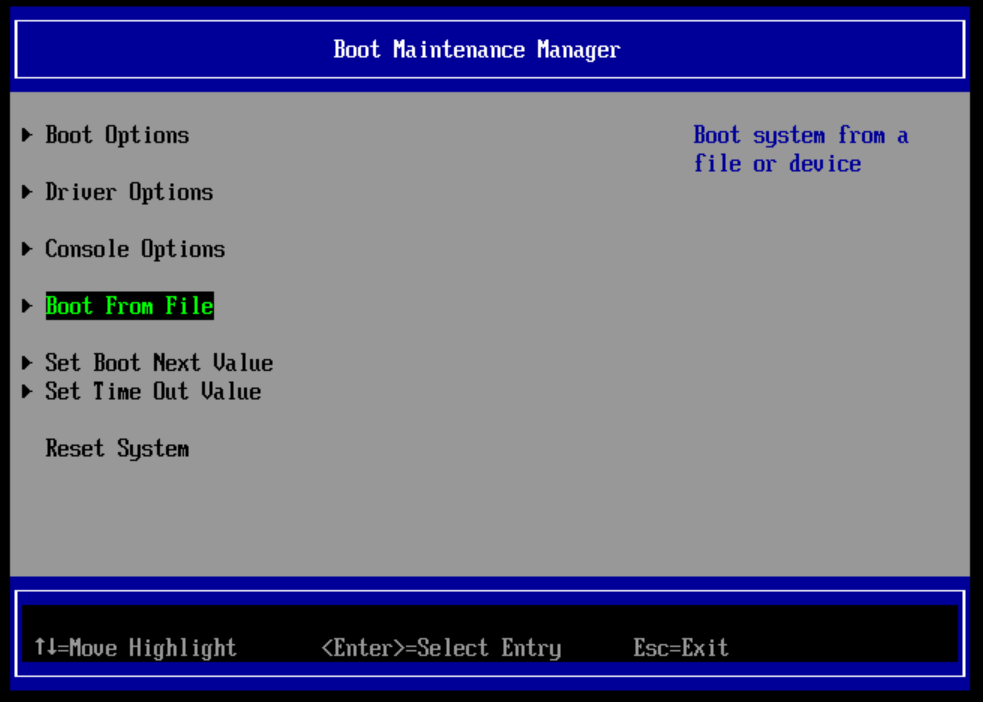
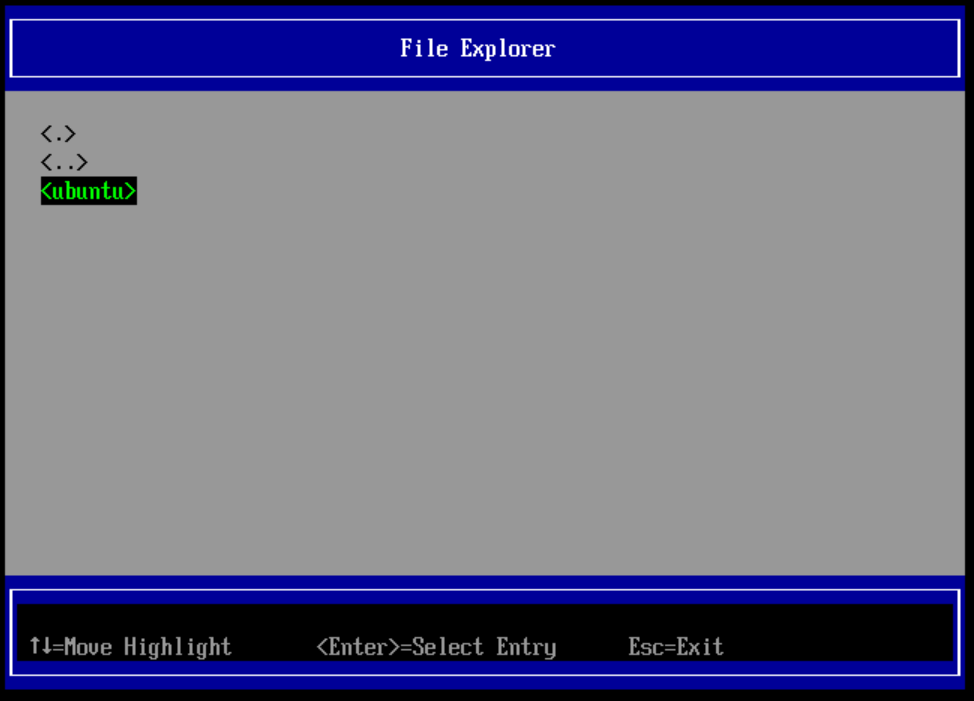
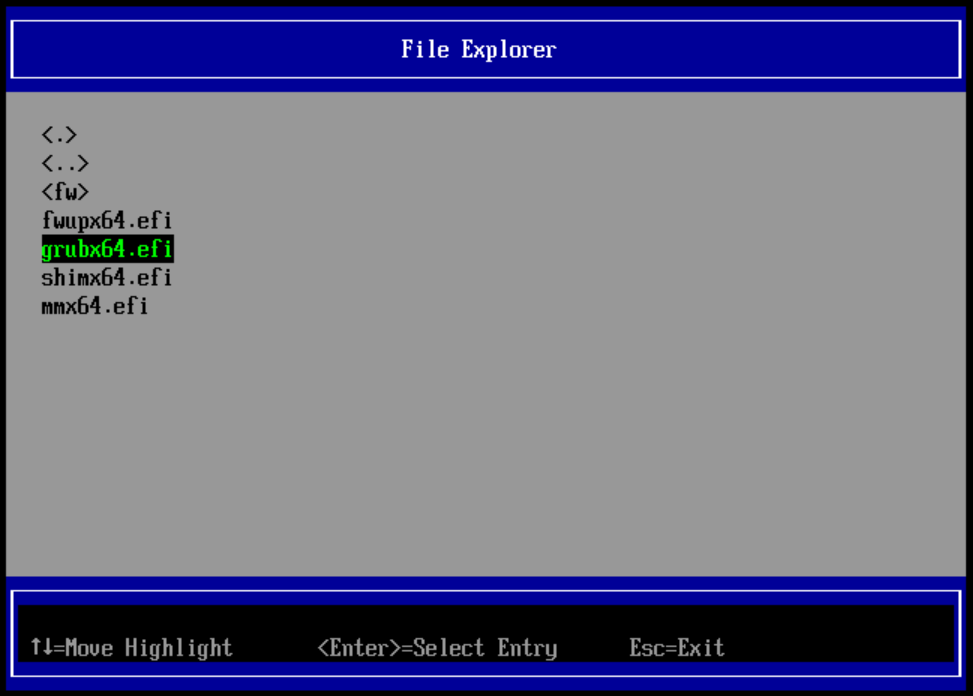
Now select, Boot From File.
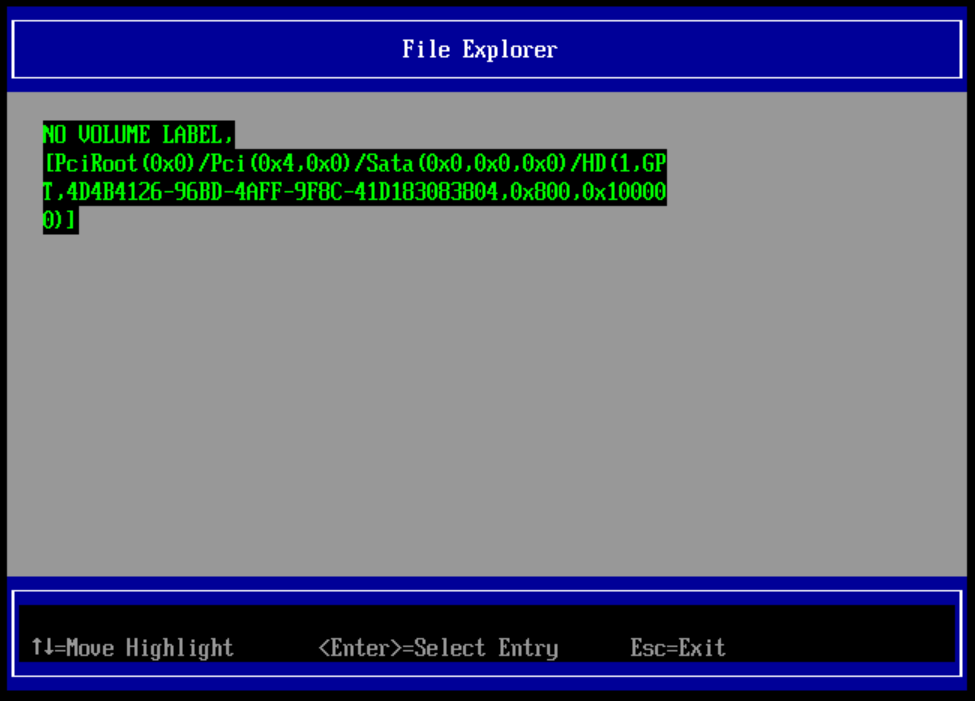
Press enter at the following (please note it will not look exactly as the screenshot below).
Then press enter on <EFI>.
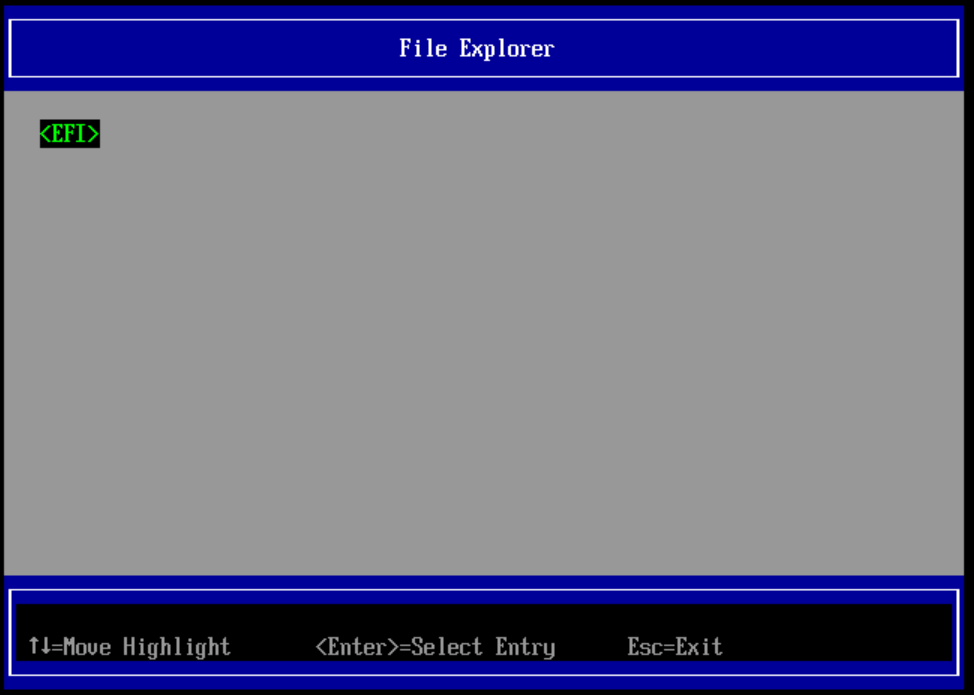
Then navigate to <ubuntu>, and then select grub64.efi.
Once Ubuntu has booted and you have logged in (using the username/password created in Step 12), we need to fix the boot sequence, to do this:
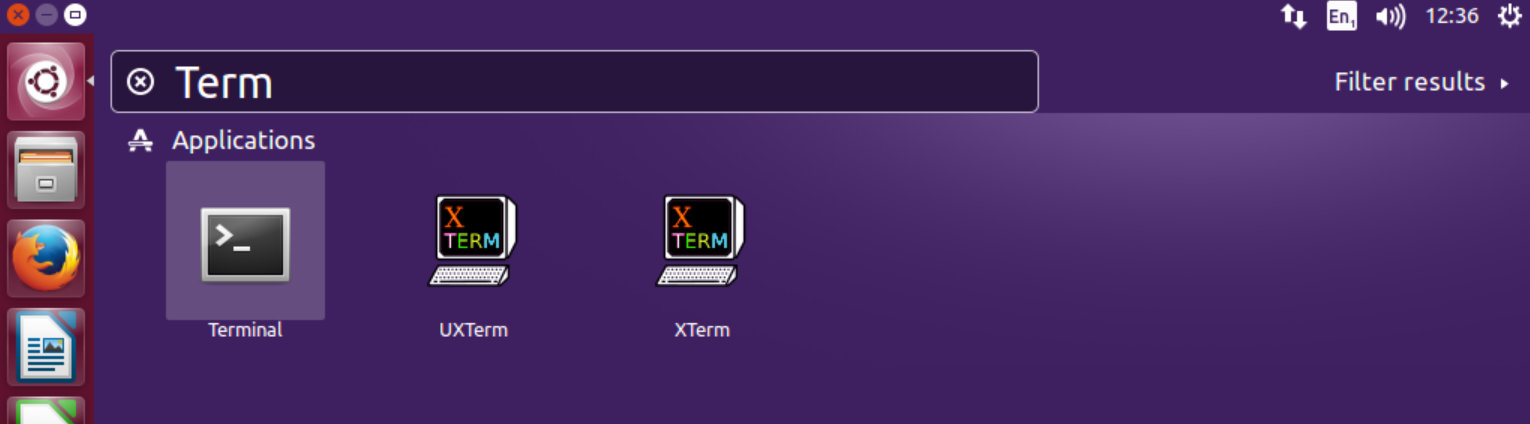
Find and load the Terminal application.
You may find it useful to lock Terminal to the launcher, for future easy access, to do this right-click on the Terminal application on the left and select Lock to Launcher.

You now need to fix the boot issue, to do this we need to issue some commands as root. But as mentioned earlier, in Ubuntu you don’t have access to root, but the superuser can issue root commands via the
The command
You can now exit the Terminal by using the command
You can now select shutdown and restart to restart the VM (it will disconnect VNC, but if you wait a moment and then reconnect via VNC, the VM should be booting correctly).

Thanks to @KrisBee for this fix, see his post for further details.
Step 15
We are now at the stage where we want to mount the FreeNAS Windows shares that you wish to backup (which you granted the user CrashPlan VMuser access to in Step 5).
You need to load Terminal, and run the command
Once you have installed cifs-utils, you need to create a directory for each share that you wish to mount, I recommend creating these in the
First create the
etc.
Step 16
To enable the Jail to mount the shares you need to edit the file
If you have closed Terminal (from Step 15), then you need to load Terminal and redo the
Use the editor nano to create the file:
The file needs to have three lines as follows:
Use Ctrl-O so save the file, and Ctrl-X to exit nano. You then need to restrict access to the credential file, so that only root can access it, to do this use the command

Step 17
You are now ready to edit the file
Warning: DO NOT edit any of the lines already in this file, or you will stop Ubuntu from working correctly. Therefore it is prudent to back-up the file
Problems you may encounter.....
1) Because the
So how do you get around this issue? One way is to make sure your shares don't have spaces in their name. However if you have already configured other things to use the share name and don't want to rename the share, then you can get around it by using the special code
2) Another issue is that sometimes the
However, if you need to use the IP number, then you should edit the
3) Remember, case is everything!
4) Also, the share name is not the same as the absolute path name of the share on the FreeNAS server, i.e. I have a share called
.....
You can load and edit the file by using the nano editor, i.e.
Then for each dataset you wish to backup you need to create an individual line within fstab, for example:
So if you wish to back-up the share called Downloads, you need to type

Run the command
Once
Please Note: For FreeNAS v11.1-U6 and above, SMB v1.0 has been disabled by default for security reasons. Therefore you need to ensure you use the parameter vers=3.0 on your mount lines in /etc/fstab. (Please note that the screenshot image above has NOT been updated to show this).
Step 18
Now we can finally install CrashPlan! :)
Load Firefox and navigate to https://www.crashplan.com, select the menu (on the right) and click on Download, then select Linux, and save the file.

Once downloaded you need to extract the install package, to do this, load the Files application and navigate to the Downloads folder, and then select the downloaded CrashPlan file. Right-click on the file and select Extract Here.
You now need to load Terminal, and run the command
Wait for the install to finish, once finished it will ask if you want to start CrashPlanDesktop, select
Step 19
Double-click on the CrashPlan icon to load CrashPlan! Follow the instructions on the CrashPlan website for configuring and using CrashPlan.
I do highly recommend the following extra reading, which details two important settings which you will want to change. Linux real-time file watching and memory usage with large backups.
If you found this resource useful (or not) I would be grateful if you could feedback using the rating system!
Jonathan
Edits:
2017-08-22: Adding warning about CrashPlan for Home being discontinued.
2017-09-08: Added in some more
2018-07-11: Small edit to clarify Ubuntu version in Title.
2018-08-29: Edit to update users about the Bhyve bug stopping latest version of the Linux Kernel (v4.15) from running (Fixed in FreeNAS v11.2).
2018-09-14: Edit regarding FreeNAS v11.1-U6 and changes to SMB v1.0 (i.e. the disabling of)
Please Note: (22-Aug-2017) CrashPlan for Home is being discontinued, please see: https://www.crashplan.com/en-us/consumer/nextsteps/. However, this guide still works for CrashPlan for Small Business.
After reading though the forums and posting various questions I have managed to get CrashPlan installed and working on FreeNAS v11.0-U2. As there wasn’t a single resource to guide me though this, I thought I would create this [HOW TO] guide so that others could benefit.
Assumptions:
FreeNAS server name is called:
freenasFreeNAS server IP number is:
192.168.0.50Main data volume is called:
tankStep 1
Install FreeNAS! ;)
Step 2
Ensure you have a dataset with a Windows share, which is accessible by Everyone (you only need “Read & Execute, List folder contents, Read” permissions). This is the default permissions FreeNAS gives a share (unless you have changed it).
You need this share to store the install .iso on, for example,
/mnt/tank/Downloads
Step 3
Visit the Ubuntu website and download the .iso for the Ubuntu Desktop version you want. Place this .iso file in the above share.
Note: I use Ubuntu Desktop v16.04.2 LTS
UPDATE (29 Aug 2018): I am now using Ubuntu Desktop v14.04.5 LTS. This is because there is a bug in Bhyve (the FreeBSD virtual machine software) which stops the latest Linux Kernel (v4.15) (which UBUNTU v16 is now patched to) from booting correctly. This has been patched by FreeBSD but the patch is not schedule until FREENAS v11.2 - as per bug report #26708.
Step 4
Using the FreeNAS GUI, create a new user called
CrashPlan, with the Full Name of CrashPlan VMUser, with a secure password.
Step 5
Using Windows Explorer, grant the user
CrashPlan access to each of the shares that you want CrashPlan to backup, using “Read & Execute, List folder contents, Read” permissions.
Step 6
Using the FreeNAS GUI, create a new zvol. This is the “hard disk storage” for the Virtual Machine you wish to create, using the following settings:
--> zvol Name: UbuntuVM_CrashPlan
--> zvol Comments: Ubuntu VM & CrashPlan install and data
--> zvol Size for this zvol: 50 GiB
--> zvol Force size: default
--> zvol Compressiong level: Inherit
--> zvol Spare volume: default
--> zvol Block Size: default
Step 7
Using the FreeNAS GUI, create a new VM, using the following settings:
-->Name: CrashPlanVM
-->Description: Ubuntu VM to allow CrashPlan backup of NAS to offsite
-->Virtual CPUs: 1
-->Memory Size (MiB): 4096
-->Boot Method: UEFI
-->Autostart: (untick)
Step 8
You now need to add some “devices” to the VM, the first of these is the hard-disk storage (i.e. zvol) you created in Step 6. Add a device using the following settings:
-->VM: CrashPlanVM
-->Type: Disk
-->Zvol: /mnt/tank/UbuntuVM_CrashPlan
-->Mode: AHCI
Step 9
We now need to add a bootable CD-ROM to the VN, so that it can access the install .iso. Add a device using the following settings:
-->VM:CrashPlanVM
-->Type: CD-ROM
-->CD-ROM (ISO): /mnt/tank/Downloads/ubuntu-16.04.2-desktop-amd64.iso
Step 10
Ensure you have a VNC application installed, I use TightVNC.
Step 11
You now need to select and start the VM, once started you then need to connect to it via VNC. The IP number is the same as your FreeNAS server, and the port number is displayed on the VMs screen.
At the moment, the VM won’t actually start until you connect to it via VNC (we will change this setting later).
For example, if the IP address is
192.168.1.100 and the port is 5901, you connect to 192.168.1.100:5901 .Step 12
Once connected via VNC, you need to follow the install process of the Ubuntu .iso:
Select your install language, then press Continue.
Select “Download updates while installing Ubuntu”, then press Continue.
“Erase disk and install Ubuntu” is selected by default, but you need to select “Use LVM with the new Ubuntu installation”, then press Install Now.
A pop-up will ask if you want to “Force UEFI installation?”, press Continue in UEFI mode.
You then get another pop-up asking you to “Write the changes to disks?”, press Continue to accept.
You are then asked to select your location, do this and then press Continue.
You then need to select your Keyboard layout and press Continue to accept.
You are now asked to create a user, this user is classed as a Superuser and has the rights to use the
sudo command (as you don’t have access to the root login within Ubuntu).-->Full Name: CrashPlan VMuser
-->Your computer's name: ubuntu-vm-crashplan
-->Username: crashplanvmuser
-->Password: <password>
-->Log in automatically
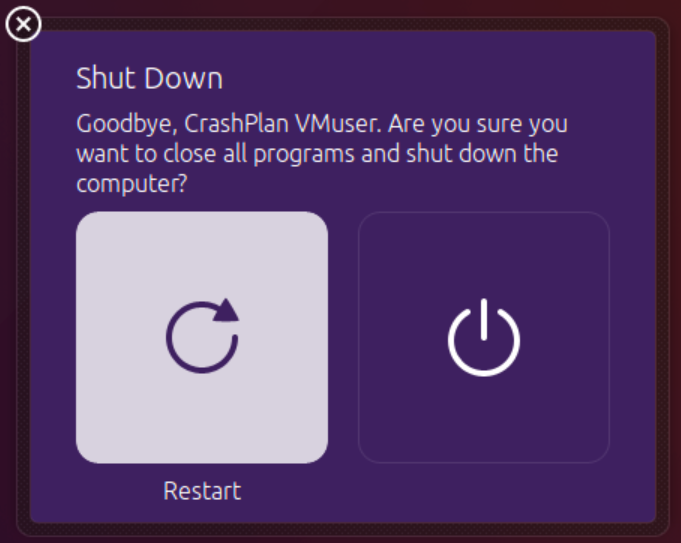
You now need to wait for the install to finish, so make yourself a cup of coffee! Once the install has finished, you need to press Restart Now. However, it may not restart and you may need to press the
send ctrl-alt-del button (on your VNC client) a few times to end the VNC session.Step 13
You now need to configure the VM to boot from the zvol and not from the install .iso, to do this you need to remove the CD-ROM device and also make some configuration changes as follows:
Stop the VM, and then delete CD-ROM device from the VM.
You then need to edit the VNC device and untick "Wait to boot" (this means it will now boot automatically and not wait for a VNC connection).
You then need to edit the VM and tick Autostart (this will ensure that the VM starts automatically on a FreeNAS server reboot).
Once you have made the above changes, you need to restart the VM.
Step 14
However, you may find that the VM does not boot into Ubuntu automatically, and if so, you will need the following fix:
If you see the UEFI Interactive Shell, then you need to type exit at the prompt.
You now need to select the Boot Maintenance Manager.
Now select, Boot From File.
Press enter at the following (please note it will not look exactly as the screenshot below).
Then press enter on <EFI>.
Then navigate to <ubuntu>, and then select grub64.efi.
Once Ubuntu has booted and you have logged in (using the username/password created in Step 12), we need to fix the boot sequence, to do this:
Find and load the Terminal application.
You may find it useful to lock Terminal to the launcher, for future easy access, to do this right-click on the Terminal application on the left and select Lock to Launcher.
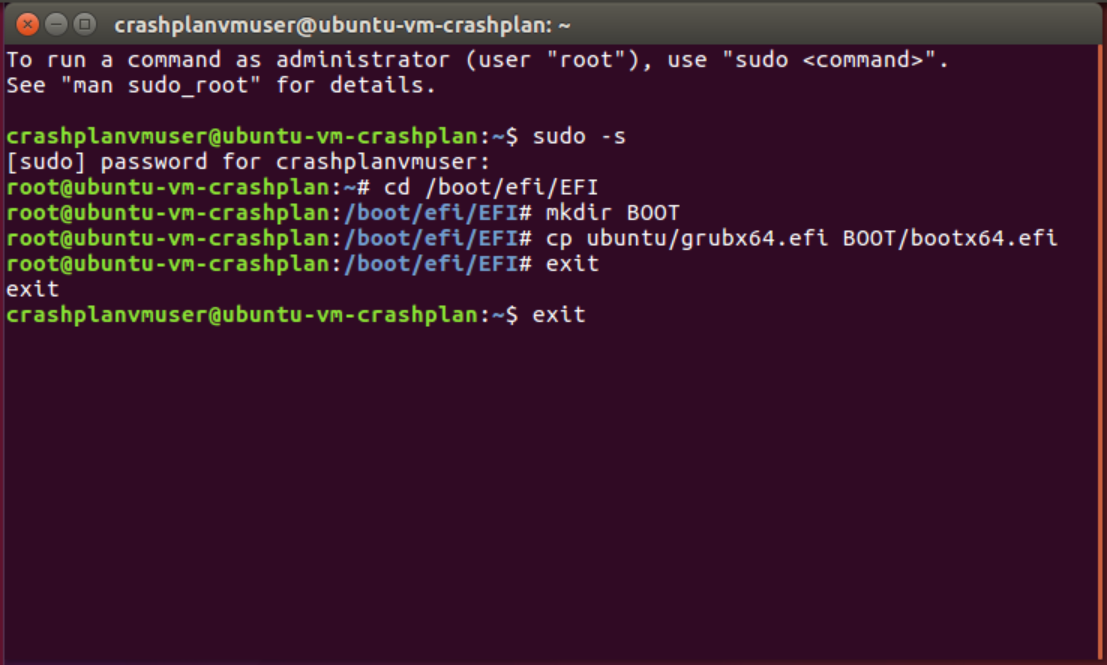
You now need to fix the boot issue, to do this we need to issue some commands as root. But as mentioned earlier, in Ubuntu you don’t have access to root, but the superuser can issue root commands via the
sudo command.The command
sudo –s will allow you to login as if you are the root user, it will prompt you for the superuser password. You then need to change directory with the command cd /boot/efi/EFI, and then create a new directory with the command mkdir BOOT, finally you need to copy the grubx64.efi file you selected earlier to the BOOT directory (noting that the file name needs to change), by using the copy command cp ubuntu/grubx64.efi BOOT/bootx64.efi.You can now exit the Terminal by using the command
exit twice; the first time exits the sudo –s login, and the second closes Terminal.
You can now select shutdown and restart to restart the VM (it will disconnect VNC, but if you wait a moment and then reconnect via VNC, the VM should be booting correctly).
Thanks to @KrisBee for this fix, see his post for further details.
Step 15
We are now at the stage where we want to mount the FreeNAS Windows shares that you wish to backup (which you granted the user CrashPlan VMuser access to in Step 5).
You need to load Terminal, and run the command
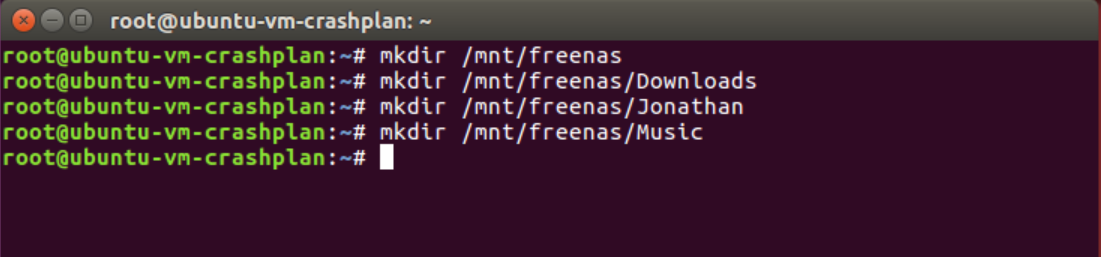
sudo –s to login as root. You then need to install cifs-utils (to allow the Jail to connect to the Windows shares), to do this run the command apt install cifs-utils and then select Yes when prompted.Once you have installed cifs-utils, you need to create a directory for each share that you wish to mount, I recommend creating these in the
/mnt directory. To create the shares use the mkdir command, i.e.First create the
/mnt/freenas directory using mkdir /mnt/freenas, then create directories for each dataset you wish to backup, i.e. mkdir /mnt/freenas/Downloads mkdir /mnt/freenas/Jonathan mkdir /mnt/freenas/Musicetc.
Step 16
To enable the Jail to mount the shares you need to edit the file
/etc/fstab, however you need to give this public-viewable file login credentials (of the user created in Step 4) to access to shares. To hide and protect these credentials you need to create a credentials file, as per the following:If you have closed Terminal (from Step 15), then you need to load Terminal and redo the
sudo –s command to get root access.Use the editor nano to create the file:
nano -w /root/.smbcredentialsThe file needs to have three lines as follows:
Code:
username=CrashPlan
password=(whatever password you used)
domain=freenas
Use Ctrl-O so save the file, and Ctrl-X to exit nano. You then need to restrict access to the credential file, so that only root can access it, to do this use the command
chmod 600 .smbcredentials.
Step 17
You are now ready to edit the file
/etc/fstab, if you have closed Terminal (from Step 16), then you need to load Terminal and redo the sudo –s command to get root access.Warning: DO NOT edit any of the lines already in this file, or you will stop Ubuntu from working correctly. Therefore it is prudent to back-up the file
/etc/fstab before you make any changes, to do this you can use the copy command cp, i.e. cp /etc/fstab /root/fstab.backup.Problems you may encounter.....
1) Because the
/etc/fstab file uses spaces as the delimiter between values, this can cause issues if you have shares with spaces in their names, i.e. they won't mount!So how do you get around this issue? One way is to make sure your shares don't have spaces in their name. However if you have already configured other things to use the share name and don't want to rename the share, then you can get around it by using the special code
\040 instead of the space, i.e. for the share //freenas/My Example, you would type in //freenas/My\040Example.2) Another issue is that sometimes the
/etc/fstab file doesn't mount when using the server name for the share path. If this happens, you can use the IP address instead, i.e. //192.168.0.50/Documents instead of //freenas/Documents.However, if you need to use the IP number, then you should edit the
/etc/hosts file in the Jail, and add in the following line: <ipaddress> <servername>, where <ipaddress> is the IP address of your FreeNAS server i.e. 192.168.0.50 freenas. If the /etc/hosts file doesn't exist you can just create a new one!3) Remember, case is everything!
//freenas/Documents is different then //freenas/documents. Ensure you have got the case right for the shares and mount folders (Step 15), otherwise they won't mount.4) Also, the share name is not the same as the absolute path name of the share on the FreeNAS server, i.e. I have a share called
Downloads, which on the FreeNAS server is in /mnt/tank/Downloads, but is accessible via the share as //freenas/Downloads......
You can load and edit the file by using the nano editor, i.e.
nano –w /etc/fstab. Remember, use Ctrl-O so save the file, and Ctrl-X to exit nano. Within nano, move to the end of the file and press return to create a blank line, then type in the following:Code:
#FreeNAS server mounts for CrashPlan access
Then for each dataset you wish to backup you need to create an individual line within fstab, for example:
Code:
//freenas/dataset_name /mnt/freenas/dataset_share_name cifs vers=3.0,credentials=/root/.smbcredentials,ro,gid=1000,uid=1000 0 0
So if you wish to back-up the share called Downloads, you need to type
Code:
//freenas/Downloads /mnt/freenas/Downloads cifs vers=3.0,credentials=/root/.smbcredentials,ro,gid=1000,uid=1000 0 0
Run the command
mount -a to check for any errors in the /etc/fstab file, if errors are displayed edit the /etc/fstab file to correct them.Once
mount -a shows no errors, you can reboot the VM.Please Note: For FreeNAS v11.1-U6 and above, SMB v1.0 has been disabled by default for security reasons. Therefore you need to ensure you use the parameter vers=3.0 on your mount lines in /etc/fstab. (Please note that the screenshot image above has NOT been updated to show this).
Step 18
Now we can finally install CrashPlan! :)
Load Firefox and navigate to https://www.crashplan.com, select the menu (on the right) and click on Download, then select Linux, and save the file.
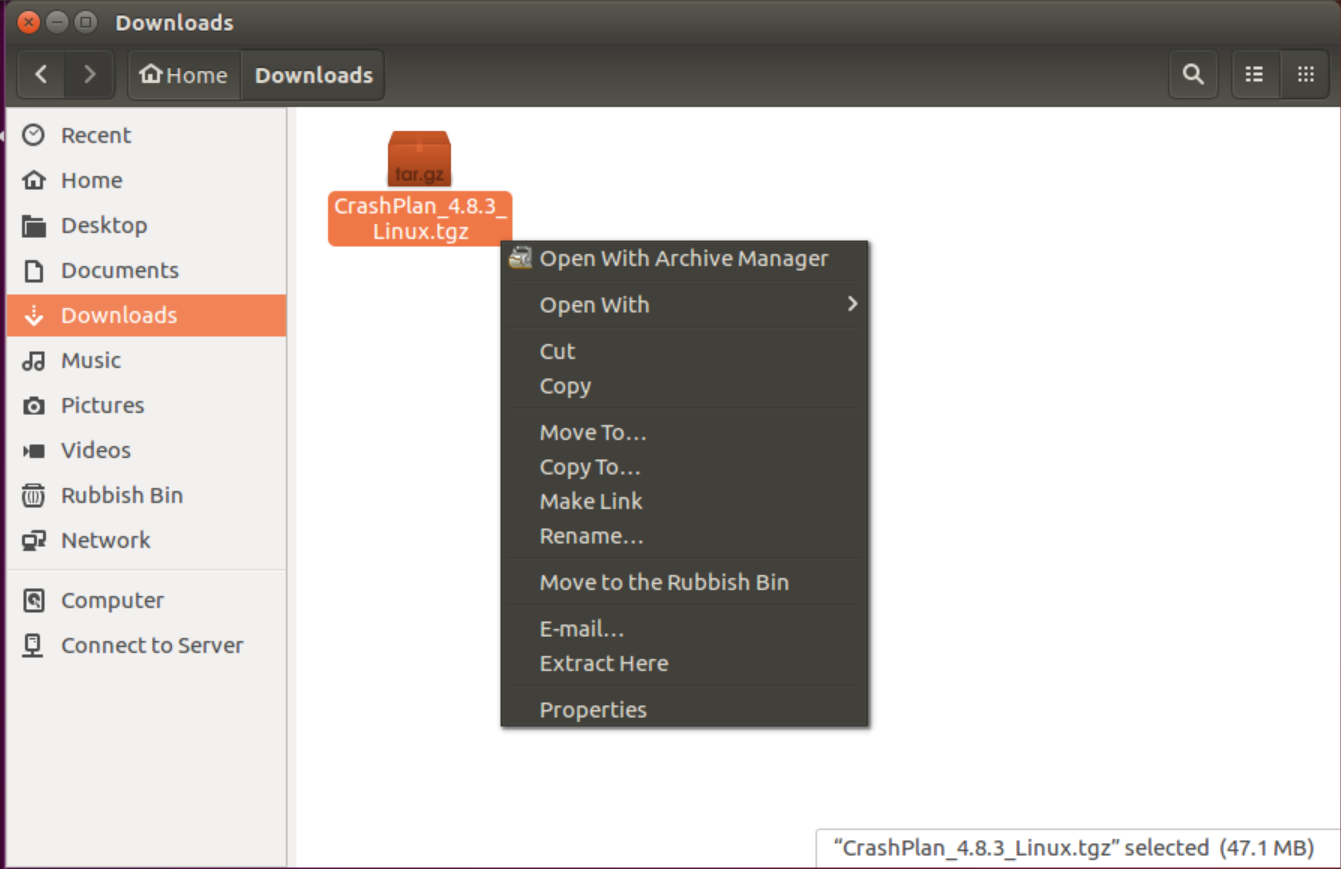
Once downloaded you need to extract the install package, to do this, load the Files application and navigate to the Downloads folder, and then select the downloaded CrashPlan file. Right-click on the file and select Extract Here.
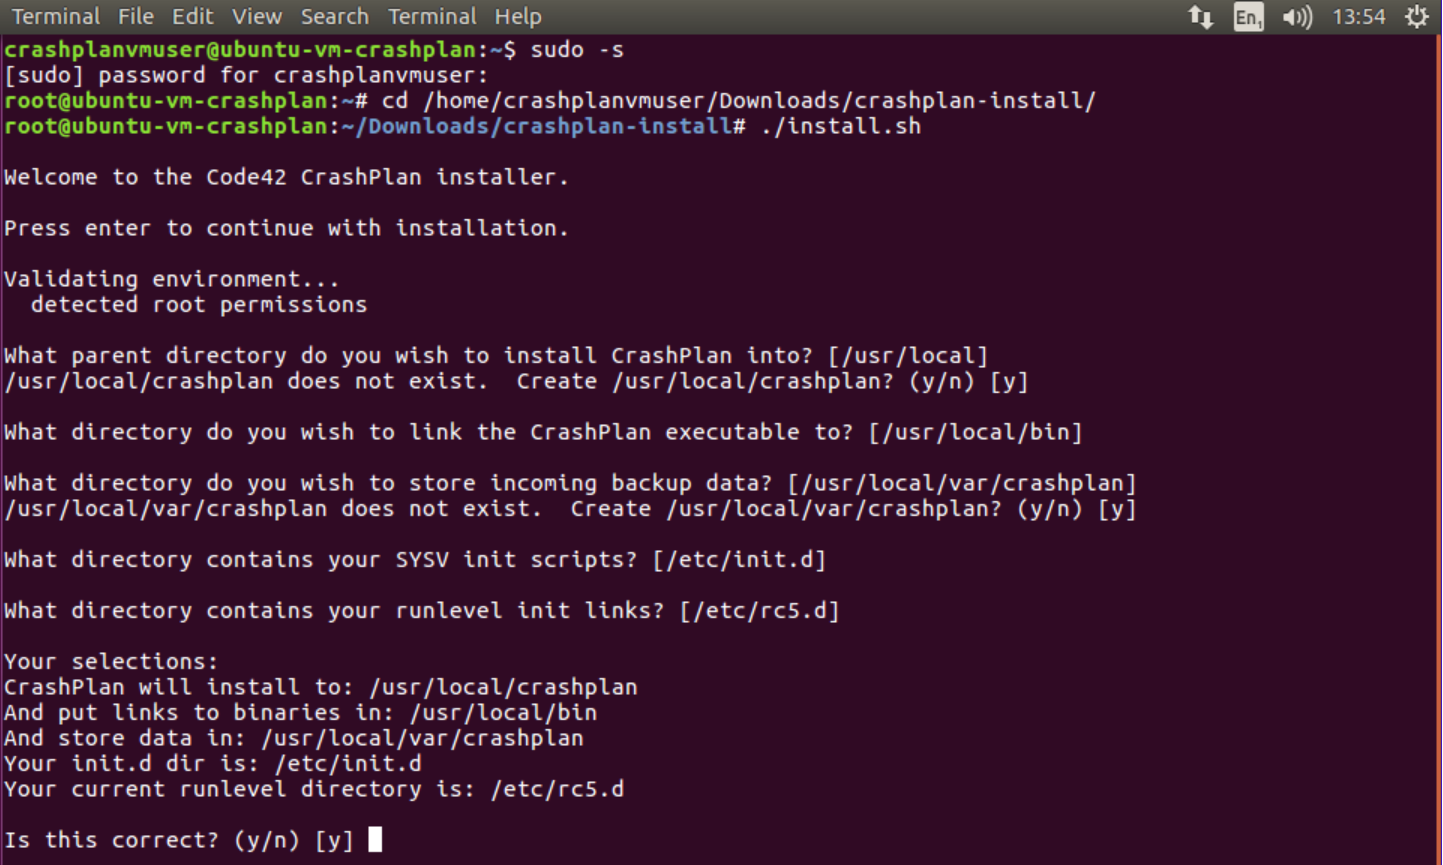
You now need to load Terminal, and run the command
sudo –s (to be root). You then need to change directory to the extracted install directory, cd /home/crashplanuservm/Downloads/crashplan-install, you then need to run the command ./install.sh. Accept the default options for the install.
Wait for the install to finish, once finished it will ask if you want to start CrashPlanDesktop, select
n. Now exit terminal, by typing exit twice, and you should now see a CrashPlan icon on the desktop.Step 19
Double-click on the CrashPlan icon to load CrashPlan! Follow the instructions on the CrashPlan website for configuring and using CrashPlan.
I do highly recommend the following extra reading, which details two important settings which you will want to change. Linux real-time file watching and memory usage with large backups.
If you found this resource useful (or not) I would be grateful if you could feedback using the rating system!
Jonathan
Edits:
2017-08-22: Adding warning about CrashPlan for Home being discontinued.
2017-09-08: Added in some more
/etc/fstab clarification as per @MauricioU post.2018-07-11: Small edit to clarify Ubuntu version in Title.
2018-08-29: Edit to update users about the Bhyve bug stopping latest version of the Linux Kernel (v4.15) from running (Fixed in FreeNAS v11.2).
2018-09-14: Edit regarding FreeNAS v11.1-U6 and changes to SMB v1.0 (i.e. the disabling of)
