Greetings iX Systems and FreeNAS Community! This mod was performed on my first FreeNAS server and brought to you by my first post and Covid-19 lab time:
Well known to owners of LSI 2008 controller based HBA cards (in this instance an IT mode flashed Dell/LSI 9217-8i) is that these puppies can get a little hot under the collar without adequate airflow. While my FreeNAS build is in a well ventilated full-size tower (Silver Stone FT-02), the HBA card was still much hotter than I would have liked. Just barely on the warmer side of anything I'd let fly in any of my systems. In this environment, there is more space and larger fans making lots of quiet airflow through the case. But also not the rack mount server configuration, blasting sound and air like a turbojet to keep the passive heatsink cooling the HBA acceptably. I had to stop and put my thinking cap on; this was about to get really fun.

Cleaned up die with remnants of the original factory thermal pad (pink) and flecks of liquid metal (presumably from heatsink removal) on the liquid electrical tape.
After pulling the card and removing the passive heatsink, I was surprised to see that the thermal pad had been removed, having been replaced by liquid metal. I know the screws are "spring loaded", but I didn't care much for the removal of material and potentially force for a liquid metal mating. Liquid electrical tape was covering the area around the die. Cleaned up the old liquid metal with medical gauss (the texture is great for LM) and 100% Acetone. Final cleanup performed with 91% Isopropyl Alcohol.
After poking around the internet and thinking about things like clearances, future-proofing, PCI-E lanes and bandwidth I knew I wanted a Noctua NF-A4x20 5V PWM, but was unsure about the heatsink. This uncertainty probably momentarily robbed me of my common sense, because as you'll see, the Enzotech SLF-40 Pure Copper, Low Profile Heat Sink is almost perfect.
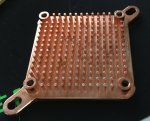
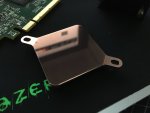
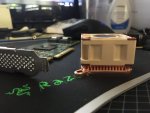
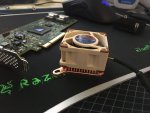
Total height of upgraded heatsink/fan combination is 27mm.
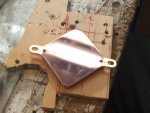
Our friend Pythagoras' Theorem tells us the length across the diagonal of a 40mm square is approximately 56.78mm. Clearly much less than the 59mm-63mm range the outer "dog-ears" mounting tabs accommodate. Holes are 32mm from centered hole to hole along the sides, 45.25mm across.
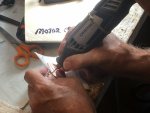
Fine-tip Sharpie and a very steady steel ruler later I was starting to drill from the flat copper base up into the fin array. Keep in mind, I was still figuring things out a bit..
I mention this as an insight into the trial and error gone through in the name of science. After simplifying my mounting hardware strategy, these holes were drilled out instead of tapped. One could just skip to drilling from the top down through the existing heatsink fan mounting holes with a 3/32" drill bit.
Here's a good point to end Part I. Perhaps watch a youtube video about creating your own self-tapping screws should you need to be crafty with a different mounting configuration.
We'll continue with the mounting hardware and installation, some thermal benchmarking and PCI-E strategy with regards to spacing and future-proofing in Part II...
(Part 1/2)
Well known to owners of LSI 2008 controller based HBA cards (in this instance an IT mode flashed Dell/LSI 9217-8i) is that these puppies can get a little hot under the collar without adequate airflow. While my FreeNAS build is in a well ventilated full-size tower (Silver Stone FT-02), the HBA card was still much hotter than I would have liked. Just barely on the warmer side of anything I'd let fly in any of my systems. In this environment, there is more space and larger fans making lots of quiet airflow through the case. But also not the rack mount server configuration, blasting sound and air like a turbojet to keep the passive heatsink cooling the HBA acceptably. I had to stop and put my thinking cap on; this was about to get really fun.
Cleaned up die with remnants of the original factory thermal pad (pink) and flecks of liquid metal (presumably from heatsink removal) on the liquid electrical tape.
After pulling the card and removing the passive heatsink, I was surprised to see that the thermal pad had been removed, having been replaced by liquid metal. I know the screws are "spring loaded", but I didn't care much for the removal of material and potentially force for a liquid metal mating. Liquid electrical tape was covering the area around the die. Cleaned up the old liquid metal with medical gauss (the texture is great for LM) and 100% Acetone. Final cleanup performed with 91% Isopropyl Alcohol.
After poking around the internet and thinking about things like clearances, future-proofing, PCI-E lanes and bandwidth I knew I wanted a Noctua NF-A4x20 5V PWM, but was unsure about the heatsink. This uncertainty probably momentarily robbed me of my common sense, because as you'll see, the Enzotech SLF-40 Pure Copper, Low Profile Heat Sink is almost perfect.


Total height of upgraded heatsink/fan combination is 27mm.
|
| A picture says a thousand words. I bet you can figure out what mistake I made by looking at the diagram to the left. I just really loved the Enzotech product. Especially in conjunction with the baby Noctua. Challenge accepted. |
Removing the 6.8mm fan leaves a copper heatsink 7mm in height. |
Our friend Pythagoras' Theorem tells us the length across the diagonal of a 40mm square is approximately 56.78mm. Clearly much less than the 59mm-63mm range the outer "dog-ears" mounting tabs accommodate. Holes are 32mm from centered hole to hole along the sides, 45.25mm across.
Fine-tip Sharpie and a very steady steel ruler later I was starting to drill from the flat copper base up into the fin array. Keep in mind, I was still figuring things out a bit..
I mention this as an insight into the trial and error gone through in the name of science. After simplifying my mounting hardware strategy, these holes were drilled out instead of tapped. One could just skip to drilling from the top down through the existing heatsink fan mounting holes with a 3/32" drill bit.


Here's a good point to end Part I. Perhaps watch a youtube video about creating your own self-tapping screws should you need to be crafty with a different mounting configuration.
We'll continue with the mounting hardware and installation, some thermal benchmarking and PCI-E strategy with regards to spacing and future-proofing in Part II...
(Part 1/2)
