
zufallsheld
Explorer
- Joined
- Dec 27, 2013
- Messages
- 54
Here’s a little how-to on how to use the new syncthing-plugin for your FreeNAS-server. Syncthing is an opensource file synchronisation client/server application. It’s a great alternative to btsync or Dropbox.
Note: The following text contains passages from my other guide on how to setup FreeNAS 9.2.1 with Transmission and Couchpotato/Sickbeard as a DLNA-Server. That’s because there are many similar steps to perform when setting up FreeNAS plugins.
Prepatory work
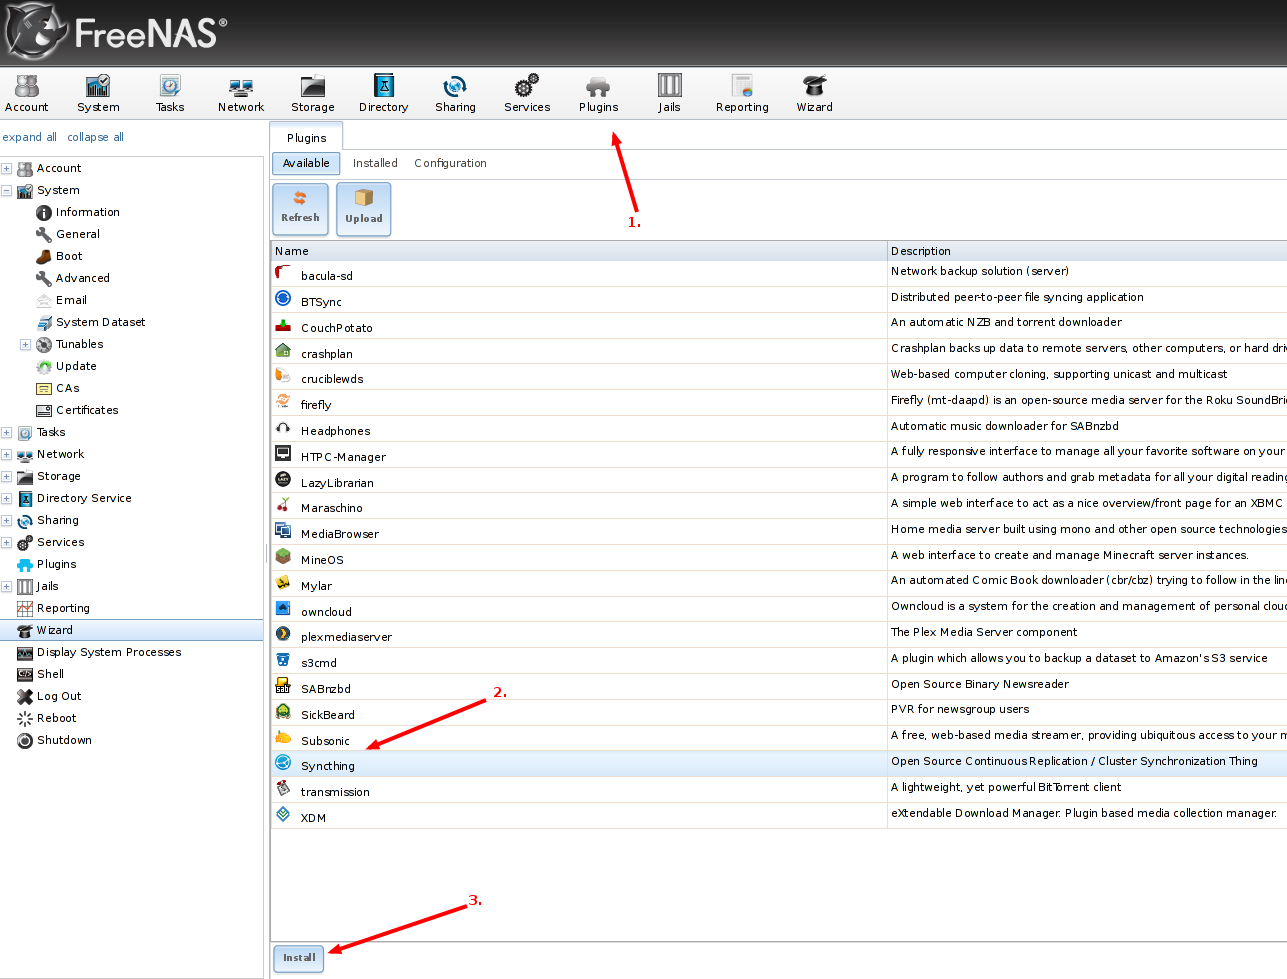
Installing plugins is very easy, as long as you stick to the available ones provided by FreeNAS. In the Plugins-menu, click on the plugins and then on Install, to install them. Each plugin is installed into a jail, a separate “operating system” in FreeNAS itself, but we’ll get to that in a later section.
You’re going to need a place to store the synchronized data. We’re going to use a separate ZFS-dataset here. If you’re already familar with FreeNAS, feel free to use an existing dataset.
This is the most important part and you should carefully read the documentation the FreeNAS community offers. I will not go into detail on what volumes or RAIDs to use. It mainly depends on your needs and what you’ve got hardware-wise.
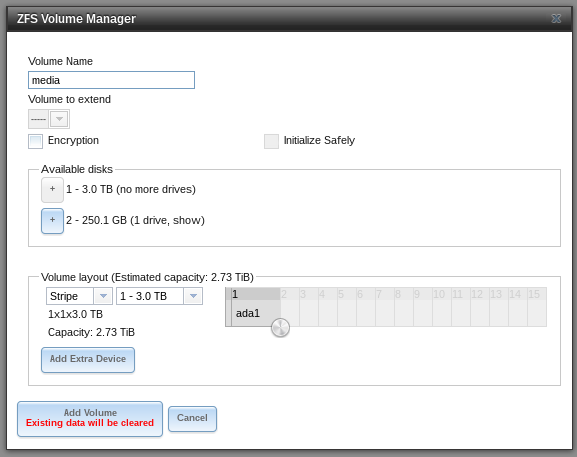
To create a dataset, you first need a volume, that is, a collection of your hard-drives. If you already created a volume, skip this step.
Afterwars, you have to create a new empty volume and attach disks to it: open Storage > Volumes > ZFS Volume Manager, give your new volume a name, add your disks and configure the layout.
To create a dataset click on your created storage, then hit the “Create dataset”-button (the one that looks like an excel-document with a plus). There, set the name for the dataset (e.g. backup). You can ignore all other options for now, as they are for advanced users.
Changing permissions of the storage
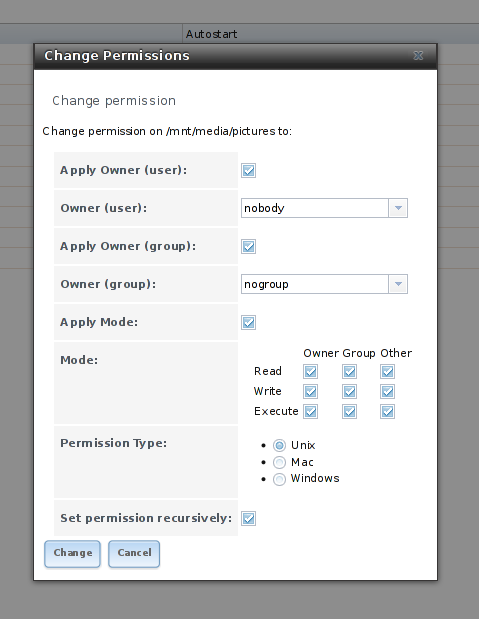
Since there probably many users and computers, that want sync their data to your storage, you’ll have to configure the permissions for it. The best way is to set the ownership of the storage to nobody and give read/write/execute permissions to everybody. You should only do this, if you trust the users of your network. To change permissions, click on the “Storage” tab, select the volume you want to edit and click the first button in the bottom line that displays hard disks and a key. There, set the Owner (user) to “nobody”, the Owner (group) to “nogroup” and activate all buttons in the mode. Type of ACL should be set to Unix. Tick the box that says “Set permission recursively” so all other folders and files in the volume will have the same permissions.
Enabling access to the jail
SSH to your FreeNAS
You’ll likely need command-line access to your FreeNAS installation and to the jail as well. To enable SSH access to FreeNAS, go to Services and click on the screwdriver next to SSH. Tick the “Login as root with password” box and save the settings. After that, enable the SSH-Service by clicking the red OFF-button. Now you’re able to connect to your FreeNAS with SSH by entering the following line into your terminal-emulator of choice:
ssh root@192.168.0.14
(change the address to the address of your FreeNAS)
Then enter the admin-password and you should be connected to your box.
Using Putty to enter your FreeNAS
If you’re on Windows and want to connect to your FreeNAS-installation using Putty, you have to enter the IP-address of FreeNAS into the “Host Name”-field, then press “open”.
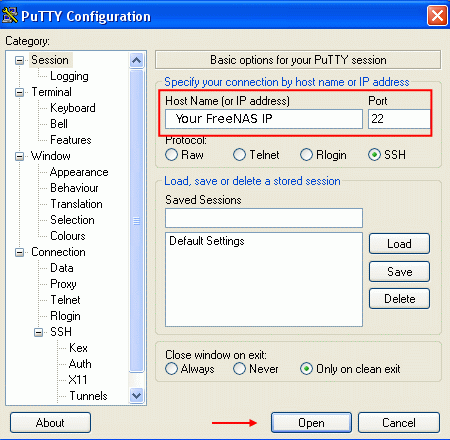
If Putty cannot connect, you probably didn’t use the correct IP-address or you forgot to enable SSH.
Entering the jails
To enter the syncthong, type “jls” on the command-line. There you’ll see all available jails. To connect to them, enter “jexec # tcsh” where # is the number of the jail.
[root@freenas] ~# jls
JID IP Address Hostname Path
1 - syncthing_1 /mnt/media/jails/syncthing_1
[root@freenas] ~# jexec 1 tcsh
root@syncthing_1:/ #
Adding the storage to the plugin
Now we’ll have to add the dataset to the syncthing-plugin, so it can access the storage. Since jails are separate systems in the server-OS itself, they cannot by default access other parts of your system.
To add the storage, go to Jails, click the plus next to the plugin, open the “Storage” tab and click “Add storage”. You’ll then have to enter the source and destination addresses.
The source is the storage or dataset you created in the first place. If you did not create a dataset before, you either have to do this now or create normal directories as sources with mkdir on the server. The destinations are directories in the jails that get mapped to the storages outside the jails.
If the destination addresses in the jails do not exist, tick the “Create directory”-box.
To manually create the directories, enter the jail, then you can create directories with the following command:
mkdir -p /media/backup
Then enter the following command the get the permissions right:
chmod -R 777 /media/backup
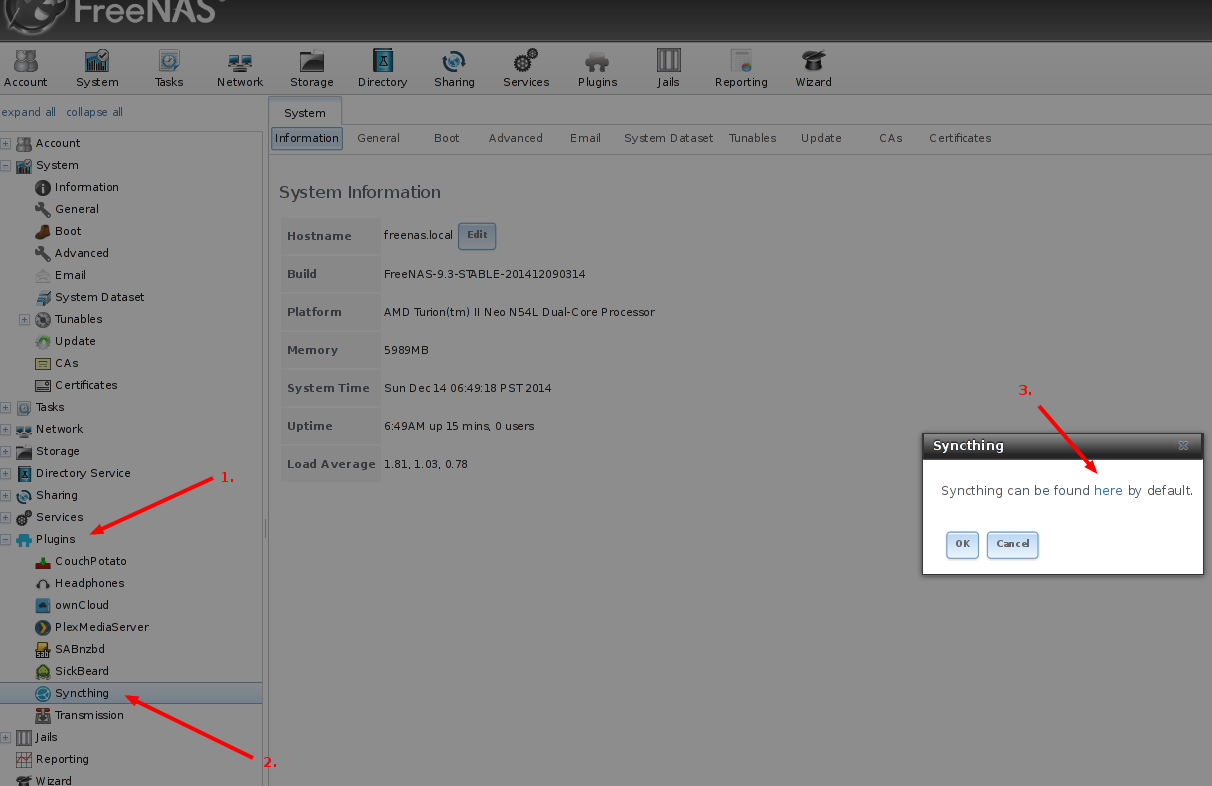
Configuring Syncthing
Now it’s time to open syncthing and configure it. You’ll have to open its frontend. The following screenshot shows, how to find out the ip-address of syncthing.
If you came this far, you can now follow the official syncthing-guide on how to get started here!
Note: The following text contains passages from my other guide on how to setup FreeNAS 9.2.1 with Transmission and Couchpotato/Sickbeard as a DLNA-Server. That’s because there are many similar steps to perform when setting up FreeNAS plugins.
Prepatory work
Installing plugins is very easy, as long as you stick to the available ones provided by FreeNAS. In the Plugins-menu, click on the plugins and then on Install, to install them. Each plugin is installed into a jail, a separate “operating system” in FreeNAS itself, but we’ll get to that in a later section.
You’re going to need a place to store the synchronized data. We’re going to use a separate ZFS-dataset here. If you’re already familar with FreeNAS, feel free to use an existing dataset.
This is the most important part and you should carefully read the documentation the FreeNAS community offers. I will not go into detail on what volumes or RAIDs to use. It mainly depends on your needs and what you’ve got hardware-wise.
To create a dataset, you first need a volume, that is, a collection of your hard-drives. If you already created a volume, skip this step.
Afterwars, you have to create a new empty volume and attach disks to it: open Storage > Volumes > ZFS Volume Manager, give your new volume a name, add your disks and configure the layout.
To create a dataset click on your created storage, then hit the “Create dataset”-button (the one that looks like an excel-document with a plus). There, set the name for the dataset (e.g. backup). You can ignore all other options for now, as they are for advanced users.
Changing permissions of the storage
Since there probably many users and computers, that want sync their data to your storage, you’ll have to configure the permissions for it. The best way is to set the ownership of the storage to nobody and give read/write/execute permissions to everybody. You should only do this, if you trust the users of your network. To change permissions, click on the “Storage” tab, select the volume you want to edit and click the first button in the bottom line that displays hard disks and a key. There, set the Owner (user) to “nobody”, the Owner (group) to “nogroup” and activate all buttons in the mode. Type of ACL should be set to Unix. Tick the box that says “Set permission recursively” so all other folders and files in the volume will have the same permissions.
Enabling access to the jail
SSH to your FreeNAS
You’ll likely need command-line access to your FreeNAS installation and to the jail as well. To enable SSH access to FreeNAS, go to Services and click on the screwdriver next to SSH. Tick the “Login as root with password” box and save the settings. After that, enable the SSH-Service by clicking the red OFF-button. Now you’re able to connect to your FreeNAS with SSH by entering the following line into your terminal-emulator of choice:
ssh root@192.168.0.14
(change the address to the address of your FreeNAS)
Then enter the admin-password and you should be connected to your box.
Using Putty to enter your FreeNAS
If you’re on Windows and want to connect to your FreeNAS-installation using Putty, you have to enter the IP-address of FreeNAS into the “Host Name”-field, then press “open”.
If Putty cannot connect, you probably didn’t use the correct IP-address or you forgot to enable SSH.
Entering the jails
To enter the syncthong, type “jls” on the command-line. There you’ll see all available jails. To connect to them, enter “jexec # tcsh” where # is the number of the jail.
[root@freenas] ~# jls
JID IP Address Hostname Path
1 - syncthing_1 /mnt/media/jails/syncthing_1
[root@freenas] ~# jexec 1 tcsh
root@syncthing_1:/ #
Adding the storage to the plugin
Now we’ll have to add the dataset to the syncthing-plugin, so it can access the storage. Since jails are separate systems in the server-OS itself, they cannot by default access other parts of your system.
To add the storage, go to Jails, click the plus next to the plugin, open the “Storage” tab and click “Add storage”. You’ll then have to enter the source and destination addresses.
The source is the storage or dataset you created in the first place. If you did not create a dataset before, you either have to do this now or create normal directories as sources with mkdir on the server. The destinations are directories in the jails that get mapped to the storages outside the jails.
If the destination addresses in the jails do not exist, tick the “Create directory”-box.
To manually create the directories, enter the jail, then you can create directories with the following command:
mkdir -p /media/backup
Then enter the following command the get the permissions right:
chmod -R 777 /media/backup
Configuring Syncthing
Now it’s time to open syncthing and configure it. You’ll have to open its frontend. The following screenshot shows, how to find out the ip-address of syncthing.
If you came this far, you can now follow the official syncthing-guide on how to get started here!
Last edited by a moderator: