Edit page
TrueNAS AppsTrueNAS Apps: Tutorials
Application maintenance is independent from TrueNAS version release cycles.
App versions, features, options, and installation behavior at time of access might vary from documented tutorials and UI reference.

Installing Custom Applications

TrueNAS includes the ability to install third-party apps in Docker containers that allow users to deploy apps not included in the catalog. Generally, any container that follows the Open Container Initiative specifications can be deployed.

To deploy a custom application, go to Apps and click Discover Apps. Click Custom App to open the Install iX App screen with a guided installation wizard. Click > Install via YAML to open the Custom App screen with an advanced YAML editor for deploying apps using Docker Compose.

Custom Docker Applications

Custom Docker applications typically follow Open Container specifications and deploy in TrueNAS following the Custom Application deployment process described below.

Carefully review documentation for the app you plan to install before attempting to install a custom app. Take note of any required environment variables, optional variables you want to define, start-up commands or arguments, networking requirements, such as port numbers, and required storage configuration.

If your application requires specific directory paths, datasets, or other storage arrangements, configure these before you start the Install Custom App wizard.

You cannot save settings and exit the configuration wizard to create data storage or directories in the middle of the process. If you are unsure about any configuration settings, review the Install Custom App Screen UI reference article before creating a new container image.

To create directories in a dataset on TrueNAS, before you begin installing the container, open the TrueNAS CLI and enter storage filesystem mkdir path="/PATH/TO/DIRECTORY".

We recommend setting up your storage, user, or other configuration requirements before beginning deployment. You should have access to information such as:

  • The path to the image repository
  • Any container entrypoint commands or arguments
  • Container environment variables
  • Network settings
  • IP addresses and DNS nameservers
  • Container and node port settings
  • Storage volume locations
  • Certificates for image security

Setting up App Storage

To set up a new container image, first, determine if you want the container to use additional TrueNAS datasets. If yes, create the dataset(s) before you begin the app installation.

The custom app installation wizard provides four options for mounting app storage, see below. When deploying a custom app via YAML, refer to the Docker Storage documentation for guidance on mount options.

Using Host Path Volumes

You can mount TrueNAS storage locations inside the container as host paths. A host path mounts a file or dataset into the container using Docker bind mounts. To mount a host path, define the path to the system storage and the container internal path for storage location to appear. You can also mount the storage as read-only to prevent using the container to change any stored data.

Using ixVolumes

Use ixVolumes to allow TrueNAS to create a dataset on the apps storage pool. Like host paths, ixVolumes are mounted as Docker bind mounts and can be mounted read only. In most use cases, ixVolume storage is better suited to app testing, while host volumes are better for production deployments.

Using SMB Shares

Users can mount a an SMB share for storage within the container using Docker volumes. Volumes consume space from the pool chosen for application management. You need to define a path where the volume appears inside the container.

Using Memory-Backed Storage

Memory-backed tmpfs storage provides a temporary, in-memory file system for storing data that only needs to persist for the lifetime of the container. It is mounted directly in RAM and automatically cleared when the container stops.

Memory-backed storage can be used to store ephemeral data, especially when performance speed is a concern, such as caching, processing data that does not need persistent storage, or storing session data. For security purposes, you can store sensitive data like temporary credentials or data in tmpfs instead of writing to disk.

Installing via Wizard

To deploy a third-party application using the Install iX App wizard, go to Apps, click Discover Apps, then click Custom App.

  1. Enter a name for the container in Application Name. Accept the default number in Version.

  2. Enter the Docker Hub repository for the application you want to install in Image Configuration. Use the format maintainer/image, for example storjlabs/storagenode, or image, such as debian, for Docker Official Images.

    If the application requires it, enter the correct value in Tag and select the Pull Policy to use.

  3. If the application requires it, define any Container Configuration settings to specify the entrypoint, commands, timezone, environment variables, and restart policy to use for the image. These can override any existing commands stored in the image.

    Click Add to the right of Entrypoint to display an entrypoint field. Each field is an item in the ENTRYPOINT list in exec format. For example, to enter ENTRYPOINT ["top", "-b"], enter top in the first Entrypoint field. Click Add again. Enter -b in the second field.

    Click Add to the right of Command to display a container command field. Each field is an item in the CMD list in exec format. For example, to enter CMD ["echo", "hello world"], enter echo in the first Command field. Click Add again. Enter hello world in the second field.

    Select the appropriate Timezone or begin typing the timezone to see a narrowed list of options to select from..

    Click Add for Environment Variables to display a block of variable fields. Enter the environment variable name or key in Name, for example MY_NAME. Enter the value for the variable in Value for example, "John Doe", John\ Doe, or John. Click Add again to enter another set of environment variables.

    Use the dropdown to select a Restart Policy to use for the container.

If needed, select the options to disable health check built into the container, enable a pseudo-TTY (or pseudo-terminal) for the container, or to keep the standard input (stdin) stream for the container open, for example for an interactive application that needs to remain ready to accept input.

  1. Enter any required settings in Security Context Configuration.

    Select Privileged to run the container in privileged mode. By default, a container cannot access any devices on the host. With Privileged enabled, the container has access to all devices on the host, which allows the container nearly all the same access as processes running on the host. Be cautious if enabling privileged mode. A more secure solution is to use Capabilities to grant limited access to system processes as needed.

    To grant access to specific processes, click Add under Capabilities to display a container capability field. Enter a Linux capability to enable, for example CHOWN. Click Add again to enter another capability. See Docker documentation for more information on linux capabilities in Docker.

    If you need to define a user to run the container, select Custom User to display the User ID and Group ID fields. Enter the numeric UID and GID of the user that runs the container. The default UID/GID is 568/568 (apps/apps).

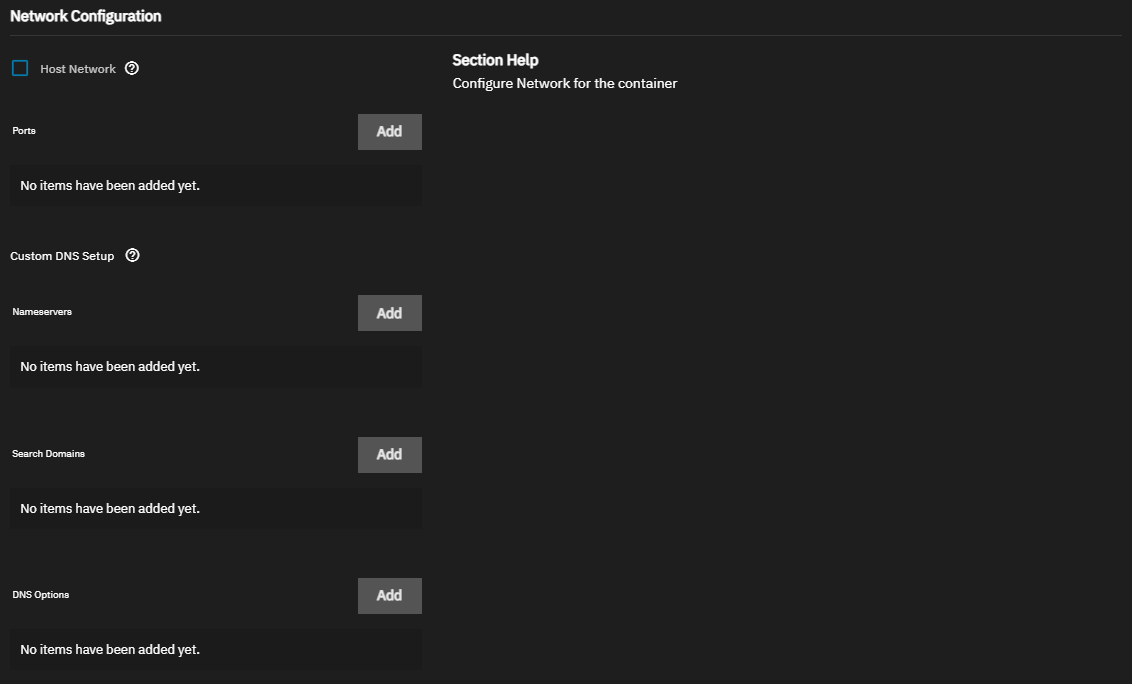
  2. Enter the Network Configuration settings.

    Select Host Network to bind the container to the TrueNAS network. When bound to the host network, the container does not have a unique IP-address, so port-mapping is disabled. See the Docker documentation for more details on host networking.

    Use Ports to reroute container ports that default to the same port number used by another system service or container. See Default Ports for a list of assigned ports in TrueNAS. See the Docker Container Discovery documentation for more on overlaying ports.

    Click Add to display a block of port configuration fields. Click again to add additional port mappings. Enter a Container Port number. Refer to the application documentation for default port values. Enter a Host Port number that is open on the TrueNAS system. Select either TCP or UDP for the transmission Protocol.

    Use Custom DNS Setup to enter any DNS configuration settings required for your application. By default, containers use the DNS settings from the host system. You can change the DNS policy and define separate nameservers and search domains. See the Docker DNS services documentation for more details.

    Use Nameservers to add one or more IP addresses to use as DNS servers for the container. Click Add to display a Nameserver entry field and enter the IP address. Click again to add another name server.

    Use Search Domains to add one or more DNS domains to search non-fully qualified host names. Click Add to display a Search Domain field and enter the domain you want to configure, for example, mydomain.com. Click again to add another search domain. See the Linux search documentation for more information.

    Use DNS Options to add one or more key-value pairs to control various aspects of query behavior and DNS resolution. Click Add to display an Option field and enter a key-value pair representing a DNS option and its value, for example ndots:2. Click again to add another option. See the Linux options documentation for more information.

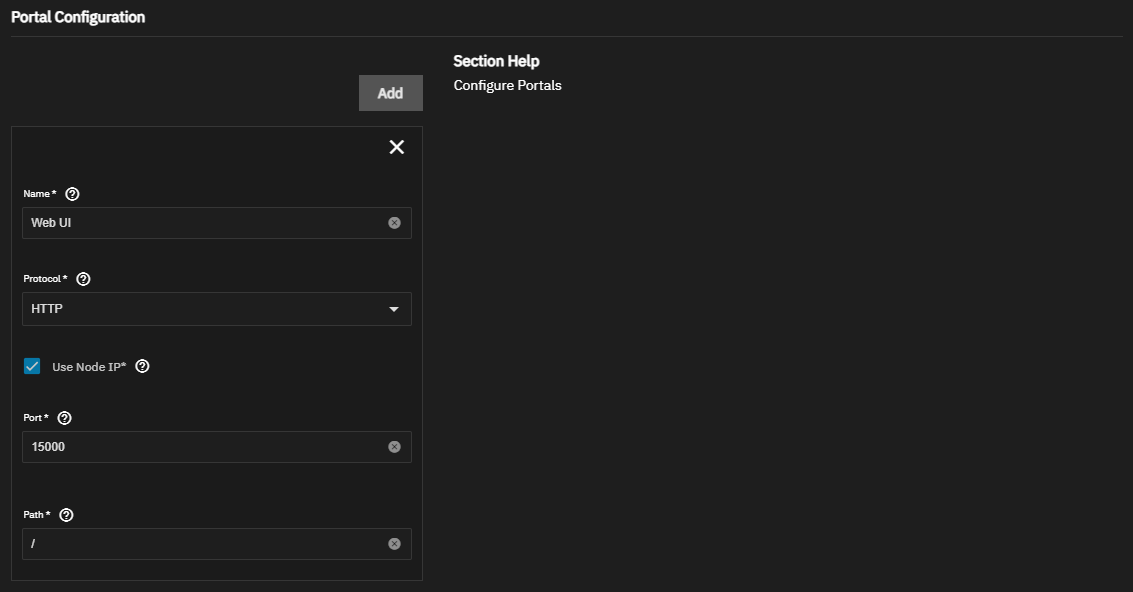
  3. Use the Portal Configuration settings to set up a web UI portal if the application includes a GUI.

    Click Add to display a block of web portal configuration settings.

    Enter a Name for the portal, for example MyAppPortal.

    Select the web Protocol to use for the portal from the dropdown list. Options are HTTP or HTTPS.

    Select Use Node IP to use the TrueNAS node, or host, IP address to access the portal or deselect to display the Host field. Then enter a host name or an internal IP within your local network, for example my-app-service.local or an internal IP address.

    Enter the Port number to use for portal access. Refer to the documentation provided by the application provider/developer for the port number the app uses. Check the port number against the list of Default Ports to make sure TrueNAS is not using it for some other purpose. If needed, you can map the default container port to an open host port under Network Configuration (see above).

    If needed, enter a custom Path for portal access, for example /admin. Defaults to /. The path is appended to the host IP and port, as in truenas.local:15000/admin.

  4. Add the Storage settings. Review the image documentation for required storage volumes. See Setting up Storage above for more information.

    Click Add to display a block of configuration settings for each storage mount. You can edit to add additional storage to the container later, if needed.

    Select the storage option you need to mount on the Type dropdown list and then configure the appropriate settings.

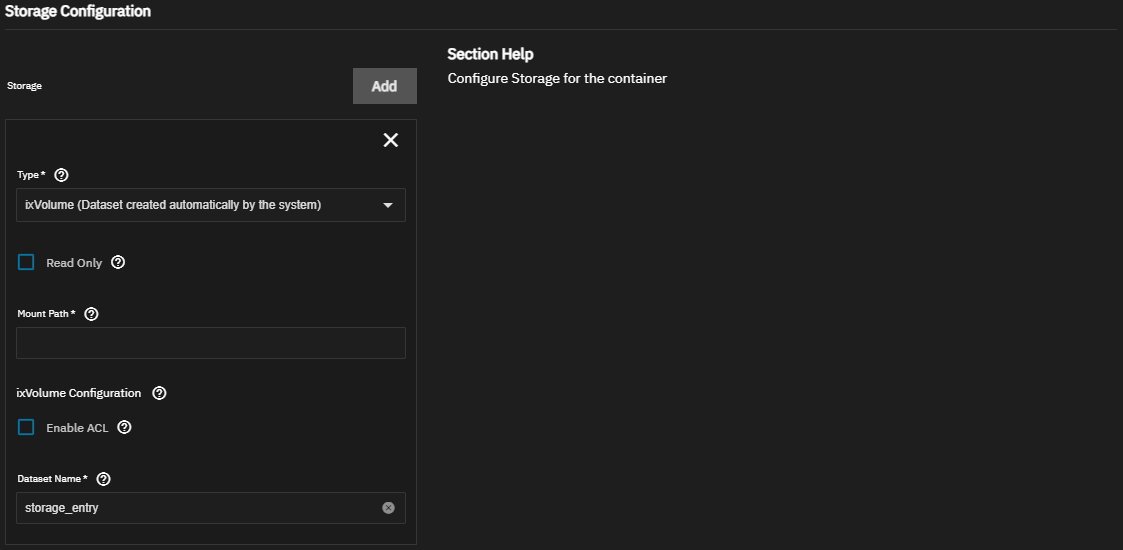
    ixVolume (Dataset created automatically by the system)

    To allow TrueNAS to create the storage volume, leave Type set to ixVolume (Dataset created automatically by the system). This is recommended for a test deployment of an app but not for a full app deployment.

    Enter the path/to/directory in Mount Path for the location where the ixVolume mounts inside the container.

    Select whether to mount the ixVolume as Read Only. This is not recommended for most use cases.

    Select Enable ACL to show the ACL and ACE Entries options.

    Enter a name for the ixVolume in Dataset Name.

    Next click Add to the right of ACL Entries to show the permissions settings.

    Set ID Type to Entry is for a USER or Entry is for a Group. Enter the UID or GID for the run-as user.

    If setting up postgres storage volumes, the default user id for these volumes is 999.

    Select the permissions level from the Access dropdown list.

    Host Path (Path that already exists on the system)

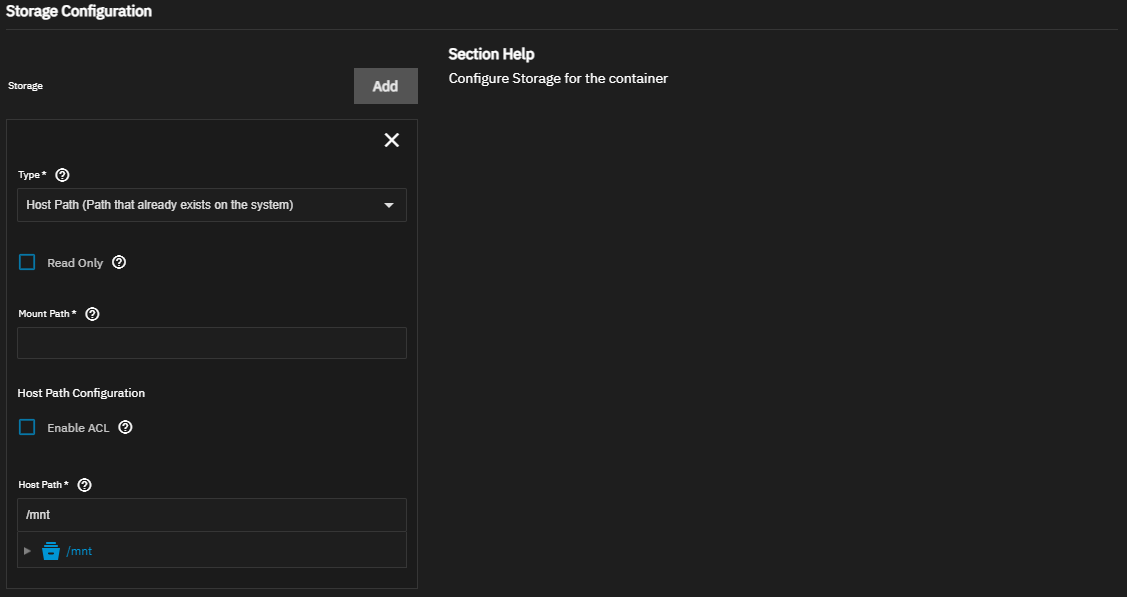
    To configure a persistent host path to an existing dataset, select Host Path (Path that already exists on the system). This is the recommended setting for on-disk storage in a production deployment.

    Enter the path/to/directory in Mount Path for the location where the host path mounts inside the container. Then define the Host Path. Enter a path or click arrow_right to the left of /mnt to browse to the location of the dataset in TrueNAS.

    Select whether to mount the host path as Read Only.

    Select Enable ACL to show the ACL and ACE Entries options. Alternatively, set read and write permissions for the run-as user on the dataset ACL.

    Enter or browse to select the dataset path.

    If needed, click Add to the right of ACL Entries to show the permissions settings.

    Set ID Type to Entry is for a USER or Entry is for a Group. Enter the UID or GID for the run-as user.

    If setting up postgres storage volumes, the default user id for these volumes is 999.

    Select the permissions level from the Access dropdown list.

    Select Force Flag to apply the ACL even if the path has existing data.

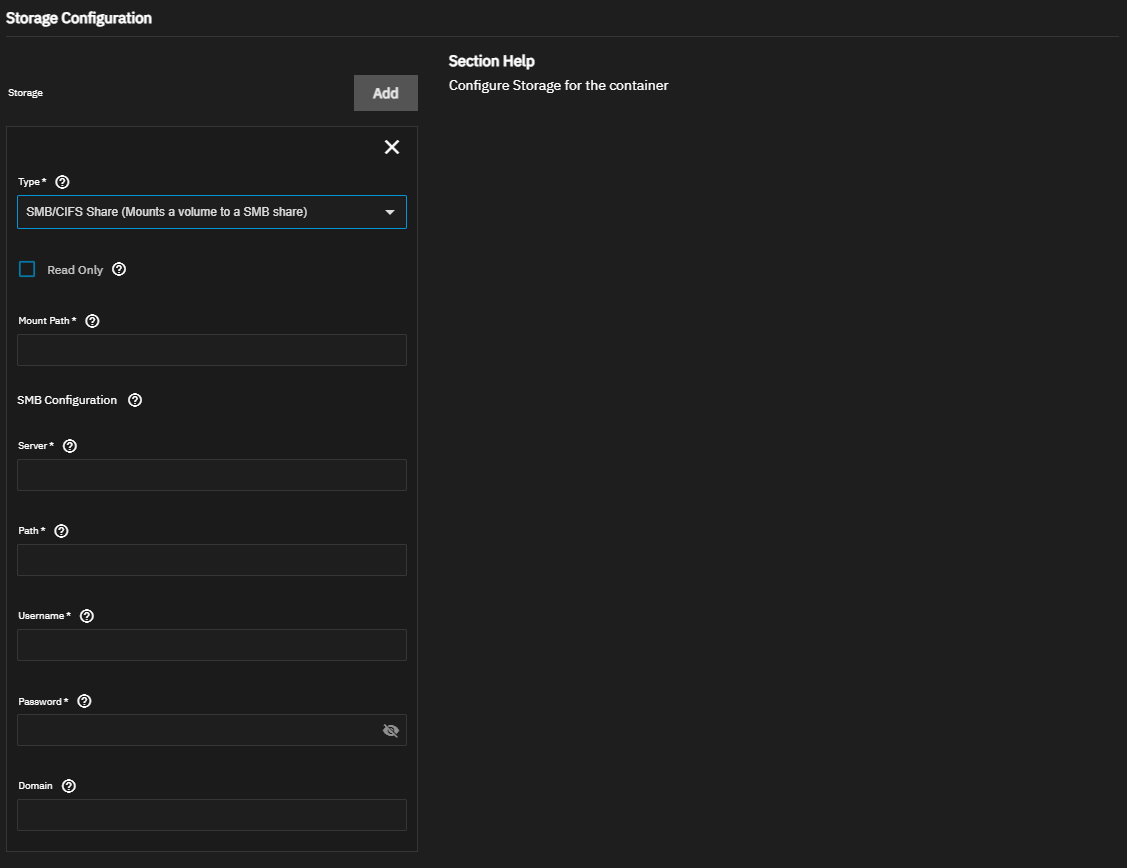
    SMB/CIFS Share (Mounts a volume to a SMB share)

    To mount an existing SMB share as a Docker volume, select SMB/CIFS Share (Mounts a volume to a SMB share).

    Enter in Mount Path the path/to/directory where the ixVolume mounts inside the container.

    Enter the IP address for the SMB server in Server, for example 192.168.1.100. This can be the TrueNAS host.

    Enter the name of the SMB share in Path, for example my-share.

    Enter the username and password of an account with permission to access the SMB share.

    Select whether to mount the share volume as Read Only or enter a directory services Domain as needed.

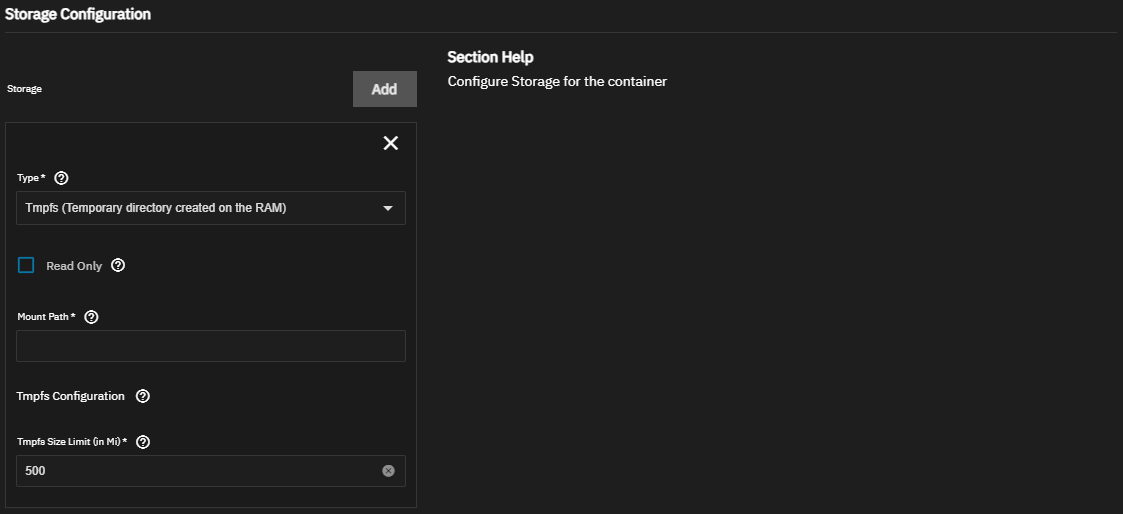
    Tmpfs (Temporary directory created on the RAM)

    To mount a temporary memory-backed storage directory, select Tmpfs (Temporary directory created on the RAM).

    Enter the path/to/directory in Mount Path for the location where the temporary directory mounts inside the container .

    Enter the maximum size of the temporary directory in mebibytes in Tmpfs Size Limit (in Mi) or accept the default of 500.

  5. Use GPU Configuration to allocate GPU resources if available and required for the application.

  6. Click Install to deploy the container. If you correctly configured the app, the widget displays on the Installed Applications screen.

    When complete, the container becomes active. If the container does not automatically start, click Start on the widget.

    Click on the App card reveals details.

Installing via YAML

Installing custom applications via YAML requires advanced knowledge of Docker Compose and YAML Syntax. Users should be prepared to troubleshoot and debug their own installations. The TrueNAS forums are available for community support.

TrueNAS applies basic YAML syntax validation to custom applications, but does not apply additional validation of configuration parameters before executing the file as written.

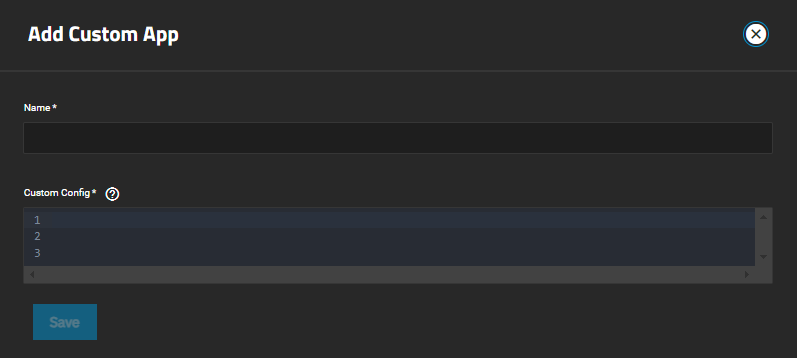
To install a third-party application using a Docker Compose YAML file, go to Apps > Discover. Click then select Install via YAML to open the Add Custom App screen.

Install Custom App via YAML
Figure 12: Install Custom App via YAML

Enter a name for the application using lowercase, alphanumeric characters.

Enter the Compose YAML file in Custom Config.

Begin the Compose file with a top-level element, such as name: or services:. See the Docker Compose file reference for more information. As Compose files can be complex and YAML relies on indentation and whitespace to define structure and hierarchy, we recommend writing the file in a stand-alone code editor before pasting the completed content into the Custom Config field.

Click Save to begin deployment of the app.

YAML Deployment Examples

The following examples represent some of the capabilities of Docker Compose and how it can be used to configure applications in TrueNAS. This is not an exhaustive collection of all capabilities, nor are the files below intended as production-ready deployment templates.

Note that app storage in these examples is configured using volumes, which are managed by the Docker engine. In a production deployment, configure bind mounts to TrueNAS storage locations.

Installing a Multi-Container App with GPU Access

This example deploys Immich with multiple containers, including pgvecto and redis.

It also enables GPU access for an NVIDIA GPU device.

  1
  2
  3
  4
  5
  6
  7
  8
  9
 10
 11
 12
 13
 14
 15
 16
 17
 18
 19
 20
 21
 22
 23
 24
 25
 26
 27
 28
 29
 30
 31
 32
 33
 34
 35
 36
 37
 38
 39
 40
 41
 42
 43
 44
 45
 46
 47
 48
 49
 50
 51
 52
 53
 54
 55
 56
 57
 58
 59
 60
 61
 62
 63
 64
 65
 66
 67
 68
 69
 70
 71
 72
 73
 74
 75
 76
 77
 78
 79
 80
 81
 82
 83
 84
 85
 86
 87
 88
 89
 90
 91
 92
 93
 94
 95
 96
 97
 98
 99
100
101
102
103
104
105
106
107
108
109
110
111
112
113
114
115
116
117
118
119
120
121
122
123
124
125
126
127
128
129
130
131
132
133
134
135
136
137
138
139
140
141
142
143
144
145
146
147
148
149
150
151
152
153
154
155
156
157
158
159
160
161
162
163
164
165
166
167
168
169
170
171
172
173
174
175
176
177
178
179
180
181
182
183
184
185
186
187
188
189
190
191
192
193
194
195
196
197
198
199
200
201
202
203
204
205
206
207
208
209
210
211
212
213
214
215
216
217
218
219
220
221
222
223
224
225
226
227
228
229
230
231
232
233
234
235
236
237
238
239
240
241
242
243
244
245
246
247
248
249
250
251
252
253
254
255
256
257
258
259
260
261
262
263
264
265
266
267
268
269
270
271
272
273
274
275
276
277
278
279
280
281
282
283
284
285
286
287
288
289
290
291
292
293
294
295
296
297
298
299
300
301
302
303
304
305
306
307
308
309
310
311
312
313
314
315
316
317
318
319
320
321
322
323
324
325
326
327
328
329
330
331
332
333
334
335
336
337
338
339
340
341
342
343
344
345
346
347
348
349
350
351
352
353
354
355
356
name: ad7a9839cdf6cde9e34b526956ba5f37
services:
  machine-learning:
    cap_drop:
      - ALL
    depends_on:
      permissions:
        condition: service_completed_successfully
        required: true
    deploy:
      resources:
        limits:
          cpus: "2"
          memory: "4294967296"
        reservations:
          devices:
            - capabilities:
                - gpu
              driver: nvidia
              device_ids:
                - GPU-UUID # REPLACE ME
    environment:
      IMMICH_LOG_LEVEL: log
      IMMICH_PORT: "32002"
      MACHINE_LEARNING_CACHE_FOLDER: /mlcache
      NODE_ENV: production
      NVIDIA_DRIVER_CAPABILITIES: all
      NVIDIA_VISIBLE_DEVICES: GPU-UUID # REPLACE ME
      TRANSFORMERS_CACHE: /mlcache
      TZ: Etc/UTC
    healthcheck:
      test:
        - CMD-SHELL
        - '/bin/bash -c ''exec {health_check_fd}<>/dev/tcp/127.0.0.1/32002 && echo -e "GET /ping HTTP/1.1\r\nHost: 127.0.0.1\r\nConnection: close\r\n\r\n" >&$${health_check_fd} && cat <&$${health_check_fd}'''
      timeout: 5s
      interval: 10s
      retries: 30
      start_period: 10s
    image: altran1502/immich-machine-learning:v1.117.0
    networks:
      default: null
    restart: unless-stopped
    security_opt:
      - no-new-privileges
    volumes:
      - type: volume
        target: /tmp
        volume: {}
      - type: volume
        target: /mlcache
        volume: {}
  permissions:
    command:
      - |2-
        function process_dir() {
            local dir=$$1
            local mode=$$2
            local uid=$$3
            local gid=$$4
            local chmod=$$5
            local is_temporary=$$6

            local fix_owner="false"
            local fix_perms="false"

            if [ -z "$$dir" ]; then
                echo "Path is empty, skipping..."
                exit 0
            fi

            if [ ! -d "$$dir" ]; then
                echo "Path [$$dir] does is not a directory, skipping..."
                exit 0
            fi

            if [ "$$is_temporary" = "true" ]; then
                echo "Path [$$dir] is a temporary directory, ensuring it is empty..."
                # Exclude the safe directory, where we can use to mount files temporarily
                find "$$dir" -mindepth 1 -maxdepth 1 ! -name "ix-safe" -exec rm -rf {} +
            fi

            if [ "$$is_temporary" = "false" ] && [ -n "$$(ls -A $$dir)" ]; then
                echo "Path [$$dir] is not empty, skipping..."
                exit 0
            fi

            echo "Current Ownership and Permissions on [$$dir]:"
            echo "chown: $$(stat -c "%u %g" "$$dir")"
            echo "chmod: $$(stat -c "%a" "$$dir")"

            if [ "$$mode" = "always" ]; then
                fix_owner="true"
                fix_perms="true"
            fi

            if [ "$$mode" = "check" ]; then
                if [ $$(stat -c %u "$$dir") -eq $$uid ] && [ $$(stat -c %g "$$dir") -eq $$gid ]; then
                    echo "Ownership is correct. Skipping..."
                    fix_owner="false"
                else
                    echo "Ownership is incorrect. Fixing..."
                    fix_owner="true"
                fi

                if [ "$$chmod" = "false" ]; then
                    echo "Skipping permissions check, chmod is false"
                elif [ -n "$$chmod" ]; then
                    if [ $$(stat -c %a "$$dir") -eq $$chmod ]; then
                        echo "Permissions are correct. Skipping..."
                        fix_perms="false"
                    else
                        echo "Permissions are incorrect. Fixing..."
                        fix_perms="true"
                    fi
                fi
            fi

            if [ "$$fix_owner" = "true" ]; then
                echo "Changing ownership to $$uid:$$gid on: [$$dir]"
                chown -R "$$uid:$$gid" "$$dir"
                echo "Finished changing ownership"
                echo "Ownership after changes:"
                stat -c "%u %g" "$$dir"
            fi

            if [ -n "$$chmod" ] && [ "$$fix_perms" = "true" ]; then
                echo "Changing permissions to $$chmod on: [$$dir]"
                chmod -R "$$chmod" "$$dir"
                echo "Finished changing permissions"
                echo "Permissions after changes:"
                stat -c "%a" "$$dir"
            fi
        }

        process_dir /mnt/pgvecto/tmp check 999 999 false true
        process_dir /mnt/postgres/data check 999 999 false false
        process_dir /mnt/redis/tmp check 1001 0 false true
    deploy:
      resources:
        limits:
          cpus: "1"
          memory: "536870912"
    entrypoint:
      - bash
      - -c
    image: bash
    networks:
      default: null
    user: root
    volumes:
      - type: volume
        source: tmp
        target: /mnt/pgvecto/tmp
        volume: {}
      - type: volume
        source: postgres-data
        target: /mnt/postgres/data
        volume: {}
      - type: volume
        source: tmp
        target: /mnt/redis/tmp
        volume: {}
  pgvecto:
    cap_drop:
      - ALL
    depends_on:
      permissions:
        condition: service_completed_successfully
        required: true
    deploy:
      resources:
        limits:
          cpus: "2"
          memory: "4294967296"
    environment:
      POSTGRES_DB: immich
      POSTGRES_PASSWORD: immich
      POSTGRES_PORT: "5432"
      POSTGRES_USER: immich
    healthcheck:
      test:
        - CMD-SHELL
        - pg_isready -h 127.0.0.1 -p 5432 -d immich -U immich
      timeout: 5s
      interval: 10s
      retries: 30
      start_period: 10s
    image: tensorchord/pgvecto-rs:pg15-v0.2.0
    networks:
      default: null
    restart: unless-stopped
    security_opt:
      - no-new-privileges
    user: 999:999
    volumes:
      - type: volume
        source: tmp
        target: /tmp
        volume: {}
      - type: volume
        source: postgres-data
        target: /var/lib/postgresql/data
        volume: {}
  redis:
    cap_drop:
      - ALL
    depends_on:
      permissions:
        condition: service_completed_successfully
        required: true
    deploy:
      resources:
        limits:
          cpus: "2"
          memory: "4294967296"
    environment:
      ALLOW_EMPTY_PASSWORD: "no"
      REDIS_PASSWORD: immich
      REDIS_PORT_NUMBER: "6379"
    healthcheck:
      test:
        - CMD-SHELL
        - redis-cli -h 127.0.0.1 -p 6379 -a $$REDIS_PASSWORD ping | grep -q PONG
      timeout: 5s
      interval: 10s
      retries: 30
      start_period: 10s
    image: bitnami/redis:7.4.1
    networks:
      default: null
    restart: unless-stopped
    security_opt:
      - no-new-privileges
    user: "1001:0"
    volumes:
      - type: volume
        source: tmp
        target: /tmp
        volume: {}
  server:
    cap_drop:
      - ALL
    depends_on:
      machine-learning:
        condition: service_started
        restart: true
        required: true
      permissions:
        condition: service_completed_successfully
        required: true
      pgvecto:
        condition: service_healthy
        required: true
      redis:
        condition: service_healthy
        required: true
    deploy:
      resources:
        limits:
          cpus: "2"
          memory: "4294967296"
        reservations:
          devices:
            - capabilities:
                - gpu
              driver: nvidia
              device_ids:
                - GPU-UUID # Replace me
    environment:
      DB_DATABASE_NAME: immich
      DB_HOSTNAME: pgvecto
      DB_PASSWORD: immich
      DB_PORT: "5432"
      DB_USERNAME: immich
      IMMICH_LOG_LEVEL: log
      IMMICH_MACHINE_LEARNING_ENABLED: "true"
      IMMICH_MACHINE_LEARNING_URL: http://machine-learning:32002
      IMMICH_PORT: "8080"
      NODE_ENV: production
      NVIDIA_DRIVER_CAPABILITIES: all
      NVIDIA_VISIBLE_DEVICES: GPU-UUID # Replace me
      REDIS_DBINDEX: "0"
      REDIS_HOSTNAME: redis
      REDIS_PASSWORD: immich
      REDIS_PORT: "6379"
      TZ: Etc/UTC
    healthcheck:
      test:
        - CMD-SHELL
        - '/bin/bash -c ''exec {health_check_fd}<>/dev/tcp/127.0.0.1/8080 && echo -e "GET /api/server-info/ping HTTP/1.1\r\nHost: 127.0.0.1\r\nConnection: close\r\n\r\n" >&$${health_check_fd} && cat <&$${health_check_fd}'''
      timeout: 5s
      interval: 10s
      retries: 30
      start_period: 10s
    image: altran1502/immich-server:v1.117.0
    links:
      - pgvecto
      - redis
      - machine-learning
    networks:
      default: null
    ports:
      - mode: ingress
        host_ip: 0.0.0.0
        target: 8080
        published: "8080"
        protocol: tcp
    restart: unless-stopped
    security_opt:
      - no-new-privileges
    volumes:
      - type: volume
        source: library
        target: /usr/src/app/upload/library
        volume: {}
      - type: volume
        source: uploads
        target: /usr/src/app/upload/upload
        volume: {}
      - type: volume
        source: thumbs
        target: /usr/src/app/upload/thumbs
        volume: {}
      - type: volume
        source: profile
        target: /usr/src/app/upload/profile
        volume: {}
      - type: volume
        source: video
        target: /usr/src/app/upload/encoded-video
        volume: {}
      - type: volume
        target: /tmp
        volume: {}
      - type: volume
        target: /scratchpad
        volume:
          nocopy: true
networks:
  default:
    name: ad7a9839cdf6cde9e34b526956ba5f37_default
volumes:
  library:
    name: ad7a9839cdf6cde9e34b526956ba5f37_library
  postgres-data:
    name: ad7a9839cdf6cde9e34b526956ba5f37_postgres-data
  profile:
    name: ad7a9839cdf6cde9e34b526956ba5f37_profile
  thumbs:
    name: ad7a9839cdf6cde9e34b526956ba5f37_thumbs
  tmp:
    name: ad7a9839cdf6cde9e34b526956ba5f37_tmp
  uploads:
    name: ad7a9839cdf6cde9e34b526956ba5f37_uploads
  video:
    name: ad7a9839cdf6cde9e34b526956ba5f37_video

Installing a Multi-Container App with a Dockerfile

This example deploys Nextcloud with multiple containers, including redis and postgres.

A Dockerfile builds the Nextcloud image locally, rather than pulling from a remote repository. You can use an existing Dockerfile or, as in the example, use dockerfile_inline to define the build commands as an inline string within the Compose file.

  1
  2
  3
  4
  5
  6
  7
  8
  9
 10
 11
 12
 13
 14
 15
 16
 17
 18
 19
 20
 21
 22
 23
 24
 25
 26
 27
 28
 29
 30
 31
 32
 33
 34
 35
 36
 37
 38
 39
 40
 41
 42
 43
 44
 45
 46
 47
 48
 49
 50
 51
 52
 53
 54
 55
 56
 57
 58
 59
 60
 61
 62
 63
 64
 65
 66
 67
 68
 69
 70
 71
 72
 73
 74
 75
 76
 77
 78
 79
 80
 81
 82
 83
 84
 85
 86
 87
 88
 89
 90
 91
 92
 93
 94
 95
 96
 97
 98
 99
100
101
102
103
104
105
106
107
108
109
110
111
112
113
114
115
116
117
118
119
120
121
122
123
124
125
126
127
128
129
130
131
132
133
134
135
136
137
138
139
140
141
142
143
144
145
146
147
148
149
150
151
152
153
154
155
156
157
158
159
160
161
162
163
164
165
166
167
168
169
170
171
172
173
174
175
176
177
178
179
180
181
182
183
184
185
186
187
188
189
190
191
192
193
194
195
196
197
198
199
200
201
202
203
204
205
206
207
208
209
210
211
212
213
214
215
216
217
218
219
220
221
222
223
224
225
226
227
228
229
230
231
232
233
234
235
236
237
238
239
240
241
242
243
244
245
246
247
248
249
250
251
252
253
254
255
256
257
258
259
260
261
262
263
264
265
266
267
268
269
270
271
272
273
274
275
276
277
278
279
280
281
282
283
284
285
286
287
288
289
290
291
292
293
294
295
296
297
298
299
300
301
302
303
304
305
306
307
308
309
310
311
312
313
314
315
316
317
318
319
320
321
322
323
324
325
326
327
328
329
330
331
332
333
334
335
336
337
338
339
340
341
342
343
344
345
346
347
348
349
350
351
352
353
354
355
356
357
358
359
360
361
362
363
364
365
366
367
368
369
370
371
372
373
374
375
376
377
378
379
380
381
382
383
384
385
386
387
388
389
390
391
392
393
394
395
396
397
398
399
400
401
402
403
404
405
406
407
408
409
410
411
412
413
414
415
416
417
418
419
420
421
422
423
424
425
426
427
428
429
430
431
432
433
434
435
436
437
438
439
440
name: ade25cf7c52e909aeef17c9aaee373aa
services:
  cron:
    cap_add:
      - CHOWN
      - FOWNER
      - DAC_OVERRIDE
      - SETGID
      - SETUID
      - NET_BIND_SERVICE
      - NET_RAW
    cap_drop:
      - ALL
    command:
      - |
        echo "*/5 * * * * php -f /var/www/html/cron.php" > /var/spool/cron/crontabs/www-data || { echo "Failed to create crontab"; exit 1; }
        /cron.sh || { echo "Failed to run cron"; exit 1; }        
    configs:
      - source: occ
        target: /usr/local/bin/occ
        mode: 493
      - source: limitrequestbody.conf
        target: /etc/apache2/conf-enabled/limitrequestbody.conf
      - source: php.ini
        target: /usr/local/etc/php/conf.d/nextcloud-z-99.ini
      - source: opcache.ini
        target: /usr/local/etc/php/conf.d/opcache-z-99.ini
    depends_on:
      nextcloud:
        condition: service_healthy
        required: true
    deploy:
      resources:
        limits:
          cpus: "2"
          memory: "4294967296"
    entrypoint:
      - /bin/sh
      - -c
    environment:
      NEXTCLOUD_ADMIN_PASSWORD: password
      NEXTCLOUD_ADMIN_USER: admin
      NEXTCLOUD_DATA_DIR: /var/www/html/data
      # Replace HOSTNAME with your system hostname and IPADDR with your system IP address
      NEXTCLOUD_TRUSTED_DOMAINS: 127.0.0.1 localhost nextcloud localhost:8080 #HOSTNAME:8080 #IPADDR:8080
      PHP_MEMORY_LIMIT: 512M
      PHP_UPLOAD_LIMIT: 3G
      POSTGRES_DB: nextcloud
      POSTGRES_HOST: postgres:5432
      POSTGRES_PASSWORD: password
      POSTGRES_USER: nextcloud
      REDIS_HOST: redis
      REDIS_HOST_PASSWORD: password
      REDIS_HOST_PORT: "6379"
      TZ: Etc/UTC
    healthcheck:
      test:
        - CMD-SHELL
        - pidof busybox > /dev/null
      timeout: 5s
      interval: 10s
      retries: 30
      start_period: 10s
    image: ix-nextcloud:30.0.0-bef6e27dfbd2ba4125af0ab54b52c55d8af6b760a2ae2c34dcb5ddc5dc643112
    networks:
      default: null
    restart: unless-stopped
    security_opt:
      - no-new-privileges
    user: "0:0"
    volumes:
      - type: volume
        source: nextcloud-html
        target: /var/www/html
        volume: {}
      - type: volume
        source: nextcloud-data
        target: /var/www/html/data
        volume: {}
      - type: volume
        target: /tmp
        volume: {}
  nextcloud:
    build:
      dockerfile_inline: |-
        FROM nextcloud:30.0.0
        RUN apt update || { echo "Failed to update apt cache. Exiting."; exit 1; }
        RUN apt install -y --no-install-recommends ffmpeg || { echo "Failed to install [ffmpeg]. Exiting."; exit 1; }
        RUN apt install -y --no-install-recommends smbclient || { echo "Failed to install [smbclient]. Exiting."; exit 1; }
        RUN apt install -y --no-install-recommends ocrmypdf || { echo "Failed to install [ocrmypdf]. Exiting."; exit 1; }
        RUN apt install -y --no-install-recommends libsmbclient-dev
        RUN pecl install smbclient
        RUN docker-php-ext-enable smbclient
        RUN ldd "$$(php -r 'echo ini_get("extension_dir");')"/smbclient.so
        RUN apt install -y --no-install-recommends tesseract-ocr-eng || { echo "Failed to install [tesseract-ocr-eng]. Exiting."; exit 1; }
        RUN apt install -y --no-install-recommends tesseract-ocr-chi-sim || { echo "Failed to install [tesseract-ocr-chi-sim]. Exiting."; exit 1; }        
      tags:
        - ix-nextcloud:30.0.0-bef6e27dfbd2ba4125af0ab54b52c55d8af6b760a2ae2c34dcb5ddc5dc643112
    cap_add:
      - CHOWN
      - FOWNER
      - DAC_OVERRIDE
      - SETGID
      - SETUID
      - NET_BIND_SERVICE
      - NET_RAW
    cap_drop:
      - ALL
    configs:
      - source: occ
        target: /usr/local/bin/occ
        mode: 493
      - source: limitrequestbody.conf
        target: /etc/apache2/conf-enabled/limitrequestbody.conf
      - source: php.ini
        target: /usr/local/etc/php/conf.d/nextcloud-z-99.ini
      - source: opcache.ini
        target: /usr/local/etc/php/conf.d/opcache-z-99.ini
      - source: ix-update-hosts-script.sh
        target: /docker-entrypoint-hooks.d/before-starting/ix-update-hosts-script.sh
        mode: 493
    depends_on:
      permissions:
        condition: service_completed_successfully
        required: true
      postgres:
        condition: service_healthy
        required: true
      redis:
        condition: service_healthy
        required: true
    deploy:
      resources:
        limits:
          cpus: "2"
          memory: "4294967296"
    environment:
      NEXTCLOUD_ADMIN_PASSWORD: password
      NEXTCLOUD_ADMIN_USER: admin
      NEXTCLOUD_DATA_DIR: /var/www/html/data
      # Replace HOSTNAME with your system hostname and IPADDR with your system IP address
      NEXTCLOUD_TRUSTED_DOMAINS: 127.0.0.1 localhost nextcloud localhost:8080 #HOSTNAME:8080 #IPADDR:8080
      PHP_MEMORY_LIMIT: 512M
      PHP_UPLOAD_LIMIT: 3G
      POSTGRES_DB: nextcloud
      POSTGRES_HOST: postgres:5432
      POSTGRES_PASSWORD: password
      POSTGRES_USER: nextcloud
      REDIS_HOST: redis
      REDIS_HOST_PASSWORD: password
      REDIS_HOST_PORT: "6379"
      TZ: Etc/UTC
    healthcheck:
      test:
        - CMD-SHELL
        - 'curl --silent --output /dev/null --show-error --fail --header "Host: localhost" http://127.0.0.1:80/status.php'
      timeout: 5s
      interval: 10s
      retries: 30
      start_period: 10s
    image: ix-nextcloud:30.0.0-bef6e27dfbd2ba4125af0ab54b52c55d8af6b760a2ae2c34dcb5ddc5dc643112
    networks:
      default: null
    ports:
      - mode: ingress
        host_ip: 0.0.0.0
        target: 80
        published: "8080"
        protocol: tcp
    restart: unless-stopped
    security_opt:
      - no-new-privileges
    user: "0:0"
    volumes:
      - type: volume
        source: nextcloud-html
        target: /var/www/html
        volume: {}
      - type: volume
        source: nextcloud-data
        target: /var/www/html/data
        volume: {}
      - type: volume
        target: /tmp
        volume: {}
  permissions:
    command:
      - |2-
        function process_dir() {
            local dir=$$1
            local mode=$$2
            local uid=$$3
            local gid=$$4
            local chmod=$$5
            local is_temporary=$$6

            local fix_owner="false"
            local fix_perms="false"

            if [ -z "$$dir" ]; then
                echo "Path is empty, skipping..."
                exit 0
            fi

            if [ ! -d "$$dir" ]; then
                echo "Path [$$dir] does is not a directory, skipping..."
                exit 0
            fi

            if [ "$$is_temporary" = "true" ]; then
                echo "Path [$$dir] is a temporary directory, ensuring it is empty..."
                # Exclude the safe directory, where we can use to mount files temporarily
                find "$$dir" -mindepth 1 -maxdepth 1 ! -name "ix-safe" -exec rm -rf {} +
            fi

            if [ "$$is_temporary" = "false" ] && [ -n "$$(ls -A $$dir)" ]; then
                echo "Path [$$dir] is not empty, skipping..."
                exit 0
            fi

            echo "Current Ownership and Permissions on [$$dir]:"
            echo "chown: $$(stat -c "%u %g" "$$dir")"
            echo "chmod: $$(stat -c "%a" "$$dir")"

            if [ "$$mode" = "always" ]; then
                fix_owner="true"
                fix_perms="true"
            fi

            if [ "$$mode" = "check" ]; then
                if [ $$(stat -c %u "$$dir") -eq $$uid ] && [ $$(stat -c %g "$$dir") -eq $$gid ]; then
                    echo "Ownership is correct. Skipping..."
                    fix_owner="false"
                else
                    echo "Ownership is incorrect. Fixing..."
                    fix_owner="true"
                fi

                if [ "$$chmod" = "false" ]; then
                    echo "Skipping permissions check, chmod is false"
                elif [ -n "$$chmod" ]; then
                    if [ $$(stat -c %a "$$dir") -eq $$chmod ]; then
                        echo "Permissions are correct. Skipping..."
                        fix_perms="false"
                    else
                        echo "Permissions are incorrect. Fixing..."
                        fix_perms="true"
                    fi
                fi
            fi

            if [ "$$fix_owner" = "true" ]; then
                echo "Changing ownership to $$uid:$$gid on: [$$dir]"
                chown -R "$$uid:$$gid" "$$dir"
                echo "Finished changing ownership"
                echo "Ownership after changes:"
                stat -c "%u %g" "$$dir"
            fi

            if [ -n "$$chmod" ] && [ "$$fix_perms" = "true" ]; then
                echo "Changing permissions to $$chmod on: [$$dir]"
                chmod -R "$$chmod" "$$dir"
                echo "Finished changing permissions"
                echo "Permissions after changes:"
                stat -c "%a" "$$dir"
            fi
        }

        process_dir /mnt/redis/tmp check 1001 0 false true
        process_dir /mnt/redis/data check 1001 0 false true
        process_dir /mnt/postgres/tmp check 999 999 false true
        process_dir /mnt/postgres/data check 999 999 false false
    deploy:
      resources:
        limits:
          cpus: "1"
          memory: "536870912"
    entrypoint:
      - bash
      - -c
    image: bash
    networks:
      default: null
    user: root
    volumes:
      - type: volume
        source: tmp
        target: /mnt/redis/tmp
        volume: {}
      - type: volume
        source: bitnami_redis_data
        target: /mnt/redis/data
        volume: {}
      - type: volume
        source: tmp
        target: /mnt/postgres/tmp
        volume: {}
      - type: volume
        source: nextcloud-postgres-data
        target: /mnt/postgres/data
        volume: {}
  postgres:
    cap_drop:
      - ALL
    depends_on:
      permissions:
        condition: service_completed_successfully
        required: true
    deploy:
      resources:
        limits:
          cpus: "2"
          memory: "4294967296"
    environment:
      POSTGRES_DB: nextcloud
      POSTGRES_PASSWORD: password
      POSTGRES_PORT: "5432"
      POSTGRES_USER: nextcloud
    healthcheck:
      test:
        - CMD-SHELL
        - pg_isready -h 127.0.0.1 -p 5432 -d nextcloud -U nextcloud
      timeout: 5s
      interval: 10s
      retries: 30
      start_period: 10s
    image: postgres:13.16
    networks:
      default: null
    restart: unless-stopped
    security_opt:
      - no-new-privileges
    user: 999:999
    volumes:
      - type: volume
        source: tmp
        target: /tmp
        volume: {}
      - type: volume
        source: nextcloud-postgres-data
        target: /var/lib/postgresql/data
        volume: {}
  redis:
    cap_drop:
      - ALL
    depends_on:
      permissions:
        condition: service_completed_successfully
        required: true
    deploy:
      resources:
        limits:
          cpus: "2"
          memory: "4294967296"
    environment:
      ALLOW_EMPTY_PASSWORD: "no"
      REDIS_PASSWORD: password
      REDIS_PORT_NUMBER: "6379"
    healthcheck:
      test:
        - CMD-SHELL
        - redis-cli -h 127.0.0.1 -p 6379 -a $$REDIS_PASSWORD ping | grep -q PONG
      timeout: 5s
      interval: 10s
      retries: 30
      start_period: 10s
    image: bitnami/redis:7.4.1
    networks:
      default: null
    restart: unless-stopped
    security_opt:
      - no-new-privileges
    user: "1001:0"
    volumes:
      - type: volume
        source: tmp
        target: /tmp
        volume: {}
      - type: volume
        source: bitnami_redis_data
        target: /bitnami/redis/data
        volume: {}
networks:
  default:
    name: ade25cf7c52e909aeef17c9aaee373aa_default
volumes:
  bitnami_redis_data:
    name: ade25cf7c52e909aeef17c9aaee373aa_bitnami_redis_data
  nextcloud-data:
    name: ade25cf7c52e909aeef17c9aaee373aa_nextcloud-data
  nextcloud-html:
    name: ade25cf7c52e909aeef17c9aaee373aa_nextcloud-html
  nextcloud-postgres-data:
    name: ade25cf7c52e909aeef17c9aaee373aa_nextcloud-postgres-data
  tmp:
    name: ade25cf7c52e909aeef17c9aaee373aa_tmp
configs:
  ix-update-hosts-script.sh:
    name: ade25cf7c52e909aeef17c9aaee373aa_ix-update-hosts-script.sh
    content: |
      #!/bin/bash
      set -e
      config_file="/var/www/html/config/config.php"

      echo "Updating database and redis host in config.php"
      sed -i "s/\('dbhost' => '\)[^']*postgres:5432',/\1postgres:5432',/" "$$config_file"
      occ config:system:set redis host --value="redis"      
  limitrequestbody.conf:
    name: ade25cf7c52e909aeef17c9aaee373aa_limitrequestbody.conf
    content: |2
      LimitRequestBody 3221225472
  occ:
    name: ade25cf7c52e909aeef17c9aaee373aa_occ
    content: |
      #!/bin/bash
      uid="$$(id -u)"
      gid="$$(id -g)"
      if [ "$$uid" = '0' ]; then
        user='www-data'
        group='www-data'
      else
        user="$$uid"
        group="$$gid"
      fi
      run_as() {
        if [ "$$(id -u)" = 0 ]; then
          su -p "$$user" -s /bin/bash -c "php /var/www/html/occ $$(printf '%q ' "$$@")"
        else
          /bin/bash -c "php /var/www/html/occ $$(printf '%q ' "$$@")"
        fi
      }
      run_as "$$@"      
  opcache.ini:
    name: ade25cf7c52e909aeef17c9aaee373aa_opcache.ini
    content: |
      opcache.memory_consumption=128      
  php.ini:
    name: ade25cf7c52e909aeef17c9aaee373aa_php.ini
    content: |
      max_execution_time=30      

Alternatively, you can use dockerfile to set an existing Dockerfile stored on your TrueNAS system.

To specify the absolute path to a Dockerfile, remove this dockerfile_inline section of the build element:

 1
 2
 3
 4
 5
 6
 7
 8
 9
10
11
12
13
14
nextcloud:
    build:
      dockerfile_inline: |-
        FROM nextcloud:30.0.0
        RUN apt update || { echo "Failed to update apt cache. Exiting."; exit 1; }
        RUN apt install -y --no-install-recommends ffmpeg || { echo "Failed to install [ffmpeg]. Exiting."; exit 1; }
        RUN apt install -y --no-install-recommends smbclient || { echo "Failed to install [smbclient]. Exiting."; exit 1; }
        RUN apt install -y --no-install-recommends ocrmypdf || { echo "Failed to install [ocrmypdf]. Exiting."; exit 1; }
        RUN apt install -y --no-install-recommends libsmbclient-dev
        RUN pecl install smbclient
        RUN docker-php-ext-enable smbclient
        RUN ldd "$$(php -r 'echo ini_get("extension_dir");')"/smbclient.so
        RUN apt install -y --no-install-recommends tesseract-ocr-eng || { echo "Failed to install [tesseract-ocr-eng]. Exiting."; exit 1; }
        RUN apt install -y --no-install-recommends tesseract-ocr-chi-sim || { echo "Failed to install [tesseract-ocr-chi-sim]. Exiting."; exit 1; }        

Replace it with the absolute path to the Dockerfile, for example:

1
2
3
4
nextcloud:
    build:
      context: .
      dockerfile: /mnt/virtual/dockerfiles/nextcloud.dockerfile

Note: an application with an absolute path to a Dockerfile is not portable without modification.

Installing Multiple Apps on a Shared Custom Network

These examples deploy two applications, Plex and Tautulli, as part of the same custom Docker network. Grouping Docker applications offers advantages for organizing, securing, and optimizing communication between containers that interact. You can use Docker networks to isolate network segmentation, simplify communication between apps, configure networking properties, and more.

Plex

 1
 2
 3
 4
 5
 6
 7
 8
 9
10
11
12
13
14
15
16
17
18
19
20
21
22
23
24
25
26
27
28
29
30
31
32
33
networks:
  plex_net:
    name: plex_net
    driver: bridge
    external: false

services:
  plex:
    networks:
     - plex_net
    image: ghcr.io/onedr0p/plex:1.41.0.8994-f2c27da23@sha256:fe9ed1189617cd98106635c63ed39d40e4ec82535514e4a51a7c72e56b65c4dd
    restart: always
    user: "UID:GID" # UPDATE ME -- MAKE SURE USER HAS ACL PERMISSIONS FOR ALL STORAGE PATHS BELOW
    environment:
      NVIDIA_VISIBLE_DEVICES: void
      # https://support.plex.tv/articles/201105343-advanced-hidden-server-settings/
      PLEX_PREFERENCE_secureConnections: "secureConnections=0"
      PLEX_PREFERENCE_LanNetworksBandwidth: "LanNetworksBandwidth=172.16.0.0/12,10.0.0.0/8,192.168.0.0/16"
      PLEX_PREFERENCE_customConnections: "customConnections=https://10.20.30.254:32400"
    ports:
      - 32400:32400
    volumes:
      - /mnt/cache/appsdata/plex:/config
      - /mnt/virtual/library/tv:/tv:ro #UPDATE LOCAL PATH
      - /mnt/virtual/library/movies:/movies:ro #UPDATE LOCAL PATH
    tmpfs:
      - /transcode
    healthcheck:
      test: 'curl --silent --fail http://localhost:32400/identity'
      interval: 15s
      timeout: 5s
      retries: 15
      start_period: 60s

Tautulli

 1
 2
 3
 4
 5
 6
 7
 8
 9
10
11
12
13
14
15
16
17
18
19
20
21
22
23
24
25
26
27
28
29
30
31
32
33
networks:
  plex_net:
    name: plex_net
    driver: bridge
    external: true

services:
  tautulli:
    image: tautulli/tautulli:v2.14.5@sha256:6017b491d8e9100a97391b639fff5824ad36a315c69aae3c9ed78407994a626e
    restart: always
    entrypoint:
      - python
      - Tautulli.py
    command:
      - --port
      - "8989"
      - --config
      - /config/config.ini
      - --datadir
      - /config
    networks:
      - plex_net
    volumes:
      - /mnt/cache/appdata/tautulli:/config
      - /mnt/cache/appdata/plex/Library/Application Support/Plex Media Server/Logs:/plexlogs:ro
    ports:
      8989:8989
    healthcheck:
      test: curl --silent --fail http://localhost:8989/status
      interval: 10s
      timeout: 5s
      retries: 5
      start_period: 30s

Managing Custom Apps

Installed custom applications show on the Installed applications screen. Many of the management options available for catalog applications are also available for custom apps.

TrueNAS monitors upstream images and alerts when an updated version is available. Update custom applications using the same Upgrading Apps procedure as catalog applications.

App Details Widgets
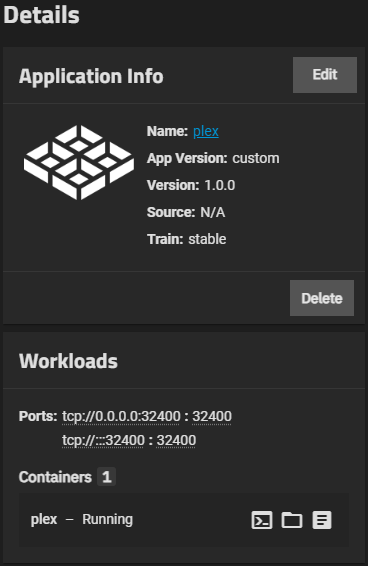
Figure 13: App Details Widgets

Custom applications installed via YAML do not include the Web Portal button on the Application Info widget. To access the web UI for a custom app, navigate to the port on the TrueNAS system, for example hostname.domain:8080.

Click Edit to edit and redeploy the application.

Click Delete to remove the application. See Deleting Apps for more information.

The Workloads widget shows ports and container information. Each container includes buttons to access a container shell, view volume mounts, and view logs.

Click Shell and enter an option in the Choose Shell Details window to access a container shell.

Click to view configured storage mounts for the container.

Click Logs to open the Container Logs window. Select options in Logs Details and click Connect to view logs for the container.