




TrueNAS Development Documentation
This content follows experimental development changes in TrueNAS 28, a future version of TrueNAS.
Use the Product and Version selectors above to view content specific to a stable software release.
Storage Tiering Pool Migration
11 minute read.
Storage Tiering is only available on TrueNAS Enterprise systems.
This tutorial covers how to use the ZFS storage tiering feature introduced in TrueNAS 27 to migrate a TrueNAS Enterprise storage appliance from a two-pool configuration (for example, an HDD pool with a mirrored special vdev and a separate SSD pool) to a single tiered pool.
If your goal is to migrate data between two local pools without enabling storage tiering, follow the Local Pool Migration Guide instead.
This procedure addresses requirements for starting and configuring the target:
Starting configuration (TrueNAS 25.10)
- Pool A: HDD pool with a mirrored special vdev
- Pool B: SSD pool for fast storage
Target configuration (TrueNAS 27 or later)
- Pool A: tiered pool that absorbs the SSDs from the former Pool B into the Pool A special vdev to provide Performance Tier capacity
ZFS storage tiering does not support zvols! iSCSI, NVMeT, or Fibre Channel block protocols, which use zvols, might not benefit from tiering, and can experience reduced performance after you change the pool topology according to this procedure.
Migrating from a two-pool configuration to a single tiered pool is a significant and disruptive storage configuration change. Make sure you have everything you need in the preparation phase before you continue to the migration phase.
Have the following ready:
- List of shares and share types to move
- List of backup tasks to move
- New topology plan for the target pool (including new special vdev configuration)
- List of which datasets you need to migrate to the performance tier after the move, and the priority order
- List of datasets with a custom special small blocks threshold, and the storage tier the customer wants for each
- Details and hierarchy of any encrypted datasets to move, and the encryption key or passphrases to unlock them
The work divides into three phases:
Phase 1: Preparation — two parts, a week before the maintenance window and the day of the migration.
Phase 2: Migration — the data and configuration move, and then you destroy Pool B to reuse the drives in Pool A.
Phase 3: Tiering — enable tiering and queue tier migration jobs to move priority datasets to the Performance Tier.
Preparation occurs in two stages, one approximately one week before the planned migration and the other the day of the migration.
Complete these tasks approximately one week before the scheduled maintenance window. Use this time to identify issues and reduce risks during the maintenance window.
- Upgrade the system (or both controllers on HA systems) to TrueNAS 27.
- Confirm that Pool A has sufficient space to hold the data from Pool B.
- Contact support to acquire a new TrueNAS 27 license that includes the ZFS Storage Tiering feature.
- Move the system dataset to Pool A if it is not located there already.
- Configure local replication tasks for data from Pool B to Pool A. Arrange your Pool B dataset hierarchy to avoid name collisions with existing datasets in Pool A.
- Be prepared to reconfigure local storage paths after they change pools.
- Reconfigure apps, containers, and VMs to use Pool A.
- Move local user account home directories from Pool B to Pool A.
- Verify the Storage > Tiering form is available in the WebUI, and that the Enable checkbox is present and not selected.
- Check datasets for a custom special small blocks threshold and determine with the customer which storage tier each of those datasets belongs in.
- Schedule and confirm an uninterrupted 4-hour maintenance window for the migration.
If you use multi-layered ZFS encryption, contact support before you continue.
Contact support and verify the new configuration before continuing. Note that all data formerly on the SSD pool initially has lower performance after pool migration until you migrate it from the regular tier to the performance tier. TrueNAS queues tier migrations by dataset, so it is important that you maintain your priority order list of which datasets you need to migrate to the performance tier after the move. You cannot pre-stage them because the required pool topology does not exist until TrueNAS 27.
Some datasets have the ZFS special_small_blocks property set to a non-zero value lower than the dataset record size. Before storage tiering existed, administrators used this setting to place small files on the special vdev and larger files on the HDD data vdevs. In the WebUI, these datasets show On for Use Metadata (Special) VDEVs with a Threshold value lower than the Record Size value.
TrueNAS assigns a dataset to the performance tier only when the threshold is equal to or greater than the record size. After the upgrade, TrueNAS flags these hybrid datasets as Regular instead of Performance. TrueNAS does not infer the tier from a partial configuration, which gives you the opportunity to move the dataset to the performance tier deliberately.
Go to Datasets, check each dataset for a custom threshold, then work with the customer to determine which tier the data belongs in:
- For a dataset the customer wants in the performance tier, add it to the day-of-migration list with the other datasets you migrate to the Performance Tier.
- For a dataset the customer wants in the regular tier, click Edit on the dataset and set Use Metadata (Special) VDEVs to Off. This sets the threshold to zero, so TrueNAS writes new data to the regular tier.
Set the threshold to zero before the maintenance window. After you enable tiering in Phase 3, Use Metadata (Special) VDEVs no longer displays on the dataset Edit screen. From that point, TrueNAS manages the threshold through the Change Storage Tier action.
Setting the threshold to zero only changes where TrueNAS writes new data. Data already on the special vdev remains there until a rewrite moves it. Decide with the customer whether to move that existing data down to the regular tier before the migration or at a later date. Contact support to schedule the rewrite and confirm the storage is in a supported configuration.
Complete these checks immediately before you begin migration work.
- Confirm that you have an uninterrupted 4-hour maintenance window and an escalation path to support for the migration.
- Verify you have IPMI access to the system (or both controllers on HA systems) as well as SSH access.
- Download a system configuration backup, including the secret seed.
- Download a system debug.
- Confirm that no client systems connect to services that share data from Pool B.
- Stop all sharing services exporting data from Pool B. Do not delete the share configuration!
- Stop all Pool B replication jobs that are not the local replication jobs you created for this migration.
Do not delete the job configuration! - Issue a final snapshot and local replication so that Pool A holds all data from Pool B.
- Confirm the system dataset is still assigned to Pool A.
- Verify directory services are healthy (if applicable).
- Confirm that your reconfiguration plan has not changed.
If you use multi-layered ZFS encryption, contact support before you continue.
Complete these checks immediately before you begin migration work.
Review all shares using storage on Pool B and follow the share migration steps for each share.
Reload the Datasets page in the WebUI and confirm no datasets in Pool B show sharing icons. Open the Sharing page and confirm all share paths now point to Pool A.
Review all backup-related tasks on Pool B and follow the task migration steps for each item.
Reload the Datasets page and confirm no stray backup tasks remain on Pool B. Open the Data Protection page and confirm no data protection tasks are active for Pool B.
Review local user account home directories to confirm no accounts use paths on Pool B.
At this point, you have reconfigured the server so that all shares, tasks, and user home directories are on Pool A. However, you can still revert all changes with the configuration file you previously saved. Before you continue, use test clients to verify that all data is accessible at the new Pool A paths.
For replicated datasets and zvols, you might need to change them to read-write before the customer can validate access.
- Destroy Pool B from the WebUI. Go to Storage and click Disconnect on Pool B. Select Delete Pool, then confirm the export and click Disconnect.
- Use the freed SSD drives to extend the special class on Pool A according to your reconfiguration plan by adding vdevs of the required type to the special class.
Any topology changes you make to Pool A (such as adding vdevs) are permanent. Thoroughly review all new topology changes before you apply them.
After you complete the migration and extend the special class with the SSD drives, you can enable storage tiering and queue datasets for Performance Tier migrations.
Go to Storage and click Tiering.
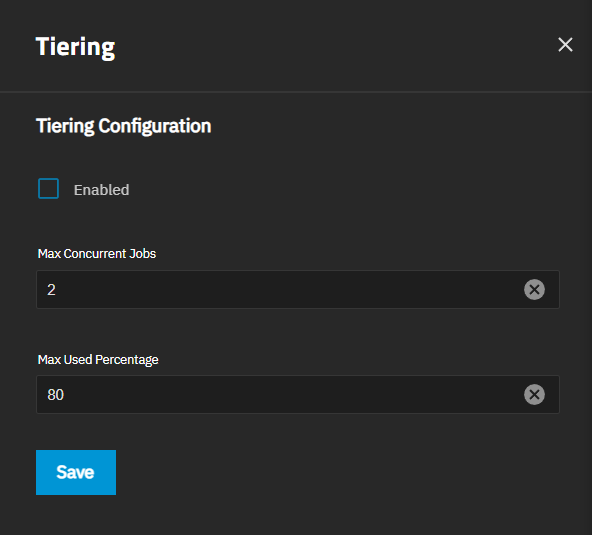
Enter your desired values for Max Concurrent Jobs and Max Used Percentage. Each dataset migration to the Performance Tier consumes one tier job. The default is two active dataset migrations at a time, with the remainder queued. Select Enable and click Save.
After tiering is on, SMB shares and WebShares stop following nested datasets. Each share exposes only its own dataset, and any child datasets under it are no longer visible to clients through that share. Create a separate share for each dataset you want to expose.
Go to Datasets, select a dataset in the tree view, then click Change next to the Storage Tier field in the Details card to migrate it to the Performance Tier.
Migrate the datasets according to the priority order list you created during the preparation phase.
Avoid unnecessary administrative failovers until all migrations are complete. In-progress tier migration jobs continue across failovers, but TrueNAS might not maintain queue ordering after service restarts or failovers.