Adding a Basic Time Machine SMB Share
5 minute read.
When creating a share, do not attempt to set up the root or pool-level dataset for the share. Instead, create a new dataset under the pool-level dataset for the share. Setting up a share using the root dataset leads to storage configuration issues.
To prevent unexpected failures in SMB shares, TrueNAS 25.04 and later automatically disables SMB2/3 lease support and AAPL extensions (typically used to configure Time Machine) globally when multiprotocol SMB/NFS shares are enabled.
This means that in TrueNAS 25.04 and later, multiprotocol shares are incompatible with Time Machine shares on the same system. To prevent service interruption, Time Machine users should make sure that no multiprotocol shares are configured on TrueNAS.
TrueNAS uses predefined setting options to establish an SMB share that fits a predefined purpose, such as a basic Time Machine share.
To set up a basic time machine share:
Create the user(s) for this SMB share. Go to Credentials > Local User and click Add.
Create the share and dataset with Purpose set to Basic time machine share.
After creating the share, enable the SMB service.
When accessing from a Windows client, having more than 512 snapshots on the TrueNAS box can lead to performance issues, as the Windows client often attempts to load all snapshots into the ‘Previous Versions’ tab. To avoid this, users should maintain fewer than 512 snapshots or consider accessing from a non-Windows client. Alternatively, configuring snapshot lifetimes or creating an automatic deletion policy via the Periodic Snapshot Tasks screen can help users manage the snapshot count more effectively.
The latest maintained macOS versions allow setting the maximum time machine backup size from the macOS UI. Setting this from the client side is generally recommended for better share flexibility and macOS coordination.
You can either create the dataset to use for the share on the Add Dataset screen and the share, or create the dataset when you add the share on the Add SMB screen. If you want to customize the dataset, use the Add Dataset screen.
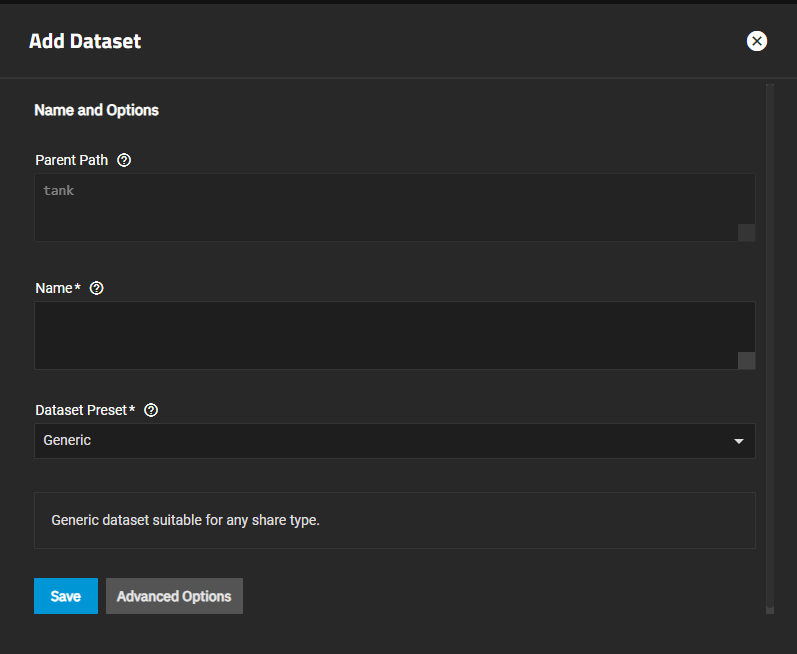
To create a basic dataset, go to Datasets. Default settings include those inherited from the parent dataset.
Select a dataset (root, parent, or child), then click Add Dataset.
Enter a value in Name.
Select the Dataset Preset option you want to use. Options are:
- Generic for non-SMB share datasets such as iSCSI and NFS share datasets, datasets for Instances (containers or virtual machines), or datasets not associated with application storage.
- Multiprotocol for datasets optimized for SMB and NFS multi-mode shares or to create a dataset for NFS shares.
- SMB for datasets optimized for SMB shares.
- Apps for datasets optimized for application storage.
Generic sets ACL permissions equivalent to Unix permissions 755, granting the owner full control and the group and other users read and execute privileges.
SMB, Apps, and Multiprotocol inherit ACL permissions based on the parent dataset. If there is no ACL to inherit, one is calculated granting full control to the owner@, group@, members of the builtin_administrators group, and domain administrators. Modify control is granted to other members of the builtin_users group and directory services domain users.
Apps includes an additional entry granting modify control to group 568 (Apps).
If creating an SMB or multi-protocol (SMB and NFS) share the dataset name value auto-populates the share name field with the dataset name.
If you plan to deploy container applications, the system automatically creates the ix-apps dataset for Docker storage for but separate datasets used for application data storage. If you want to store data by application, create the dataset(s) first, then deploy your application. When creating a dataset for an application, select Apps as the Dataset Preset. This optimizes the dataset for use by an application.
If you want to configure advanced setting options, click Advanced Options. For the Sync option, we recommend production systems with critical data use the default Standard choice or increase to Always. Choosing Disabled is only suitable in situations where data loss from system crashes or power loss is acceptable.
Select either Sensitive or Insensitive from the Case Sensitivity dropdown. The Case Sensitivity setting is found under Advanced Options and is not editable after saving the dataset.
Click Save.
Review the Dataset Preset and Case Sensitivity under Advanced Options on the Add Dataset screen before clicking Save. You cannot change these or the Name setting after clicking Save.
To use the Add SMB screen, click Add on the Windows (SMB) Shares widget to open the screen.
Set the Path to the existing dataset created for the share, or to where you want to add the dataset, then click Create Dataset.
Enter a name for the dataset and click Create Dataset. The dataset name populates the share Name field and updates the Path automatically. The dataset name becomes the share name. Leave this as the default.
If you change the name, follow the naming conventions for:
Set the Purpose to Basic time machine share.
Select Enabled to allow sharing of this path when the SMB service is activated. Leave it clear if you want to disable the share without deleting the configuration.
Finish customizing the share, then click Save.
Do not start the SMB service when prompted; start it after configuring the SMB service.
Click on the on the Windows (SMB) Share widget, then click Configure Service to open the SMB Service screen.
You can also go to System > Services and scroll down to SMB. If using the Services screen, click the toggle to turn off the SMB service if it is running, then click edit Configure to open the SMB Service settings screen.
Click Advanced Settings.
Verify or select Enable Apple SMB2/3 Protocol Extension to enable it, then click Save.
Restart the SMB service.


