Multiprotocol Shares
9 minute read.
When creating a share, do not attempt to set up the root or pool-level dataset for the share. Instead, create a new dataset under the pool-level dataset for the share. Setting up a share using the root dataset leads to storage configuration issues.
To prevent unexpected failures in SMB shares, TrueNAS 25.04 and later automatically disables SMB2/3 lease support and AAPL extensions (typically used to configure Time Machine) globally when multiprotocol SMB/NFS shares are enabled.
This means that in TrueNAS 25.04 and later, multiprotocol shares are incompatible with Time Machine shares on the same system. To prevent service interruption, Time Machine users should make sure that no multiprotocol shares are configured on TrueNAS.
A mult-protocol or mixed-mode NFS and SMB share supports both NFS and SMB protocols for sharing data. Multi-protocol shares allow clients to use either protocol to access the same data. This can be useful in environments with a mix of Windows systems and Unix-like systems, especially if some clients lack an SMB client.
Carefully consider your environment and access requirements before configuring a multi-protocol share. For many applications, a single protocol SMB share provides a better user experience and ease of administration. Linux clients can access SMB shares usingmount.cifs.
It is important to properly configure permissions and access controls to ensure security and data integrity when using mixed-mode sharing. To maximize security on the NFS side of the multiprotocol share, we recommend using NFSv4 and Active Directory(AD) for Kerberos authentication. It is also important that NFS clients preserve extended attributes when copying files, or SMB metadata could be discarded in the copy.
Multi-protocol shares are not compatible with APPL extensions such as Apple Time Machine that rely on SMB3/3 lease support, which is no longer available in multi-protocol shares. The Apple Time Machine feature cannot be enabled, and a warning message shows in the UI. Choosing to configure a multi-protocol share disables options to enable AAPL extensions globally.
Before adding a multiprotocol SMB and NFS share to your system:
Configure and start the SMB and NFS services. Configure the NFS service to require Kerberos authentication.
Join the TrueNAS server to an existing Active Directory domain. Configure a container, Kerberos admin, and user accounts in AD.
Create the dataset and share with Dataset Preset set to Multiprotocol.
Before joining AD and creating a dataset for the share, start both the SMB and NFS services and configure the NFS service for Kerberos authentication. Configure the NFS service before joining AD for a simpler Kerberos credential creation.
You can either use the Shares screen Configure Service option on both the Windows (SMB) Share and on the UNIX (NFS) Shares widgets or go to System > Services and select the Edit option on the SMB and NFS services.
Unless you need a specific setting or are configuring a unique network environment, we recommend using the default SMB service settings.
After configuring the SMB and NFS share services, start the services.
From the Sharing screen, click on the Windows (SMB) Shares to display the service options, which are Turn Off Service if the service is running or Turn On Service if the service is not running.
After adding a share, use the toggle to enable or disable the service for that share.
To enable the service from the System > Services screen, click the toggle for the service and set Start Automatically if you want the service to activate when TrueNAS boots.
Open the NFS service screen, then select only NFSv4 on the Enabled Protocols dropdown list. For security hardening, we recommend disabling the NFSv3 protocol.
Select Require Kerberos for NFSv4 to enable using a Kerberos ticket.
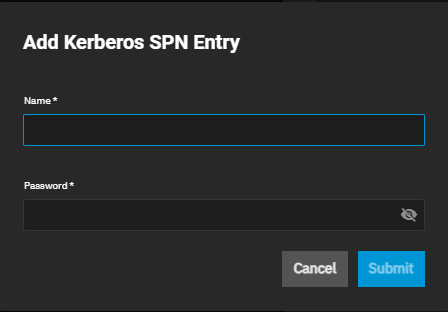
If Active Directory is already joined to the TrueNAS server, click Save, then reopen the NFS service screen. Click Add SPN to open the Add Kerberos SPN Entry dialog.
Click Yes when prompted to add a Service Principal Name (SPN) entry. Enter the AD domain administrator user name and password in Name and Password.
TrueNAS automatically applies SPN credentials if the NFS service is enabled with Require Kerberos for NFSv4 selected before joining Active Directory.
Click Save again, then start the NFS service.
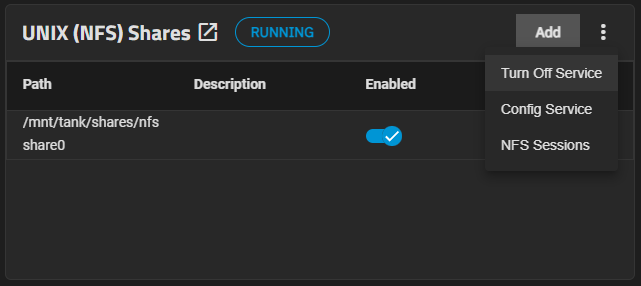
From the Sharing screen, click on the Unix Shares (NFS) to display the service options, which are Turn Off Service if the service is running or Turn On Service if the service is not running.
Each NFS share on the list also has a toggle to enable or disable the service for that share.
To enable the service from the System > Services screen, click the toggle for the service and set Start Automatically if you want the service to activate when TrueNAS boots.
The NFS service does not automatically start on boot if all NFS shares are encrypted and locked.
Mixed-mode SMB and NFS shares greatly simplify data access for clients running a range of operating systems. They also require careful attention to security complexities not present in standard SMB shares. NFS shares do not respect permissions set in the SMB Share ACL. Protect the NFS export with proper authentication and authorization controls to prevent unauthorized access by NFS clients.
We recommend using Active Directory to enable Kerberos security for the NFS share. Configure a container (group or organizational unit), Kerberos admin, and user accounts in AD.
You can create a share and a dataset from either the Add Dataset or Add SMB screen.
The multi-protocol share type is mutually exclusive with AAPL extension support, like Time Machine. These extensions require the SMB2/3 lease support, which is no longer available in multi-protocol shares. Therefore, Time Machine cannot be enabled, and a warning message shows in the UI. Selecting other Apple protocol options also displays warning messages. Multi-protocol shares can impact the performance of all SMB shares.
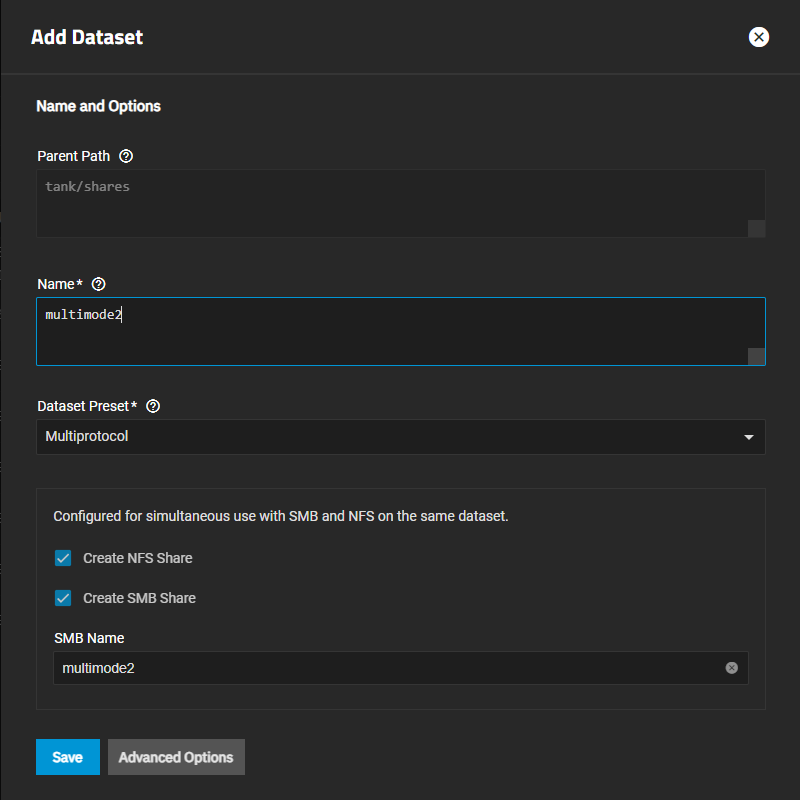
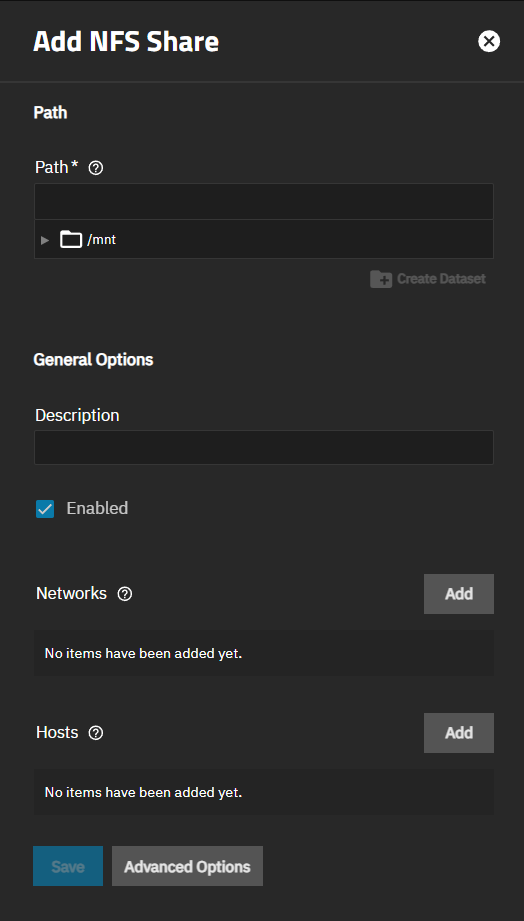
TrueNAS allows you to create the dataset and add a multiprotocol (SMB and NFS) share using the Add Dataset screen.
It is best practice to use a dataset instead of a full pool for SMB and/or NFS shares. Sharing an entire pool makes it more difficult to later restrict access if needed.
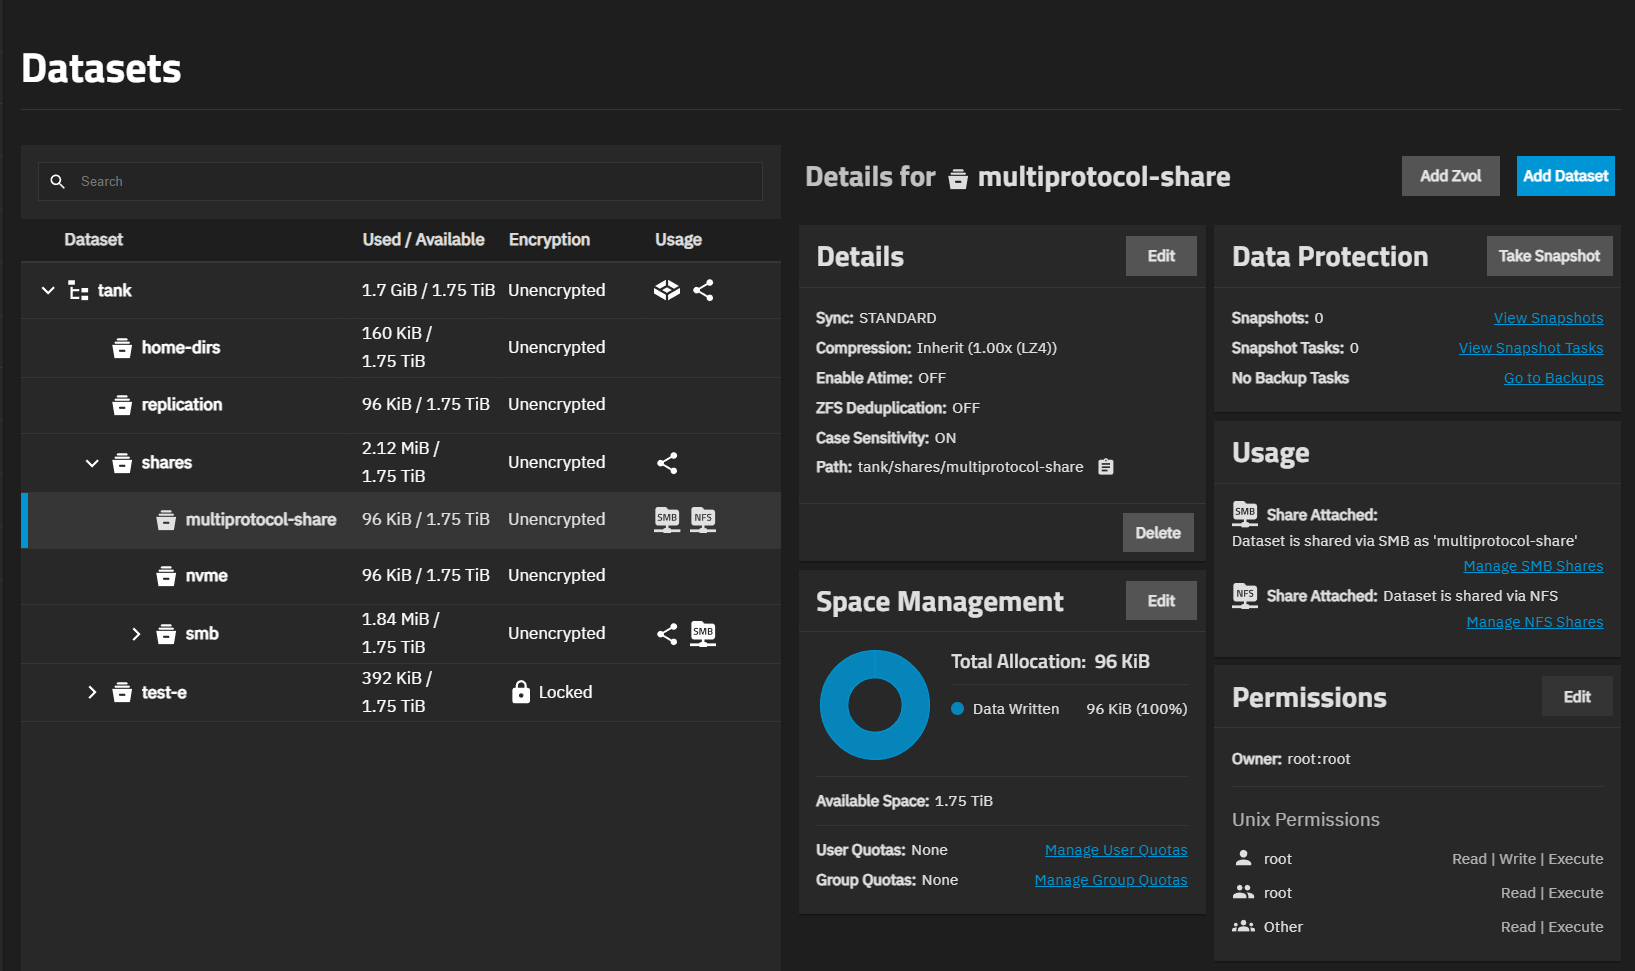
Select the dataset you want to be the parent of the multi-mode dataset, then click Add Dataset.
Enter a name for the dataset.
Select Multiprotocol from the Dataset Preset dropdown. The share configuration options display with Create NFS Share and Create SMB Share preselected, and the dataset name populates the SMB Name field and becomes the name of the SMB and NFS shares.
(Optional) Click Advanced Options to customize other dataset settings such as quotas, compression level, encryption, and case sensitivity. See Creating Datasets for more information on adding and customizing datasets.
Click Save. TrueNAS creates the dataset and the multi-protocol SMB and NFS shares. TrueNAS sets the same share presets as the Multi-protocol (SMB/NFS) share setting in Purpose on the Advanced Options for the Add SMB screen. To configure other share settings, go to the Sharing, select the share, click the edit icon to open the Edit SMB screen, and click Advanced Options to modify the settings.
After adding the dataset, edit the dataset ACL.
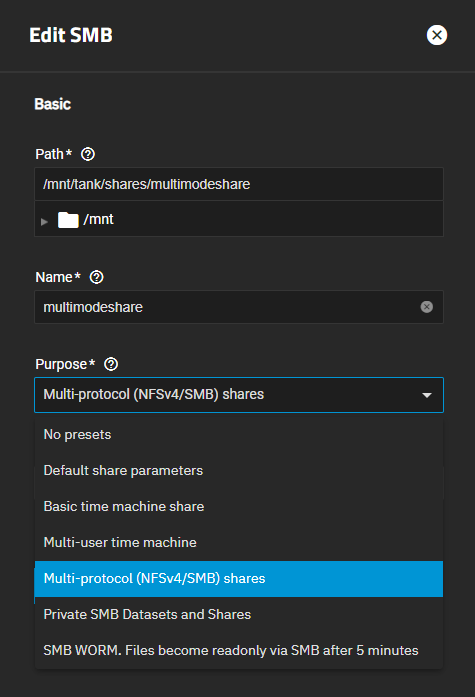
To create a share and dataset from the Add SBM share screen, go to Shares, and click Add on the Windows (SMB) Shares widget to open the Add SMB screen.
Enter or browse to select the dataset where you want to add the share dataset, then click Create Dataset. The dataset name populates the Name field. Both the dataset and the share have the same name.
Select Multi-protocol (NFSv4/SMB) shares from the Purpose dropdown list. This applies the pre-determined Other Options selected on the Advanced Options screen.
Click Advanced Options to modify any settings you want to use. Multi-mode shares cannot use APPL extension settings like Time Machine.
(Optional) Enter a Description to help explain the share purpose.
Click Save.
Restart the service when prompted. You can modify share settings after creating it.
After creating the multi-mode share on the Add Dataset screen, go to Shares and edit the NFS share.
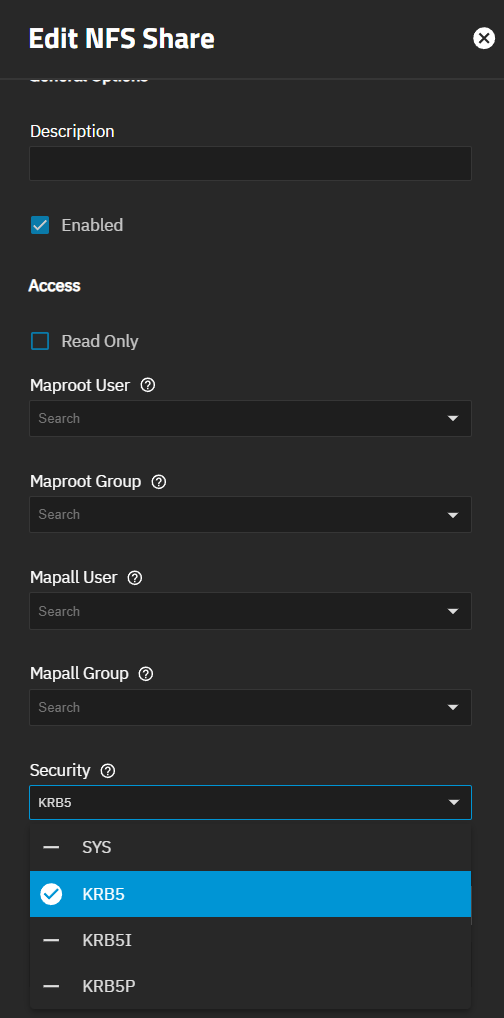
Select the new share listed on Unix (NFS) Shares widget and then click Edit. The Edit NFS screen opens with the Basic Options settings showing.
Enable Kerberos security. Click Advanced Options. Select KRB5 from the Security dropdown to enable the Kerberos ticket generated when you joined Active Directory.
If needed, select Read-Only to prohibit writing to the share.
Click Save.
Restart the service when prompted.
After joining AD, and creating a multi-mode dataset and the SMB and NFS shares, adjust the dataset/file system ACL permissions to match the container and users configured in AD.
You can modify dataset permissions from the Shares screen using the Edit Filesystem ACL icon to open the Edit ACL screen for the selected share (SMB and NFS). Select the share row on the widget, then click the edit icon to modify permissions for the share dataset. Perform this for both the SMB and NFS shares.
Or go to Datasets, select the dataset row created for the multiprotocol share on the Datasets table, then scroll down to the Permissions widget for the dataset. Click Edit to open the Edit ACL screen.
Check the Access Control List to see if the AD group you created is on the list and has the correct permissions. If not, add this Access Control Entry (ACE) item on the Edit ACL screen for the multi-mode dataset (or each share).
Enter Group in the Who field or use the dropdown list to select Group.
Type or select the appropriate group in the Group field.
Verify Full Control displays in Permissions. If not, select it from the dropdown list.
Click Save Access Control List to add the ACE item or save changes.
See Permissions for more information on editing dataset permissions.
After setting the dataset permission, connect to the share.
After creating and configuring the shares, connect to the multi-protocol share using either SMB or NFS protocols from a variety of client operating systems including Windows, Apple, FreeBSD, and Linux/Unix systems.
For more information on accessing shares, see Mounting the SMB Share and Connecting to the NFS Share.


