TrueNASTrueNAS Nightly Development Documentation
This content follows experimental nightly development software. Pre-release software is intended for testing purposes only.
Use the Product and Version selectors above to view content specific to a stable software release.

Setting Up an Encrypted Replication Task

Using Encryption in Replication Tasks

TrueNAS replication allows users to create replicated snapshots of data stored in encrypted pools, datasets or zvols as a way to back up stored data to a remote system. You can use encrypted datasets in a local replication.

You can set up a replication task for a dataset encrypted with a passphrase or a hex encryption key, but you must unlock the dataset before the task runs or the task fails.

With the implementation of the Local Administrator user and role-based permissions, when setting up remote replication tasks when logged in as an admin user requires selecting Use Sudo For ZFS Commands.

The first snapshot taken for a task creates a full file system snapshot, and all subsequent snapshots taken for that task are incremental to capture differences occurring between the full and subsequent incremental snapshots.

Scheduling options allow users to run replication tasks daily, weekly, monthly, or on a custom schedule. Users also have the option to run a scheduled job on demand.

Remote replication with datasets also require an SSH connection in TrueNAS. You can use an existing SSH connection if it has the same user credentials you want to use for the new replication task.

Setting Up a Simple Replication Task Overview

This section provides a simple overview of setting up a remote replication task for an encrypted dataset. It also covers the related steps you should take prior to configuring the replication task.

Replication Task General Overview
  1. Set up the data storage for where you want to save replicated snapshots.

  2. Make sure the admin user has a home directory assigned.

  3. Create an SSH connection between the local TrueNAS system and the remote system. You can do this by either going to Credentials > Backup Credentials > SSH Connection and clicking Add or from the Replication Task Wizard using the Generate New option for the remote system.

  4. Unlock the encrypted dataset(s) and export the encryption key to a text editor like Notepad.

  5. Go to Data Protection > Replication Tasks and click Add to open the Replication Task Wizard. Specify the from and to sources, task name, and set the schedule.

    Setting options change based on the source selections. Replicating to or from a local source does not requires an SSH connection.

This completes the general process for all replication tasks.

Creating a Remote Replication Task for an Encrypted Dataset

To streamline creating simple replication tasks use the Replication Task Wizard to create and copy ZFS snapshots to another system. The wizard assists with creating a new SSH connection and automatically creates a periodic snapshot task for sources that have no existing snapshots.

If you have an existing replication task, you can select it on the Load Previous Replication Task dropdown list to load the configuration settings for that task into the wizard, and then make change such as assigning it a different destination, select encryption options, schedule, or retention lifetime, etc. Saving changes to the configuration creates a new replication task without altering the task you loaded into the wizard. This saves some time when creating multiple replication tasks between the same two systems.

Before you begin configuring the replication task, first verify the destination dataset you want to use to store the replication snapshots is free of existing snapshots, or that snapshots with critical data are backed up before you create the task.

To create a replication task:

  1. Create the destination dataset or storage location you want to use to store the replication snapshots. If using another TrueNAS system, create a dataset in one of your pools.

  2. Verify the admin user home directory, auxiliary groups, and sudo setting on both the local and remote destination systems. Local replication does not require an SSH connection, so this only applies to replication to another system.

    If using a TrueNAS 13.0-U6.x system as the remote server, the remote user is always root.

    If using an earlier TrueNAS 22.12.1 system or you installed TrueNAS as the root user then created the admin user after initial installation, you must verify the admin user is correctly configured.

    Verify Admin User Settings

    a. Go to Credentials > Local User, click anywhere on the admin user row to expand it, and then click Edit.

    Scroll down to the Home Directory setting. If set to /var/empty, first create a dataset to use for home directories, like /tank/homedirs. Enter this in the Home Directory field, make sure this is not read only.

    For more information, follow the instructions in Adding Home Directories to create the home directory for the admin user.

    b. Select the sudo permission level you want the admin user to have. Allow all sudo commands with no password must be selected to enable SSH+NETCAT remote replication.

    c. Click Save.

  1. Unlock the source dataset and export the encryption key to a text editor such as Notepad. Go to Datasets select the source dataset, locate the ZFS Encryption widget and unlock the dataset if locked. Export the key and paste it in any text editor such as Notepad. If you set up encryption to use a passphrase, you do not need to export a key.

  2. Go to Data Protection and click Add on the Replication Tasks widget to open the Replication Task Wizard. Configure the following settings:

    a. Select On this System on the Source Location dropdown list. If your source is the local TrueNAS system, you must select On a Different System from the Destination Location dropdown list to do remote replication.

    If your source is a remote system, create the replication task as the root user and select On a Different System. The Destination Location automatically changes to On this System.

    TrueNAS shows the number of snapshots available for replication.

    b. Select an existing SSH connection to the remote system or create a new connection. Select Create New to open the New SSH Connection configuration screen.

    c. Browse to the source pool/dataset(s), then click on the dataset(s) to populate the Source with the path. You can select multiple sources or manually type the names into the Source field. Separate multiple entries with commas. Selecting Recursive replicates all snapshots contained within the selected source dataset snapshots.

    d. Repeat to populate the Destination field. You cannot use zvols as a remote replication destination. Add a /datasetname to the end of the destination path to create a new dataset in that location.

    e. (Optional) Select Encryption to add a second layer of encryption over the already encrypted dataset.

    f. Select Use Sudo for ZFS Commands. Only displays when logged in as the admin user (or the name of the admin user). This removes the need to issue the cli zfs allow command in Shell on the remote system. When the dialog displays, click Use Sudo for ZFS Comands. If you close this dialog, select the option on the Add Replication Task wizard screen.

    This option only displays when logged in as the admin user. If not selected you need to issue the cli zfs allow command in Shell on the remote system.

    g. Select Replicate Custom Snapshots, then accept the default value in Naming Schema. Remote sources require entering a snapshot naming schema to identify the snapshots to replicate. A naming schema is a pattern of naming custom snapshots you want to replicate. If you want to change the default schema, enter the name and strftime(3) %Y, %m, %d, %H, and %M strings that match the snapshots to include in the replication. Separate entries by pressing Enter. The number of snapshots matching the patterns display.

    h. (Optional) Enter a name for the snapshot in Task Name. TrueNAS populates this field with the default name using the source and destination paths separated by a hyphen, but this default can make locating the snapshot in destination dataset a challenge. To make it easier to find the snapshot, give it a name that is easy for you to identify. For example, a replicated task named dailyfull for a full file system snapshot taken daily.

  1. Click Next to display the scheduling options.

  2. Select the schedule and snapshot retention life time.

    a. Select Replication Schedule to use. Select Run Once to set up a replication task you run one time. Select Run On a Schedule then select when from the Schedule dropdown list.

    b. Select the Destination Snapshot Lifetime radio button option you want to use. This specifies how long TrueNAS should store copied snapshots in the destination dataset before TrueNAS deletes it. Same as Source is selected by default. Select Never Delete to keep all snapshots until you delete them manually. Select Custom to show two additional settings, then enter the number of the duration you select from the dropdown list. For example, 2 Weeks.

  3. Click START REPLICATION. A dialog displays if this is the first snapshot taken using the destination dataset. If TrueNAS does not find a replicated snapshot in the destination dataset to use to create an incremental snapshot, it deletes any existing snapshots found and creates a full copy of the day snapshot to use as a basis for the future scheduled incremental snapshots for this schedule task.

    This operation can delete important data, so ensure you can delete any existing snapshots or back them up in another location.

    Click Confirm, then Continue to add the task to the Replication Task widget. The newly added task shows the status as PENDING until it runs on the schedule you set.

    Select Run Now if you want to run the task immediately.

To see a log for a task, click the task State to open a dialog with the log for that replication task.

To see the replication snapshots, go to Datasets, select the destination dataset on the tree table, then select Manage Snapshots on the Data Protection widget to see the list of snapshots in that dataset. Click Show extra columns to add more information columns to the table such as the date created which can help you locate a specific snapshot or enter part of or the full the name in the search field to narrow the list of snapshots.

Configure a New SSH Connection

When using a TrueNAS system on a different release, the remote or destination system user is always root.

To configure a new SSH connection from the Replication Task Wizard:

  1. Select Create New on the SSH Connection dropdown list to open the New SSH Connection configuration screen.

  2. Enter a name for the connection.

  3. Select the Setup Method from the dropdown list. If a TrueNAS system, select Semi-Automatic.

  4. Enter the URL to the remote TrueNAS in TrueNAS URL.

  5. Enter the administration user (i.e., root or admin) that logs into the remote system with the web UI in Admin Username. Enter the password in Admin Password.

  6. Enter the administration user (i.e., root or admin) for remote system SSH session. If you clear root as the the user and type any other name the Enable passwordless sudo for ZFS commands option displays. This option does nothing so leave it cleared.

  7. Select Generate New from the Private Key dropdown list.

  8. (Optional) Select a cipher from the dropdown list, or enter a new value in seconds for the Connection Timeout if you want to change the defaults.

  9. Click Save to create a new SSH connection and populate the SSH Connection field in the Replication Task Wizard.

Using SSH Transfer Security

Using encryption for SSH transfer security is always recommended.

In situations where you use two systems within an absolutely secure network for replication, disabling encryption speeds up the transfer. However, the data is completely unprotected from eavesdropping.

Choosing No Encryption for the task is less secure but faster. This method uses common port settings but you can override these by switching to the Advanced Replication Creation options or by editing the task after creation.

Unlocking the Destination Dataset

After the replication task runs and creates the snapshot on the destination, you must unlock it to access the data. Click the from the replication task options to download a key file that unlocks the destination dataset.

Replicating to an Unencrypted Destination Dataset

TrueNAS does not support preserving encrypted dataset properties when trying to re-encrypt an already encrypted source dataset.

To replicate an encrypted dataset to an unencrypted dataset on the remote destination system, follow the instructions above to configure the task, then to clear the dataset properties for the replication task:

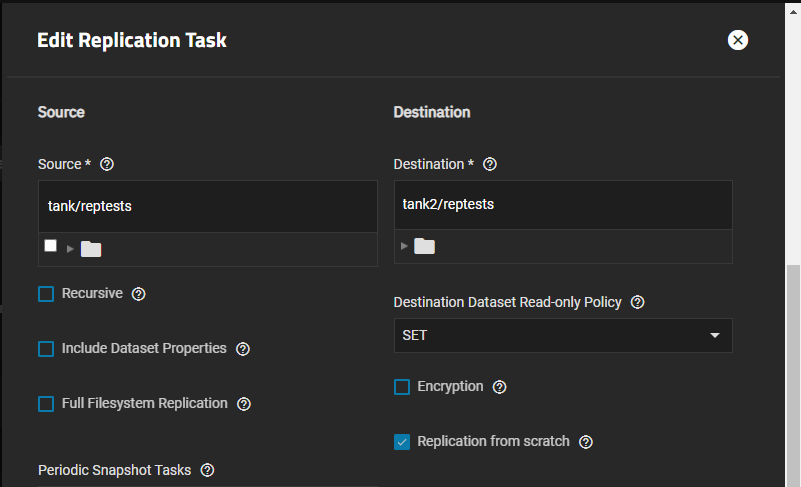
  1. Select the task on the Replication Task widget. The Edit Replication Task screen opens.

  2. Scroll down to and select Include Dataset Properties to clear the checkbox.

Edit Replication Task Include Dataset Properties
Figure 11: Edit Replication Task Include Dataset Properties
  1. Click Save.

This replicates the unlocked encrypted source dataset to an unencrypted destination dataset.

Using Additional Encryption Options

When you replicate an encrypted pool or dataset you have one level of encryption applied at the data storage level. Use the passphrase or key created or exported from the dataset or pool to unlock the dataset on the destination server.

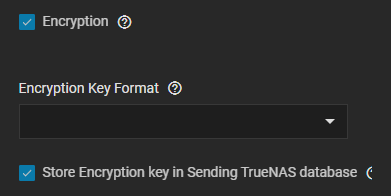
To add a second layer of encryption at the replication task level, select Encryption on the Replication Task Wizard, then select the type of encryption you want to apply.

Replication Task Encryption Options
Figure 12: Replication Task Encryption Options

Select either Hex (base-16 numeral format) or Passphrase (alphanumeric format) from the Encryption Key Format dropdown list to open settings for that type of encryption.

Selecting Hex displays Generate Encryption Key preselected. Select the checkbox to clear it and display the Encryption Key field where you can import a custom hex key.

Selecting Passphrase displays the Passphrase field where you enter your alphanumeric passphrase.

Select Store Encryption key in Sending TrueNAS database to store the encryption key in the sending TrueNAS database or leave unselected to choose a temporary location for the encryption key that decrypts replicated data.