Configuring Active Directory
9 minute read.
The Directory Services screen and widgets provide access to TrueNAS settings to set up access to directory services and advanced authentication systems deployed in user environments.
TrueNAS does not configure Active Directory domain controllers or LDAP directory servers, nor does it configure Kerberos authentication servers or ID mapping systems.
Refer to documentation for these services and systems for information on how to configure each to suit your use case.
You can have either Active Directory, LDAP, or IPA configured on TrueNAS but not multiple directory services simultaneously.
The Active Directory (AD) service shares resources in a Windows network. AD provides authentication and authorization services for the users in a network, eliminating the need to recreate the user accounts on TrueNAS.
When joined to an AD domain, you can use domain users and groups in local ACLs on files and directories. You can also set up shares to act as a file server.
Joining an AD domain also configures the Privileged Access Manager (PAM) to let domain users log on via SSH or authenticate to local services.
Users can configure AD services on Windows or Unix-like operating systems using Samba version 4.
Before configuring Active Directory (AD) in TrueNAS:
You need to know the hostname assigned to the TrueNAS system. The default value is truenas.
The Domain Account Name default is Administrator, or enter a name for TrueNAS to generate as the computer account upon domain join. Enter the password for this account.
Verify name resolution. Go to Network > Global Network Settings to verify your TrueNAS network DNS name servers are configured with the target domain controller address that you plan to add on the Active Directory screen.
Change the default hostname of the system from truenas to the name assigned to the TrueNAS system.
After taking these actions, you can connect to the Active Directory domain.
NetBIOS names (workgroup, domain, and computer names) are limited to 15 characters and cannot contain the following characters:
\ / : * ? " < > |Microsoft and RFC 852 define reserved words that should not be used as NetBIOS names. TrueNAS 25.04 and later enforce these restrictions through validation.
If you encounter validation errors when joining Active Directory or configuring SMB services, verify that your NetBIOS Name, Workgroup, and Domain Name comply with these requirements.
Active Directory relies on the time-sensitive Kerberos protocol. TrueNAS adds the AD domain controller with the PDC Emulator FSMO Role as the preferred NTP server during the domain join process. If your environment requires something different, go to System > Advanced Settings, click Add to open the NTP Servers screen, then add a new or edit a listed server.
Keep the local system time sync within five (5) minutes of the AD domain controller time in a default AD environment.
Use an external time source when configuring a virtualized domain controller. TrueNAS generates alerts if the system time gets out of sync with the AD domain controller time.
TrueNAS has a few options to ensure both systems are synchronized. Either:
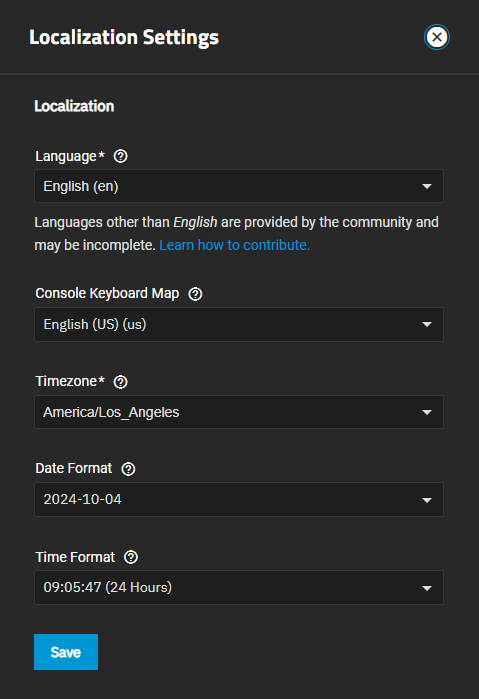
Go to System > General Settings, click Settings in the Localization widget, and set Timezone to the value that matches the location of the AD domain controller.
Or
- Set the system BIOS to either local time or universal time.
Before you begin, modify the system DNS server settings. Take a screenshot of your current settings to refer to if you need to revert to pre-AD settings for any reason. Change the nameserver 1 setting to the IP address of the AD server and clear the other name server settings. Make sure the domain name is set to something other than the default value truenas.
To connect TrueNAS to Active Directory:
Go to Credentials > Directory Services and click Configure Directory Services to open the Directory Services Configuration form.
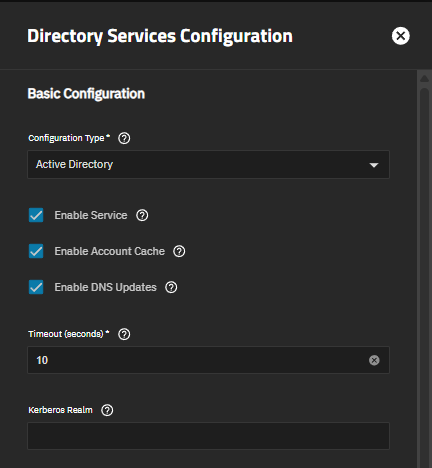
Select Active Directory from the Configuration Type dropdown list.
Enter the Basic Configuration settings:
Select the Enable Service checkbox to activate the AD configuration.
Leave the Enable Account Cache checkbox selected to cache user and group information. Caching makes directory users and groups available in UI dropdown menus. Users with large domains should consider disabling account caching in order to reduce the load on domain controllers.
Leave the Enable DNS Updates checkbox selected to allow the directory service to update DNS records.
Enter the number of seconds (1-40) before the directory service connection times out in Timeout (seconds).
Enter the Kerberos realm in Kerberos Realm. TrueNAS auto-populates this field after joining the domain.
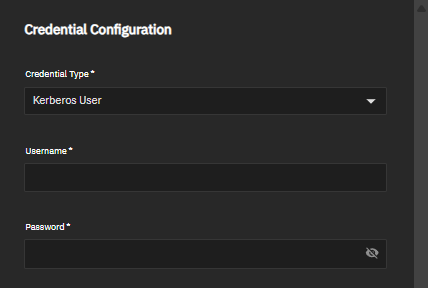
Enter the Credential Configuration settings:
Select Kerberos User from the Credential Type dropdown list. Required.
Enter the AD domain administrator username in Username. Required. Enter only the username (for example, Administrator), not the domain-prefixed format.
Enter the password for the administrator account in Password. Required.
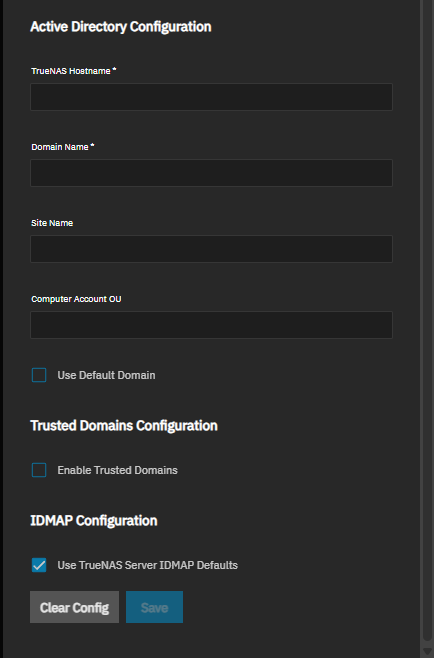
Enter the required Active Directory Configuration settings:
Enter the TrueNAS hostname in TrueNAS Hostname. This value must match the Hostname setting on the Network > Global Configuration screen and cannot exceed 15 characters.
Enter the Active Directory domain name in Domain Name. For example, example.com or sales.example.com if configuring access to a child domain.
(Optional) Enter the site name in Site Name.
(Optional) Enter the organizational unit in Computer Account OU. This controls the location where the TrueNAS computer object is created when joining the Active Directory domain for the first time. The OU string includes the distinguished name (DN) of the Computer Account OU. For example, OU=Computers,DC=example,DC=com.
(Optional) Select the Use Default Domain checkbox to remove the domain name prefix from AD users and groups. This setting might be required for specific configurations such as Kerberos authentication with NFS for AD users. Using this setting can cause collisions with local user account names.
(Optional) Configure trusted domains:
Select the Enable Trusted Domains checkbox to allow clients to access TrueNAS if they are members of domains with a trust relationship.
Starting in TrueNAS 25.10, trusted domains are configured as part of the Active Directory configuration rather than as separate IDmap entries.
When selected, you can add trusted domain configurations. Each trusted domain requires an IDMAP Backend selection.
Configure IDMAP settings:
IDMAP (Identity Mapping) ensures that UIDs and GIDs assigned to Active Directory users and groups have consistent values domain-wide. By default, TrueNAS uses an algorithmic method based on the RID component of the user or group SID, which is suitable for most environments. Only administrators experienced with configuring ID mapping should customize IDMAP settings. Misconfiguration can lead to permissions incorrectly assigned to users or groups when data is transferred via ZFS replication or rsync, or when accessed via NFS or other protocols that directly access UIDs/GIDs on files.
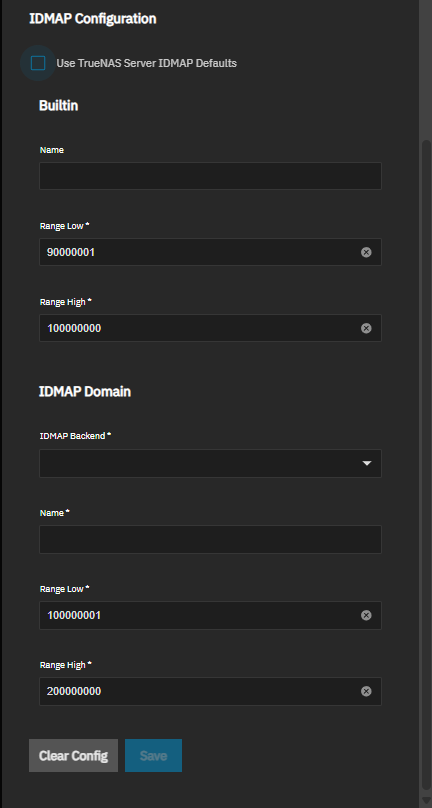
Select Use TrueNAS Server IDMAP Defaults to use default IDMAP configuration. Selected by default and recommended for most setups.
To customize IDMAP settings, clear Use TrueNAS Server IDMAP Defaults to reveal additional configuration options:
Builtin section with optional Name field and required Range Low and Range High fields.
IDMAP Domain section with required IDMAP Backend, Name, Range Low, and Range High fields.
See Understanding IDMAP Backends for more information on IDMapping.
Click Save.
TrueNAS creates the default Kerberos realm and principal, and the Computer Account OU value.
If you get a DNS server error, go to Network > Global Configuration, click Settings, and verify the DNS nameserver IP addresses are correctly configured with addresses that permit access to the Active Directory domain controller. Correct any network configuration settings, then reconfigure the Active Directory settings.
TrueNAS offers advanced options for fine-tuning the AD configuration, but the preconfigured defaults are generally suitable.
When the import completes, AD users and groups become available while configuring basic dataset permissions or an ACL with TrueNAS cache enabled (enabled by default).
Joining AD also adds default Kerberos realms and generates a default AD_MACHINE_ACCOUNT keytab. TrueNAS automatically begins using this default keytab and removes any administrator credentials stored in the TrueNAS configuration file.
When customizing IDMAP settings, you can select from several backend options. Each backend uses a different method to map Windows security identifiers (SIDs) to UNIX UIDs and GIDs:
AD - Reads UID and GID mappings from an Active Directory server that uses pre-existing RFC2307 / SFU schema extensions.
AUTORID - Automatically allocates UID and GID ranges for each domain. Useful for environments with multiple trusted domains.
LDAP - Reads and writes UID / GID mapping tables from an external LDAP server.
NSS - Uses the Name Service Switch (NSS) to retrieve Unix user and group information from local or network sources.
RFC2307 - Reads ID mappings from RFC2307 attributes on a standalone LDAP server. This backend is read-only.
RID - Uses an algorithm to map UIDs and GIDs to SIDs. It determines the UID or GID by adding the RID value from the Windows Account SID to the base value in range_low.
TDB - Stores ID mappings in a local Trivial Database (TDB) file. Allocates new UIDs and GIDs as needed. Useful for standalone servers but not recommended for multi-server environments as mappings are not shared.
For most environments, the default RID backend provides consistent, reliable ID mapping without additional configuration.
If the cache becomes out of sync or fewer users than expected are available in the permissions editors, click Settings in the Active Directory widget, then click Rebuild Directory Service Cache to resync the cache.
The name in TrueNAS Hostname should match the name in Hostname on the Network > Global Configuration screen.
To disable your AD server connection without deleting your configuration or leaving the AD domain, click Settings in the Active Directory widget to open the Active Directory settings screen. Clear the Enable Service checkbox and click Save to disable the AD service.
This returns you to the main Directory Services screen.
Click Configure Directory Services to open the Directory Services Configuration form with your existing configuration settings. Select Enable Service again, and click Save to reactivate your connection to your AD server.
Users must cleanly leave an Active Directory for TrueNAS to delete the configuration. To cleanly leave AD, click Leave Domain on the Active Directory settings screen to remove the AD object. Remove the computer account and associated DNS records from the Active Directory.
If the AD server moves or shuts down without you using Leave Domain, TrueNAS does not remove the AD object, and you have to clean up the Active Directory.


