Adding SSH Credentials
8 minute read.
The SSH Connections and SSH Keypairs widgets on the Backup Credentials screen display a list of SSH connections and key pairs configured on the system. Using these widgets, users can establish Secure Socket Shell (SSH) connections.
You must also configure and activate the SSH Service to allow SSH access.
These SSH credentials are used to manage SSH connections specifically for automated tasks such as replication, backups, cloud sync, or other system-to-system operations. You can generate, store, and manage SSH key pairs and define SSH connections that TrueNAS uses for these automated processes. The key pairs managed here are not tied to individual user but are instead used by the system for secure communication with other systems or services.
For individual user SSH access, configure SSH keys in the user account settings under Credentials > Users.
To begin setting up an SSH connection, go to Credentials > Backup Credentials.
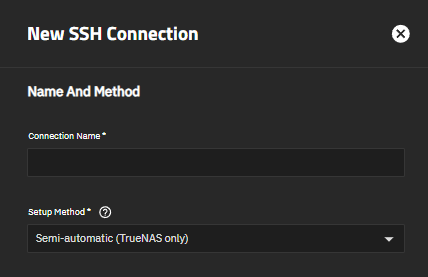
Click Add on the SSH Connections widget to open the configuration screen:
Enter a name for the connection, then select the Setup Method.
If establishing an SSH connection to another TrueNAS server use the default Semi-automatic (TrueNAS only) option.
If connecting to a non-TrueNAS server select Manual from the dropdown list.
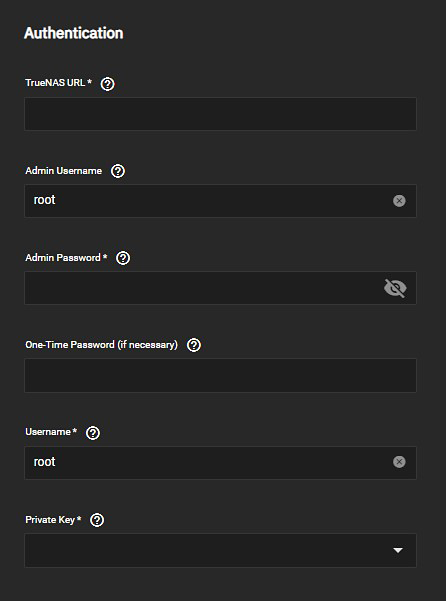
Enter the authentication settings.
a. Enter a valid URL scheme for the remote TrueNAS URL in TrueNAS URL. If specifying an IPv6 address, you must enter the IPv6 address enclosed in square brackets. For example, https://[ffff:ff:59f1:123::12].
b. Enter an admin user name, which is the username on the remote system entered to log in via the web UI to set up the connection. You can leave Admin Username set to the default root user, then enter the user password in Admin Password.
c. (Optional) Enter the one-time password in One-Time Password (if necessary) if two-factor authentication is enabled.
d. Enter a Username, which is the user name on the remote system to log in via SSH.
e. Enter or import the private key from a previously created SSH key pair, or select Generate New to create a new one.
(Optional) Enter the number of seconds you want to wait for the remote TrueNAS system to connect in Connect Timeout.
Click Save.
Saving a new connection automatically opens a connection to the remote TrueNAS and exchanges SSH keys. The new SSH connection displays on the SSH Connection and the SSH Keypairs widgets.
To edit the SSH connection, select it, then click on edit open the SSH Connections configuration screen populated with the saved settings.
To download the private and public keypair, click the file_download for the new keypair on the SSH Keypairs widget. To view and copy the public or private key, click the Edit option for the keypair to open the Edit Keypair screen.
The procedure in this section covers the semi-automatic setup method for creating an SSH connection with another TrueNAS system.
Semi-automatic simplifies setting up an SSH connection with another TrueNAS system without logging in to that system to transfer SSH keys. This requires an SSH key pair on the local system and administrator account credentials for the remote TrueNAS. You must configure the remote system to allow root access with SSH. You can generate the key pair as part of the semiautomatic configuration or a manually created one using SSH Keypairs.
Click Add on the SSH Connections widget to open the configuration screen:
Enter a name for the connection, then select the Setup Method.
If establishing an SSH connection to another TrueNAS server use the default Semi-automatic (TrueNAS only) option.
If connecting to a non-TrueNAS server select Manual from the dropdown list.
Enter the authentication settings.
a. Enter a valid URL scheme for the remote TrueNAS URL in TrueNAS URL. If specifying an IPv6 address, you must enter the IPv6 address enclosed in square brackets. For example, https://[ffff:ff:59f1:123::12].
b. Enter an admin user name, which is the username on the remote system entered to log in via the web UI to set up the connection. You can leave Admin Username set to the default root user, then enter the user password in Admin Password.
c. (Optional) Enter the one-time password in One-Time Password (if necessary) if two-factor authentication is enabled.
d. Enter a Username, which is the user name on the remote system to log in via SSH.
e. Enter or import the private key from a previously created SSH key pair, or select Generate New to create a new one.
(Optional) Enter the number of seconds you want to wait for the remote TrueNAS system to connect in Connect Timeout.
Click Save.
Saving a new connection automatically opens a connection to the remote TrueNAS and exchanges SSH keys. The new SSH connection displays on the SSH Connection and the SSH Keypairs widgets.
To edit the SSH connection, select it, then click on edit open the SSH Connections configuration screen populated with the saved settings.
To download the private and public keypair, click the file_download for the new keypair on the SSH Keypairs widget. To view and copy the public or private key, click the Edit option for the keypair to open the Edit Keypair screen.
The instructions in this section cover how to set up an SSH connection to a non-TrueNAS system. To manually set up an SSH connection, you must copy a public encryption key from the local system to the remote system. A manual setup allows a secure connection without a password prompt.
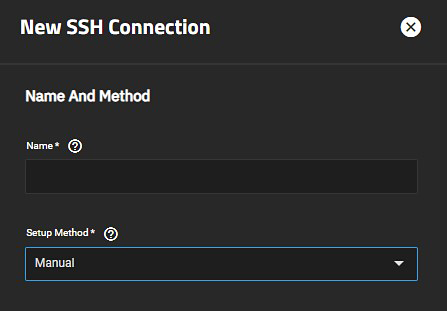
Click Add on the SSH Connections widget to open the configuration screen:
Enter a name for the connection, then select Manual from the Setup Method dropdown list.
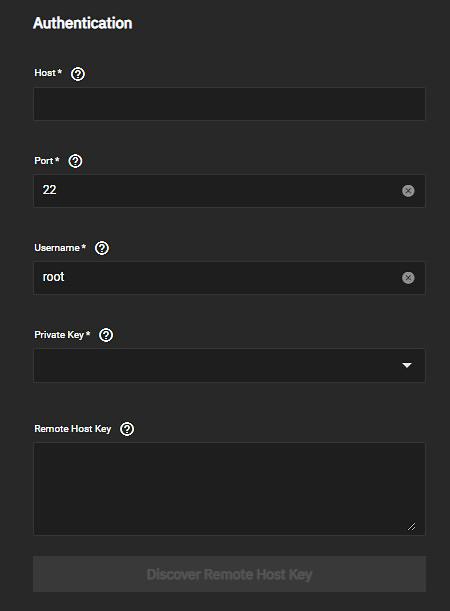
Enter the authentication settings.
a. Enter a host name or host IP address for the remote non-TrueNAS system as a valid URL. An IP address example is https://10.231.3.76. This is a required field.
b. Enter the port number of the remote system to use for the SSH connection.
c. Enter a user name for logging into the remote system in Username.
d. Select the private key from the SSH key pair that you use to transfer the public key on the remote NAS from the Private Key dropdown.
e. Click Discover Remote Host Key after properly configuring all other fields to query the remote system and automatically populate the Remote Host Key field.
(Optional) Enter the number of seconds you want to wait for the remote TrueNAS system to connect in Connect Timeout.
Click Save.
Saving a new connection automatically opens a connection to the remote TrueNAS and exchanges SSH keys. The new SSH connection displays on the SSH Connection widget. To edit it, click on the name to open the SSH Connections configuration screen populated with the saved settings.
This procedure covers adding a public SSH key to the admin account on the TrueNAS system and generating a new SSH Keypair to add to the remote system (TrueNAS or other).
Copy the SSH public key text or download it to a text file:
Log in to the TrueNAS system that generated the SSH key pair and go to Credentials > Backup Credentials.
Click on the name of the key pair on the SSH Keypairs widget to open the key pair for the SSH connection.
Copy the text of the public SSH key or download the public key as a text file.
Add the public key to the admin account on the system where you want to register the public key.
Log in to the TrueNAS system where you want to register the public key and go to Credentials > Users.
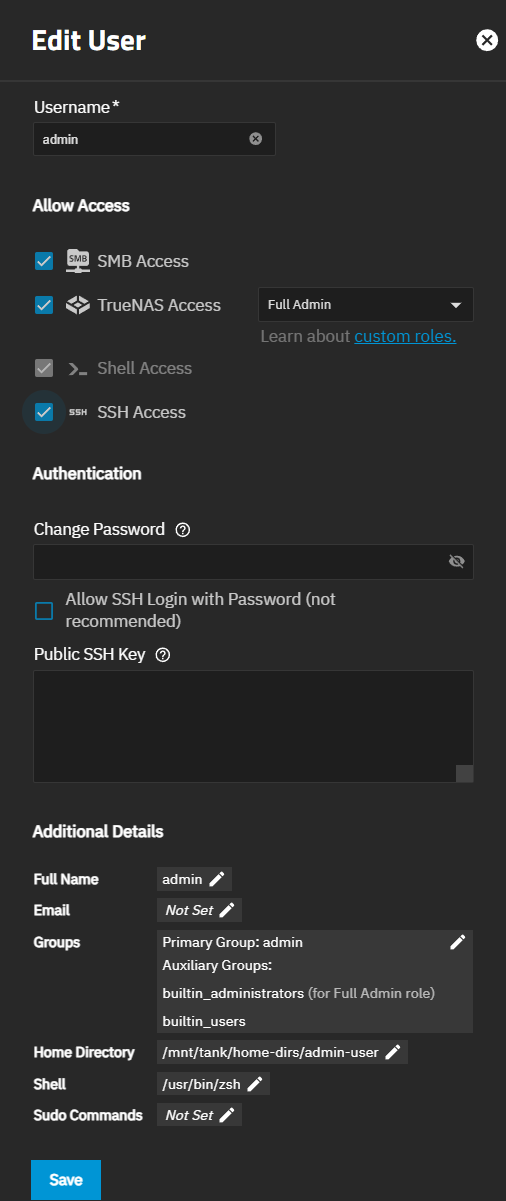
Edit the admin account. Select the user, and click Edit to open the Edit User screen.
Verify the user has TrueNAS Access selected and the full admin role selected, and the SSH Access selected to show the SSH authentication fields.
Paste the SSH public key text into the Public SSH Key field in the Authentication settings.
Do not paste the SSH private key.Click Save.
If you need to generate a new SSH key pair, see Generating SSH Keypairs.
If the remote NAS is not a TrueNAS system, refer to the documentation for that system and find its instructions on adding a public SSH key.
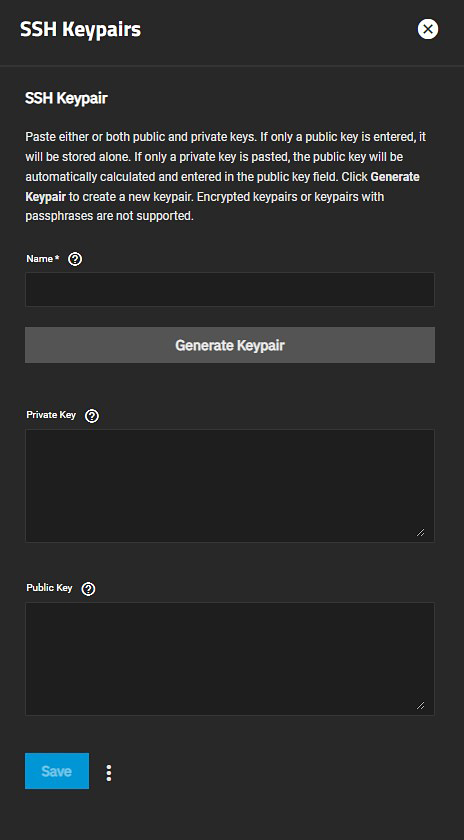
TrueNAS generates and stores RSA-encrypted SSH public and private key pairs on the SSH Keypairs widget found on the Credentials > Backup Credentials screen. Key pairs are generally used when configuring SSH Connections or SFTP Cloud Credentials. TrueNAS does not support encrypted key pairs or key pairs with passphrases.
TrueNAS automatically generates key pairs as needed when creating new SSH Connections or Replication tasks.
To manually create a new key pair:
- Click Add on the SSH Keypairs widget.
- Click Generate New on the SSH Keypairs screen.
- Give the new key pair a unique name and click Save. The key pair displays on the SSH Keypairs widget.
Click the vertical ellipsis at the bottom of the SSH Keypairs configuration screen to download these strings as text files for later use.


