Adding Cloud Credentials
13 minute read.
The Cloud Credentials screen, accessed from the Backup Credentials screen allows users to integrate TrueNAS with cloud storage providers.
These providers are supported for Cloud Sync tasks in TrueNAS:
- Amazon S3
- Backblaze B2
- Box
- Dropbox
- File Transfer Protocol (FTP)
- Google Cloud Storage
- Google Drive
- Google Photos
- Hypertext Transfer Protocol (HTTP)
- Hubic (closed to new accounts)
- Microsoft Azure Blob Storage
- Microsoft OneDrive
- OpenStack Swift
- pCloud
- SSH File Transfer Protocol (SFTP)
- Storj iX*
- WebDAV
- Yandex
*TrueCloud backup tasks streamline functionality for Storj iX cloud backups and restoration.
To maximize security, TrueNAS encrypts cloud credentials when saving them. However, this means that to restore any cloud credentials from a TrueNAS configuration file, you must enable Export Password Secret Seed when generating that configuration backup. Remember to protect any downloaded TrueNAS configuration files.
Authentication methods for each provider could differ based on the provider security requirements. You can add credentials for many of the supported cloud storage providers from the information on the Cloud Credentials Screens. This article provides instructions for the more involved providers.
We recommend you open another browser tab and log into the cloud storage provider account you intend to link with TrueNAS.
Some TrueNAS providers credentials require entering additional information generated while creating the provider account. For example, the Storj iX account produces an access and secret key that must be entered in the Cloud Credential screen to create the credential.
Have the authentication information required by your cloud storage provider on hand to make the process easier. Authentication information can include but is not limited to user credentials, access tokens, and access and security keys.
To add a cloud credential:
Select the cloud service from the Provider dropdown list. The provider required authentication option settings display.
For details on each provider authentication settings see Cloud Credentials Screens.
Enter a name for the credential.
Enter the required authentication credentials, such as access token, access key and/or secret keys, and user credentials for the account into the appropriate fields.
Click Verify Credentials to verify the entered credentials work.
Click Save.
Storj iX is the default cloud storage provider in TrueNAS.
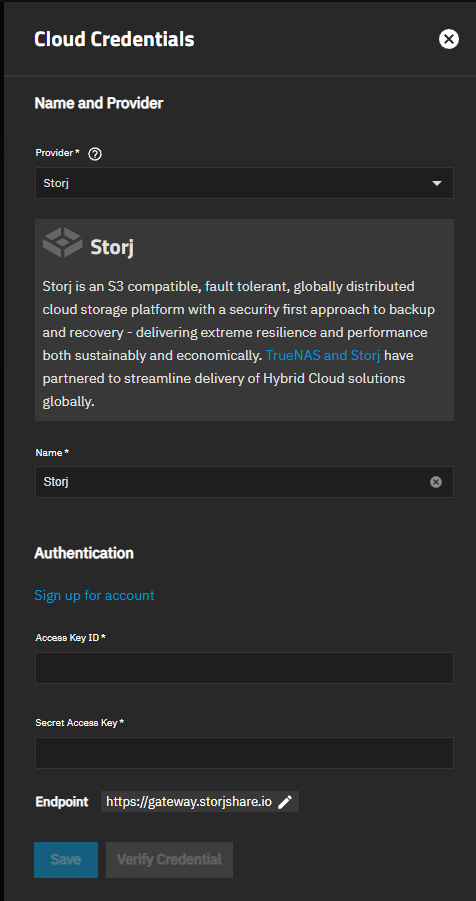
Go to Credentials > Backup Credentials and click Add on the Cloud Credentials widget. The Cloud Credentials screen opens with Storj displayed as the default provider in the Provider field.
Enter a descriptive name to identify the credential in the Name field.
You can create your Storj iX cloud service account using two methods:
- Go to the TrueNAS Storj web page and click Sign Up & Log in - iX-Storj.
- Go to Credentials > Backup Credentials and click Add. Select Storj iX as the Provider on the Cloud Credentials screen, then click Sign up for account.
The Storj Create your Storj account web page opens.
You must use this link to create your Storj account to take advantage of the benefits of the Storj iX pricing!
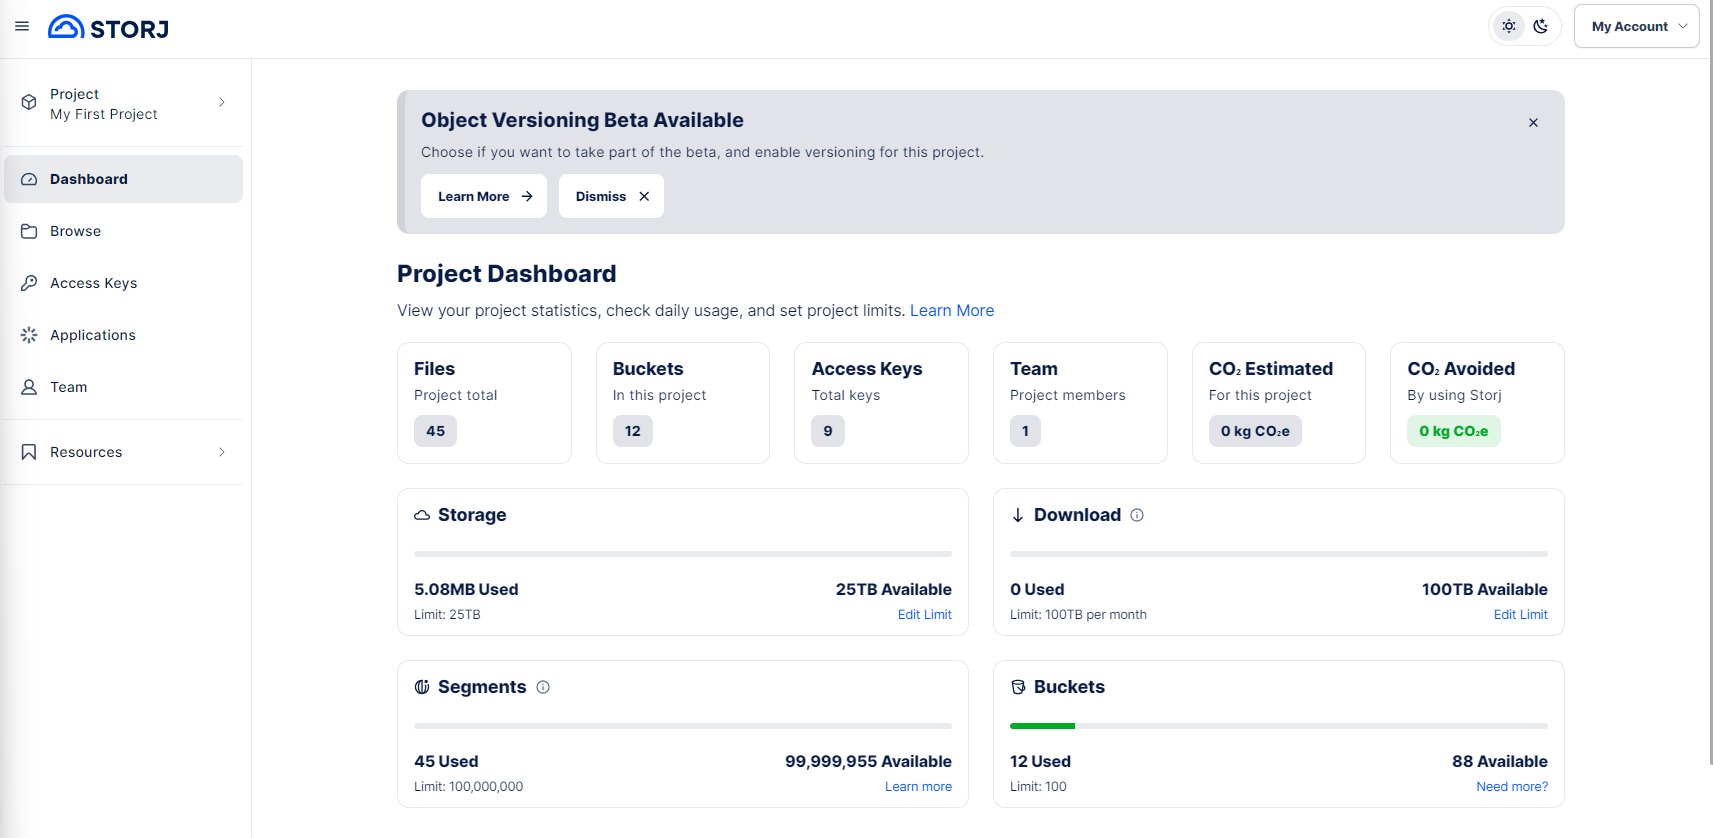
Enter your information in the fields, select the I agree to the Terms of Service and Privacy Policy, and click the button at the bottom of the screen. The Storj main dashboard opens.
After setting up your Storj iX account, set up Storj S3 access and create your Storj bucket.
The endpoint set in the Storj credential applies to all Cloud Sync Tasks that use that credential.
After creating your Storj account and obtaining your S3 credentials, optionally specify a custom Endpoint to use a specific Storj tier (such as Global or Select). Leave the Endpoint field blank to use the default Storj endpoint.
After creating your Storj iX account, add S3 access credentials.
Click Access Keys to open the Access Keys dashboard, then click New Access Key.
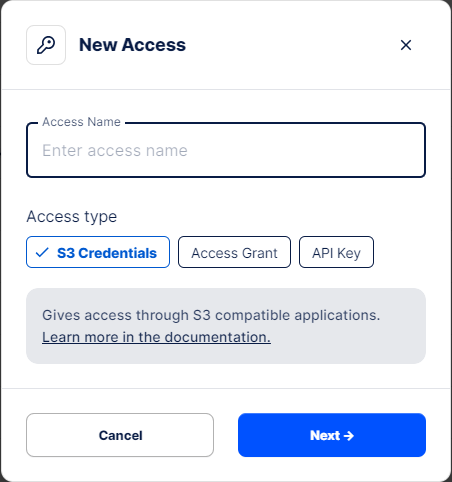
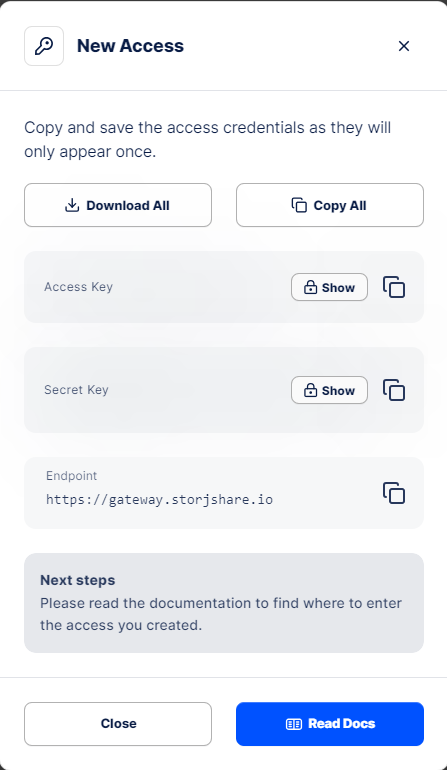
The New Access window opens.
Enter the name you want to use for this credential. Select S3 Credentials for access type, then click Next.
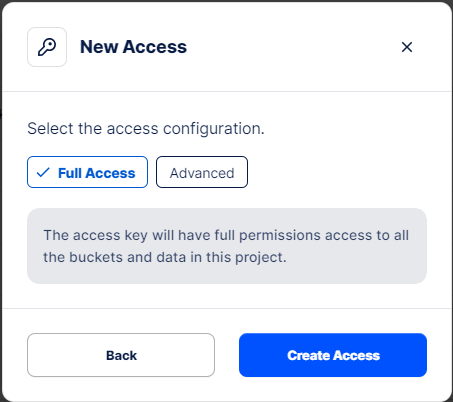
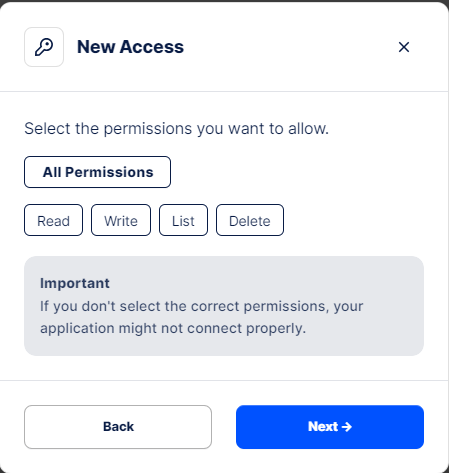
Select the permissions you want to allow this access key. Choose Full Access to allow permanent full permissions to all buckets and data then click Create Access or select Advanced then click Next to customize access configuration.
To enable TrueNAS to create new Storj buckets, set the access configuration to Full Access.(Optional) If configuring advanced access options:
a. Select the permissions to allow. Choose one or more of Read, Write, List, Delete, or choose All Permissions. Click Next.
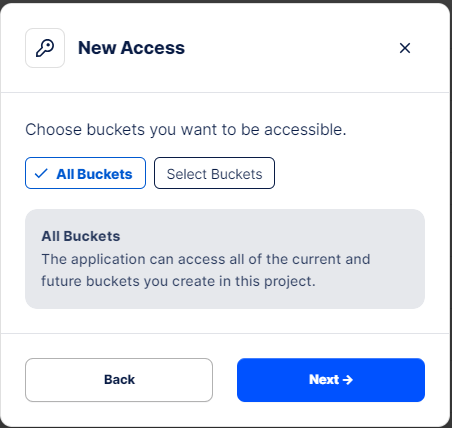
b. Select the buckets to allow access to. Click All Buckets or click Select Buckets and use the Buckets dropdown to select one or more bucket(s). Click Next.
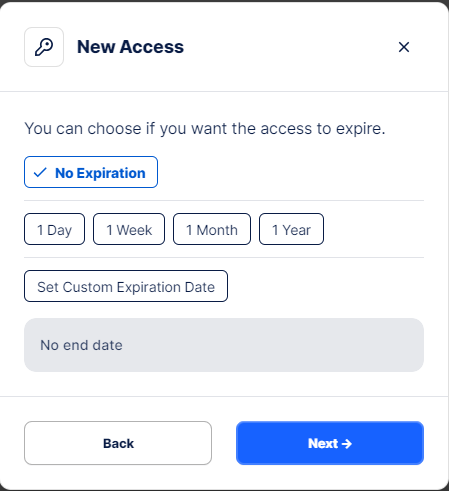
c. Select an expiration date if you want to set the duration or length of time to allow this credential to exist. You can select a preset period, click Set Custom Expiration Date to use the calendar to set the duration, or select No expiration. Click Next to open the Access Encryption window.
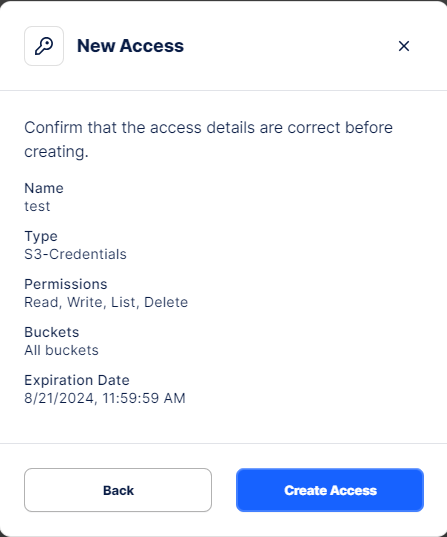
d. Review access details and then click Create Access.
Use Copy All or Download All to obtain the access key, secret key, and endpoint. Keep these in a safe place where you can back up the file.
Click Close.
Enter these keys in the Authentication fields in TrueNAS on the Cloud Credentials screen to complete setting up the cloud credential.
Enter the authentication information provided by Storj in the Access Key ID and Secret Access Key fields.
Click Verify Credentials and wait for the system to verify the credentials.
Click Save.
You can either create a TrueNAS compatible Storj bucket while configuring cloud credentials or wait to do so while configuring a TrueCloud back up or Cloud Sync task.
Not all Storj buckets are TrueNAS compatible. To create a TrueNAS-compatible bucket, either log in to Storj using the ix Storj affiliate link before creating the bucket in the Storj UI, or use the TrueNAS UI to create the bucket using the Add New option.
To create a Storj bucket from the TrueNAS UI:
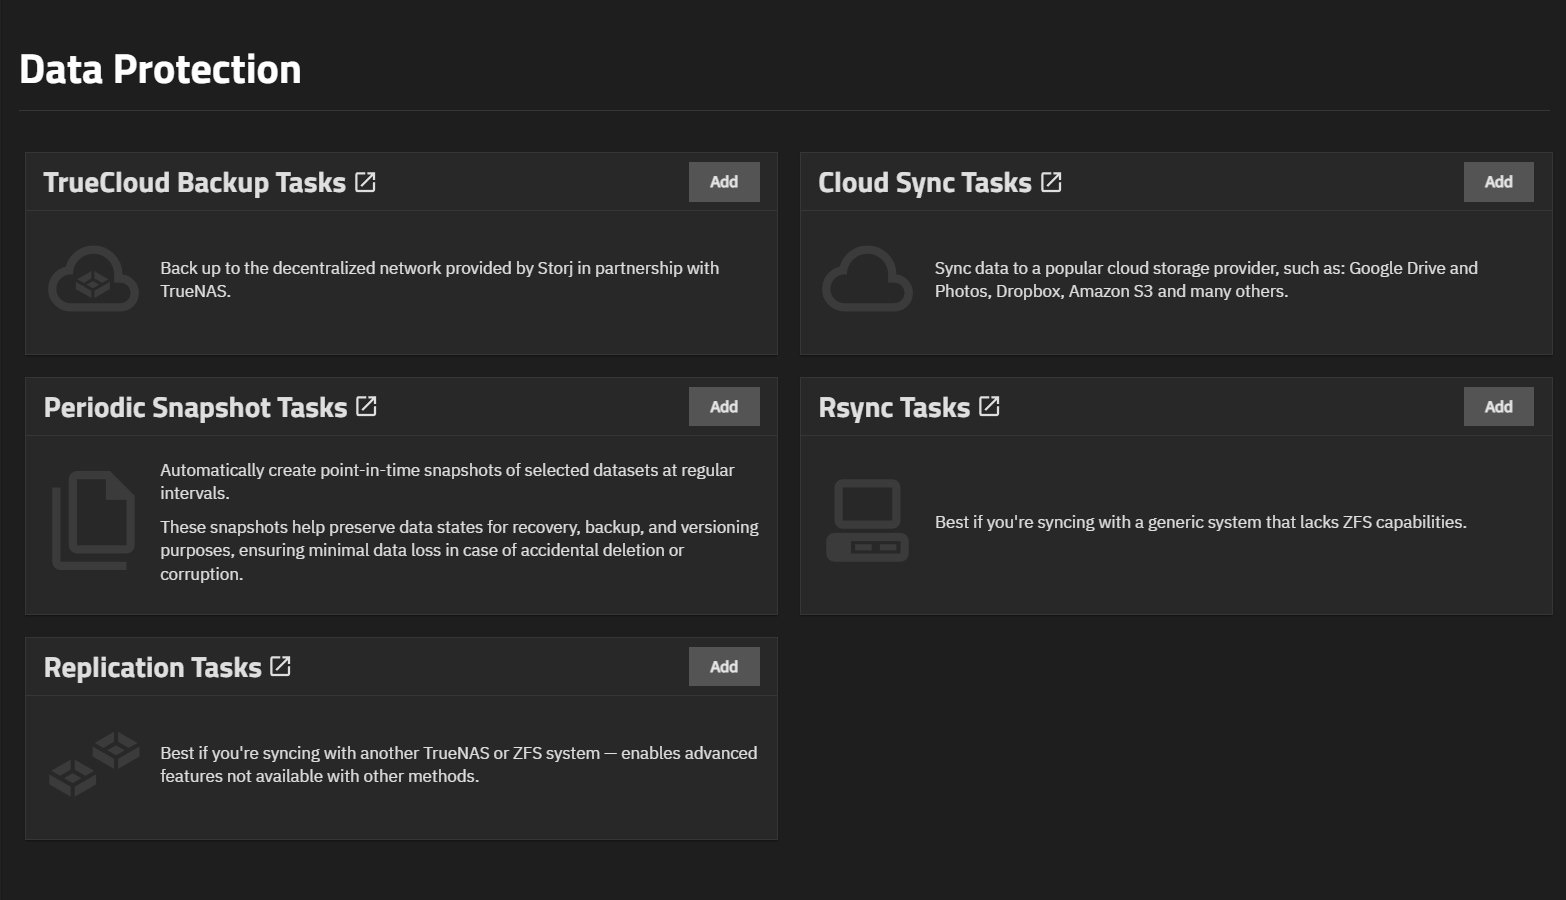
Go to Data Protection. Click Add on either the TrueCloud Backup Tasks or Cloud Sync Tasks widget.
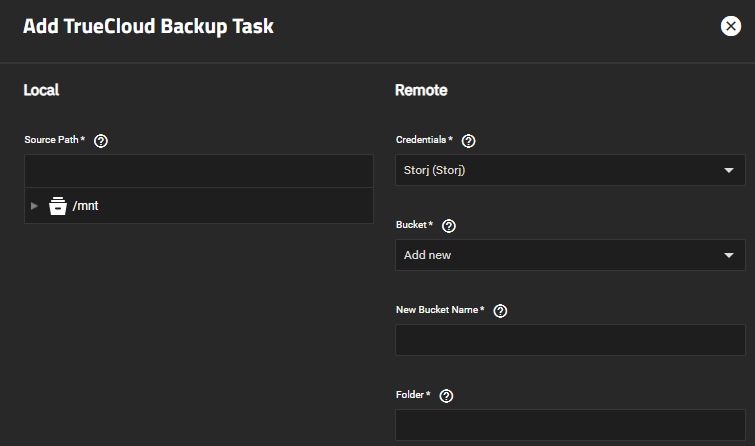
If using the Add TrueCloud Backup Task screen:
Select the stored Storj cloud credential from the Credentials dropdown. Do this as part of setting up a task.
Select Add New from the Bucket dropdown.
Enter a name for the new bucket. Only lowercase letters, numbers, and hyphens are allowed
Continue to configure the TrueCloud backup task, then click Save. TrueNAS creates the task and remote bucket on Storj.
If using the Cloud Sync Task Wizard:
Select the stored Storj cloud credential from the Provider > Credentials dropdown. Do this as part of setting up a task or use the wizard to create the bucket without saving a configured task.
Click Verify Credential for verification, then click Next to go to the What and When screen.
Select Add New to open the Add Bucket screen.
Enter a name for the new bucket.
Click Save. TrueNAS creates the remote bucket on Storj and then returns to the Cloud Sync Task Wizard.
When adding an Amazon S3 cloud credential, you can either use the default authentication settings or advanced settings if you want to include endpoint settings.
To add a cloud credential for Amazon S3, select Amazon S3 in Provider, enter a name and then:
Open a web browser tab to Amazon AWS.
Navigate to My account > Security Credentials > Access Keys to obtain the Amazon S3 secret access key ID. Access keys are alphanumeric and between 5 and 20 characters.
If you cannot find or remember the secret access key, go to My Account > Security Credentials > Access Keys and create a new key pair.
Enter or copy/paste the access key into Access Key ID.
Enter or copy/paste the Amazon Web Services alphanumeric password that is between 8 and 40 characters into Secret Access Key
(Optional) Enter a value to define the maximum number of chunks for a multipart upload in Maximum Upload Ports. Setting a maximum is necessary if a service does not support the 10,000-chunk AWS S3 specification.
(Optional) Select Advanced Settings to display the endpoint settings.
a. Enter the S3 API endpoint URL in Endpoint URL.
To use the default endpoint for the region and automatically fetch available buckets leave this field blank. For more information refer to the AWS Documentation for a list of Simple Storage Service Website Endpoints.
b. Enter an AWS resources in a geographic area in Region.
To detect the correct public region for the selected bucket leave the field blank. Entering a private region name allows interaction with Amazon buckets created in that region.
c. (Optional) Configure a custom endpoint URL.
d. (Optional) Select Disable Endpoint Region to prevent automatic detection of the bucket region. Enable only if your AWS provider does not support regions.
d. (Optional) Select Use Signature Version 2 to force using signature version 2 with the custom endpoint URL. Select only if your AWS provider does not support default version 4 signatures. For more information on using this to sign API requests see Signature Version 2.
Click Verify Credentials to check your credentials for any issues.
Click Save
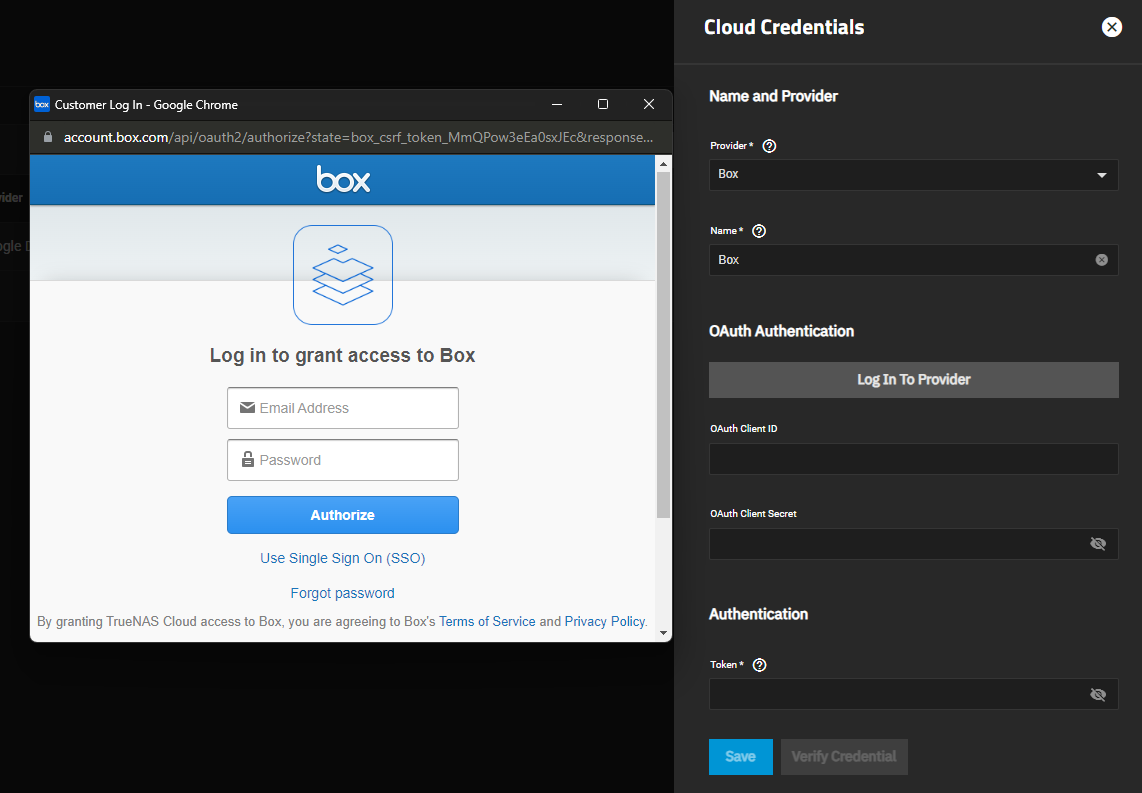
Cloud storage providers using OAuth as an authentication method are Box, Dropbox, Google Drive, Google Photos, pCloud, and Yandex. Some providers like Google Drive and pCloud use additional settings to authenticate credentials.
Open the Cloud Credentials screen, select the name of the cloud storage provider on the Provider dropdown list, enter a name for the credential, and then:
Enter the provider account email in OAuth Client ID and the password for that user account in OAuth Client Secret.
Click Log In To Provider. The Authentication window opens. Click Proceed to open the OAuth credential account sign-in window.
Yandex displays a cookies message you must accept before you can enter credentials.
Enter the provider account user name and password to verify the credentials.
(Optional) Enter the value for any additional authentication method. For pCloud, enter the pCloud host name for the host you connect to in Hostname. For Google Drive when connecting to Team Drive, enter the Google Drive top-level folder ID.
Enter the access token from the provider if not populated by the provider after OAuth authentication. Obtaining the access token varies by provider.
Provider Access Token Box For more information on the user access token for Box click here. An access token enables Box to verify a request belongs to an authorized session. Example token: T9cE5asGnuyYCCqIZFoWjFHvNbvVqHjl. Dropbox Create an access token from the Dropbox account. Google Drive The authentication process creates the token for Google Drive and populates the Access Token field automatically. Access tokens expire periodically, so you must refresh them. Google Photo Does not use an access token. pCloud Create the pCloud access token here. These tokens can expire and require an extension. Yandex Create the Yandex access token here. Click Verify Credentials to make sure you can connect with the entered credentials.
Click Save.
BackBlaze B2 uses an application key and key ID to authenticate credentials.
Open the Cloud Credentials screen, select BackBlaze B2 in Provider, enter a name and then:
Log into the BackBlaze account, go to the App Keys page, and add a new application key. Copy and paste this into Key ID.
Generate a new application key on the BackBlaze B2 website. From the App Keys page, add a new application key. Copy the application Key string Application Key.
Click Verify Credentials.
Click Save.
Google Cloud Storage uses a service account JSON file to authenticate credentials.
Open the Cloud Credentials screen, select Google Cloud Storage in Provider, enter a name and then:
Go to your Google Cloud Storage website to download this file to the TrueNAS server. The Google Cloud Platform Console creates the file.
Click Choose File to browse the server to locate the downloaded JSON file and upload it. The file populates Preview JSON Service Account Key For help uploading a Google Service Account credential file click here.
Click Verify Credentials.
Click Save.
OpenStack Swift authentication credentials change based on selections made in AuthVersion. All options use the user name, API key or password, and authentication URL, and can use the optional endpoint settings. For more information on OpenStack Swift settings, see rclone documentation.
Open the Cloud Credentials screen, select OpenStack Swift Cloud in Provider, enter a name for the credential and then:
Enter your OpenStack OS_USERNAME from an OpenStack credentials file in User Name.
Enter the OS_PASSWORD from an OpenStack credentials file in API Key or Password.
(Optional) Select the version from the AuthVersion. For more information see rclone documentation. Select the desired option based on your use case.
Click Verify Credentials.
Click Save.
Microsoft OneDrive uses OAuth authentication to connect TrueNAS to your cloud account.
Open the Cloud Credentials screen, select Microsoft OneDrive in Provider, enter a name and then:
Click Log In To provider to open the Microsoft sign-in page in a new window. You can confirm the intended authorization in the new window.
Confirm the authorization to enter your Microsoft login information. After logging in to your account, Microsoft prompts you to give TrueNAS access to your Microsoft information.
Give TrueNAS access to your Microsoft account and close the pop-up window. Your Cloud Credentials wizard should now say Logged In To Provider and have populated OAuth Client ID, OAuth Client Secret, Access Token, and Drive Account Type fields.
(Optional) Select an entry from the Drives List drop-down menu. This will also populate the Drive ID field.
Choose a drive from your OneDrive account and enter the ID in this field. If you selected an entry for Drives List, this field should already be populated with a valid ID.
Click Save.
Some providers can automatically populate the required authentication strings by logging in to the account.
To automatically configure the credential, click Login to Provider and enter your account user name and password.
We recommend verifying the credential before saving it.


