TrueNAS SCALE Documentation Archive
This content follows the TrueNAS SCALE 24.04 (Dragonfish) releases. Archival documentation is provided for reference only and not actively maintained.
Use the Product and Version selectors above to view content specific to different TrueNAS software or major version.
Managing SMB Shares
8 minute read.
When creating a share, do not attempt to set up the root or pool-level dataset for the share. Instead, create a new dataset under the pool-level dataset for the share. Setting up a share using the root dataset leads to storage configuration issues.
To access SMB share management options, go to Shares screen with the Windows (SMB) Shares widget. The widget lists SMB shares configured on but is not the full list. Each share listed includes four icons that open other screens or dialogs that provide access to share settings. To see a full list of shares, click on Windows (SMB) Shares to open the Sharing > SMB screen. Each share row on this screen provides access to the other screens or dialogs with share settings.
SCALE has implemented administrator roles to further comply with FIPS security hardening standards. The Sharing Admin role allows the user to create new shares and datasets, modify the dataset ACL permissions, and to start/restart the sharing service, but does not permit the user to modify users to grant the sharing administrator role to new or existing users.
Full Admin users retain full access control over shares and creating/modifying user accounts.
To manage an SMB share click the icons on the widget or use the on the Sharing > SMB details screen to see the options for the share you want to manage. Options are:
Edit opens the Edit SMB screen where you can change settings for the share.
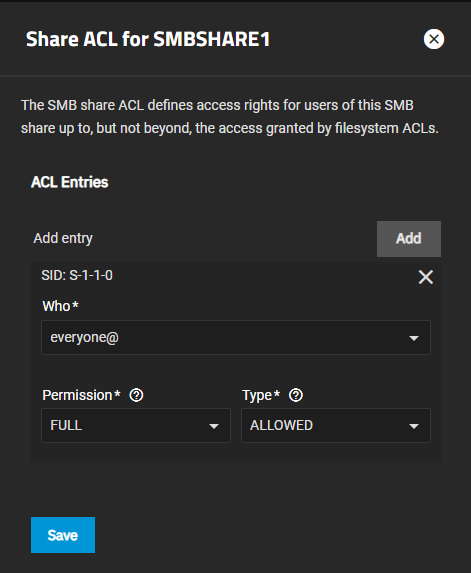
Edit Share ACL opens the Share ACL screen where you can add or edit ACL entries.
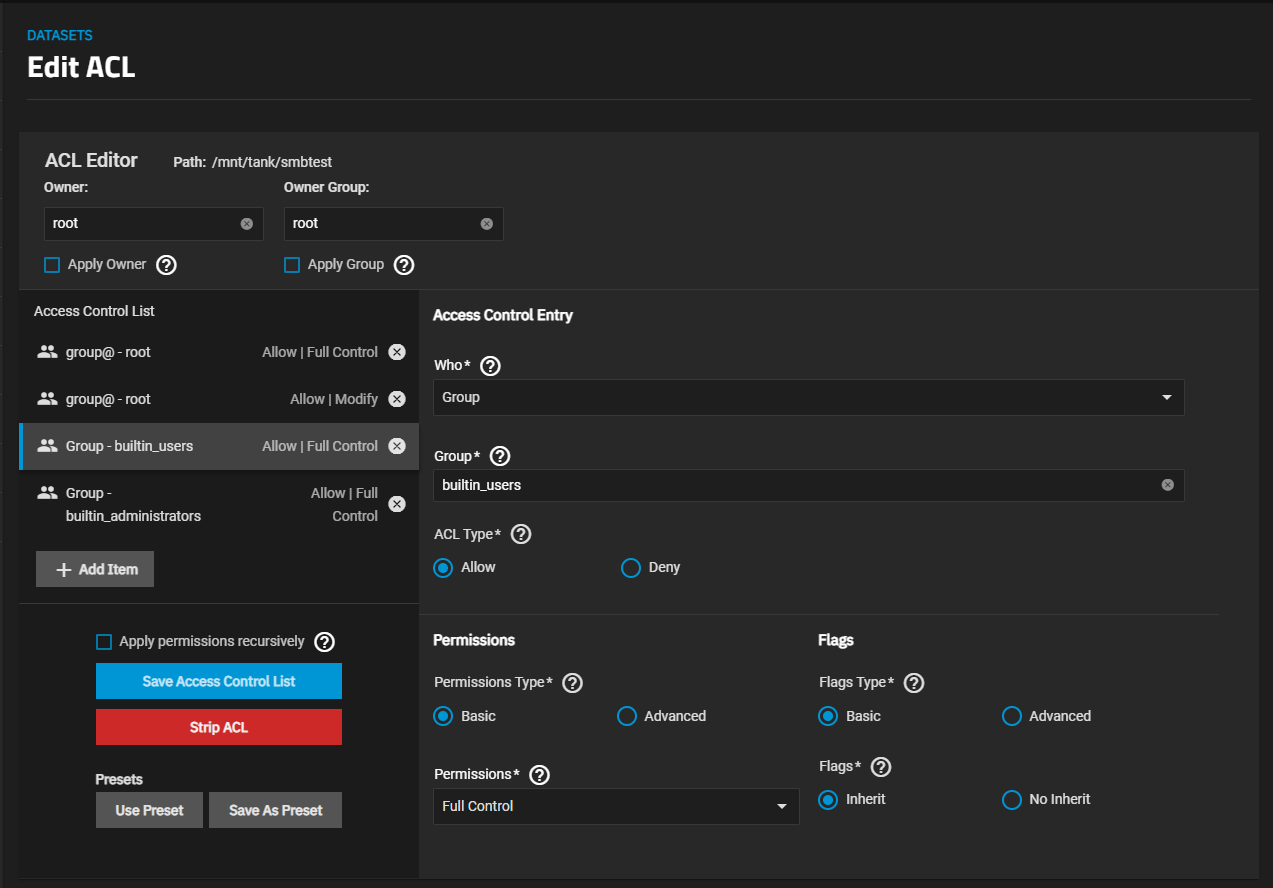
Edit Filesystem ACL opens the Edit ACL screen where you can edit the dataset permissions for the share. The Dataset Preset option determines the ACL type and therefore the ACL Editor screen that opens.
Delete opens a delete confirmation dialog. Use this to delete the share and remove it from the system. Delete does not affect shared data.
You have two options that modify ACL permissions for SMB shares:
Edit Share ACL where you modify ACL permissions applying to the entire SMB share.
Edit Filesystem ACL where you modify ACL permissions at the shared dataset level.
See the ACL Primer for general information on Access Control Lists (ACLs) in general, the Permissions article for more details on configuring ACLs, and Edit ACL Screen for more information on the dataset ACL editor screens and setting options.
You cannot access SMB shares with the root user. Change the SMB dataset ownership to the admin user (Full Admin user).
Using the Edit Share ACL option configures the permissions for just the share, but not the dataset the share uses. The permissions apply at the SMB share level for the selected share. They do not apply to other file sharing protocol clients, other SMB shares that export the same share path (i.e., /poolname/shares specified in Path), or to the dataset the share uses.
After creating the share and dataset, modify the share permissions to grant user or group access.
Click on Edit Share ACL icon to open the Edit Share ACL screen if you want to modify permissions at the share level.
Select either User in Who, then the user name in User, and then set the permission level using Permissions and Type.
(Optional) Click Add then select Group, the group name, and then set the group permissions.
Click Save.
See Permissions for more information on setting user and group settings.
You cannot access SMB shares with the root user. Change the SMB dataset ownership to the admin user (Full Admin user).
To configure share owner, user and group permissions for the dataset Access Control List (ACL), use the Edit Filesystem ACL option. This modifies the ACL entry for the SMB share the path (defined in Path) at the dataset level. To customize permissions, add Access Control Entries (ACEs) for users or groups.
To access the dataset (filesystem) permissions, either click the «span class=“material-icons”>security> Edit Filesystem ACL icon on the share row to open the Edit ACL screen for the dataset the share uses. You can also go to Datasets, select the dataset the share uses (same name as the share), then click Edit on the Permissions widget to open the Edit ACL screen.
Samba Authentication selected by default when SMB share users are created or added to TrueNAS SCALE manually or through a directory service, and these users are automatically added to the builtin-users group. Users in this group can add or modify files and directories in the share.
The share dataset ACL includes an ACE for the builtin-users group, and the @owner and @group are set to root by default. Change the @owner and @group values to the admin (Full admin) user and click Apply under each.
To restrict or grant additional file permissions for some or all share users, do not modify the builtin-users group entry. Best practice is to create a new group for the share users that need different permissions, reassign these users to the new group and remove them from builtin-users group. Next, edit the ACL by adding a new ACE entry for the new group, and then modify the permissions of that group.
Home users can modify the builtin-users group ACE entry to grant FULL_CONTROL
If you need to restrict or increase permissions for some share users, create a new group and add an ACE entry with the modified permissions.
To change permissions for the builtin_users group, go to Datasets, select the share dataset, and scroll down to the Permissions widget.
Click Edit to open the Edit ACL screen. Locate the ACE entry for the builtin-users group and click on it.
Check the Access Control List area to see the if the permissions are correct.
Enter or select Group in the Who field.
Begin typing builtin_users in the Group field until it displays, then click on it to populate the field.
Select Basic in the Permissions area then select the level of access you want to assign in the Permissions field. For more granular control, select Advanced then select on each permission option to include.
Click Save Access Control List to add the ACE item or save changes.
To change the permission level for some share users, add a new group, reassign the user(s) to the new group, then modify the share dataset ACL to include this new group and the desired permissions.
Go to Local Groups, click Add and create the new group.
Go Local Users, select a user, click Edit, remove the builtin-user entry from Auxiliary Groups and add the new group. Click Save. Repeat this step for each user or change the group assignment in the directory server to the new group.
Edit the filesystem (dataset) permissions. Use one of the methods to access the Edit ACL screen for the share dataset.
Add a new ACE entry for the new group. Click Add Item.
Select Group in the Who field, type the name into the Group field, then set the permission level.
Select Basic in the Permissions area then select the level of access you want to assign in the Permissions field. For more granular control, select Advanced then select on each permission option to include.
Click Save Access Control List.
If restricting this group to read only and the share dataset is nested under parent datasets, go to each parent dataset, edit the ACL. Add an ACE entry for the new group, and select Traverse. Keep the parent dataset permission set to either Full_Control or MODIFY but select Traverse.
If a share dataset is nested under other datasets (parents), you must add the ACL Traverse permission at the parent dataset level(s) to allow read-only users to move through directories within an SMB share.
After adding the group and assigning it to the user(s), next modify the dataset ACLs for each dataset in the path (parent datasets and the share dateset).
Add the new group to the share ACL. Use one of the methods to access the Edit ACL screen for the share dataset.
Add a new ACE entry for the new group. Click Add Item to create an ACE for the new group.
Select Group in the Who field, type the name into the Group field, then set the permission level.
Click Save Access Control List.
Return to the Datasets screen, locate the parent dataset for the share dataset, use one of the methods to access the Edit ACL screen for the parent dataset.
Add a new ACE entry for the new group. Click Add Item to create an ACE for the new group.
Select Group in the Who field, type the name into the Group field, then select Traverse.
Click Save Access Control List.
Repeat for each parent dataset in the path. This allows the restricted share group to navigate through the directories in the path to the share dataset.


