TrueNAS SCALETrueNAS SCALE Version Documentation
This content follows the TrueNAS SCALE 23.10 (Cobia) releases. Use the Product and Version selectors above to view content specific to different TrueNAS software or major version.

Virtualization Screens

  22 minute read.

Last Modified 2023-12-20 09:58 EST

The Virtualization option displays the Virtual Machines screen that displays the list of VMs configured on the TrueNAS SCALE system.

VirtualMachinesScreenwithVM

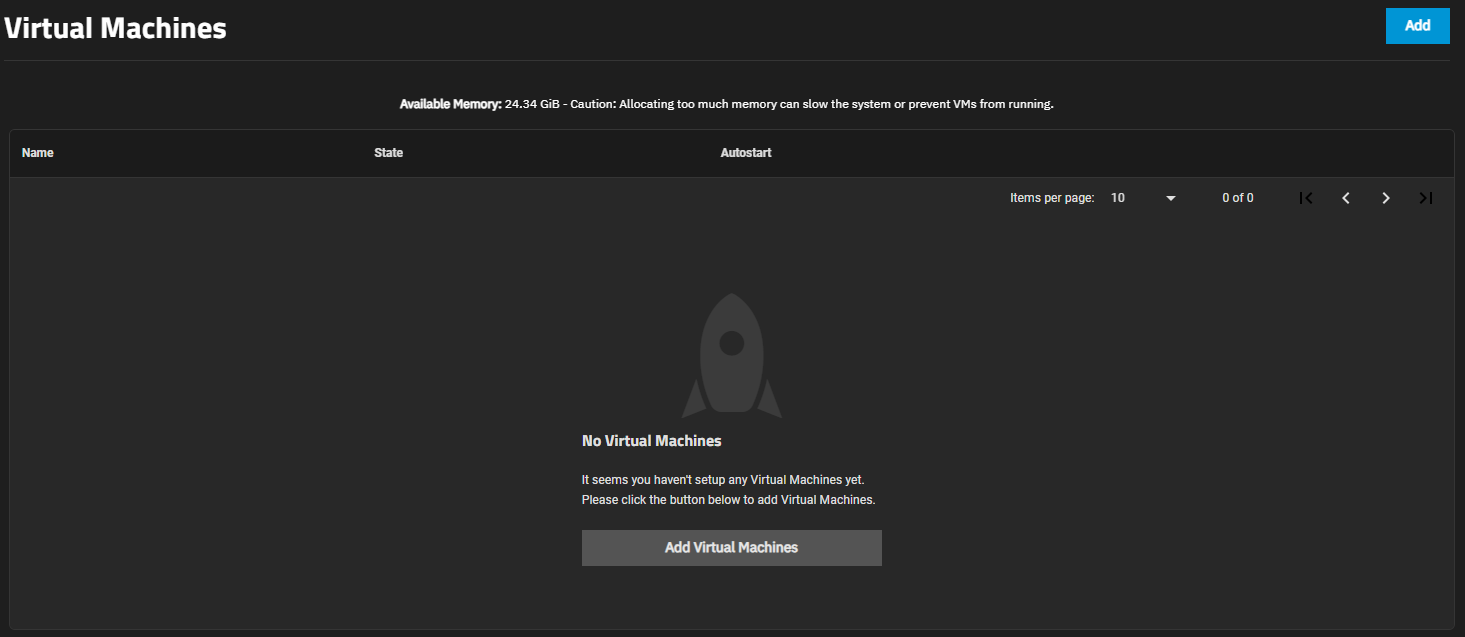
If there are no VMs configured on the system, the No Virtual Machines screen displays. This also displays if you delete all VMs on the system.
AddVMNoVMs

Add Virtual Machines and the Add button in the top right of the screen opens the Create Virtual Machine wizard configuration screens.

After adding virtual machines (VMs) to the system the screen displays a list of the VMs.

Click on the VM name or the expand down arrow to the right of a VM to open the details screen for that VM.

The State toggle displays and changes the state of the VM. The Autostart checkbox, when selected, automatically starts the VM if the system reboots. When cleared you must manually start the VM.

Create Virtual Machine Wizard Screens

The Create Virtual Machine configuration wizard displays all settings to set up a new virtual machine.

Use Next and Back to advance to the next or return to the previous screen to change a setting. Use Save to close the wizard screens and add the new VM to the Virtual Machines screen.

Operating System Screen

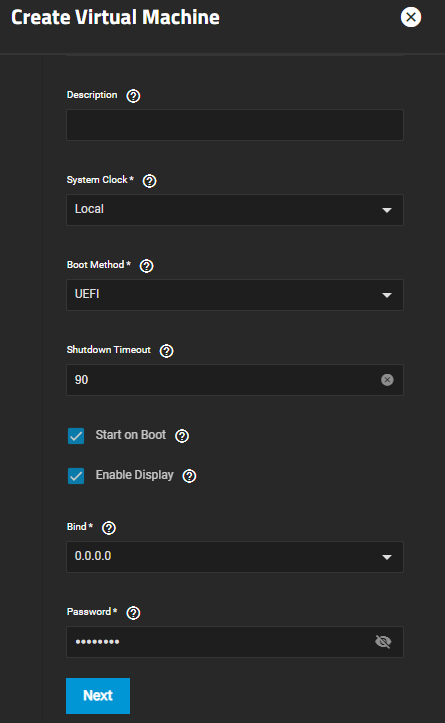
The Operating System configuration screen settings specify the VM operating system type, the time it uses, its boot method, and its display type.

AddVMOperSys

SettingDescription
Guest Operating SystemRequired. Select the VM operating system type from the dropdown list. Select from Windows, Linux or FreeBSD.
Enable Hyper-V EnlightenmentsOnly displays when Guest Operating System is set to Windows. This emulates a Hyper-V compatible hypervisor for the Windows guest operating system and makes some Hyper-V specific features available.
NameRequired. Enter an alphanumeric name for the virtual machine.
DescriptionOptional. Enter a description.
System ClockSelect the VM system time from the dropdown list. Options are Local or UTC. Default is Local.
Boot MethodSelect the boot method option from the dropdown list. Select UEFI for newer operating systems or Legacy BIOS for older operating systems that only support BIOS booting.
Shutdown TimeoutEnter the time in seconds the system waits for the VM to cleanly shut down. During system shutdown, the system initiates power-off for the VM after the shutdown timeout entered expires.
Start on BootSelect to start this VM when the system boots.
Enable DisplayEnable a Display (Virtual Network Computing) remote connection. Requires UEFI booting.
BindDisplays when Enable Display is selected. Select the IP address option from the dropdown list. The primary interface IP address is the default. A different interface IP address can be chosen.
PasswordDisplays when Enable Display is selected. Enter a password that the display device uses to securely access the VM.

CPU and Memory Screen

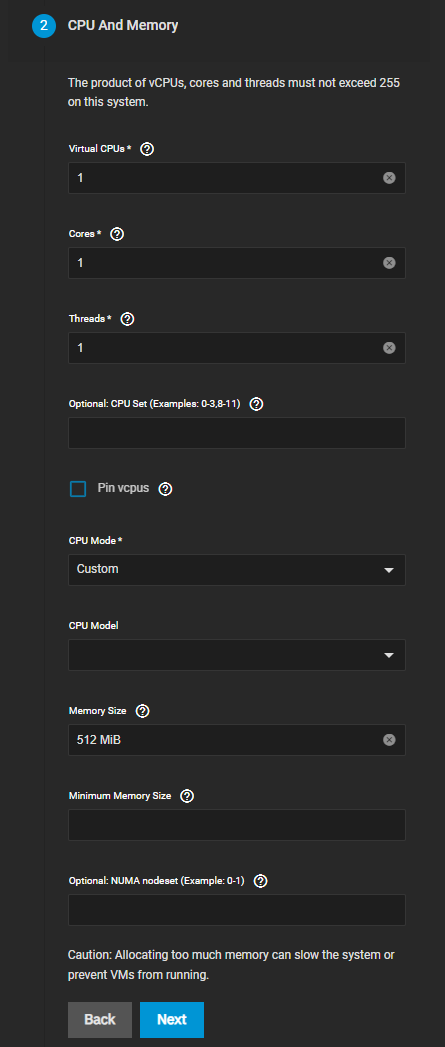
The CPU and Memory configuration wizard screen settings specify the number of virtual CPUs to allocate to the virtual machine, cores per virtual CPU socket, and threads per core. Also to specify the CPU mode and model, and the memory size.

AddVMMemory

SettingDescription
Virtual CPUsRequired. Enter the number of virtual CPUs to allocate to the virtual machine. The maximum is 16, or fewer if the host CPU limits the maximum. The VM operating system might impose operational or licensing restrictions on the number of CPUs. Default setting changes with the option selected in Guest OS, for Windows it is 2, for Unix-Type it is 1.
CoresRequired. Enter the number of cores per virtual CPU socket. The product of vCPUs, cores, and threads must not exceed 16.
ThreadsRequired. Enter the number of threads per core. A single CPU core can have up to two threads per core. A dual core could have up to four threads. The product of vCPUs, cores, and threads must not exceed 16.
Optional: CPU Set (Examples: 0-3,8-11)Specify the logical cores that VM is allowed to use. Better cache locality can be achieved by setting CPU set base on CPU topology. E.g. to assign cores: 0,1,2,5,9,10,11 you can write: 1-2,5,9-11
Pin vcpusWhen the number of vCPUs equals the number of CPUs in CPU Set, vCPUs can be automatically pinned into CPU Set. Pinning is done by mapping each vCPU into a single CPU number following the order in CPU Set. This improves CPU cache locality and can reduce possible stutter in GPU passthrough VMs.
CPU ModeSelect the CPU mode attribute from the dropdown list to allow your guest VM CPU to be as close to the host CPU as possible. Select Custom to make it so a persistent guest virtual machine sees the same hardware no matter what physical physical machine the guest VM boots on. It is the default if the CPU mode attribute is not specified. This mode describes the CPU presented to the guest. Select Host Model to use this shortcut to copying the physical host machine CPU definition from the capabilities XML into the domain XML. As the CPU definition copies just before starting a domain, a different physical host machine can use the same XML while still providing the best guest VM CPU each physical host machine supports. Select Host Passthrough when the CPU visible to the guest VM is exactly the same as the physical host machine CPU, including elements that cause errors within libvirt. The downside of this is you cannot reproduce the guest VM environment on different hardware.
CPU ModelSelect a CPU model to emulate.
Memory SizeAllocate RAM for the VM. Minimum value is 256 MiB. This field accepts human-readable input (Ex. 50 GiB, 500M, 2 TB). If units are not specified, the value defaults to bytes.
Minimum Memory SizeOptional. Enter to enable a variable RAM amount as needed within a range between this value and the one entered in Memory Size.
Optional: NUMA nodeset (Example: 0-1)Node set allows setting NUMA nodes for multi NUMA processors when CPU set was defined. Better memory locality can be achieved by setting nodeset based on the assigned CPU set. Example: if CPUs 0,1 belong to NUMA node 0, setting nodeset to 0 improves memory locality.

Disks Screen

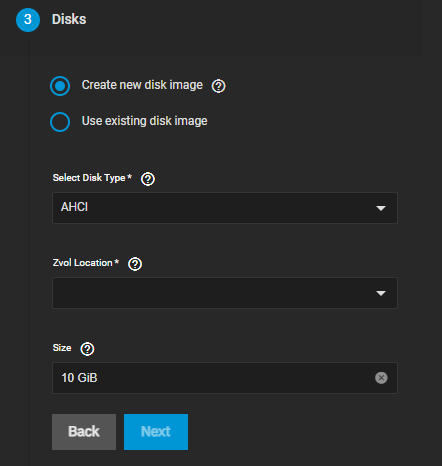
The Disks configuration wizard screen settings specify whether to create a new zvol on an existing dataset for a disk image or use an existing zvol or file for the VM. You also specify the disk type, zvol location and size.

CreateVirtualMachineDisks

SettingDescription
Create new disk imageSelect this radio button to create a new zvol on an existing dataset to use as a virtual hard drive for the VM.
Use existing disk imageSelect this radio button to use an existing zvol or file for the VM. Displays the Select Existing Zvol dropdown list field.
Select Disk TypeSelect desired disk type as either AHCI or VirtIO from the dropdown list. Select AHCI for Windows VMs. VirtIO requires a guest OS that supports VirtIO paravirtualized network drivers.
Zvol LocationSelect a dataset for the new zvol from the dropdown list of datasets on the system.
SizeRequired. Allocate space for the new zvol. (Examples: 500 KiB, 500M, 2 TB). Units smaller than MiB are not allowed.
Select Existing ZvolDisplays after selecting the Use existing disk image radio button. Select an existing zvol from the dropdown list of zvols on the system.

Network Interface Screen

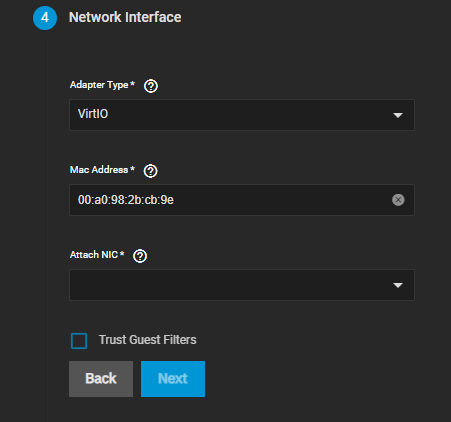
The Network Interface screen settings specify the network adapter type, mac address and the physical network interface card associated with the VM.

AddVMNetwork

SettingDescription
Adapter TypeSelect the adapter type from the dropdown list. Intel e82545 (e1000) emulates the same Intel Ethernet card and provides compatibility with most operating systems. VirtIO provides better performance when the operating system installed in the VM supports VirtIO para-virtualized network drivers.
Mac AddressEnter the desired address into the field to override the randomized MAC address.
Attach NICSelect the physical interface to associate with the VM from the dropdown list.
Trust Guest FiltersDefault setting is not enabled. Set this attribute to allow the virtual server to change its MAC address. As a consequence, the virtual server can join multicast groups. The ability to join multicast groups is a prerequisite for the IPv6 Neighbor Discovery Protocol (NDP).
Setting Trust Guest Filters to “yes” has security risks, because it allows the virtual server to change its MAC address and so receive all frames delivered to this address.

Installation Media Screen

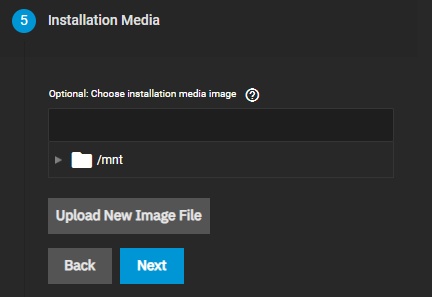
The Installation Media screen settings specify the operation system installation media image on a dataset or upload one from the local machine.

AddVMInstallMedia

SettingDescription
Choose Installation Media ImageEnter the path or browse to the operating system installer image file. To collapse the browse tree click on the to the left of /mnt.
Upload New Image FileSelect to open the Upload Image File dialog.

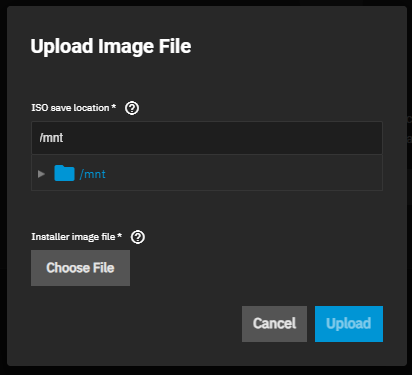
CreateVMWInstallMediaUploadSCALE

SettingDescription
ISO save locationEnter the path or browse to the location you want to install the image file.
Choose FileClick to save the path populated in the ISO save location field.
UploadClick to upload the file selected in the ISO save location field.

GPU Screen

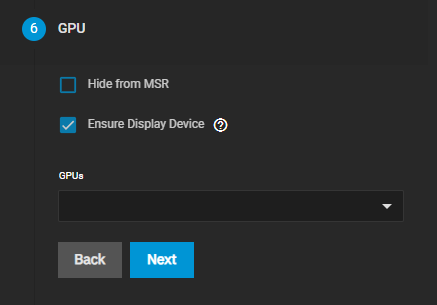
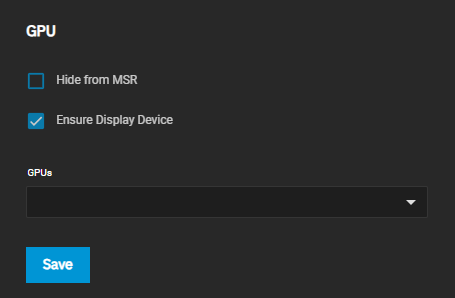
The GPU screen settings specify graphic processing unit (GPU) for the VM. It also provides the option to hide the VM from the Microsoft Reserved Partition (MSR) on Windows systems.

AddVMGPU

SettingDescription
Hide from MSRSelect to enable the VM to hide the GPU from the Microsoft Reserved Partition (MSR).
Ensure Display DeviceSelect to ensure that the guest always has access to a video device. Required for headless installations like ubuntu server for the guest to operate properly. Leave checkbox clear for cases where want to use a graphic processing unit (GPU) passthrough and do not want a display device added.
GPU’sSelect a physical GPU on your system from the dropdown list to use for the VM.

Confirm Options Screen

The Confirm Options screen displays the settings selected using the Create Virtual Machine wizard screens. It displays the number CPUs, cores, threads, the memory, name of the VM and the disk size.

Click Save to add the VM to the Virtual Machines screen. Click Back to return to the previous screens to make changes.

Virtual Machine Detail Screen

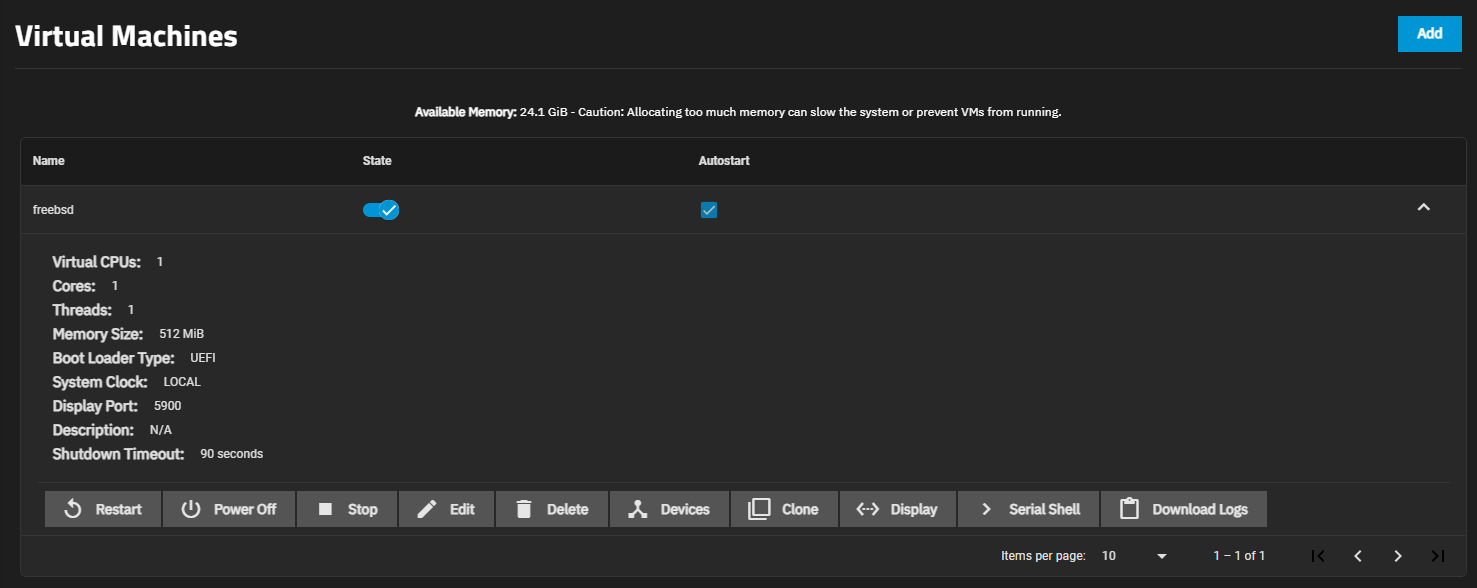
The details view of any VM displays the basic information on the number of virtual CPUS, cores, and threads, the amount of memory, boot load and system clock types, the display port number and the shutdown timeout in seconds.

VirtualMachinesScreenwithVMDetails

The buttons below the details show the actions options for each VM.

OperationIconDescription
StartStarts a VM. The toggle turns blue when the VM switches to running. Toggles to Stop. After clicking Start the Restart,Power Off, Display and Serial Shell option buttons display.
RestartreplayRestarts the VM.
Power Offpower_settings_newPowers off and halts the VM, similar to turning off a computer power switch.
StopStops a running VM. Because a virtual machine does not always respond well to STOP or the command might time-out if the VM does not have an OS. Use Power Off instead.
Editmode_editOpens the Edit Virtual Machine that displays editable VM settings. You cannot edit a VM while it is running. You must first stop the VM and then you can edit the properties and settings.
DeleteDeletes a VM. Opens a delete dialog that allows you to remove the VM from your system. You cannot delete a virtual machine that is running. You must first stop the VM and then you can delete it.
Devicesopens the Virtual Machine Devices screen with a list of virtual machine devices configured on the system.
CloneMakes an exact copy or clone of the VM that you can select and edit. Opens the Clone dialog that allows you to clone the selected VM. Enter a name for the cloned VM. Naming the clone VM is optional. The cloned VM displays on the Virtual Machines list with the extension _clone0. If you clone the same VM again the extension for the second clone is clone1.
DisplayOpens a browser window that allows you to connect to the Virtual Machine desktop.
Serial ShellOpens the TrueNAS VM Serial Shell screen.
Download Logscontent_pasteDownloads a .log file to the system.

Delete Virtual Machine Dialog

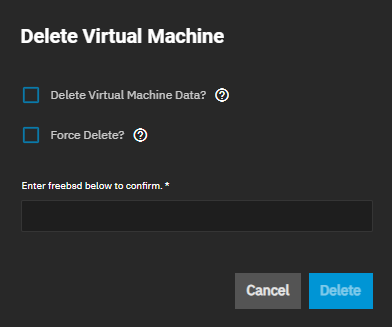
Delete removes the VM configuration from your system.

DeleteVirtualMachine

SettingDescription
Delete Virtual Machine DataSelect to remove the data associated with this virtual machine. This results in data loss if the data is not backed up. Leave unselected to keep the VM data intact.
Force DeleteSelect to ignore the virtual machine status during the delete operation. Leave unselected to prevent deleting the VM when it is still active or has an undefined state.
Enter vmname below to confirmEnter the name of the VM to confirm you want to delete the selected VM.

Clone Virtual Machine Window

The Clone option opens a Name dialog where you can enter an optional name for a clone or exact duplicate of the selected VM.

VM Serial Shell Screen

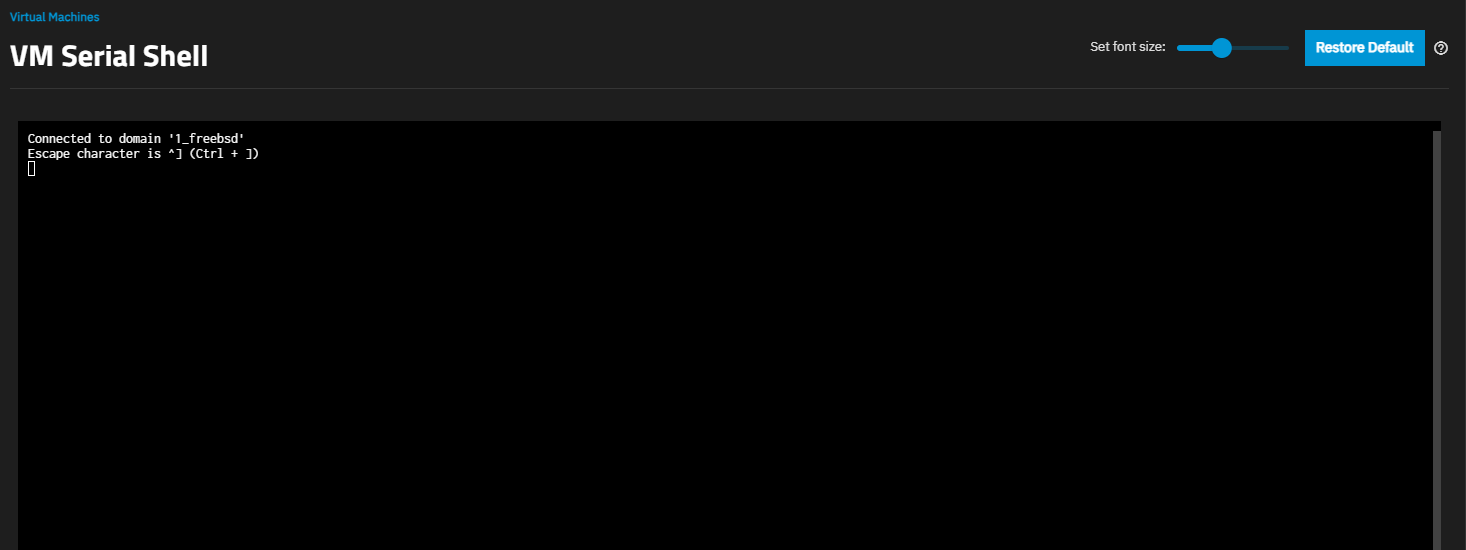
Serial Shell opens the VM Serial Shell window where you can enter commands for the selected virtual machine.

VMSerialShellScreen

Click Virtual Machines in the header to return to the Virtual Machine screen.

Edit Virtual Machine Screen

The Virtual Machine > Edit screens settings are a subset of those found on the Create Virtual Machine settings.

Edit General Settings

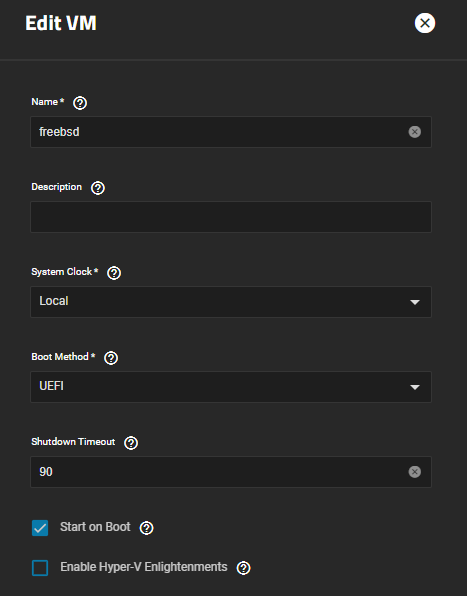
The Edit screen General Settings specify the basic settings for the VM. Unlike the Create Virtual Machine wizard, you cannot change the Enable or Start on Boot status or change the display type or bind address for a saved VM.

EditVMGeneralSettings

SettingDescription
NameRequired. Enter an alphanumeric name for the virtual machine.
DescriptionEnter a description (optional).
System ClockSelect the VM system time from the dropdown list. Options are Local or UTC. Default is Local.
Boot MethodSelect the boot method option from the dropdown list. Select UEFI for newer operating systems or Legacy BIOS for older operating systems that only support BIOS booting.
Shutdown TimeoutEnter the time in seconds the system waits for the VM to cleanly shut down. During system shutdown, the system initiates power-off for the VM after the shutdown timeout entered expires.
Start on BootSelect to start this VM when the system boots.
Enable Hyper-V EnlightenmentsKVM implements Hyper-V Enlightenments for Windows guests. These features make Windows think they’re running on top of a Hyper-V compatible hypervisor and use Hyper-V specific features. In some cases enabling these Enlightenments might improve usability and performance on the guest.

Edit CPU and Memory Settings

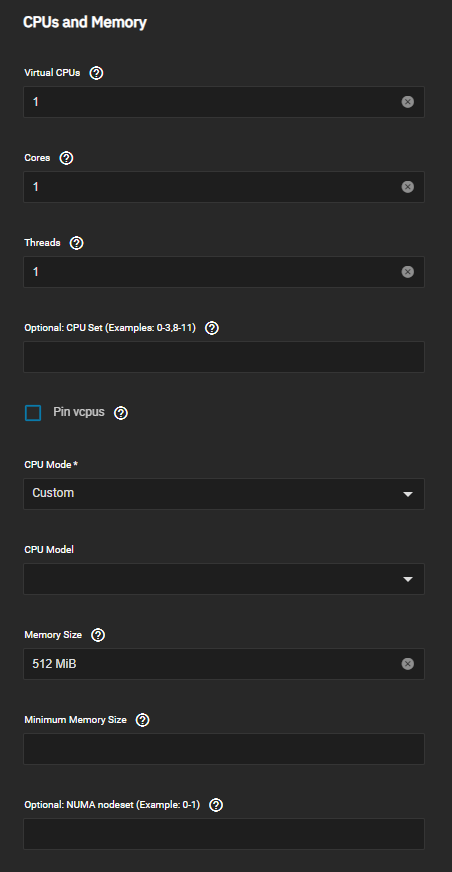
The Edit screen CPU and Memory settings are the same as those in the Create Virtual Machine wizard screen.

EditVMCPUandMemory

SettingDescription
Virtual CPUsRequired. Enter the number of virtual CPUs to allocate to the virtual machine. The maximum is 16, or fewer if the host CPU limits the maximum. The VM operating system might impose operational or licensing restrictions on the number of CPUs.
CoresRequired. Enter the number of cores per virtual CPU socket. The product of vCPUs, cores, and threads must not exceed 16.
ThreadsRequired. Enter the number of threads per core. A single CPU core can have up to two threads per core. A dual core could have up to four threads. The product of vCPUs, cores, and threads must not exceed 16.
Optional: CPU Set (Examples: 0-3,8-11)Specify the logical cores that VM is allowed to use. Better cache locality can be achieved by setting CPU set base on CPU topology. E.g. to assign cores: 0,1,2,5,9,10,11 you can write: 1-2,5,9-11
Pin vcpusWhen the number of vCPUs equals the number of CPUs in CPU Set, vCPUs can be automatically pinned into CPU Set. Pinning is done by mapping each vCPU into a single CPU number following the order in CPU Set. This improves CPU cache locality and can reduce possible stutter in GPU passthrough VMs.
CPU ModeSelect the CPU mode attribute from the dropdown list to allow your guest VM CPU to be as close to the host CPU as possible. Select Custom to make it so a persistent guest virtual machine sees the same hardware no matter what physical physical machine the guest VM boots on. It is the default if the CPU mode attribute is not specified. This mode describes the CPU presented to the guest. Select Host Model to use this shortcut to copying the physical host machine CPU definition from the capabilities XML into the domain XML. As the CPU definition copies just before starting a domain, a different physical host machine can use the same XML while still providing the best guest VM CPU each physical host machine supports. Select Host Passthrough when the CPU visible to the guest VM is exactly the same as the physical host machine CPU, including elements that cause errors within libvirt. The downside of this is you cannot reproduce the guest VM environment on different hardware.
CPU ModelSelect a CPU model to emulate.
Memory SizeAllocate RAM for the VM. Minimum value is 256 MiB. This field accepts human-readable input (Ex. 50 GiB, 500M, 2 TB). If units are not specified, the value defaults to bytes.
Minimum Memory SizeOptional. Enter to enable a variable RAM amount as needed within a range between this value and the one entered in Memory Size.
Optional: NUMA nodeset (Example: 0-1)Node set allows setting NUMA nodes for multi NUMA processors when CPU set was defined. Better memory locality can be achieved by setting nodeset based on the assigned CPU set. Example: if CPUs 0,1 belong to NUMA node 0, setting nodeset to 0 improves memory locality.

Edit GPU Settings

The Edit screen GPU settings are the same as those in the Create Virtual Machine wizard screens.

EditVMGpuSettings

SettingDescription
Hide from MSRSelect to enable the VM to hide the GPU from the Microsoft Reserved Partition (MSR).
Ensure Display DeviceSelect to ensure that the guest always has access to a video device. Required for headless installations like ubuntu server for the guest to operate properly. Leave checkbox clear for cases where want to use a graphic processing unit (GPU) passthrough and do not want a display device added.
GPU’sSelect a physical GPU on your system from the dropdown list to use for the VM.

Devices Screens

The Virtual Machines > Devices screen displays a list of VM devices configured on your system.

VMDevicesListed

Add opens the Virtual Machine > Devices > Add configuration screen. Settings change based on the various device types.

Device Actions

The more_vert displays a list of options for each device listed on the Devices screen.

Edit opens the Edit type Device screen where type is the device type selected. Settings vary based on the type of device in Device Type, and are the same as those on the Add Device screen. The Device Type setting only displays on the Add Device screens.

Delete opens a dialog. Delete Device confirms you want to delete the device.

Change Device Order opens a dialog for the selected device. Enter the number that represents the order the VM looks to the device during boot-up. The lower the number places the device earlier in the boot process.

Details displays an information dialog for the selected device that lists the port, type, bind IP and other details about the device. Click Close to close the dialog.

Devices Add Screens

The Add Device screen displays different settings based on the Device Type selected.

Add Device Type CD-ROM

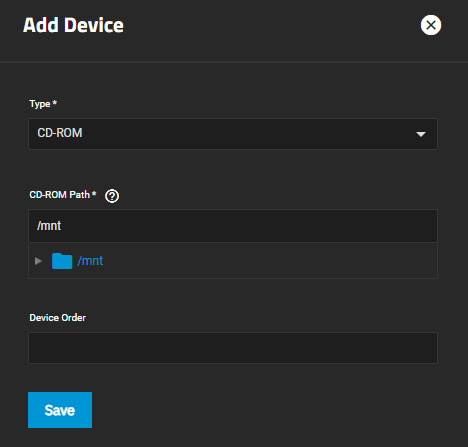
Select CD-ROM in Device Type in the Add device screen to see the CD-ROM settings.

VMAddDeviceCDROM

SettingDescription
TypeSelect the device type from the dropdown list. CD-ROM is the default setting.
CD-ROM PathUse the to the left of /mnt to browse to the location of the CD-ROM file on the system.
Device OrderEnter the number (such as 1003) that represents where in the boot order this device should be. The higher the number the later in the boot-up process the device falls. If you want the CD-ROM to be the first device checked assign it a lower number.

Add Device Type NIC

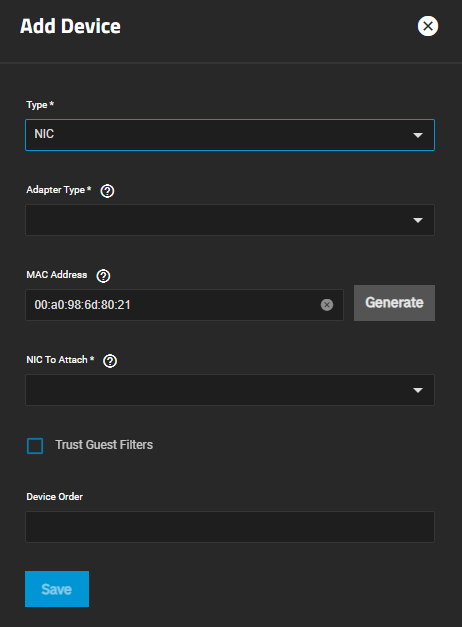
Select NIC in Device Type in the Add device screen to see the VM network interface card settings.

VMAddDeviceNIC

SettingDescription
TypeSelect the device type from the dropdown list.
Adapter TypeRequired. Select the emulator type from the dropdown list. Emulating an Intel e82545 (e1000) Ethernet card provides compatibility with most operating systems. Change to VirtIO to provide better performance on systems with VirtIO paravirtualized network driver support.
MAC AddressDisplays the default auto-generated random MAC address the VM receives. Enter a custom address to override the default.
GenerateClick to add a new randomized address in MAC Address.
NIC To attachSelect a physical interface from the dropdown list to associate with the VM.
Trust Guest FiltersDefault setting is not enabled. Set this attribute to allow the virtual server to change its MAC address. As a consequence, the virtual server can join multicast groups. The ability to join multicast groups is a prerequisite for the IPv6 Neighbor Discovery Protocol (NDP).
Setting Trust Guest Filters to “yes” has security risks, because it allows the virtual server to change its MAC address and so receive all frames delivered to this address.
Device OrderEnter the number (such as 1003) that represents where in the boot order this device should be. The higher the number the later in the boot-up process the device falls. If you want the CD-ROM to be the first device checked assign it a lower number.

Add Device Type Disk

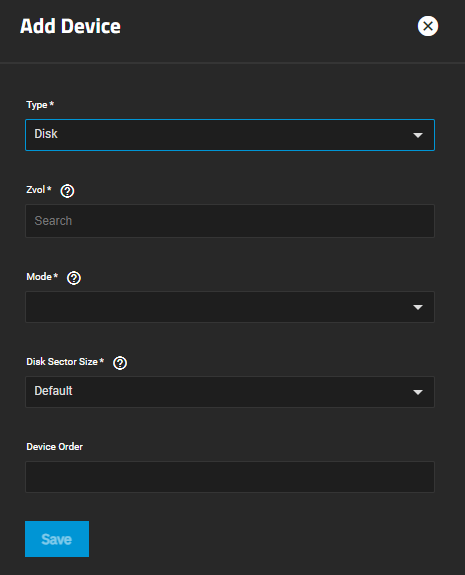
Select Disk in Device Type in the Add device screen to see the disk settings that include disk location, drive type and disk sector size.

VMAddDeviceDisk

SettingDescription
TypeSelect the device type from the dropdown list.
ZvolSelect the zvol path from the dropdown list.
ModeSelect the drive type from the dropdown list. Options are AHCI or VirtIO.
Disk sector sizeSelect the disk sector size from the dropdown list or leave set as Default. Options are Default, 512 or 4096.
Device OrderEnter the number (such as 1003) that represents where in the boot order this device should be. The higher the number the later in the boot-up process the device falls. If you want the CD-ROM to be the first device checked assign it a lower number.

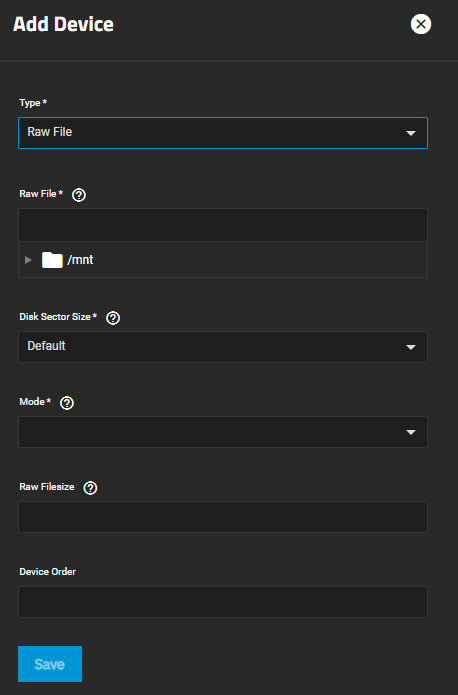
Add Device Type Raw File

Select Raw File in Device Type in the Add device screen to see the raw file settings that include location, size of the file, disk sector size, and type.

VMAddDeviceRawFile

SettingDescription
TypeSelect the device type from the dropdown list.
Raw FileEnter or use the to the left of /mnt to browse to the location of the file on the system.
Disk sector sizeSelect the disk sector size from the dropdown list or leave set as Default. Options are Default, 512 or 4096.
ModeSelect the drive type from the dropdown list. Options are AHCI or VirtIO.
Raw filesizeEnter the size of the file in GiB.
Device OrderEnter the number (such as 1003) that represents where in the boot order this device should be. The higher the number the later in the boot-up process the device falls. If you want the CD-ROM to be the first device checked assign it a lower number.

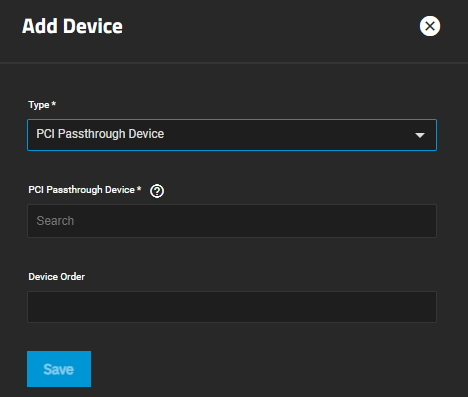
Add Device Type PCI Passthrough Device

Select PCI Passthrough Devicein Device Type in the Add device screen to see the PCI passthrough device settings.

Depending upon the type of device installed in your system, you might see a warning: PCI device does not have a reset mechanism defined. You might experience inconsistent or degraded behavior when starting or stopping the VM. Determine if you want to proceed with this action in such an instance.

VMAddDevicePCIpass

SettingDescription
TypeSelect the device type from the dropdown list.
PCI Passthrough DeviceEnter or select the device from the dropdown list of options. Enter as (bus#/slot#/fcn#).
Device OrderEnter the number (such as 1003) that represents where in the boot order this device should be. The higher the number the later in the boot-up process the device falls. If you want the CD-ROM to be the first device checked assign it a lower number.

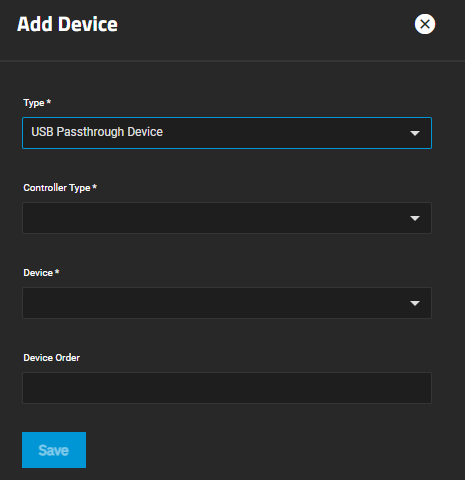
Add Device Type USB Passthrough Device

Select USB Passthrough Device in Device Type in the Add device screen to see the USB passthrough device settings.

VMAddDeviceUSBpass

SettingDescription
TypeSelect the device type from the dropdown list.
Controller TypeRequired. Choose from piix3-uhci, piix4-uhci, ehci, ich9-ehci1, vt82c686b-uhci, pci-ohci, nec-xhci, qemu-xhci.
DeviceEnter or select the device from the dropdown list of options. If Specify custom is chosen, enter the required Vendor ID and Product ID.
Device OrderEnter the number (such as 1003) that represents where in the boot order this device should be. The higher the number the later in the boot-up process the device falls. If you want the CD-ROM to be the first device checked assign it a lower number.

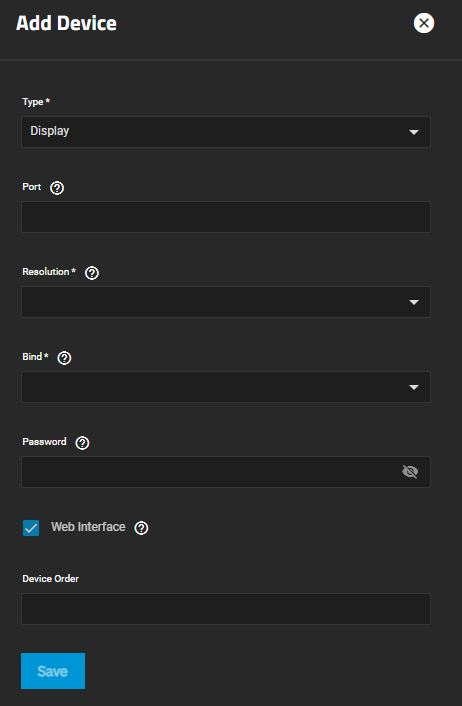
Add Device Type Display

Remote clients can connect to VM display sessions using a SPICE client, or by installing a 3rd party remote desktop server inside your VM. SPICE clients are available from the SPICE Protocol site.

Select Display in Device Type in the Add device screen to see the display device settings.

VMAddDeviceDisplay

SettingDescription
TypeSelect the device type from the dropdown list. Display is the default setting.
PortEnter the port number. You can assign 0, leave empty for TrueNAS to assign a port when the VM is started, or set to a fixed preferred port number.
ResolutionSelect a screen resolution to use for VM display sessions.
BindSelect an IP address to use for VM display sessions or use the default 0.0.0.0.
PasswordEnter a password of no more than eight characters in length to automatically pass to the VM display session.
Web InterfaceSelect to enable connecting to the VM display web interface.
Device OrderEnter the number (such as 1003) that represents where in the boot order this device should be. The higher the number the later in the boot-up process the device falls. If you want the CD-ROM to be the first device checked assign it a lower number.

Related Content

Related GPU Articles