TrueNAS Documentation Archive
This content follows the TrueNAS 23.10 (Cobia) releases. Archival documentation is provided for reference only and not actively maintained. Use the Product and Version selectors above to view content specific to different TrueNAS software or major version.
System Boot Screens
4 minute read.
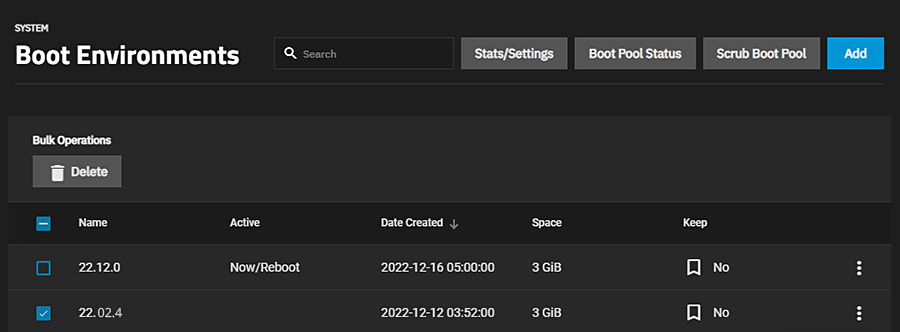
Last Modified 2023-08-03 10:49 EDTThe System Settings > Boot screen displays a list of boot environments on the TrueNAS system. Each time the system updates to a new software release, it creates a new boot environment.

Each boot environment on the list includes:
- Name which is the name of the boot entry as it appears in the boot menu.
- Active that indicates which entry boots by default if a boot environment is not active. Activated environment displays Non/Reboot.
- Date Created that shows the creation date and time.
- Space shows the boot environment size.
- Keep that indicates whether TrueNAS deletes this boot environment when a system update does not have enough space to proceed.
Select the checkbox(es) for each boot environment. Displays the Batch Operations that allows you to delete the selected environments at one time.

The vertical ellipsis displays a list of boot environment actions that change based on whether it is activated or not.
The vertical ellipsis for an environment displays actions available to that environment.
| Action | Boot State | Description |
|---|---|---|
| Activate | Deactivated | Opens the Activate dialog. Changes the System Boot screen status to Reboot and changes the current Active entry from Now/Reboot to Now, indicating that it is the current boot environment but is not used on next boot. |
| Clone | Both states | Opens the Clone Boot Environment window. Copies the selected boot environment into a new entry. Enter a new name using only alphanumeric characters, and/or the allowed dashes (-), underscores (_), and periods (.) characters. |
| Delete | Deactivated | Opens the Delete dialog. Does not display if the boot environment is activated/ You cannot deleted the default or activated boot environment. Removes the highlighted entry and also removes that entry from the boot menu. |
| Rename | Both states | Opens the Rename Boot Environment window. Enter a new name using only alphanumeric characters, and/or the allowed dashes (-), underscores (_), and periods (.) characters. |
| Keep | If set to false | Opens the Keep dialog, and toggles the boot environment action to Unkeep. Use to prevent the TrueNAS updater from automatically deleting the environment to make more space for a new environment when there is insufficient space for it. |
| Unkeep | If Keep is set to True | Opens the Unkeep dialog, and toggles the boot environment action to Keep. Use to allow TrueNAS updater to automatically delete the environment to make space for a new boot environment when there is not enough space for it. |
The System Settings > Boot screen displays four options at the top right of the screen.
| Setting | Description |
|---|---|
| Stats/Settings | Opens the Stats/Settings window with the Boot pool Condition, Size and Used, and Last Scrub Run statistics for the operating system device, and provides the option to change the default duration between the operating system device scrubs from every 7 days to a new duration in days. |
| Boot Pool Status | Opens the Boot Pool Status screen that displays the status of each device in the operating system device (boot pool), and lists any read, write, or checksum errors. |
| Scrub Boot Pool | Opens the Scrub dialog. Performs a manual data integrity check (scrub) of the operating system device. |
| Add | Opens the Create Boot Environment window where you make a new boot environment from the active environment. Enter a new name using only alphanumeric characters, and/or the allowed dashes (-), underscores (_), and periods (.) characters. |
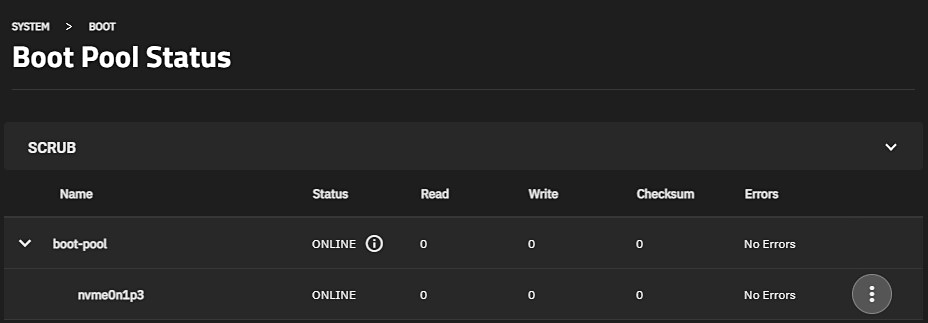
The System Settings > Boot > Boot Pool Status screen shows the status of the current boot-pool. It includes the current status, the path, and the number of read, write and checksum errors.

The vertical ellipsis displays two options, Attach or Replace.
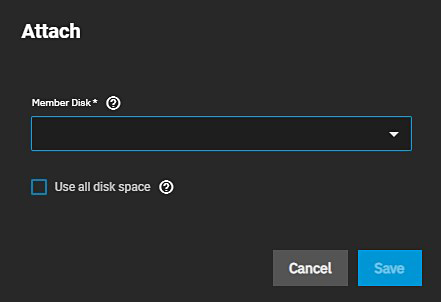
The boot status Attach screen settings specify a device as the disk member and how much of the device is used.

Select a device from the Member Disk dropdown.
Select Use all disk space to use the entire capacity of the new device.
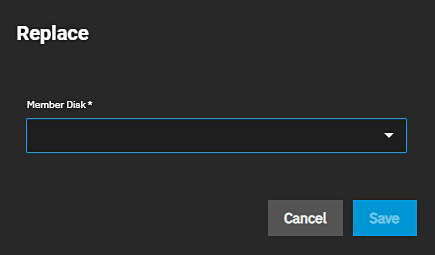
Replace settings specify a replacement device from the Member Disk dropdown


