TrueNAS Documentation Archive
This content follows the TrueNAS 23.10 (Cobia) releases. Archival documentation is provided for reference only and not actively maintained. Use the Product and Version selectors above to view content specific to different TrueNAS software or major version.
Adding a Basic Time Machine SMB Share
3 minute read.
Last Modified 2024-03-19 08:38 EDTSCALE uses predefined setting options to establish an SMB share that fits a predefined purpose, such as a basic time machine share.
To set up a basic time machine share:
Create the user(s) that use this share. Go to Credentials > Local User and click Add.
Create a dataset for the share to use.
Create the share with Purpose set to Basic time machine share.
After creating the share, enable the SMB service.
When adding a share, first create the dataset you plan to use for the new share.
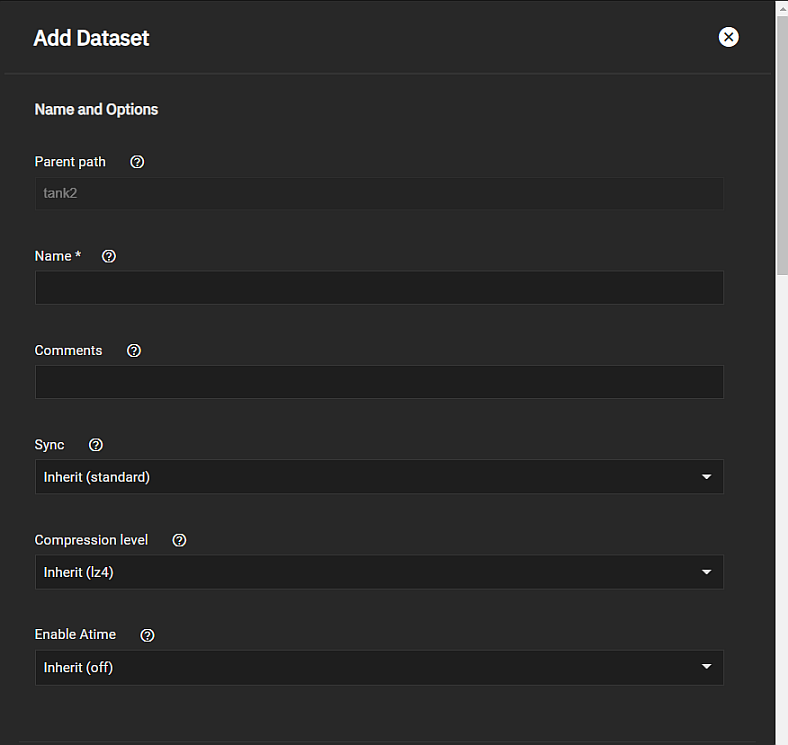
To create a dataset using the default settings, go to Datasets. Default settings include the settings datasets inherit from the parent dataset.
Select a dataset (root, parent, or child), then click Add Dataset.
Enter a value in Name.
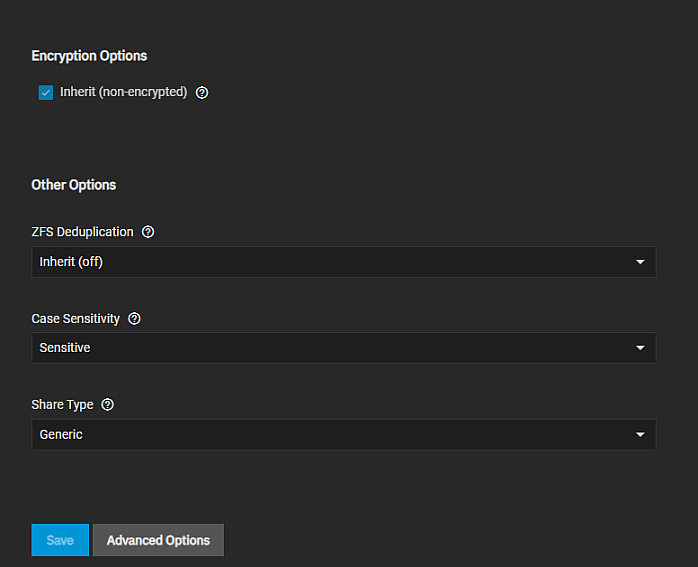
Select either Sensitive or Insensitive from the Case Sensitivity dropdown.
Select the Share Type, then click Save. Options are Generic, Multiprotocol, SMB, or Apps.
You can create datasets optimized for SMB shares or with customized settings for your dataset use cases.
If you plan to deploy container applications, the system automatically creates the ix-applications dataset, but it is not used for application data storage. If you want to store data by application, create the dataset first, then deploy your application. When creating a dataset for an application, select App as the Share Type setting. This optimizes the dataset for use by an application.
Review the Share Type and Case Sensitivity options on the configuration screen before clicking Save. You cannot change these or the Name setting after clicking Save.
Select this dataset as the mount path when you create your SMB share that uses the Basic time machine share setting.
Go to System Settings > Services and scroll down to SMB.
Click the toggle to turn off the SMB service if it is running, then click edit Configure to open the SMB Service settings screen..
Click Advanced Settings.
Verify or select Enable Apple SMB2/3 Protocol Extension to enable it, then click Save
Click the toggle to restart the SMB service.
Go to Shares and click Add on the Windows SMB Share widget to open the Add SMB Share screen.
Enter the SMB share Path and Name.
The Path is the directory tree on the local file system that TrueNAS exports over the SMB protocol.
The Name is the SMB share name, which forms part of the full share pathname when SMB clients perform an SMB tree connect. Because of how the SMB protocol uses the name, it must be less than or equal to 80 characters. It cannot have invalid characters as specified in Microsoft documentation MS-FSCC section 2.1.6. If you do not enter a name, the share name becomes the last component of the path. If you change the name, follow the naming conventions for:
Select a Basic time machine share from the Purpose dropdown list.
(Optional) Enter a Description to help explain the share purpose.
Select Enabled to allow sharing of this path when the SMB service is activated. Leave it cleared if you want to disable the share without deleting the configuration.
Click Save to create the share and add it to the Shares > Windows (SMB) Shares list.
You can also choose to enable the SMB service at this time.


