TrueNAS Documentation Archive
This content follows the TrueNAS 23.10 (Cobia) releases. Archival documentation is provided for reference only and not actively maintained. Use the Product and Version selectors above to view content specific to different TrueNAS software or major version.
Adding Cloud Sync Tasks
6 minute read.
Last Modified 2024-03-19 08:38 EDTTrueNAS can send, receive, or synchronize data with a cloud storage provider. Cloud sync tasks allow for single-time transfers or recurring transfers on a schedule. They are an effective method to back up data to a remote location.
These providers are supported for Cloud Sync tasks in TrueNAS SCALE:
- Amazon S3
- Backblaze B2
- Box
- Dropbox
- File Transfer Protocol (FTP)
- Google Cloud Storage
- Google Drive
- Google Photos
- Hypertext Transfer Protocol (HTTP)
- Hubic (closed to new accounts)
- Mega
- Microsoft Azure Blob Storage
- OpenStack Swift
- pCloud
- SSH File Transfer Protocol (SFTP)
- Storj iX
- WebDAV
- Yandex
Using the cloud means data can go to a third-party commercial vendor not directly affiliated with iXsystems. You should fully understand vendor pricing policies and services before using them for cloud sync tasks.
iXsystems is not responsible for any charges incurred from using third-party vendors with the cloud sync feature.
- You must have all system storage configured and ready to receive or send data.
- You must have a cloud storage provider account and location (like an Amazon S3 bucket).
You can create the cloud storage account credentials using Credentials > Backup Credentials > Cloud Credentials before creating the sync task or add it at the time you create the cloud sync task on Data Protection > Cloud Sync Task > Add Cloud Sync Task. See the Cloud Credentials article for instructions on adding a backup credential using cloud credentials.
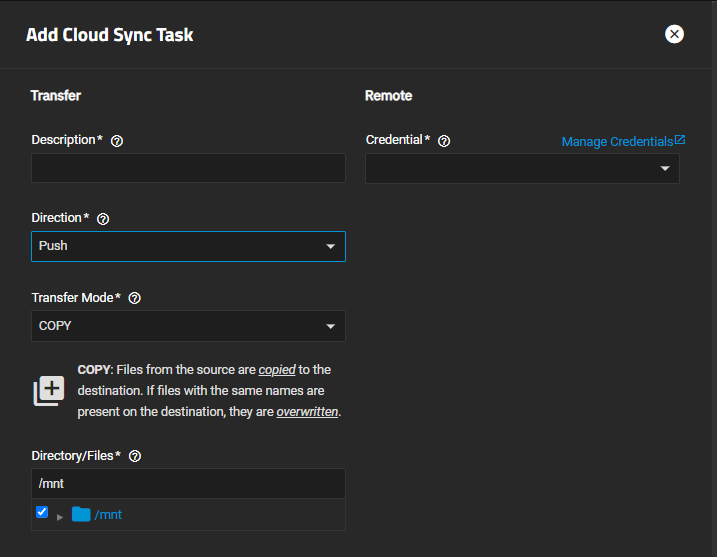
To add a cloud sync task, go to Data Protection > Cloud Sync Tasks and click Add. The Add Cloud Sync Task configuration screen opens.
(Required) Type a memorable task description in Description.
Select an existing backup credential from the Credential dropdown list. If you have not added the cloud credential, click Manage Credentials to open the Backup Credentials screen.
Select the option from Direction and in Transfer Mode. Select the location where to pull from or push data to in the Folder field. A Bucket field also displays for some cloud providers.
Select the dataset location in Directory/Files.
Cloud provider settings change based on the credential you select. Select or enter the required settings that include where files are stored.
Select the time from the Schedule options.
Click Save to add the task.
You can use Dry Run to test your configuration before you click Save or select the option on the Cloud Sync Task widget after you click Save.
The option to encrypt data transferred to or from a cloud storage provider is available in the Advanced Options settings.
Select Remote Encryption to use rclone crypt encryption during pull and push transfers. With Pull selected as the Transfer Direction, the Remote Encryption decrypts files stored on the remote system before the transfer. This requires entering the same password used to encrypt data in both Encryption Password and Encryption Salt.
With Push selected as the Transfer Direction, data is encrypted before it is transferred and stored on the remote system. This also requires entering the same password used to encrypt data in both Encryption Password and Encryption Salt.
Filename Encryption is selected by default. When selected, the pull and push tranfers encrypt or decrypt file names with the rclone Standard file name encryption mode. The original directory structure of the files is preserved. When disabled, encryption does not hide file names or directory structure, file names can be 246 characters long, use sub-paths, and copy single files. When enabled, file names are encrypted, file names are limited to 143 characters, directory structure is visible, and files with identical names have identical uploaded names. File names can use sub-paths, single copy files, and shortcuts to shorten the directory recursion.
Sync keeps all the files identical between the two storage locations. If the sync encounters an error, it does not delete files in the destination.
One common error occurs when the Dropbox copyright detector flags a file as copyrighted.
Syncing to a Backblaze B2 bucket does not delete files from the bucket, even when you deleted those files locally. Instead, files are tagged with a version number or moved to a hidden state. To automatically delete old or unwanted files from the bucket, adjust the Backblaze B2 Lifecycle Rules.
A directory, deleted in BackBlaze B2 and notated with an asterisk, do not display in the SCALE UI. These folders are essentially empty directories and Backblaze API restricts these so they do not display.
Sync cannot delete files stored in Amazon S3 Glacier or S3 Glacier Deep Archive. First restore these files by another means, like the Amazon S3 console.
Advanced users can write scripts that run immediately before or after the cloud sync task. Using either the Add Cloud Sync Task or Edit Cloud Sync Task screens, enter environment variables to either the Pre-script or Post-script fields. The Post-script field only runs when the cloud sync task succeeds.
Saved tasks activate according to their schedule or you can use the Run Now option the Cloud Sync Task widget.
To run the sync task before the saved schedule for the task, click on the cloud sync task to open the edit configuration screen for that task.
If not already cleared, select Enable below the Schedule field to clear the checkbox, and then click Save.
On the Cloud Sync Task widget, click the Run Now play_arrow button.
An in-progress cloud sync must finish before another can begin. Stopping an in-progress task cancels the file transfer and requires starting the file transfer over.
To view logs about a running task, or its most recent run, click State.
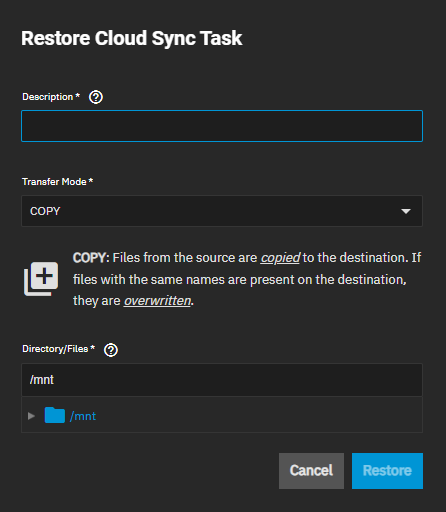
To create a new cloud sync task that uses the same options but reverses the data transfer, select history for an existing cloud sync on the Data Protection page. The Restore Cloud Sync Task window opens.
Enter a name in Description for this reversed task.
Select the Transfer Mode and then define the path for a storage location on TrueNAS scale for the transferred data.
Click Restore.
TrueNAS saves the restored cloud sync as another entry in Data protection > Cloud Sync Tasks.
If you set the restore destination to the source dataset, TrueNAS may alter ownership of the restored files to root. If root did not create the original files and you need them to have a different owner, you can recursively reset their ACL permissions through the GUI or run chown from the CLI.


