TrueNAS Documentation Archive
This content follows the TrueNAS 23.10 (Cobia) releases. Archival documentation is provided for reference only and not actively maintained. Use the Product and Version selectors above to view content specific to different TrueNAS software or major version.
Creating ACME Certificates
2 minute read.
Last Modified 2024-01-31 07:31 -0800TrueNAS SCALE allows users to automatically generate custom domain certificates using Let’s Encrypt.
- An email address for your TrueNAS SCALE Admin user.
- A custom domain that uses Cloudflare, AWS Route 53, or OVH.
- A DNS server that does not cache for your TrueNAS SCALE system.
Go to Credentials > Certificates and click ADD in the ACME DNS-Authenticators widget.

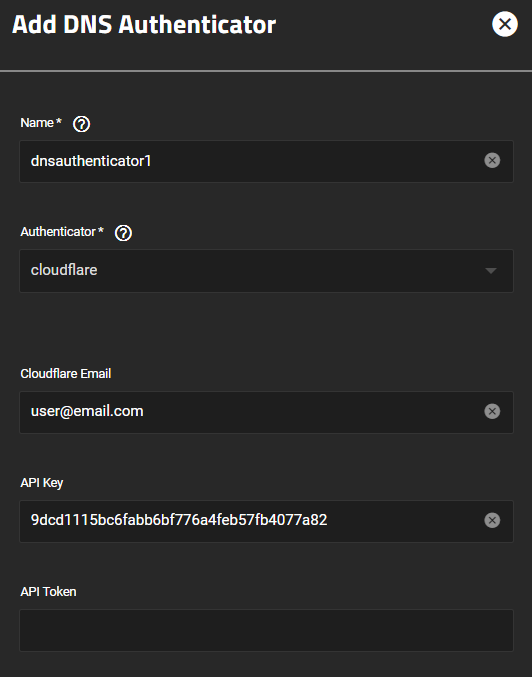
Enter the required fields depending on your provider, then click Save.
For Cloudflare, enter either your Cloudflare Email and API Key, or enter an API Token. If you create an API Token, make sure to give the token the permission Zone.DNS:Edit as it’s required by certbot.
For Route53, enter your Access Key ID and Secret Access Key.
For OVH, enter your OVH Application Key, OVH Application Secret, OVH Consumer Key, and OVH Endpoint.
Next, click ADD in the Certificate Signing Requests widget.
You can use default settings except for the Common Name and Subject Alternate Names fields.

Enter your primary domain name in the Common Name field, then enter additional domains you wish to secure in the Subject Alternate Names field.
For example, if your primary domain is domain1.com, entering www.domain1.com secures both addresses.
Click the icon next to the new CSR.

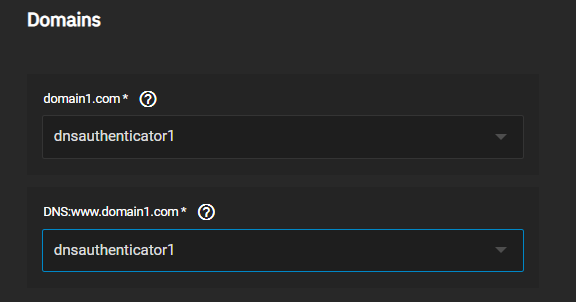
Fill out the ACME Certificate form. Under Domains, select the ACME DNS Authenticator you created for both domains, then click Save.
You can create testing and staging certificates for your domain.


