TrueNAS Documentation Archive
This content follows the TrueNAS 23.10 (Cobia) releases. Archival documentation is provided for reference only and not actively maintained. Use the Product and Version selectors above to view content specific to different TrueNAS software or major version.
Adding ACME DNS-Authenticators
2 minute read.
Last Modified 2023-08-24 15:28 EDTAutomatic Certificate Management Environment (ACME) DNS authenticators allow users to automate certificate issuing and renewal. The user must verify ownership of the domain before TrueNAS allows certificate automation.
ACME DNS is an advanced feature intended for network administrators or AWS professionals. Misconfiguring ACME DNS can prevent you from accessing TrueNAS.
The system requires an ACME DNS Authenticator and CSR to configure ACME certificate automation.
To add an authenticator,
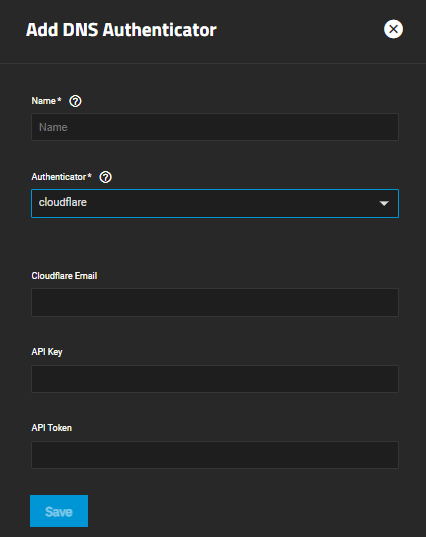
Click Add on the ACME DNS-Authenticator widget to open the Add DNS Authenticator screen.
Enter a name, and select the authenticator you want to configure. Options are cloudflare, Amazon route53, OVH, and shell. Authenticator selection changes the configuration fields.
If you select cloudflare as the authenticator, you must enter your Cloudflare account email address, API key, and API token.
If you select route53 as the authenticator, you must enter your Route53 Access key ID and secret access key.
If you select OVH as the authenticator, you must enter your OVH application key, application secret, consumer key, and endpoint.
Click Save to add the authenticator.
The shell authenticator option is meant for advanced users. Improperly configured scripts can result in system instability or unexpected behavior.
If you select shell as the authenticator, you must enter the path to an authenticator script, the running user, a certificate timeout, and a domain propagation delay.
Advanced users can select this option to pass an authenticator script, such as acme.sh, to shell and add an external DNS authenticator. Requires an ACME authenticator script saved to the system.


