TrueNAS SCALETrueNAS SCALE Version Documentation
This content follows the TrueNAS SCALE 23.10 (Cobia) releases. Use the Product and Version selectors above to view content specific to different TrueNAS software or major version.

Backing Up TrueNAS

  8 minute read.

Last Modified 2024-03-21 14:11 EDT

After configuring your TrueNAS storage and data sharing or any other function, service, or application, it is time to ensure effective back up of your data.

You should also:

You should also set up a data storage backup method using either a cloud sync or replication task.

Backing Up TrueNAS Storage Data

TrueNAS provides for data backup through cloud sync or replication.

Using Cloud Sync for Data Backup

Cloud sync requires an account with a cloud storage provider and a storage location created with that provider, like an Amazon S3 bucket. SCALE support major providers like Storj, Amazon S3, Google Cloud, Box, and Microsoft Azure, along with a variety of other vendors. These providers can charge fees for data transfer and storage, so please review the polices of your cloud storage provider before transferring your data.

You can configure TrueNAS to send, receive, or synchronize data with a cloud storage provider.

  1. Add your cloud storage credentials to TrueNAS.

    Go to Credentials > Backup Credentials and click Add to open the Cloud Credentials configuration screen.

    Some cloud storage providers, like Amazon S3, require you log into your cloud account to generate additional information like an access key. TrueNAS requires you to enter the Amazon S3 credentials you generate on their Security Credentials > Access Keys page before you can save and add the cloud credentials. Check with your cloud storage provider to see what credentials they require TrueNAS to provide to complete data transfers.

    Some cloud storage providers, like Box, can automatically populate the required Authentication fields after you log into your account using OAuth Authentication.

After logging into the provider with the OAuth credentials, the provider provides the access token. Google Drive and pCloud use one more setting to authenticate credentials.

  1. Enter the name and select the cloud storage provider from the Provider dropdown list.

  2. Enter the provider account email in OAuth Client ID and the password for that user account in OAuth Client Secret.

  3. Click Log In To Provider. The Authentication window opens. Click Proceed to open the OAuth credential account sign in window.

    Yandex displays a cookies message you must accept before you can enter credentials.

    Enter the provider account user name and password to verify the credentials.

  4. (Optional) Enter the value for any additional authentication method. For pCloud, enter the pCloud host name for the host you connect to in Hostname. For Google Drive when connecting to Team Drive, enter the Google Drive top-level folder ID.

  5. Enter the access token from the provider if not populated by the provider after OAuth authentication. Obtaining the access token varies by provider.

    ProviderAccess Token
    BoxFor more information the user access token for Box click here. An access token enables Box to verify a request belongs to an authorized session. Example token: T9cE5asGnuyYCCqIZFoWjFHvNbvVqHjl.
    DropboxCreate an access token from the Dropbox account.
    Google DriveThe authentication process creates the token for Google Drive and populates the Access Token field automatically. Access tokens expire periodically, so you must refresh them.
    pCloudCreate the pCloud access token here. These tokens can expire and require an extension.
    YandexCreate the Yandex access token here.
  6. Click Verify Credentials to make sure you can connect with the entered credentials.

  7. Click Save.

For more information on cloud credentials see Adding Cloud Credentials

  1. Create a cloud sync data transfer task.

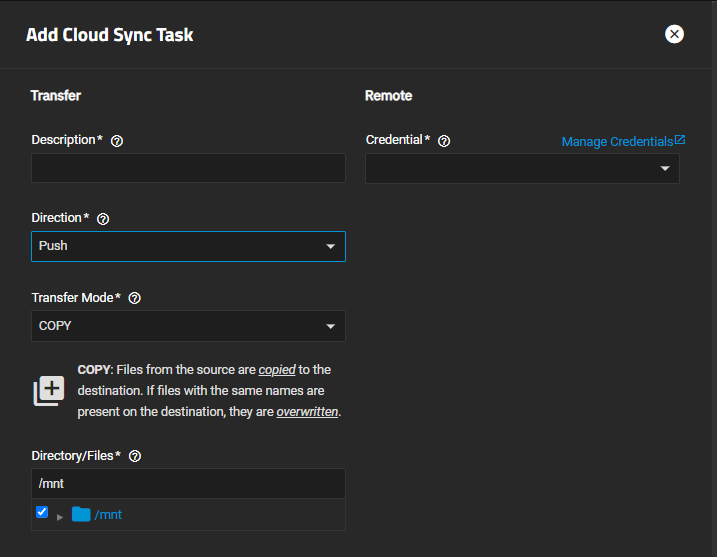
    To add a cloud sync task, go to Data Protection > Cloud Sync Tasks and click Add. The Add Cloud Sync Task configuration screen opens.

    1. (Required) Type a memorable task description in Description.

    2. Select an existing backup credential from the Credential dropdown list. If you have not added the cloud credential, click Manage Credentials to open the Backup Credentials screen.

    3. Select the option from Direction and in Transfer Mode. Select the location where to pull from or push data to in the Folder field. A Bucket field also displays for some cloud providers.

    4. Select the dataset location in Directory/Files.

    5. Cloud provider settings change based on the credential you select. Select or enter the required settings that include where files are stored.

    6. Select the time from the Schedule options.

    7. Click Save to add the task.

    You can use Dry Run to test your configuration before you click Save or select the option on the Cloud Sync Task widget after you click Save.

    To manually start a saved task, click the Run Now for the cloud sync task you want to start.

Using Replication for Data Backup

Replication is the process of taking a moment-in-time snapshot of data and then copying that snapshot to another location. Snapshots typically use less storage than full file backups and have more management options.

To create a simple replication task with the TrueNAS replication wizard:

  1. Create a periodic snapshot task using the Periodic Snapshot Task or use the Run Once replication schedule option. If scheduling a task, SCALE creates the periodic snapshot task when it runs the replication task according to the scheduled time.

  2. Create the replication task.

    Go to Data Protection and click Add on the Replication Tasks widget. The Replication Task Wizard opens on the What and Where configuration screen. Select both the Source Location and Destination Location using the dropdown list options. You can back up your data on the same system or a different system. If you select A different system you must have SSH connection. Have your destination and source information ready.

    Next enter the Source and Destination paths. To populate the field with the full path, you can either type the full path to the data you want to back up or click on the caret to the left of mnt and at the pool and dataset levels to expand the options. Click on the dataset and/or the file if you want to narrow backup down to that level.

    The task name populates from the values in Source and Destination. Click Next.

  3. Define when you want this task to occur.

    Select the radio button for Run On a Schedule and select the schedule you want to use. Or select Run Once to run the task manually. If using this option you must have a periodic snapshot task already defined. If running on a schedule you don’t have to have a pre-defined snapshot task.

    Select the radio button to specify the destination snapshot lifetime.

  4. Click START REPLICATION. The task appears on the Replication Tasks widget with the status as PENDING.

Backing Up the System Configuration

Now that you configured your system network, storage, and the data shares you want, and you have set up your data back up solution, it is time to back up your system configuration.

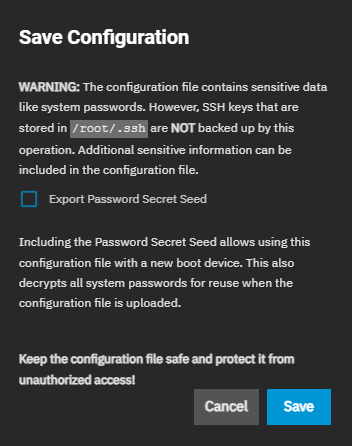
When you download the configuration file, you have the option to Export Password Secret Seed, which includes encrypted passwords in the configuration file. This allows you to restore the configuration file to a different operating system device where the decryption seed is not already present. Users must physically secure configuration backups containing the seed to prevent unauthorized access or password decryption.

We recommend backing up the system configuration regularly. Doing so preserves settings when migrating, restoring, or fixing the system if it runs into any issues. Save the configuration file each time the system configuration changes.

If you plan to set up a cluster that includes this TrueNAS SCALE, wait to download your system configuration file until after the cluster is set up and working.

Go to System Settings > General and click on Manage Configuration. Select Download File.

GeneralManageConfigurationOptions

The Save Configuration dialog displays.

SaveConfigurationWindow

Click Export Password Secret Seed and then click Save. The system downloads the system configuration. Save this file in a safe location on your network where files are regularly backed up.

Anytime you change your system configuration, download the system configuration file again and keep it safe.

Downloading the Initial System Debug File

After saving the system configuration, go to System Settings > Advanced and click Save Debug. After the download completes save this initial debug file with your system configuration file.

Create a Boot Environment

After installing and completing your SCALE system configuration, create a boot environment to use as a restore point. If an issue occurs where you lose access to the SCALE UI, you can establish an SSH session and restore it from the boot environment. You can clone the boot environment listed after the initial-install environment and rename the clone to something you recognize, such as the release number with date and time.

Related Configuration Articles

Related Backup Articles