TrueNAS SCALE Documentation Archive
This content follows the TrueNAS SCALE 22.12 (Bluefin) releases. Archival documentation is provided for reference only and not actively maintained.
Use the Product and Version selectors above to view content specific to different TrueNAS software or major versions.
Managing Network Settings (Enterprise HA)
3 minute read.
Last Modified 2024-12-11 09:22 ESTTrueNAS Enterprise
The instructions in the article only apply to SCALE Enterprise (HA) systems.
SCALE Enterprise (HA) systems use three static IP addresses for access to the UI:
- VIP to provide UI access regardless of which controller is active. If your system fails over from controller 1 to 2, then fails over back to controller 1 later you might not know which controller is active.
- IP for controller 1. If enabled on your network, DHCP assigns only the Controller 1 IP address. If not enabled, you must change this to the static IP address your network administrator assigned to this controller.
- IP for Controller 2. DHCP does not assign the second controller an IP address.
Have your list of network addresses, host, and domain names ready so you can complete the network configuration without disruption or system timeouts. SCALE safeguards allow a default of 60 seconds to test and save changes to a network interface before reverting changes. This is to prevent users from breaking their network connection in SCALE.
You must disable the failover before you can configure network settings!
To configure network settings:
Disable the failover service. Go to System Settings > Failover. Select Disable Failover and click Save.
Edit the Global Network settings to add or change the host and domain names, DNS name server and default gateway address. If enabled on your network, TrueNAS uses DHCP to assign global network addresses as well as the SCALE UI access IP address. If not enabled in your network, you must enter these values yourself. Review the Global Configuration settings to verify they match the information your network administrator provided.
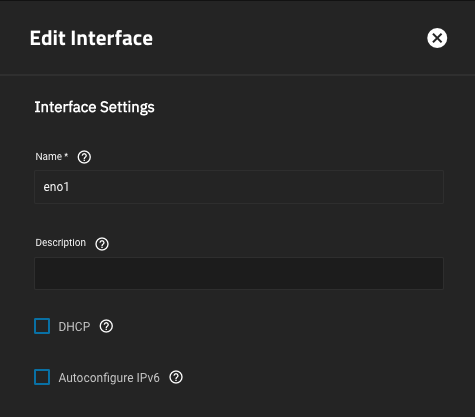
Edit the primary network interface. Go to Network and click on the primary interface eno1 to open the Edit Interface screen for this interface.
a. Turn DHCP off. Select DHCP to clear the checkbox.

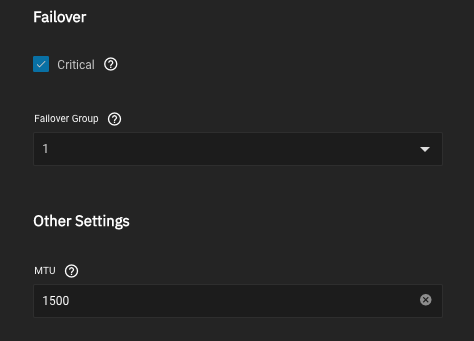
b. Add the failover settings. Select Critical, and then select 1 on the Failover Group dropdown list.

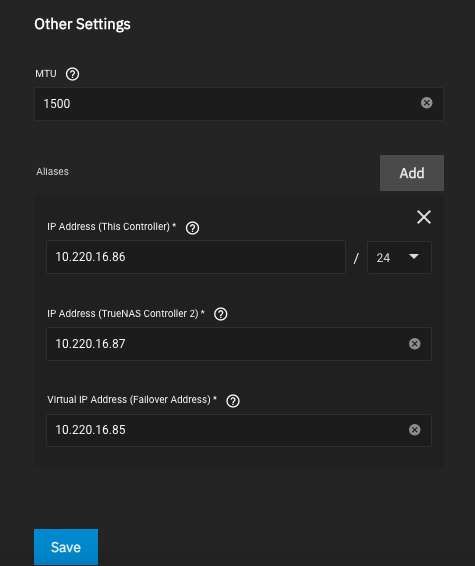
c. Add the virtual IP (VIP) and controller 2 IP. Click Add for Aliases to display the additional IP address fields.

Type the IP address for controller 1 into IP Address (This Controller) and select the CIDR number from the dropdown list.
Type the controller 2 IP address into IP Address (TrueNAS Controller 2) field.
Type the VIP address into Virtual IP Address (Failover Address) field.
Click Save
After editing the interface settings, the Test Changes button displays. You have 60 seconds to test and then save changes before they revert. If this occurs, edit the interface again.
Turn failover back on. Go to System Settings > Failover Select Disable Failover to clear the checkmark and turn failover back on, then click Save.
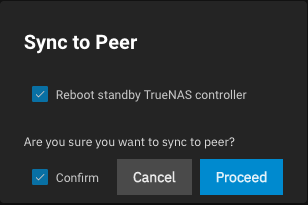
The system might reboot. Monitor the status of controller 2 and wait until the controller is back up and running, then click Sync To Peer. Select Reboot standby TrueNAS controller and Confirm, then click Proceed to start the sync operation. The controller reboots, and SCALE syncs controller 2 with controller 1, which adds the network settings and pool to controller 2.


