Collabora and OnlyOffice are popular office suite choices for Nextcloud. This is a collection of notes on how to get OnlyOffice working in Nextcloud behind a reverse proxy on FreeNAS. To realise this, a number of building blocks need to be put together.
Credits
@danb35 : Nextcloud and Caddy resources
@KevDog : Collabora configuration, Docker Compose
IMPORTANT NOTE: If you have issues with steps 1 and 2 below, please DO NOT post those issues in the discussion area for this resource. However, in the context of Nextcloud-OnlyOffice integration, if you have some useful information on steps 1 and 2 that may benefit other forum members, please post your experience in the discussion area here.
Outline of the Steps
Using a Ubuntu VM on TrueNAS CORE:
Note: For the purpose of explanation, the steps below assume that the Nextcloud FQDN is cloud.mydomain.com and for OnlyOffice, it is office.mydomain.com.
Step 1: Install Nextcloud
I used @danb35's Scripted installation of Nextcloud 19 in iocage jail resource to set up a new Nextcloud service.
Notes:
Q1. I'm having problems getting Nextcloud working using the script?
Raise your issues in the discussion area for the script. Please don't raise your issues in the discussion area here. Do not proceed to step 2 until you have Nextcloud working.
Q2. I've set up Nextcloud using a different resource and I'm having issues getting Nextcloud working?
You may have used a different resource to set up Nextcloud. You should refer any issues you have with that resource provider. If you've set up Nextcloud using the plugin, raise your issues in the forum. Do not raise your Nextcloud issues here as I'm unable to provide any assistance when it comes to debugging Nextcloud. Do not proceed to step 2 until you have Nextcloud working.
Q3. I have an existing Nextcloud service. Can I still integrate OnlyOffice (or Collabora) into it?
Well, that depends. The table below shows what combinations and versions of applications have been tested and when.
I'm unable to comment on OnlyOffice (or Collabora) integration with earlier versions of Nextcloud or FreeNAS. Try it, and whether it works or not, let the FreeNAS community know about your experience here.
Q4. How will I know Nextcloud is working, and I can proceed to step 2?
Enter the jail
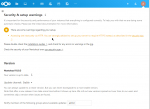
You'll be able to see the Nextcloud login page when you enter its jail IP e.g. http://10.1.1.29 in a browser. Secondly, the Nextcloud Administration Overview should show the following warnings.

Now, re-add
Step 2: Set up Nextcloud behind a Reverse Proxy
I used @danb35's Reverse Proxy using Caddy (with optional automatic TLS) resource to set up a reverse proxy including automatic HTTPS using TLS with HTTP validation, and with Cloudflare providing DNS hosting.
Notes:
Q1. I'm having problems getting Nextcloud working with Caddy?
Raise your issues in the discussion area for the Caddy resource. Please don't raise your issues in the discussion area here. Do not proceed to step 3 until you have Nextcloud working with Caddy.
Q2. I've set up a reverse proxy using a different resource and I'm having issues getting Nextcloud working with it?
You may have used a different resource to set up a reverse proxy. You should refer any issues you have with that resource provider. Do not raise your reverse proxy issues here as I do not have any depth of experience with reverse proxies. Do not proceed to step 3 until you have Nextcloud working with the reverse proxy.
Q3. How will I know Nextcloud is working with a reverse proxy such as Caddy, and I can proceed to step 3?
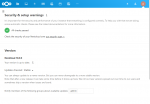
Entering https://cloud.mydomain.com in the browser will reach the Nextcloud login page. In addition, the Nextcloud Administration Overview should now show just one warning. Do not proceed to step 3 until you get these results.

For further information about the HTTP Strict Transport Security warning, refer here.
Step 3: Install Ubuntu with Docker and Docker Compose in a TrueNAS VM
Refer to Installing Docker in the FreeNAS User Documentation.
Install Docker Compose.
Notes:
The Docker engine correctly runs the hello-world image, even after a restart of the VM. Do not proceed to the next step until you get this result.
Test the Docker Compose installation with
Step 4: Install the OnlyOffice Document Server using Docker Compose
Change to the home directory
References:
Alter the highlighted entry to suit your environment.
Build and run OnlyOffice Document Server with Compose
Q1. How will I know the OnlyOffice Document Server is working correctly, and I can proceed to step 5?
On startup, it can take a few minutes for the OnlyOffice Document Server to stabilise. You can monitor the progress of server initialisation using
You know you're approaching the end of server initialisation when last few lines of the log look something like the following:
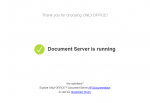
Next, you'll see the OnlyOffice Document Server welcome banner when you enter the Ubuntu host IP and OnlyOffice listening port e.g. http://10.1.1.21:8880 in a browser. Do not proceed to step 5 until you get these results.

Step 5: Set up the OnlyOffice Document Server behind the reverse proxy
Notes:
For a load balancing example, refer to this post.
Q1. How will I know OnlyOffice is working with a reverse proxy such as Caddy, and I can proceed to step 6?
Entering https://office.mydomain.com in a browser directs you to the OnlyOffice Document Server welcome banner seen in the previous step. Do not proceed to the next step until you get this result.
Step 6: Enable and configure the OnlyOffice connector in Nextcloud
Notes:

Q1. How will I know the OnlyOffice connector has been set up properly?
On clicking Save, you should see the message 'Settings have been successfully updated' flash up for several seconds towards the top RHS of the screen. If you don't see this message, check the paths to your Nextcloud and Document Server.
That's pretty much it. Logging in as a Nextcloud user now gives you access to the OnlyOffice suite including a word processor, spreadsheet and presentation applications. To see what's on offer, have a look at the marketing spiel including a video here. There are also free OnlyOffice desktop and mobile (iOS and Android) apps that work with Nextcloud.
Step 7: OnlyOffice Automatic Updates
This is an optional step. It is not required for Nextcloud-OnlyOffice integration. What it does is aim to ensure that Nextcloud has access to the latest version of OnlyOffice Document Server. A check is done daily for a new version of the OnlyOffice image. If a new version exists, it is downloaded and the OnlyOffice container updated. The old image is then removed.
The following assumes that you’ve adhered closely to Step 4 above and your Compose file is stored in the OnlyOffice folder within the home directory.
Change to the OnlyOffice folder
Reference: CODE docker automatic update
Make the file executable
Next, we’re going to add a line, that takes the form below, to the system-wide crontab.
References:
Standard and error output will be appended to /path/to/log. By design, the log file will be placed in the OnlyOffice folder as well, so:
However, we need to use the evaluated version of $HOME for the system-wide crontab. Make a note of what this is
For example:

For this example:
Edit the system-wide crontab
The script should be run at a time when it’s unlikely anyone will be using OnlyOffice. In the example below, I’m checking for updates daily at 20 minutes after midnight.
If there isn’t an update when the job is run, a typical log entry will look something like the following:

If an update is available, the log entry will instead look more like this:

Credits
@danb35 : Nextcloud and Caddy resources
@KevDog : Collabora configuration, Docker Compose
IMPORTANT NOTE: If you have issues with steps 1 and 2 below, please DO NOT post those issues in the discussion area for this resource. However, in the context of Nextcloud-OnlyOffice integration, if you have some useful information on steps 1 and 2 that may benefit other forum members, please post your experience in the discussion area here.
Outline of the Steps
Using a Ubuntu VM on TrueNAS CORE:
- Install Nextcloud
- Set up Nextcloud behind a reverse proxy
- Install Ubuntu with Docker and Docker Compose in a TrueNAS VM
- Install the OnlyOffice Document Server using Docker Compose
- Set up the OnlyOffice Document Server behind the reverse proxy
- Enable and configure the OnlyOffice connector in Nextcloud
- OnlyOffice automatic updates (optional)
- Install Nextcloud
- Set up Nextcloud behind a reverse proxy
Install Ubuntu with Docker and Docker Compose in a TrueNAS VM- Deploy OnlyOffice Document Server on TrueNAS SCALE
- Set up the OnlyOffice Document Server behind the reverse proxy
- Enable and configure the OnlyOffice connector in Nextcloud
OnlyOffice automatic updates (optional)
Note: For the purpose of explanation, the steps below assume that the Nextcloud FQDN is cloud.mydomain.com and for OnlyOffice, it is office.mydomain.com.
Step 1: Install Nextcloud
I used @danb35's Scripted installation of Nextcloud 19 in iocage jail resource to set up a new Nextcloud service.
Notes:
- Importantly, set
HOST_NAME="cloud.mydomain.com"andNO_CERT=1in the script configuration filenextcloud-config. SettingNO_CERT=1configures Caddy within the Nextcloud resource to provide web services, but not TLS services. - For Nextcloud to operate correctly behind a reverse proxy, overwrite parameters will need to be modified.
Q1. I'm having problems getting Nextcloud working using the script?
Raise your issues in the discussion area for the script. Please don't raise your issues in the discussion area here. Do not proceed to step 2 until you have Nextcloud working.
Q2. I've set up Nextcloud using a different resource and I'm having issues getting Nextcloud working?
You may have used a different resource to set up Nextcloud. You should refer any issues you have with that resource provider. If you've set up Nextcloud using the plugin, raise your issues in the forum. Do not raise your Nextcloud issues here as I'm unable to provide any assistance when it comes to debugging Nextcloud. Do not proceed to step 2 until you have Nextcloud working.
Q3. I have an existing Nextcloud service. Can I still integrate OnlyOffice (or Collabora) into it?
Well, that depends. The table below shows what combinations and versions of applications have been tested and when.
| Date | Nextcloud | Caddy | OnlyOffice | Collabora | Ubuntu | TrueNAS |
|---|---|---|---|---|---|---|
2020-04-06 | 18.0.3 | 1.0.4 | 5.5.1.76 | 6.2-9 | 18.4.04 | 11.3-U1 |
2020-08-03 | 19.0.1 | 2.1.1 | 5.5.3.39 | 6.2-21 | 18.4.04 | 11.3-U4.1 |
2020-08-14 | 5.6.2.2 | 20.04.1 | ||||
2021-03-06 | 20.0.8 | 2.4.0-BETA.1 | 6.0.2.5 | 6.4-28 | 11.3-U5 | |
2021-05-12 | 20.0.9 | 2.4.0 | 6.2.2 | 6.4-37 | 20.04.2 | 12.0-U3 |
2021-07-16 | 21.0.3 | 2.4.3 | | 12.0-U4.1 | ||
2021-08-01 | 6.3.1 | 6.4.10.6 | 12.0-U4.1 21.06 |
I'm unable to comment on OnlyOffice (or Collabora) integration with earlier versions of Nextcloud or FreeNAS. Try it, and whether it works or not, let the FreeNAS community know about your experience here.
Q4. How will I know Nextcloud is working, and I can proceed to step 2?
Enter the jail
iocage console nextcloud and remove overwriteprototcol and overwritehost from config.php:Code:
su -m www -c 'php /usr/local/www/nextcloud/occ config:system:delete overwriteprotocol'
su -m www -c 'php /usr/local/www/nextcloud/occ config:system:delete overwritehost'
You'll be able to see the Nextcloud login page when you enter its jail IP e.g. http://10.1.1.29 in a browser. Secondly, the Nextcloud Administration Overview should show the following warnings.
Now, re-add
overwriteprototcol and overwritehost into config.php:Code:
su -m www -c 'php /usr/local/www/nextcloud/occ config:system:set overwriteprotocol --value="https"'
su -m www -c 'php /usr/local/www/nextcloud/occ config:system:set overwritehost --value="cloud.mydomain.com"'
Step 2: Set up Nextcloud behind a Reverse Proxy
I used @danb35's Reverse Proxy using Caddy (with optional automatic TLS) resource to set up a reverse proxy including automatic HTTPS using TLS with HTTP validation, and with Cloudflare providing DNS hosting.
Notes:
- Importantly, your local DNS resolver must resolve mydomain.com to your Caddy jail IP.
- If you're exposing your reverse proxy to the internet, ports 80 and 443 must be forwarded to the Caddy jail.
- In Cloudflare, set up a CNAME record for the subdomain cloud.mydomain.com.
- If using Caddy V2, the Caddyfile code block for Nextcloud will look something like:
Code:
cloud.mydomain.com {
  encode gzip
  reverse_proxy http://10.1.1.29
}
Q1. I'm having problems getting Nextcloud working with Caddy?
Raise your issues in the discussion area for the Caddy resource. Please don't raise your issues in the discussion area here. Do not proceed to step 3 until you have Nextcloud working with Caddy.
Q2. I've set up a reverse proxy using a different resource and I'm having issues getting Nextcloud working with it?
You may have used a different resource to set up a reverse proxy. You should refer any issues you have with that resource provider. Do not raise your reverse proxy issues here as I do not have any depth of experience with reverse proxies. Do not proceed to step 3 until you have Nextcloud working with the reverse proxy.
Q3. How will I know Nextcloud is working with a reverse proxy such as Caddy, and I can proceed to step 3?
Entering https://cloud.mydomain.com in the browser will reach the Nextcloud login page. In addition, the Nextcloud Administration Overview should now show just one warning. Do not proceed to step 3 until you get these results.
For further information about the HTTP Strict Transport Security warning, refer here.
Step 3: Install Ubuntu with Docker and Docker Compose in a TrueNAS VM
Refer to Installing Docker in the FreeNAS User Documentation.
Install Docker Compose.
Notes:
- For the VM characteristics, I used what I saw in Figure 18.1.2 in the previous section of the User Documentation. This worked well for me.
- I installed Ubuntu 18.04.4 Desktop.
- Don't forget the post-installation step of setting up Docker to start on boot.
- Set up a static IP for the Ubuntu host.
- Cut and paste isn't possible with the VNC supplied in the FreeNAS UI. Enable SSH in the Ubuntu VM so you can SSH into it using an SSH client like PuTTY. You will then be able to cut and paste into the terminal.
The Docker engine correctly runs the hello-world image, even after a restart of the VM. Do not proceed to the next step until you get this result.
Test the Docker Compose installation with
docker compose --version Step 4: Install the OnlyOffice Document Server using Docker Compose
Change to the home directory
cd and create a directory for the Compose file mkdir onlyoffice. Change to the directory cd onlyoffice. Create the Compose file nano docker-compose.yml and paste the following:Code:
version: '3.3'
services:
  documentserver:
    ports:
      - '8880:80'
    environment:
      - JWT_ENABLED=true
      - JWT_SECRET=secret
    restart: always
    container_name: onlyoffice-document-server
    image: onlyoffice/documentserver
References:
Alter the highlighted entry to suit your environment.
Build and run OnlyOffice Document Server with Compose
sudo docker-compose up -d.Q1. How will I know the OnlyOffice Document Server is working correctly, and I can proceed to step 5?
On startup, it can take a few minutes for the OnlyOffice Document Server to stabilise. You can monitor the progress of server initialisation using
sudo docker logs -f onlyoffice-document-server to view the server log (Ctrl-C to exit). There are a couple of useful indicators that the OnlyOffice Document Server has started properly:You know you're approaching the end of server initialisation when last few lines of the log look something like the following:
Code:
[2020-04-29T13:48:45.698] [WARN] nodeJS - start cluster with 1 workers
[2020-04-29T13:48:45.749] [WARN] nodeJS - worker 823 started.
[2020-04-29T13:48:47.958] [WARN] nodeJS - Express server starting...
[2020-04-29T13:48:48.137] [WARN] nodeJS - Express server listening on port 8080 in production-linux mode
Next, you'll see the OnlyOffice Document Server welcome banner when you enter the Ubuntu host IP and OnlyOffice listening port e.g. http://10.1.1.21:8880 in a browser. Do not proceed to step 5 until you get these results.
Step 5: Set up the OnlyOffice Document Server behind the reverse proxy
Notes:
- In Cloudflare, set up a CNAME record for the subdomain office.mydomain.com.
- If using Caddy V2, the Caddyfile code block for OnlyOffice will look something like:
Code:
office.mydomain.com {
  encode gzip
  reverse_proxy http://10.1.1.21:8880
}
For a load balancing example, refer to this post.
Q1. How will I know OnlyOffice is working with a reverse proxy such as Caddy, and I can proceed to step 6?
Entering https://office.mydomain.com in a browser directs you to the OnlyOffice Document Server welcome banner seen in the previous step. Do not proceed to the next step until you get this result.
Step 6: Enable and configure the OnlyOffice connector in Nextcloud
Notes:
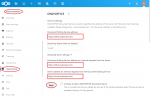
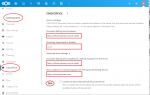
- Enable the ONLYOFFICE connector under Office & Text applications and configure it as shown below. Don't enable the Community Document Server as it is a Linux image that doesn't run under FreeBSD.
Q1. How will I know the OnlyOffice connector has been set up properly?
On clicking Save, you should see the message 'Settings have been successfully updated' flash up for several seconds towards the top RHS of the screen. If you don't see this message, check the paths to your Nextcloud and Document Server.
That's pretty much it. Logging in as a Nextcloud user now gives you access to the OnlyOffice suite including a word processor, spreadsheet and presentation applications. To see what's on offer, have a look at the marketing spiel including a video here. There are also free OnlyOffice desktop and mobile (iOS and Android) apps that work with Nextcloud.
Step 7: OnlyOffice Automatic Updates
This is an optional step. It is not required for Nextcloud-OnlyOffice integration. What it does is aim to ensure that Nextcloud has access to the latest version of OnlyOffice Document Server. A check is done daily for a new version of the OnlyOffice image. If a new version exists, it is downloaded and the OnlyOffice container updated. The old image is then removed.
The following assumes that you’ve adhered closely to Step 4 above and your Compose file is stored in the OnlyOffice folder within the home directory.
Change to the OnlyOffice folder
cd $HOME/onlyoffice. Create the update.sh script nano update.sh and paste the following:Code:
#!/bin/bash
date
cd "`dirname "$0"`"
docker-compose pull
docker-compose up -d
docker image prune -f
date
echo
Reference: CODE docker automatic update
Make the file executable
chmod +x update.sh.Next, we’re going to add a line, that takes the form below, to the system-wide crontab.
Code:
m h * * * /path/to/script >> /path/to/log 2>&1
References:
Standard and error output will be appended to /path/to/log. By design, the log file will be placed in the OnlyOffice folder as well, so:
Code:
/path/to/script = $HOME/onlyoffice/update.sh
/path/to/log = $HOME/onlyoffice/update.log
However, we need to use the evaluated version of $HOME for the system-wide crontab. Make a note of what this is
echo $HOME.For example:
For this example:
Code:
/path/to/script = /home/administrator/onlyoffice/update.sh
/path/to/log = /home/administrator/onlyoffice/update.log
Edit the system-wide crontab
sudo crontab -e and set up the cron job.The script should be run at a time when it’s unlikely anyone will be using OnlyOffice. In the example below, I’m checking for updates daily at 20 minutes after midnight.
Code:
20 0 * * * /home/administrator/onlyoffice/update.sh >> /home/administrator/onlyoffice/update.log 2>&1
If there isn’t an update when the job is run, a typical log entry will look something like the following:
If an update is available, the log entry will instead look more like this: