TrueNAS SCALETrueCommand Nightly Development Documentation
This content follows experimental early release software. Use the Product and Version selectors above to view content specific to a stable software release.

Clusters (deprecated)

TrueCommand 3.0 has not passed validation for Clustering and that feature is expected to be highly unstable in this release. With the current unmaintained state of the upstream Gluster project, consider this functionality deprecated. The clustering feature is scheduled for removal in a future TrueCommand revision.

Further, TrueNAS SCALE 24.04 has removed the deprecated gluster backend. Systems installed with SCALE 24.04 (Dragonfish) are unable to use this deprecated TrueCommand feature.

This article describes the various screens used for clustering TrueNAS SCALE systems with TrueCommand. If you want to create and integrate clusters, see Clustering and Sharing SCALE Volumes with TrueCommand

Clusters

The Clusters screen contains all options related to the cluster feature. To see this screen, log in to TrueCommand and click the Clusters icon in the upper left.

TrueCommand Clusters Screen
Figure 1: TrueCommand Clusters Screen
Option descriptions (click to expand)

If you have not created a cluster, there is a single option on this screen:

SettingDescription
CREATE CLUSTEROpens the form to create a new cluster.

Create Cluster

The cluster creation options split into two pages: Systems and Confirmation.

Systems

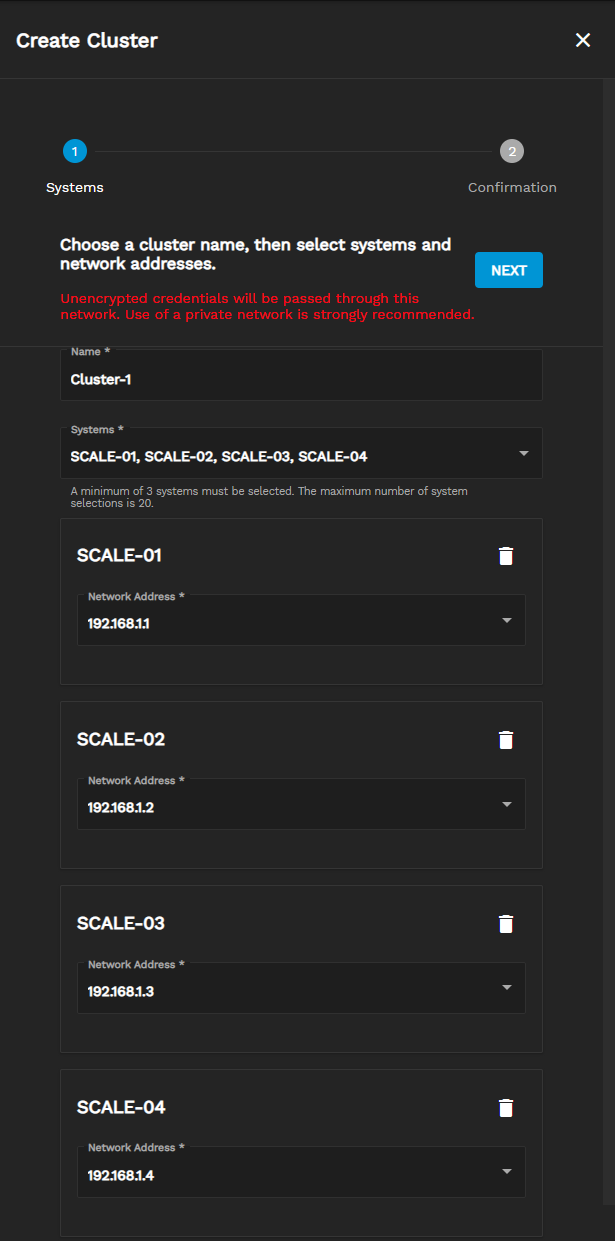
The initial form has two fields:

Configuring Systems in the Cluster
Figure 2: Configuring Systems in the Cluster
Option descriptions (click to expand)
SettingDescription
NameEnter a string to identify the cluster.
SystemsDropdown list shows all connected TrueNAS SCALE systems available for this cluster. Clusters can consist of between 3 and 20 individual SCALE systems.

Making selections in the Systems field adds more options.

Network Options for Clustered Systems
Figure 3: Network Options for Clustered Systems
Option descriptions (click to expand)
SettingDescription
DeleteClicking the Delete icon removes the system from the cluster.
Network AddressDropdown list shows available IP addresses to use for cluster traffic. Using private dedicated network addresses is recommended.

Confirmation

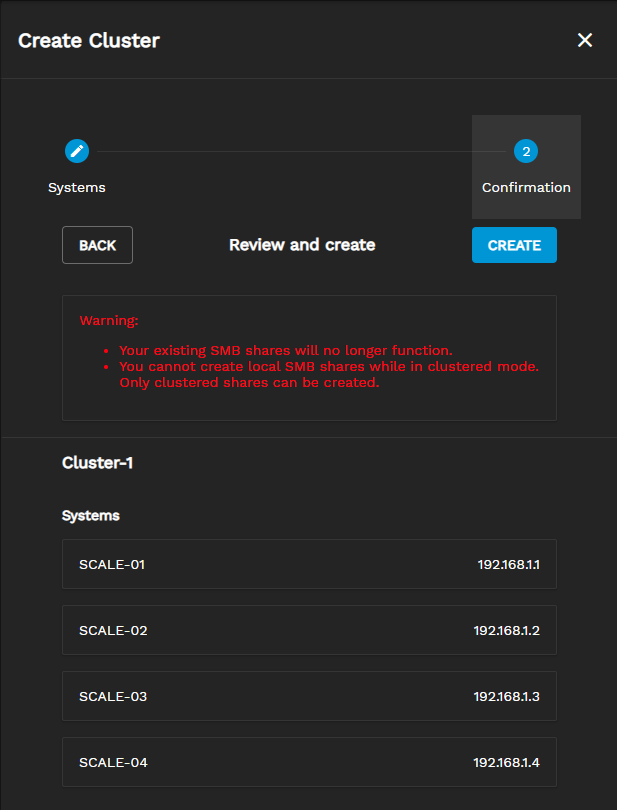
There is a single option on this page.

Review and create page for Clusters
Figure 4: Review and create page for Clusters
Option descriptions (click to expand)
SettingDescription
CREATEBegins creating the cluster, which restricts the SMB functionality on the SCALE systems.

Configure Cluster

Successfully creating a cluster adds a cluster widget to the Clusters screen and opens options to configure the new cluster. These options are split into four screens: VIPs, Associate VIPs, Active Directory, and Confirmation.

VIPs

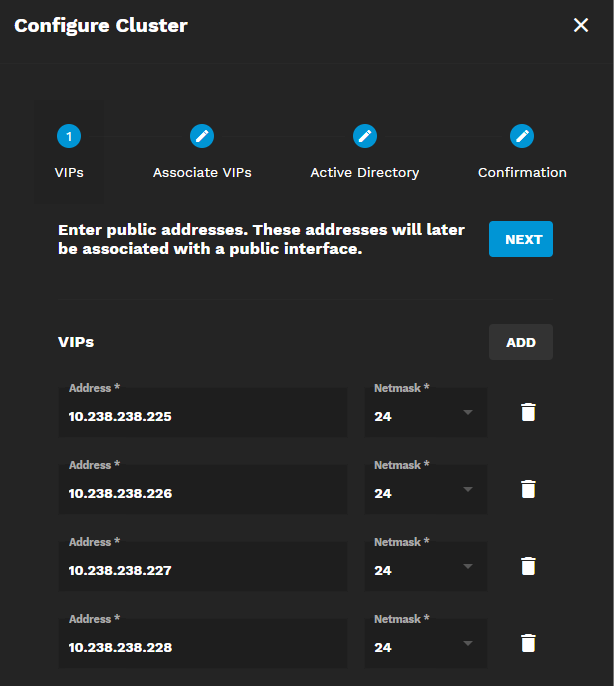
The VIPs page has options and fields added for each SCALE system in the cluster.

Configure Cluster SMB Network
Figure 5: Configure Cluster SMB Network
SettingDescription
ADDAdds another line under VIPs for IPs and netmasks.
AddressVirtual IP address for one of the cluster systems.
NetmaskNetmask for the IP address.

Associate VIPs

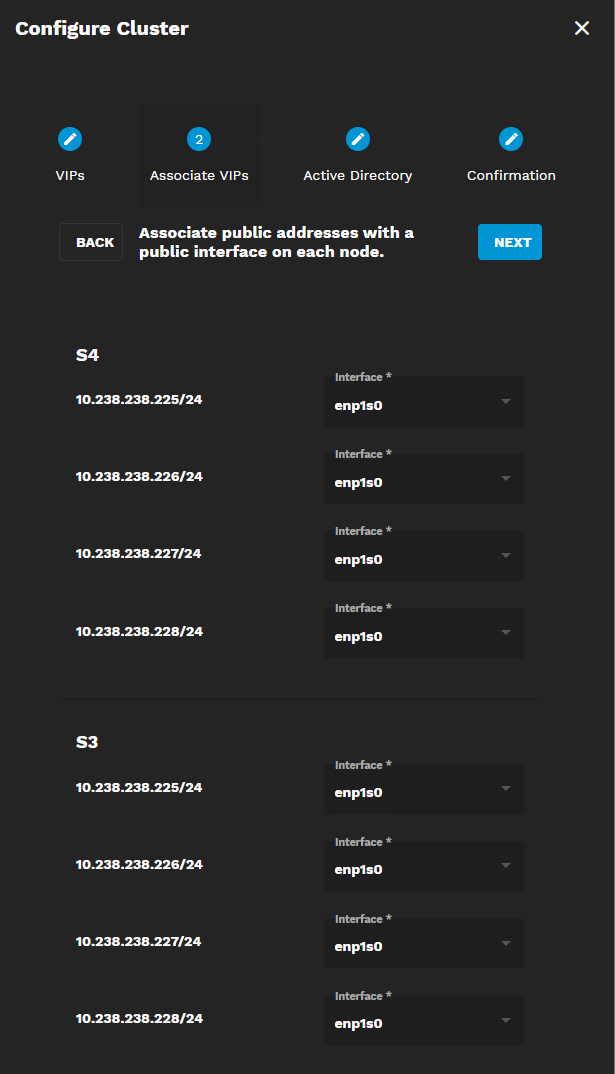
The Associate VIPs page allows you to select interfaces to assign to the VIPs.

Configure Associate VIPs
Figure 6: Configure Associate VIPs
SettingDescription
InterfaceSelect an interface from the dropdown list of interface options and assign it to the VIP.

Active Directory

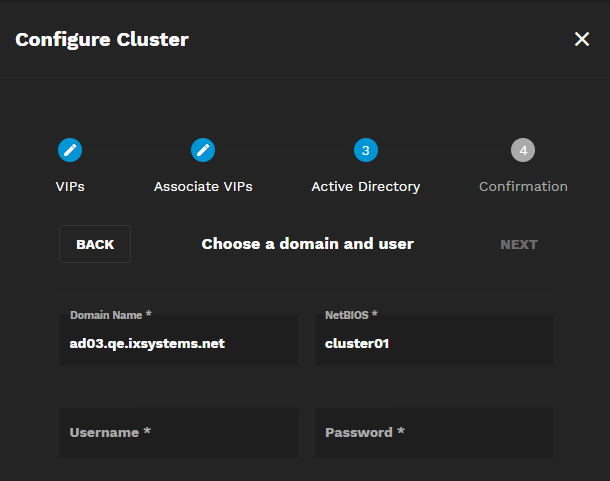
The options on this page let you establish a connection between an Active Directory environment, SCALE systems, and TrueCommand.

Configure Cluster Active Directory Connection
Figure 7: Configure Cluster Active Directory Connection
Option descriptions (click to expand)
SettingDescription
Domain NameEnter a string for the Microsoft Active Directory (AD) environment host name.
NetBIOSAutomatically populates with the cluster name.
UsernameEnter a string for the account credential to establish the AD connection. You must use an account with administrative access.
PasswordEnter a string for the account credential to establish the AD connection. You must use an account with administrative access.

Confirmation

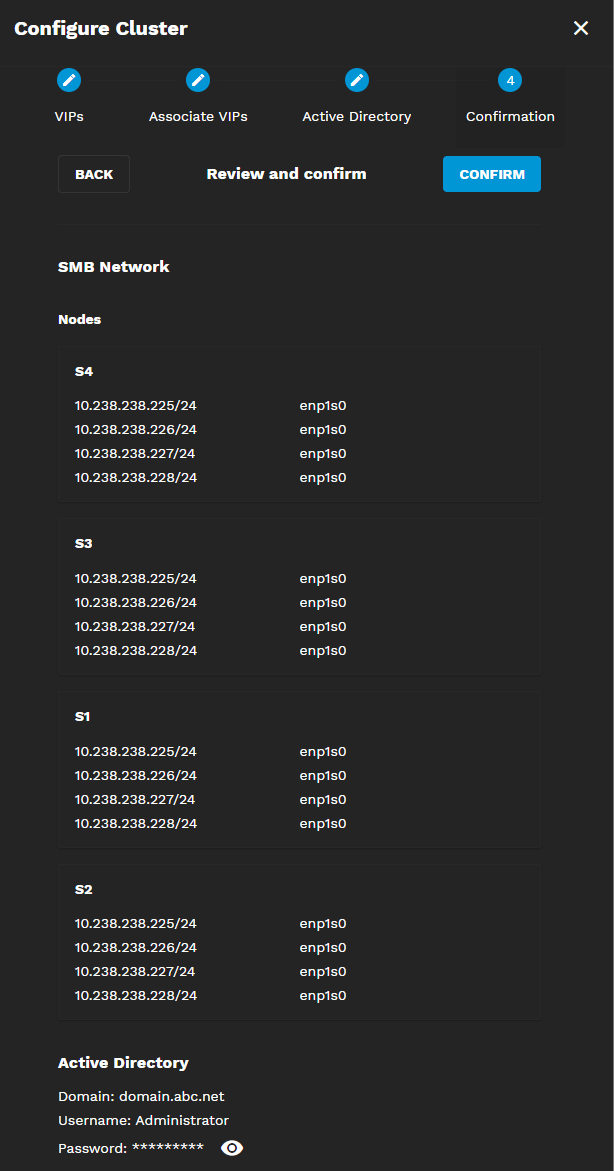
All chosen settings display here for you to confirm before being applied to the cluster.

Configure Cluster: Review and confirm
Figure 8: Review and Confirm
Option descriptions (click to expand)
SettingDescription
CONFIRMSaves the configuration settings and permanently apply them to the cluster.

Manage Clusters

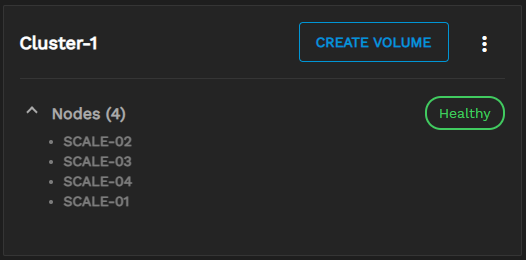
Clusters display as standalone cards.

TrueCommand Cluster View
Figure 9: TrueCommand Cluster View

The card displays the name of the cluster, the current state, and the names of the systems used in the cluster (Nodes). Click the Options icon to see management options for the cluster. Click the ^ or v icons to minimize or expand (respectively) the list of nodes.

Option descriptions (click to expand)
SettingDescription
CREATE VOLUMEOpens the form to create new clustered storage.
RenameOpens the form to enter a new Cluster Name.
DeleteDisconnects each SCALE system from the cluster and removes the card from TrueCommand. Shows a confirmation popup when clicked.

Cluster Volumes

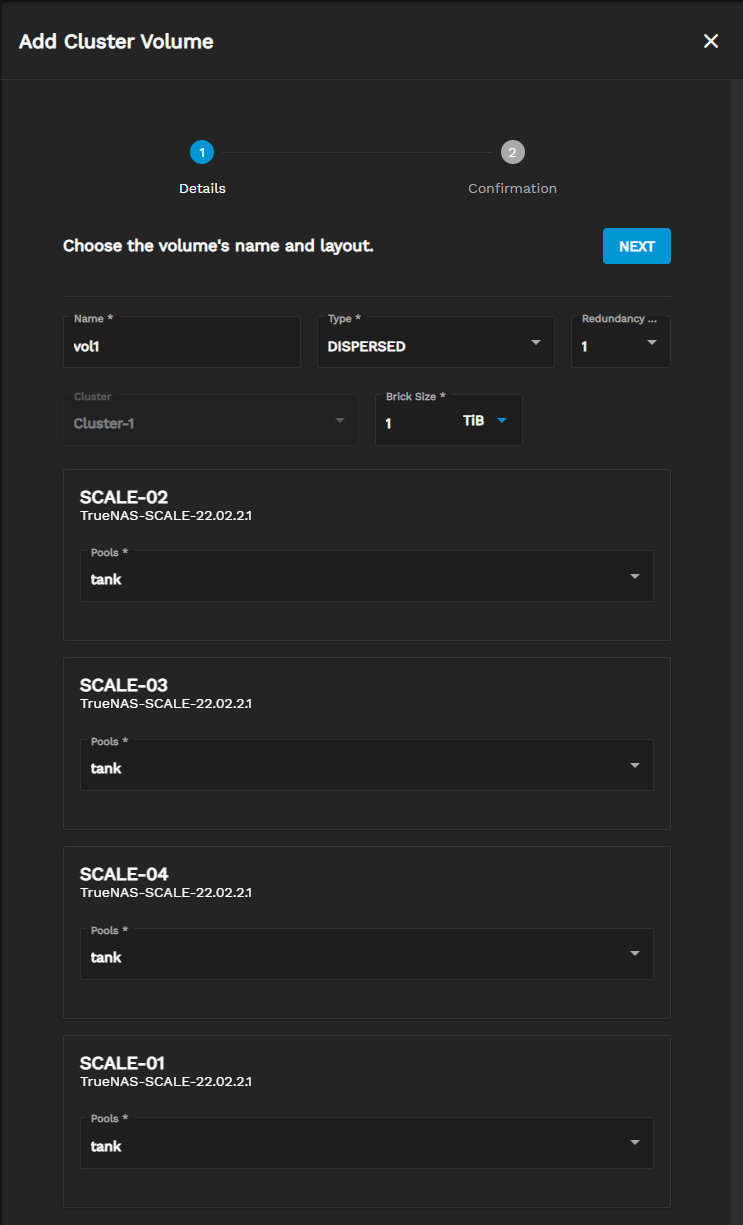
Clicking CREATE VOLUME for an existing cluster shows options to configure new clustered storage. The options split into two pages: Details and Confirmation.

Details

Add Cluster Volume: Details
Figure 10: Details
Option descriptions (click to expand)
SettingDescription
NameEnter a string as an identifying label for this cluster volume.
TypeDropdown list. Select the layout and behavior for the volume.
ClusterString (disabled). Shows the cluster that controls the new volume.
Brick SizeEnter an integer and select from the dropdown list to define storage capacity. Allows numeric values and selecting units of size.
PoolsDropdown list. Select a storage pool on the individual SCALE system that provides capacity for the cluster volume.

The Type field has four options:

Replicated

Replicated volumes are the most similar to ZFS mirrors. They have exact copies of all data on all bricks. Since TrueNAS SCALE SMB cluster implementation requires a minimum of three nodes, a replicated volume has three identical copies of all data.

A replicated volume can experience multiple brick failures, yet you can still access the data if a single brick is still accessible. Replicated volumes excel in data reliability and data redundancy at the cost of lower overall storage.

Distributed Replicated

Distributed replicated volumes distribute files across replicated sets of bricks. You set the replica count during the initial volume configuration.

Distributed replicated volumes require a minimum of three replicas to avoid potential issues with split-brain. The number of bricks must be a multiple of the replica count. The minimum number of nodes for this volume type is six since each replica set requires three nodes.

Distributed replicated volumes are best when you need highly-available data with redundancy protection, although they scale poorly.

TrueCommand currently allows distributed replicated volumes with two replicas. This unintended behavior can lead to potential data loss due to split-brain situations. We are working to resolve this in TC-2626.

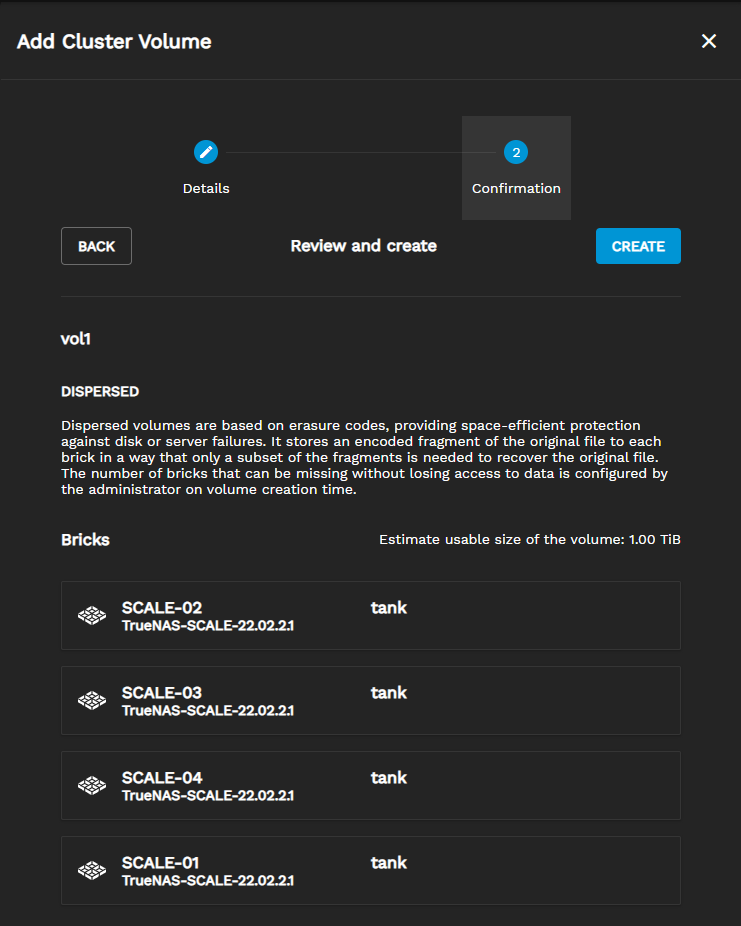
Dispersed

Dispersed volumes are most similar to RAIDZ. Data is striped across the bricks with parity added. You configure the number of redundant bricks during volume creation. The number of parity bricks determines the number of bricks the cluster can lose without impacting volume operation.

Confirmation

The Confirmation page shows details for the chosen volume Type and storage makeup of the new clustered volume.

Add Cluster Volume: Review and create
Figure 11: Review and Create
Option descriptions (click to expand)
SettingDescription
BACKClick the button to go to the previous configuration page.
CREATEClick the button to save the configuration and build the clustered volume on each system in the cluster.

Managing Cluster Volumes

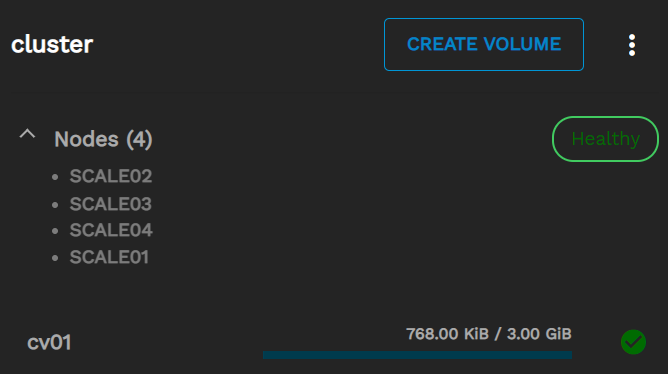
Created cluster volumes display in the related cluster card.

Cluster Volume added to a Cluster
Figure 12: Cluster Volume added to a Cluster

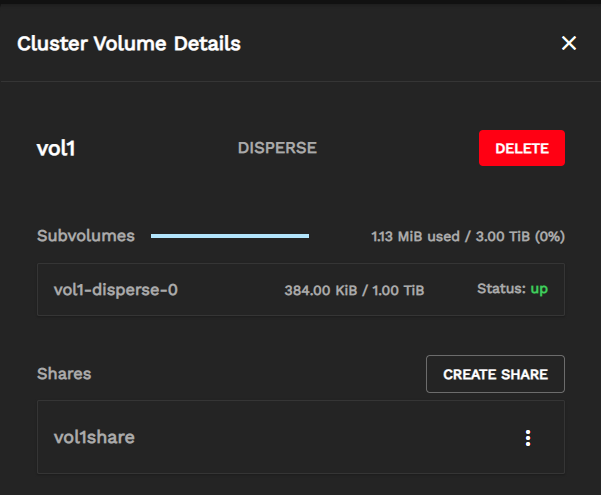
The card displays the name, used storage, and volume status. Click the volume name to expand the details and see more management options.

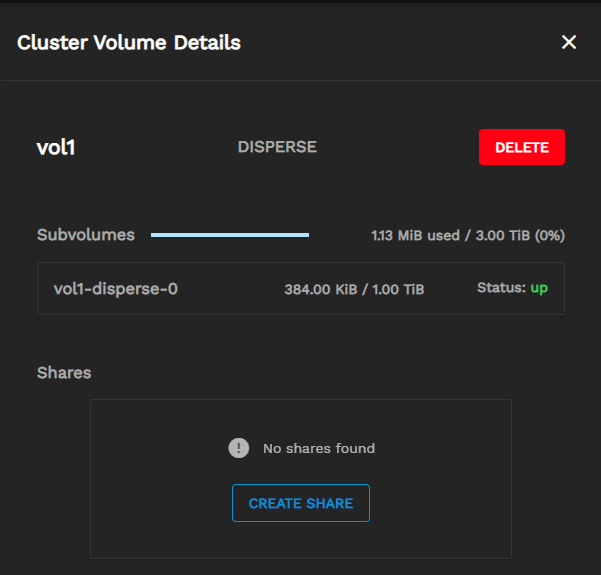
Cluster Volume Details
Figure 13: Cluster Volume Details
Option descriptions (click to expand)
SettingDescription
DELETEClick the button to remove the volume from the cluster and destroy stored data.
CREATE SHAREOpens the form to configure a new SMB share for remote access to this cluster volume.

Cluster Volume Sharing

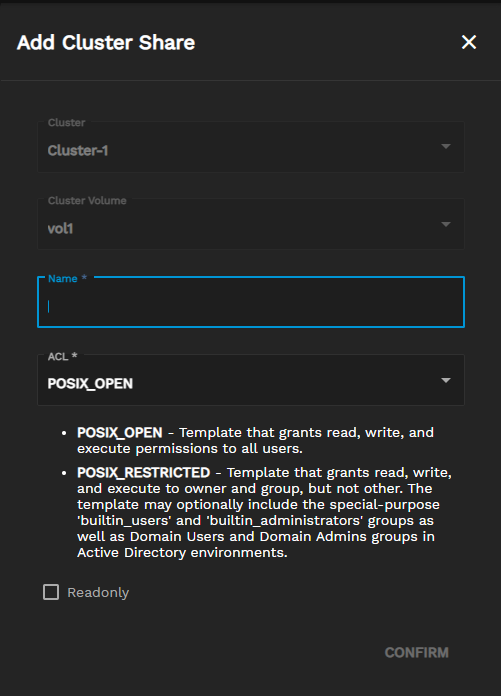
Adding a cluster share shows a few options.

Add Cluster Share
Figure 14: Add Cluster Share
Option descriptions (click to expand)
SettingDescription
ClusterString (disabled). Shows the name of the cluster related to this share.
Cluster VolumeString (disabled). Shows the name of the cluster volume to share.
NameEnter a string to create a label for this new cluster share.
ACLDropdown list. Access Control List. Choose permissions for the share.
ReadonlyCheckbox disables or allows file management options for connected users. Select to disable.
CONFIRMClick the button to save the settings, create the share, and make the cluster volume accessible to Active Directory user accounts.

ACL Options

  • POSIX_OPEN - Grants read, write, and execute permissions to all users.
  • POSIX_RESTRICTED - Grants read, write, and execute to owner and group, but not others. The template may optionally include the special-purpose ‘builtin_users’ and ‘builtin_administrators’ groups and Domain Users and Domain Admins groups in Active Directory environments.

Managing Cluster Volume Shares

Click the cluster volume name to open the Cluster Volume Details and see any shares.

Cluster Volume Share Options
Figure 15: Cluster Volume Share Options
Option descriptions (click to expand)
SettingDescription
DELETERemoves the share from the Cluster Volume. This operation does not destroy data.
CREATE SHAREOpens the form to configure a new SMB share for remote access to this cluster volume.