TrueNAS SCALETrueNAS SCALE Nightly Development Documentation
This content follows experimental early release software. Use the Product and Version selectors above to view content specific to a stable software release.

Rsync Tasks Screens

The Rsync Task widget on the Data Protection screen shows configured rsync tasks configured on the TrueNAS system, and provides access to configuration screens to add single-time or scheduled recurring transfers between TrueNAS SCALE and an rsync backup server. Rsync tasks are an effective method to back up data to a remote location.

Rsync Task Widget

The Rsync Tasks widget shows a list of tasks configured on the system.

Data Protection Rsync Task Widget
Figure 1: Data Protection Rsync Task Widget

The Rsync Tasks widget shows No Rsync Tasks configured before adding a task.

Data Protection Rsync Task Widget No Tasks
Figure 2: Data Protection Rsync Task Widget No Tasks

Click on the widegt header to open the Rsync Task screen that lists all tasks configured on the system.

Add opens the Add Rsync Task screen.

Each task includes three icons for various functions:

  • The edit Edit icon opens the Edit Rsync Task screen populated with with the settings for that task.

  • The Run Now icon starts the rsync, running it outside of the scheduled time.

  • The delete Delete icon opens a confirmation dialog before the system deletes the task.

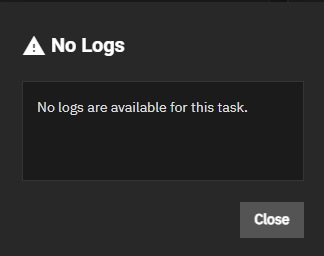
State displays the status of the next cloud sync task as SUCCESS for completed tasks, FAILED if the task fails to complete the sync, and PENDING for tasks that have not run yet. Click on the state oval to open the Logs dialog for that task. Download Logs saves a copy of the current task logs.

Rsync Task Log Dialog
Figure 3: Rsync Task Log Dialog

Rsync Task Screen

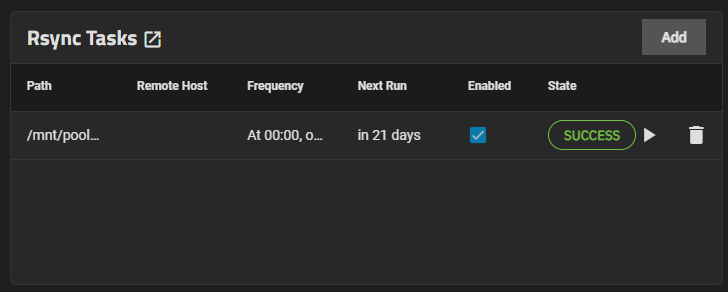
The Rsync Task screen lists all tasks configured on the system.

Rsync Task Screen
Figure 4: Rsync Task Screen

Each task shows details about the configured task and the same icon buttons found on the Rsync Task widget to run the task outside of the scheduled time, edit and/or delete the task.

Add and Edit Rsync Task Screens

The Add Rsync Task and Edit Rsync Task display the same settings.

Source and Remote Options

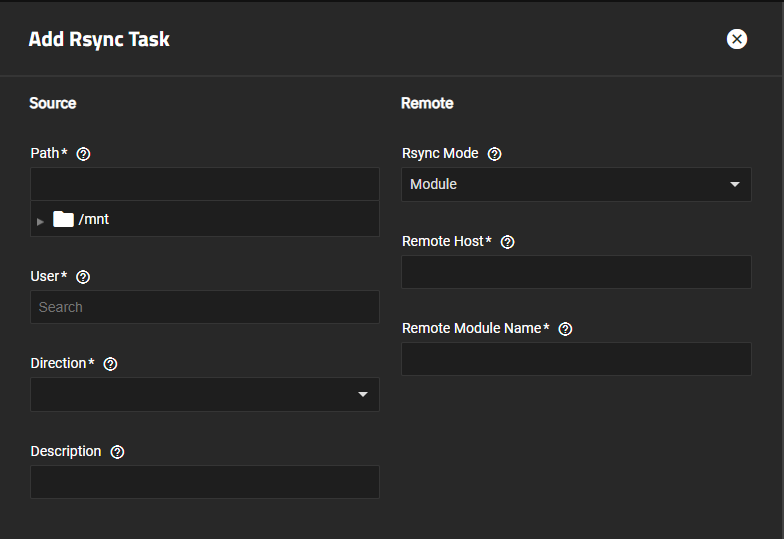
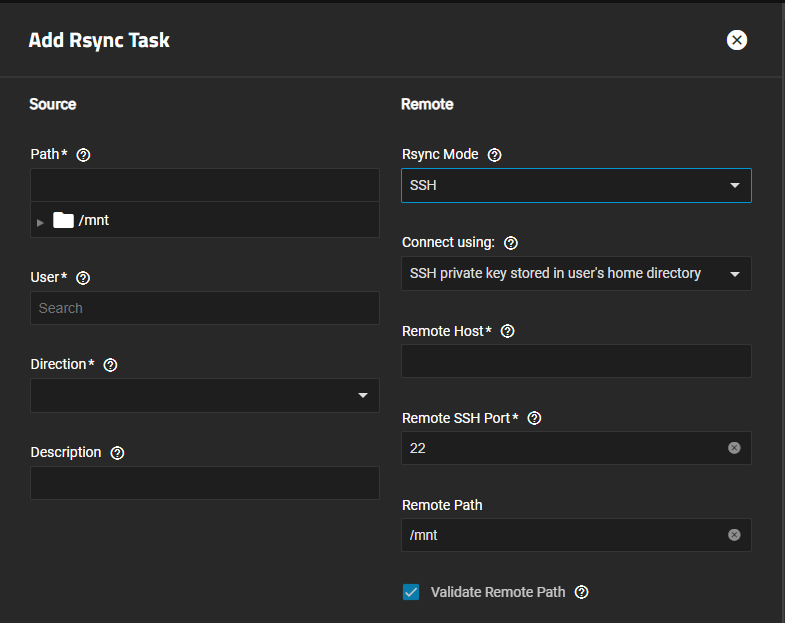
Source settings specify the location of the stored data to sync with a remote server, sets the user that performs the task, and the direction of the task (send or receive data). The Remote settings specify the mode for the task and remote host connection information. Settings change base on the Rsync Mode selected (Module or SSH).

Rsync Task Source and Remote Module Settings
Figure 5: Rsync Task Source and Remote Module Settings
Rsync Task Source and Remote SSH Settings
Figure 6: Rsync Task Source and Remote SSH Settings

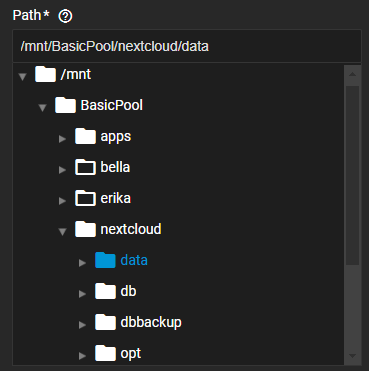
Browsing to select a path

Click the arrow to the left of the folder icon to expand that folder and show any child datasets and directories. A solid folder icon shows for datasets and an outlined folder for directories. A selected dataset or directory folder and name shows in blue.

Source and Remote Settings
SettingDescription
Path(Required) Enter or browse to the dataset or directory to sync with a remote server. Use the arrow_right to the left of /mnt folder to expand the folder tree, then click on the name to select and populate the Path field. Linux file path limits apply. Other operating systems can have different limits which might affect how to use them as sources or destinations.
User(Required) Select the user to run the rsync task. Select a user that has permissions to write to the specified directory on the remote host. If setting Rsync Mode to SSH, the user must have an SSH private key in their home directory if Connect using is set to SSH private key stored in user’s home directory.
Direction(Required) Select the direction of the flow of data to the remote host. Options are:
  • Push - During a push, the dataset transfers to the remote module.
  • Pull - During a pull, the dataset stores files from the remote system.
  • Description(Optional) Enter a description of the rsync task.
    Rsync ModeSelect the mode from the dropdown list. Options are:
  • Module - Select to use a custom-defined remote module from the rsync server.
  • SSH - Select to use an SSH configuration for the rsync task. The remote system must have SSH enabled. The host system needs an established SSH connection to the remote for the rsync task. SSH displays more settings.
  • Remote Host(Required) Enter the IP address or host name of the remote system that stores the copy. Use the format username@remote_host if the user name differs on the remote host. Or enter the IP address for the remote system.
    Remote Module Name(Required) If Rsync Mode is set to Module, specify the name of the module on the remote rsync server. Define at least one module per rsyncd.conf(5) on the remote rsync server. Enter the Module Name exactly as it appears on the remote system.
    Connect usingSelect the connection method from the dropdown list. Options are:
  • SSH private key stored in user’s home directory - If selected, the user entered in User must have an SSH private key added and stored in the home directory for the user. Create the SSH connection and keypair, download the keys, then add the private key to the user in the UI and to the home directory either from the Shell using Linux CLI commands or while in an SSH session with the system.
  • SSH connection from the keychain - Requires creating an SSH connection and keypair before setting up the rsync task.
  • Remote SSH Port(Required) If Rsync Mode is set to SSH, enter the SSH port number of the remote system. By default, 22 is reserved in TrueNAS.
    Remote PathEnter an existing path on the remote host. Maximum path length is 255 characters.
    Validate Remote PathShows when Rsync Mode is set to SSH. Select to automatically create the defined Remote Path if it does not exist.

    Schedule and More Options

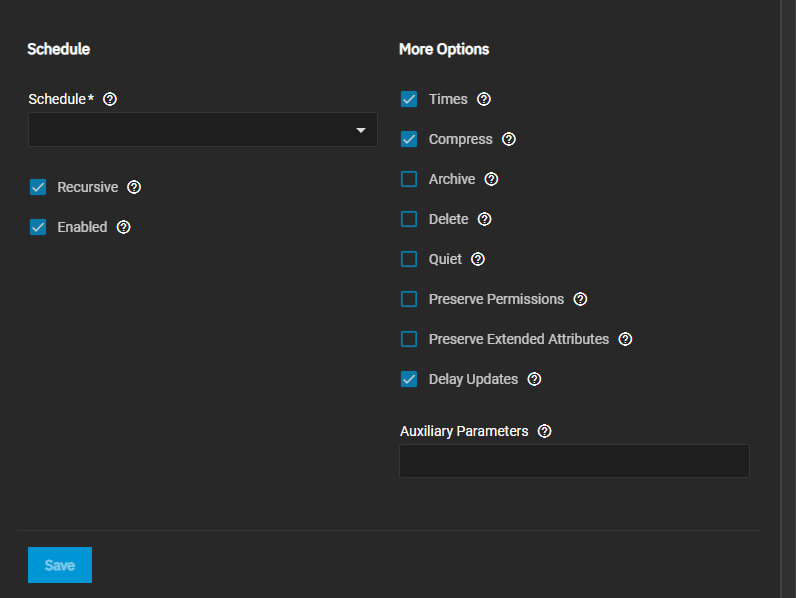
    Schedule defines when the remote sync task occurs. The More Options specify other settings related to when and how the rsync occurs.

    Rsync Task Schedule and Other Options Settings
    Figure 8: Rsync Task Schedule and Other Options Settings
    Schedule Settings
    SettingDescription
    ScheduleSelect a schedule preset or choose Custom to open the advanced scheduler.
    RecursiveSelect to include all subdirectories of the specified directory. When cleared, only the specified directory is included.
    EnabledSelect to enable this rsync task. Clear to disable this rsync task without deleting it.
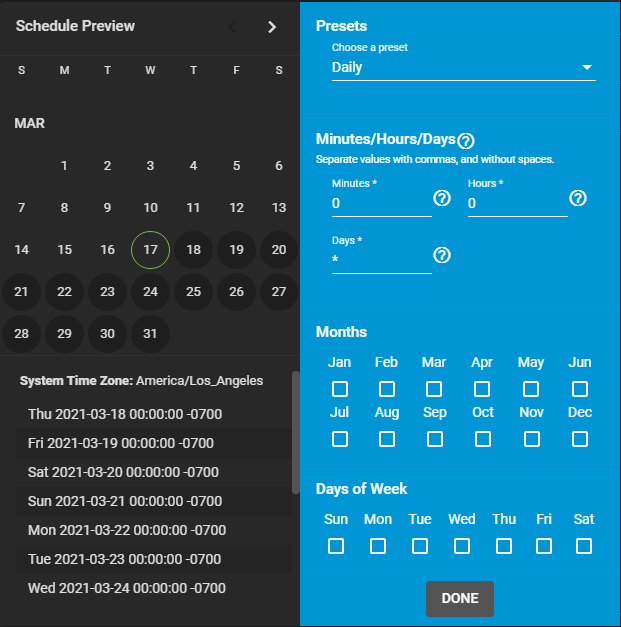
    Advanced Scheduler

    Tasks Advanced Scheduler

    Choosing a Presets option populates the rest of the fields. To customize a schedule, enter crontab values for the Minutes/Hours/Days.

    These fields accept standard cron values. The simplest option is to enter a single number in the field. The task runs when the time value matches that number. For example, entering 10 means that the job runs when the time is ten minutes past the hour.

    An asterisk (*) means match all values.

    Specific time ranges are set by entering hyphenated number values. For example, entering 30-35 in the Minutes field sets the task to run at minutes 30, 31, 32, 33, 34, and 35.

    You can also enter lists of values. Enter individual values separated by a comma (,). For example, entering 1,14 in the Hours field means the task runs at 1:00 AM (0100) and 2:00 PM (1400).

    A slash (/) designates a step value. For example, while entering * in Days means the task runs every day of the month, */2 means the task runs every other day.

    Combining all the above examples together creates a schedule running a task each minute from 1:30-1:35 AM and 2:30-2:35 PM every other day.

    There is an option to select which Months the task runs. Leaving each month unset is the same as selecting every month.

    The Days of Week schedules the task to run on specific days. This is in addition to any listed days. For example, entering 1 in Days and setting Wed for Days of Week creates a schedule that starts a task on the first day of the month and every Wednesday of the month.

    The Schedule Preview displays when the current settings mean the task runs.

    Examples of CRON syntax

    SyntaxMeaningExamples
    *Every item.* (minutes) = every minute of the hour.
    * (days) = every day.
    */NEvery Nth item.*/15 (minutes) = every 15th minute of the hour (every quarter hour).
    */3 (days) = every 3rd day.
    */3 (months) = every 3rd month.
    Comma and hyphen/dashEach stated item (comma)
    Each item in a range (hyphen/dash).
    1,31 (minutes) = on the 1st and 31st minute of the hour.
    1-3,31 (minutes) = on the 1st to 3rd minutes inclusive, and the 31st minute, of the hour.
    mon-fri (days) = every Monday to Friday inclusive (every weekday).
    mar,jun,sep,dec (months) = every March, June, September, December.

    Days can be specified as days of month, or days of week.

    With these options, you can create flexible schedules similar to these examples:

    Desired scheduleValues to enter
    3 times a day (at midnight, 08:00 and 16:00)months=*; days=*; hours=0/8 or 0,8,16; minutes=0
    (Meaning: every day of every month, when hours=0/8/16 and minutes=0)
    Every Monday, Wednesday and Friday, at 8.30 pmmonths=*; days=mon,wed,fri; hours=20; minutes=30
    1st and 15th day of the month, during October to June, at 00:01 ammonths=oct-dec,jan-jun; days=1,15; hours=0; minutes=1
    Every 15 minutes during the working week, which is 8am - 7pm (08:00 - 19:00) Monday to FridayNote that this requires two tasks to achieve:
    (1) months=*; days=mon-fri; hours=8-18; minutes=*/15
    (2) months=*; days=mon-fri; hours=19; minutes=0
    We need the second scheduled item, to execute at 19:00, otherwise we would stop at 18:45. Another workaround would be to stop at 18:45 or 19:45 rather than 19:00.
    More Options Settings
    SettingDescription
    TimesSelect to preserve modification times of files.
    CompressSelect to reduce the size of data to transmit. Recommended for slow connections.
    ArchiveSelect to preserve symlinks, permissions, modification times, group and special files. When selected, rsync runs recursively. When run as root, owner, device files, and special files are also preserved. Equal to passing the flags -rlptgoD to rsync.
    DeleteSelect to delete files in the destination directory that do not exist in the source directory.
    QuietSelect to suppress informational messages from the remote server.
    Preserve PermissionsSelect to preserve original file permissions. Useful when the user is set to root.
    Preserve Extended AttributesSelect to preserve extended attributes, but this must be supported by both systems.
    Delay UpdatesSelect to save a temporary file from each updated file to a holding directory until the end of the transfer. All transferred files renamed once the transfer is complete.
    Auxiliary ParametersEnter additional rsync(1) options to include. Separate entries by pressing Enter. Note: You must escape the emergency character with a backslash (\) or used inside single quotes (’*.txt’).